


Docker completely changed the development, packaging, and deployment of applications. Docker provides consistent environments from development to production by isolating applications in containers. The Dockerfile is the foundation of this ecosystem since it serves as a guide for creating Docker images. This blog covers everything from the fundamentals to more complex subjects like comparisons, troubleshooting, and best practices.
What is Docker?
The open-source Docker platform helps developers automate application deployment within portable, lightweight containers. These containers are perfect for CI/CD pipelines and cloud environments because they contain all the code, runtime, libraries, and dependencies an application needs to function.
At this point, you know what Docker is. We’ll now discuss what a Dockerfile is.
What is a Dockerfile?
The Dockerfile, which uses DSL (Domain Specific Language), includes instructions for creating a Docker image. The Dockerfile specifies how to generate an image quickly. Because the Docker daemon executes all of the instructions from top to bottom, you should create a Dockerfile in the correct order when creating your application.
The basic Dockerfile syntax looks as follows:


Next, we’ll examine what a Docker container is.
What is a Docker Container?
A runtime instance of a Docker image is called a Docker container. Everything required to run an application is included in this standalone, executable software package. Containers are perfect for contemporary cloud-native applications because they are quick, scalable, and portable.
We will now discuss Dockerfile Commands and Instructions.
Dockerfile Commands/Instructions
1 FROM


It is typically your Dockerfile’s first line. It alludes to an already-existing image that serves as the foundation for your creation. The filesystem of the referenced image serves as the foundation for all ensuing instructions.
2. COPY


Adds folders and files to the filesystem of your image. It replicates between the work-in-progress image and your Docker host. All of the files you have copied in will be included in containers that use the image.
3. ADD


In addition to supporting remote file URLs and automatic archive extraction, ADD functions similarly to COPY. The archives will be extracted into your container’s destination path. It can decompress files in the gzip, bzip2, and xz formats.
ADD can make certain image authoring tasks easier, but because of the way it obscures crucial details, its use is discouraged. Because archive files will be extracted into your container rather than copied exactly as is, accidentally using ADD rather than COPY can be confusing.
4. RUN


RUN executes a command within the image you are creating. The filesystem modifications that the command applies are contained in the new image layer that is made on top of the old one. The most common use of RUN instructions is to install and configure packages that are necessary for your image.
5. CMD


The CMD command can be overridden and is primarily used to launch the process inside the container.
6. ENV

Setting environment variables that will be accessible within your containers is done with the ENV instruction. Its argument resembles a variable assignment in your shell: enter the variable’s name and the value to be assigned, separated by the equals symbol.
7. ENTRYPOINT


ENTRYPOINT configures a container that will act as an executable. ENTRYPOINT is a command or script that is run when the Docker container is started.
You can’t override it.CMD and ENTRYPOINT are identical, except that CMD can be overridden while ENTRYPOINT cannot.
8. MAINTAINER

We can determine the author or owner of the Dockerfile and set our own author or owner for the image by using the MAINTAINER command
The steps to create a Dockerfile with an example (Jenkins) will be shown next.
Steps to Create a Dockerfile with Example (Jenkins)
To run Jenkins in a containerized environment, create a custom Dockerfile by following these steps:
Step 1: Create a Project Directory
Make a folder first to store your Dockerfile and any associated settings.


Step 2: Create a Dockerfile
Create a file called Dockerfile (no extension) using any text editor.


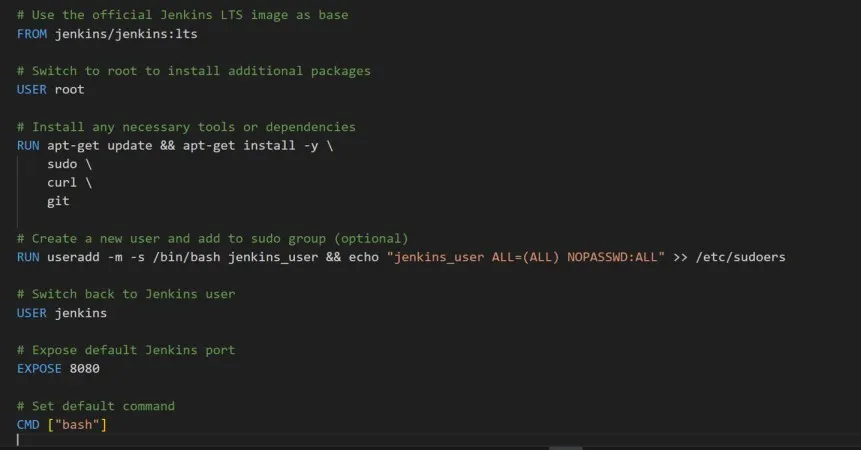
Step 3: Create instructions for a Dockerfile
A straightforward Dockerfile for installing and running Jenkins with an LTS image can be found below:

Step 4: Create the Docker image
In the same directory as your Dockerfile, execute the following command:


Step 5: Launch the Jenkins Container -d:


- Launches the container in detached mode.
- -p 8080:8080: Converts host port to container port
- –name: Gives your container a unique name.
With this Dockerfile, you have effectively produced a customized Jenkins Docker image, which can be further enhanced with extra plugins, configurations, and scripts for CI/CD requirements.
After learning how to create a Dockerfile using an example (Jenkins), we’ll go on to the advantages of Dockerfile.
Benefits of Dockerfile
The advantages of Dockefile are as follows:
- Consistency and Reproducibility: Dockerfile minimizes host environment-dependent issues by ensuring that environment setups and dependencies are consistently facilitated across various setups.
- Version Control: You can use Dockerfiles to version your source code and keep track of changes and rollbacks.
- Automation: It reduces errors and manual intervention in the process of developing, configuring, and deploying applications.
The Best Ways to Write Dockerfile
The best practices for creating Dockerfiles are as follows:
- Use official base images: To ensure dependability, security, and compatibility, try using the official base images.
- Reduce Layers: Try reducing the number of layers by utilizing multi-stage builds and the && option to combine common commands.
- Leverage Caching: We can optimize cache layering and accelerate builds by arranging the instructions from least to most frequently changing.
- Keep it Clean: Make sure to eliminate any unnecessary files and use the. The Dockerignore extension is used to omit any files or directories that are not needed in the picture.
We’ll now examine how to troubleshoot Dockerfile issues and compare Dockerfile with Docker Compose.
Troubleshooting Dockerfile Issues
| Issue | Solution |
| Build fails at RUN | Check the command syntax or missing dependencies |
| The container exits immediately | Use CMD or ENTRYPOINT properly |
| Image too large | Use a slim or Alpine base, and remove unnecessary files |
| Permission errors | Use the correct USER, set file permissions |
Use tools like docker logs, docker inspect, and Hadolint for debugging and linting.
Dockerfile vs Docker Compose
| Feature | Dockerfile | Docker Compose |
| Purpose | Builds a container image | Runs multi-container applications |
| Format | Single file (Dockerfile) | YAML (docker-compose.yml) |
| Focus | Image configuration | Orchestration and services |
| Use Case | Image creation | Defining full app stack (DB + app + cache) |
Use Dockerfile for building; use Docker Compose for running complex systems.
Conclusion
Building dependable and scalable containerized applications requires a solid Dockerfile. These best practices aid in streamlining the development and deployment process, from choosing the appropriate base image to protecting the container. You’re building a solid foundation for effective DevOps and cloud-native architecture by becoming proficient with Dockerfiles.
The blog explains how Dockerfile and Docker Compose work together—Dockerfile builds the image, while Docker Compose manages multi-container setups, making app development and deployment more efficient.
Kickstart your DevOps career with Edureka’s hands-on DevOps Certification Training. Learn key tools like Docker, Jenkins, Kubernetes, and Git through real-world projects and expert-led sessions. Gain practical skills in automation, deployment, and monitoring to become job-ready for high-demand DevOps roles. Join thousands worldwide advancing their tech careers with Edureka.
Do you have any questions or need further information? Feel free to leave a comment below, and we’ll respond as soon as possible!