


In a world where we are working with programming languages on a day to day basis, all of us tend to search for methods and tricks to make our lives easy. Well, Dependency Injection is one such technique which aims to help the developer code easily by providing dependencies of another object. In this article on What is Dependency Injection, I will help you understand this technique in detail.
The following topics will be covered in this article:
- Introduction To Dependency Injection
- Inversion of Control
- Types of Dependency Injection
- Benefits of Dependency Injection
- Implement Dependency Injection using Spring Boot
So, let’s get started with this article.
What is Dependency Injection?
Dependency Injection is the ability of an object to supply dependencies of another object.
Now, I am pretty sure, you might not have understood anything by the above technical definition. So, let me clear the confusion for you.
When you hear the term dependency, what comes on to your mind?
Obviously, something relying on something else for support right?
Well, that’s the same, in the case of programming also.
Dependency in programming is an approach where a class uses specific functionalities of another class. So, for example, If you consider two classes A and B, and say that class A uses functionalities of class B, then its implied that class A has a dependency of class B. Now, if you are coding in Java then you must know that, you have to create an instance of class B before the objects are being used by class A.
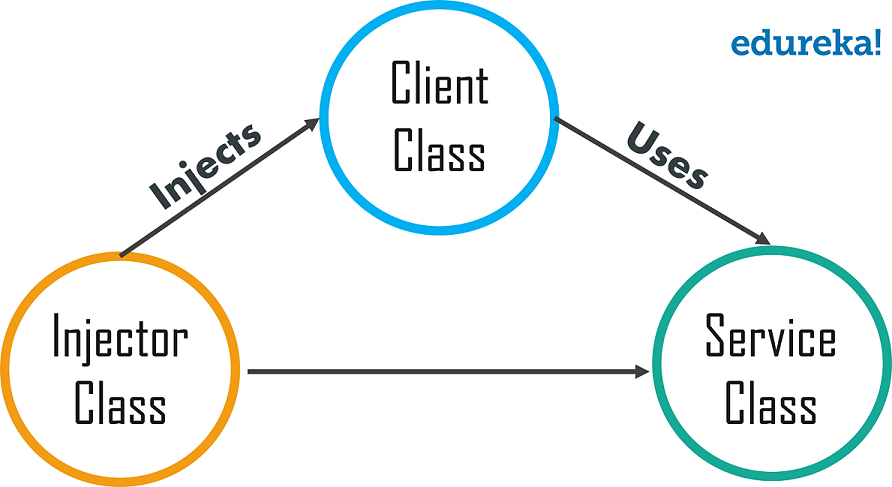

So, if I have to now define Dependency Injection for you, then the process of creating an object for some other class and let the class directly using the dependency is called Dependency Injection. It mainly has three classes involved:
Client Class: This is the dependent class and is dependent on the Service class.
Service Class: This class provides a service to the client class.
Injector Class: This class is responsible for injecting the service class object into the client class
Now, that you have understood, what is Dependency Injection, let me next take you through the principle on which Dependency Injection is based.
Inversion of Control
As I have mentioned above Inversion of Control is a principle based on which, Dependency Injection is made. Also, as the name suggests, Inversion of Control is basically used to invert different kinds of additional responsibilities of a class rather than the main responsibility.
If I have to explain you in simpler terms, then consider an example, wherein you have the ability to cook. According to the IoC principle, you can invert the control, so instead of you cooking food, you can just directly order from outside, wherein you receive food at your doorstep. Thus the process of food delivered to you at your doorstep is called the Inversion of Control.
You do not have to cook yourself, instead, you can order the food and let a delivery executive, deliver the food for you. In this way, you do not have to take care of the additional responsibilities and just focus on the main work.
Now, that you know the principle behind Dependency Injection, let me take you through the types of Dependency Injection.
Types of Dependency Injection
There are mainly three types of Dependency Injection:
Constructor Injection: In this type of injection, the injector supplies dependency through the client class constructor.
Setter Injection / Property Injection: In this type of injection, the injector method injects the dependency to the setter method exposed by the client.
Interface Injection: In this type of injection, the injector uses Interface to provide dependency to the client class. The clients must implement an interface that will expose a setter method which accepts the dependency.
Till now, I hope you have understood the fact that Dependency Injection is responsible to create objects, understand which classes require those objects and finally provide those classes with the objects. So, on that note, let us next look into the benefits of Dependency Injection.
Benefits of Dependency Injection
Before I list down the benefits of Dependency Injection, let me explain to you the need for this injection on an industry level, to help you understand the benefits better.
Consider a scenario, wherein you have an Email Class, whose sole responsibility is to take care of the emails received. Now, this class will have objects such as “To email address”, “From email address”, “Subject and the Body of the email”.
Now, if the company wants to save text and audio messages, do you think this class can save the message?
Well, the answer is no?
That’s because, the Email Class cannot handle the parameters of the text and the audio messages. In such cases, you will have to recreate the class. Now, recreating the class is quite a cumbersome job, especially if you have to it regularly. Instead, if you use Dependency Injection, you can change the objects at run-time. So, in this way, you do not have to recreate the class which further helps you in a lot of ways.
So, If I have to summarize the benefits of Dependency injection, then the following are the benefits:


Alright, so now that you know the benefits of Dependency Injection, let us move forward and see how to implement Dependency Injection using Spring Boot.
How to Implement DI using Spring Boot?
Step 1: Open your Eclipse IDE and create a Spring Boot Application by right-clicking and choosing Spring Starter Project. Then mention the name of the project and click on Finish.
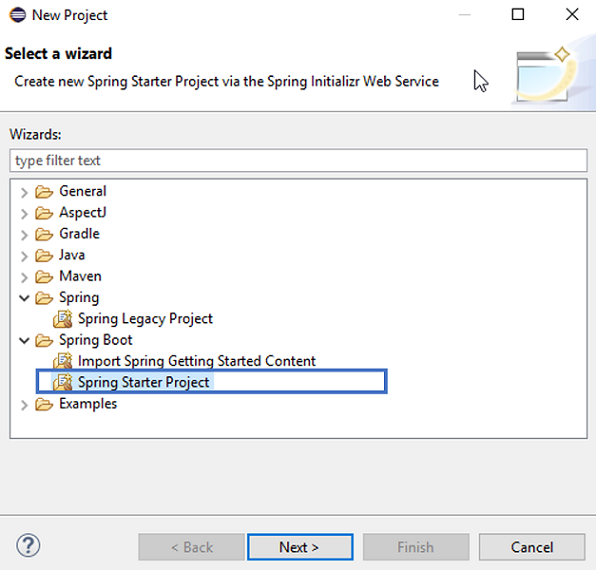

To get the Spring Starter Project, you have to install Spring Tool Suite from the Eclipse Marketplace. In case, you do not have Spring Too Suite installed, you can refer to my article on Installation of Spring Tool Suite.
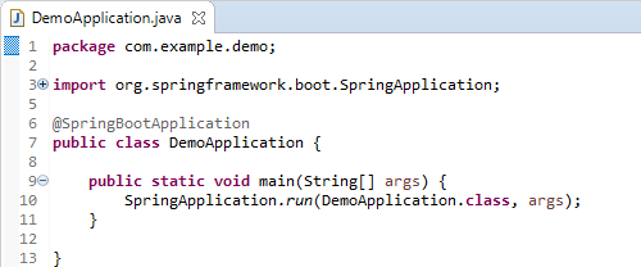
You will automatically see that an application file is created as below.

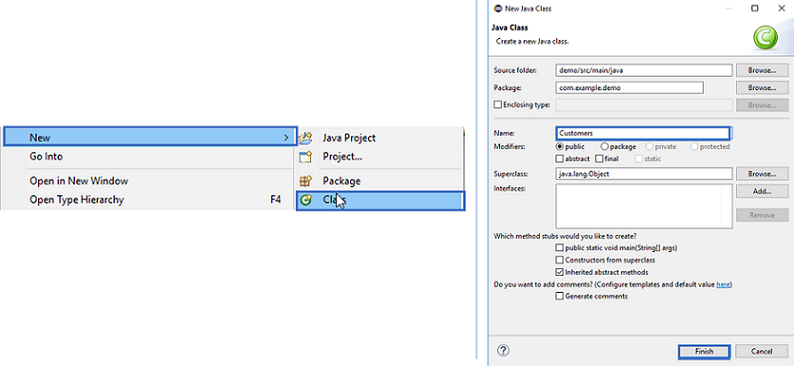
Step 2: Next, create a class in the same package. To do that right-click the file -> choose Class and mention the class name. Then click on Finish. This will create a Class file. Here I have created a Customers class. Refer below.

Step 3: After that, let us put in some properties for the class. So, let us say, we include Customer ID, Customer name and Course name. Mention the code below.
package com.example.demo; //package name

public class Customers {
private int custid;
private String custname;
private String coursename;

}
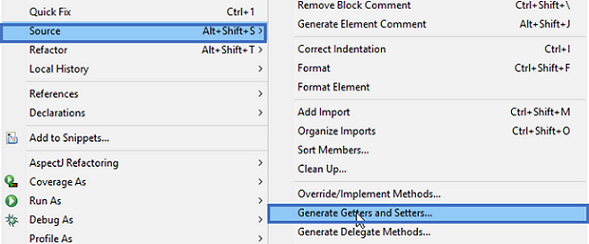
Step 3.1: Once you are done with that, you have to generate Getter and Setter methods for these properties. To do that, select these properties and the right click. Then choose Source -> Generate Getter and Setter methods.

Your code till now should be as follows:
package com.example.demo;

public class Customers {
private int custid;
private String custname;
private String coursename;

public int getCustid() {
return custid;
}
public void setCustid(int custid) {
this.custid = custid;
}
public String getCustname() {
return custname;
}
public void setCustname(String custname) {
this.custname = custname;
}
public String getCoursename() {
return coursename;
}
public void setCoursename(String coursename) {
this.coursename = coursename;
}
}
Now, consider a scenario where you have to create an object for Customers and you do not want to do it manually. In such scenario, you will then have to use Dependency Injection, to get the objects whenever you require it.
So, next let us look into how we can achieve the same.
Step 4: First, change the run line in the application class file to the following:
ConfigurableApplicationContext context = SpringApplication.run(DemoApplication.class, args);
Note: If you get an error import the following:
import org.springframework.boot.SpringApplication;
import org.springframework.boot.autoconfigure.SpringBootApplication;
import org.springframework.context.ConfigurableApplicationContext;
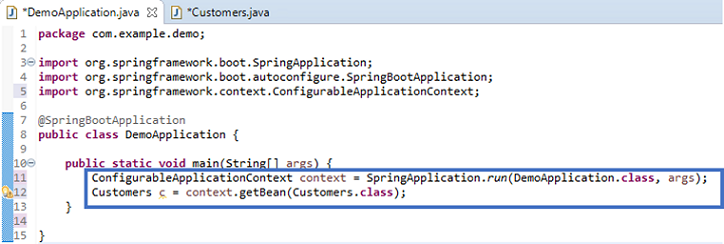
This above line of code will return an object at the time of execution. Now add the following code into the application file.
customers c = context.getBean(customers.class);
The above line, will tell the compiler to return an object of the customer class. Refer below.

Step 4.1: Now, to check whether it is working or not, you can go back to the Customer class and add a method as follows:
public void display()

{

System.out.println("Object Returned Successfully");

}
This method will display an output “Object Returned Successfully” on successful execution.
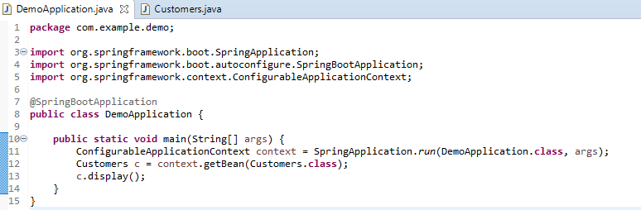
Step 4.2: Next, you have to go back to the application file and mention the following:
c.display();
Through this, you are calling the object of the Customers class with a reference of the display method. Refer to the below image for the code of Application class till now:

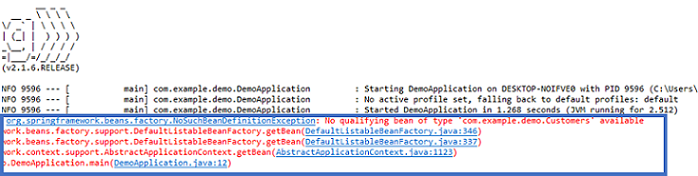
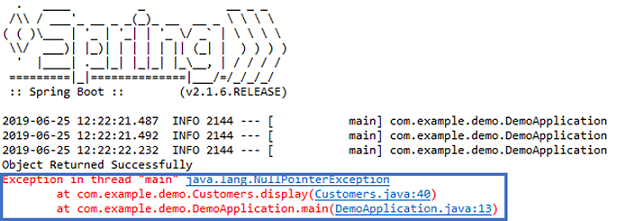
Now, if you execute the project, you will see an exception of No qualifying bean of type. This is because the customer class which you have defined is not a Spring Bean i.e. is not a Spring Object. Refer below.

Step 4.3: So, to tell the Spring Container that, we need an object of the customer Class. To do that, you need to mention the @Component annotation, in the Customer class. The code in the Customers class should be as below:
package com.example.demo;

import org.springframework.stereotype.Component;
@Component
public class Customers {
private int custid;
private String custname;
private String coursename;

public int getCustid() {
return custid;
}
public void setCustid(int custid) {
this.custid = custid;
}
public String getCustname() {
return custname;
}
public void setCustname(String custname) {
this.custname = custname;
}
public String getCoursename() {
return coursename;
}
public void setCoursename(String coursename) {
this.coursename = coursename;
}
public void display()

{
System.out.println("Object Returned Successfully");

}
}
Then, when you mention customers c = context.getBean(customers.class); the compiler will check whether there is a customer bean available in the container or not.
If the Bean is available, then the Spring framework is injecting the customer object in your application. So, basically, this object is created by the Spring framework, which can be further used in the application.
So, If I execute this project now, you will see an output that Object Returned Successfully. Refer below.
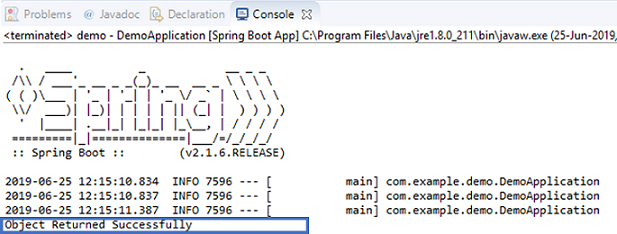

This is basically how you can implement Dependency Injection.
Example: Dependency Injection Using Autowired Annotation
I hope you have understood how Dependency Injection works in Spring Boot. Now, let us extend this example and further see how a class dependent on the other class used the functionalities of that class in Spring Boot.
Step 1: Create a new class file, by again right-clicking on the package and the by choosing New -> Class. Now, mention the name of the class as below and click on Finish.
Step 2: Next, let us put in some properties for the class. So, let us say, we include TechID, Techname. Mention the code below.
package com.example.demo;
public class Technologies {
private int techid;
private String techname;
}
Step 2.1: Once you are done with that, generate Getter and Setter methods for these properties by right-clicking on the file and then choose Source -> Generate Getter and Setter methods.
Step 3: Now, let us say, we have to create a method which prints “Successful“. To do that mention the code:
public void tech()
{
System.out.println(" Successful");
}
Your code until now should look like below:
package com.example.demo;

public class Technologies {
private int techid;
private String techname;
public int getTechid() {
return techid;
}
public void setTechid(int techid) {
this.techid = techid;
}
public String getTechname() {
return techname;
}
public void setTechname(String techname) {
this.techname = techname;
}
public void tech()

{

System.out.println(" Successful");

}
}
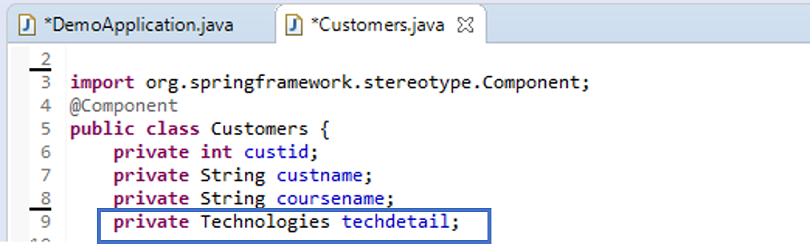
Step 4: Now, to call the tech() method in the customers class, you have to create an object of the technologies class. So mention the following line of code in the customers class:
private Technologies techdetail;

Step 4.1: Once you are done with that, generate Getter and Setter methods for these properties by right-clicking on the file and then choose Source -> Generate Getter and Setter methods.
Step 5: Next, to use the tech() method, you have to mention techdetail.tech(); under the display method of the customers class. Also, to make sure that the techdetail object is instantiated mention @Component annotation is the Technologies class. Refer below.


So, to enable Customer to recognize the Technologies class, you have to insert the @Autowired annotation in the Customers class. Your final code of the customers class should be as follows:
package com.example.demo;

import org.springframework.beans.factory.annotation.Autowired;
import org.springframework.stereotype.Component;
@Component
public class Customers {
private int custid;
private String custname;
private String coursename;
@Autowired
private Technologies techdetail;

public Technologies getTechdetail() {
return techdetail;
}
public void setTechdetail(Technologies techdetail) {
this.techdetail = techdetail;
}
public int getCustid() {
return custid;
}
public void setCustid(int custid) {
this.custid = custid;
}
public String getCustname() {
return custname;
}
public void setCustname(String custname) {
this.custname = custname;
}
public String getCoursename() {
return coursename;
}
public void setCoursename(String coursename) {
this.coursename = coursename;
}
public void display()

{

System.out.println("Object Returned Successfully");
techdetail.tech();

}
}
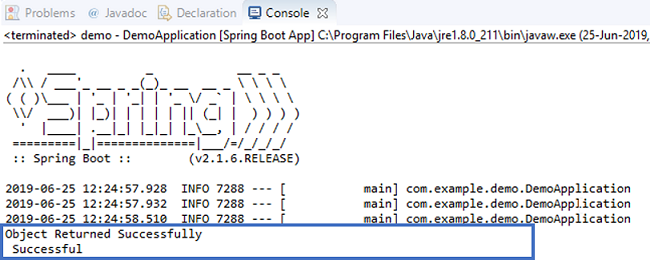
Once you execute these files, you will see the outputs as Object Returned Successfully and Successful, which implies that our Dependency of the classes has been fulfilled. Refer below.

Now that you are done with the article, check out the Spring Framework Certification Training by Edureka, a trusted online learning company with a network of more than 250,000 satisfied learners spread across the globe.
Got a question for us? Please mention it in the comments section of this “What is Dependency Injection?” article and we will get back to you as soon as possible.