
AWS Solution Architect Certification Training
- 186k Enrolled Learners
- Weekend/Weekday
- Live Class
(67950)


 Copy Link!
The other night, I was watching a series on Netflix, and I was totally hooked on the storyline. But in the middle of an intense scene, a thought popped into my mind, how does Netflix manage to stream content so smoothly, without buffering, no matter where you are in the world? I mean, millions of people watch different shows at the same time! That one thought got me curious, and after a little bit of research, I realized the magic behind it, AWS.
It turns out Netflix didn’t just go with AWS by chance. They chose it because AWS gave them more flexibility and tons of helpful tools. Before moving to the cloud, Netflix was using a traditional development model that used one code base to perform multiple business functions, which made it hard to scale and update things quickly. As they grew, this setup became a real problem. Their old data centers couldn’t keep up. AWS made it easy for them to reach people all over the world without building new servers everywhere.
In this blog, I’ll walk you through what AWS is, how it makes things like Netflix work so smoothly, and everything else you need to know about it.
Let’s start by understanding what AWS is and why it is such a big deal.
Amazon Web Services(AWS) is a cloud service from Amazon that provides services in the form of building blocks. These building blocks can be used to create and deploy any application in the cloud.
These services or building blocks are designed to work together and result in sophisticated and highly scalable applications.
Now, to really understand how AWS became so powerful, we need to take a quick look at how it all started.
Amazon S3 (Simple Storage Service) changed the way businesses deal with scalable storage when it came out in 2006. This is where AWS began. This was the first thing AWS did to make ways for businesses of all kinds to use the cloud that are cheap and simple.
People could rent virtual computers when Amazon EC2 (Elastic Compute Cloud) came out. It became a lot cheaper to set up hardware systems this way. When the platform got bigger, new services like AWS Lambda made serverless computing well-known by letting people run code without having to manage servers.
AWS has slowly but surely grown to meet the needs of businesses all over the world. It’s easy to start apps with Elastic Beanstalk, and there are now a lot of machine learning services to choose from. At the moment, AWS is a huge cloud company that helps businesses in all sorts of areas with hundreds of services.
Now that we know what AWS is and where it came from, let us look at what people actually use it for in real life.
AWS has a huge number of services that people and companies in many different fields love to use for different reasons. AWS gives you the infrastructure and tools you need to host applications, store data safely, and use a wide range of services that make your IT resources more flexible and easier to handle.
To be more specific, AWS is used for
By letting you pay as you go for these core components, AWS makes it easy to build, launch, and scale any app or IT solution without having to deal with actual hardware.
We have seen what AWS can do, but how does it actually make all this happen behind the scenes? Let us talk about it.
AWS offers cloud services through a strong system around the world. Here is how it works:
There are a lot of data centers all over the world that are part of AWS. Each area has more than one Availability Zone, which was carefully planned to offer high availability, low latency, and a lot of backups.
This global setup is what holds AWS together and makes all of its cloud services possible. It supports computing, storage, networking, databases, and more.
You can make your own Virtual Private Clouds, which are private networks in AWS that are safe and separate from everyone else. Since you can control IP ranges, subnets, and who can access your cloud services, this is the best option for your needs.
AWS allows applications to automatically scale by:
The AWS Management Console has an easy-to-use web tool for:
The way AWS is built is meant to:
AWS is able to offer very reliable, scalable, and safe cloud computer solutions thanks to its strong global infrastructure and suite of services.
Before we talk about specific services, let’s talk about the concepts that you should be aware of to make AWS work smoothly.
You should learn about things like Global Network Infrastructure, Regions, and Availability Zones if you want to get the most out of AWS. These AWS basics will help you keep your apps safe and scalable. They have resources spread out around the world so that they can give you the fastest and most reliable service.
When you think about AWS, remember these things:
You need to know these basic ideas to make AWS apps that are very stable, can grow, and can be accessed from anywhere in the world.
Now that we understand the basics, let us look at the huge list of services AWS has to offer.
The Compute domain includes services related to compute workloads, it consists of the following services:
The Storage domain includes services related data storage, it includes the following services:
The Database domain is used for database-related workloads, and it includes the following services:
The Migration domain is used for transferring data to or from the AWS Infrastructure, it includes the following services:
The Networking and Content Delivery domain is used to isolate your network infrastructure, and content delivery is used to deliver content faster. It includes the following services:
The Management Tools domain consists of services that are used to manage other services in AWS, it includes the following services:
The Security & Identity Compliance domain consists of services which are used to manage to authenticate and provide security to your AWS resources. It consists of the following services:
The Messaging domain consists of services that are used for queuing, notifying, or emailing messages. It consists of the following domains:
In the exciting world of Cloud Computing, AWS offers an amazing variety of services tailored to meet diverse fields and needs. Here are some of the most popular AWS services that many people are using today:
From compute and storage to serverless functions and networking, these top AWS services empower users to build scalable, reliable, and innovative cloud solutions.
Now that we know the benefits, let’s see where AWS is actually used.
Startups use these services to keep hardware infrastructure costs under control and make application launches faster without lowering performance.
Larger businesses are using AWS cloud services to handle their infrastructure, which lets them focus on creating more products for a wider audience.
Here are some interesting examples of how AWS services are used in the real world by businesses:
AWS is the base tool for a huge range of real-world applications and business changes, from helping startups cut costs to running huge global companies.
AWS Tutorial For Beginners
This video focuses on the complete AWS Course which is the ultimate tutorial for beginners or anyone who wishes to scale up in their career.
First and foremost, you should analyze, what is your application about. Is it something that requires you to be worried about the underlying infrastructure? Is it something that requires a database? Is it something that will require monitoring?
So, once you know all the requirements of your application, you can pick the domain, and hence choose a service.
Like for example, if you want to deploy an application in AWS, which does not require you to worry about the underlying architecture, which service will you choose?
Well, in the compute section there is this service called Elastic Beanstalk. You just upload your application, and AWS does the rest for you. It’s that simple!
Of course, you wouldn’t know about any of these services without using them right? That’s why AWS came up with an amazing free-tier option.
Every customer receives the free tier option when he registers on AWS and is eligible for it for one year from the time he registers.
How shall this help?
You can try every application in AWS and learn! The more you practice, the more you learn what AWS is.
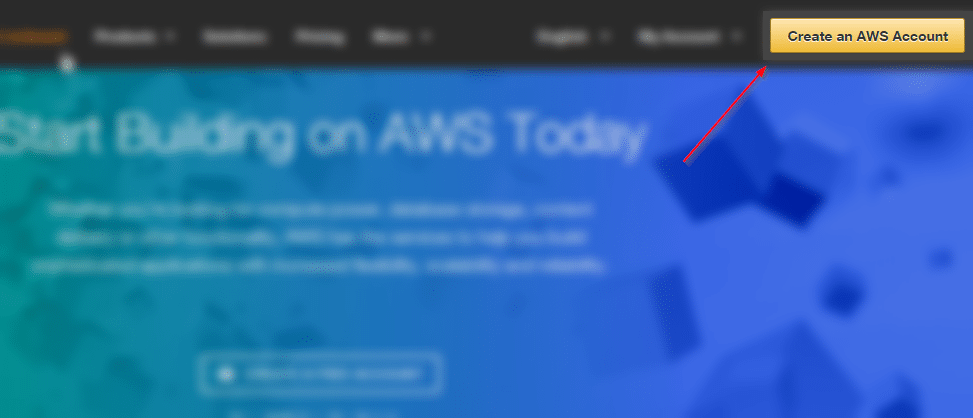
Step 1: Go to aws.amazon.com and click on Create an AWS Account.
Step 2: Click on ‘I am a new customer’ option, enter your email address and at last click on Sign In.

Step 3: On the next page, fill-in all the relevant information and click on Create Account.

Step 4: On the next page, fill in your personal details and click on Create Account.

Step 5: You would be asked to enter your credit or debit card details on this page, once you do that, proceed by clicking on continue.

Step 6: Next Step would be to verify your phone number, enter the details and click on Call me Now.

Step 7: You will get a call from AWS and will be asked to enter a pin, next up you will be selecting your plan for AWS, but before that click on Next.

Step 8: You shall select a plan, which suits you, I will be going with a basic plan since this account would be for personal use.

Step 9: Congrats! Your AWS Account is ready to be used! Go sign in and play!

Now, since you have an AWS account at your disposal, why not do some hands-on? What say?
Let’s host a PHP website on EC2 and back it up with an RDS MySQL database. Not familiar with the services? Let me brief you up:
EC2 (Elastic Compute Cloud) is an AWS compute service that provides resizable compute capacity in the cloud.
So in simple words you get a server with custom to compute capacity, this capacity can be adjusted according to your needs. Cool, right? Want to know more, AWS EC2 Blog.
Let’s discuss RDS now, so RDS is Relational Database Service, which includes different databases like MySQL, MongoDB etc.
So basically, RDS manages these databases for you, How? Check out this blog on AWS RDS.
We will be creating a small application on EC2-RDS infrastructure. By the end, you will have a PHP application on EC2, backed by a fully managed MySQL server.
Let’s start by deploying an EC2 instance first.
Step 1: Login to AWS Management Console.

Step 2: Select a region from the drop down.

Step 3: Click EC2 under Compute section. This will take you to EC2 dashboard.

Step 4: Select Launch Instance and hence select an AMI, for our example, we will be selecting a Windows 2016 Server Instance which falls under free tier.

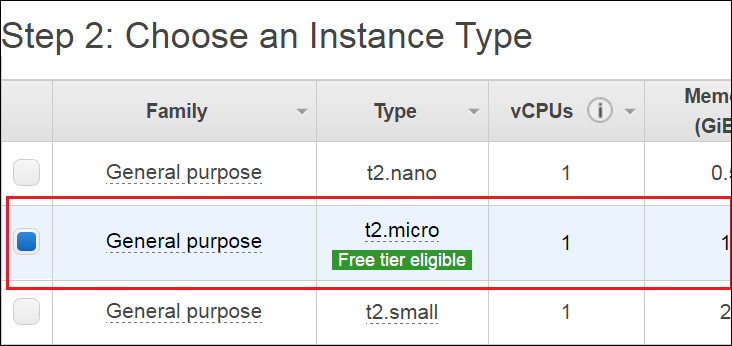
Step 5: Once you select your desired AMI, select your instance type, this is basically where you decide how much computing power you need to start, since ours is a small application, we shall suffice with the free tier.
Step 6: Configure all the details and then click on add storage.

Step 7: Here you will be configuring your storage devices, once done click on tag instance.

Step 8: Here you will be tagging your instance, this is how your instance will be identified.

Step 9: Now you will be configuring your security group.

Step 10: Check all your settings, once verified launch your instance!

Step 11: In the next step you will be prompted for a key pair, create one and download at a handy location.

Step 12: Select your instance and click on Connect.

Step 13: Once you click connect, you will be prompted with the following screen. Copy the public IP and then click on Get Password.

Step 14: Select the key-pair that you downloaded, then click decrypt password.

Step 15: Copy the password and the public IP, keep it handy for the next step.

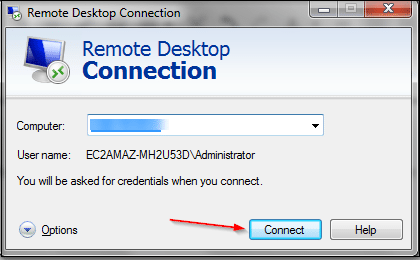
Step 16: We have the Public IP and the password now, let’s connect to our instance! Open the remote desktop manager. Enter the public IP address and click on Connect.
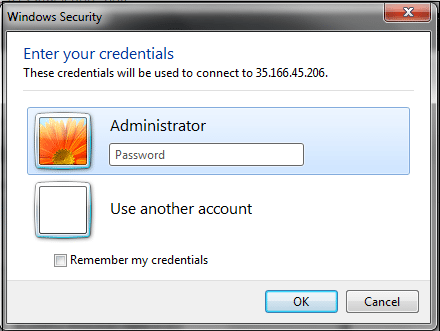
Step 17: Enter the saved password here and click on OK.
Step 18: Congratulations! Windows Server on EC2 at your service!

Next, Let’s create an RDS instance for MySQL
Step 1: Select the RDS service from the AWS Management Console.

Step 2: Since we will be launching a MySQL instance, select the MySQL instance from the list of DBs. let’s go to Step 3.

Step 3 : Since we are creating this instance for demo purposes, we will be selecting Dev/Test option and click on Next Step.

Step 4 :
On the next page you will be filling the following details:

Step 5 :
In the next step, you will be configuring Advanced Settings for your DB
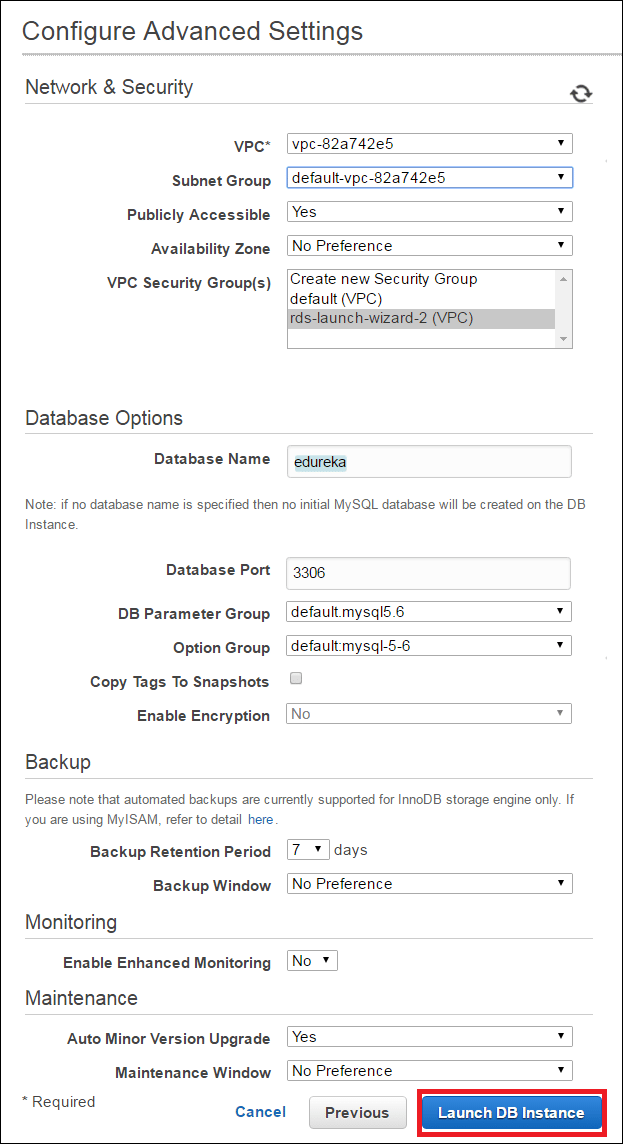
Step 6 :

Congratulations! On your first RDS Instance!!
Next, let’s configure your RDS instance to connect to your EC2 server.
Step 1: On your RDS Dashboard, select your RDS instance.
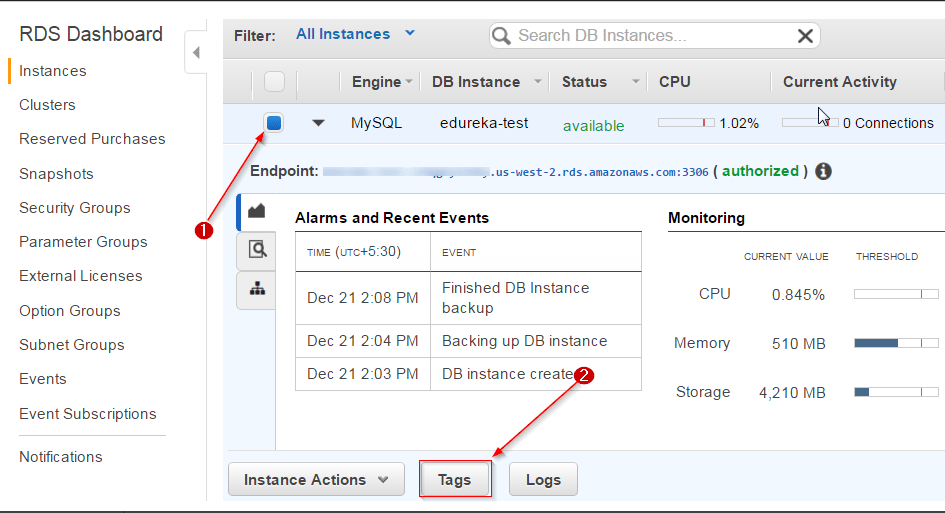
Step 2: You have to edit the Security Group here, Why? Because you want your EC2 instance to be able to connect to your RDS Instance, for that you have to add the IP address of your EC2 instance here.
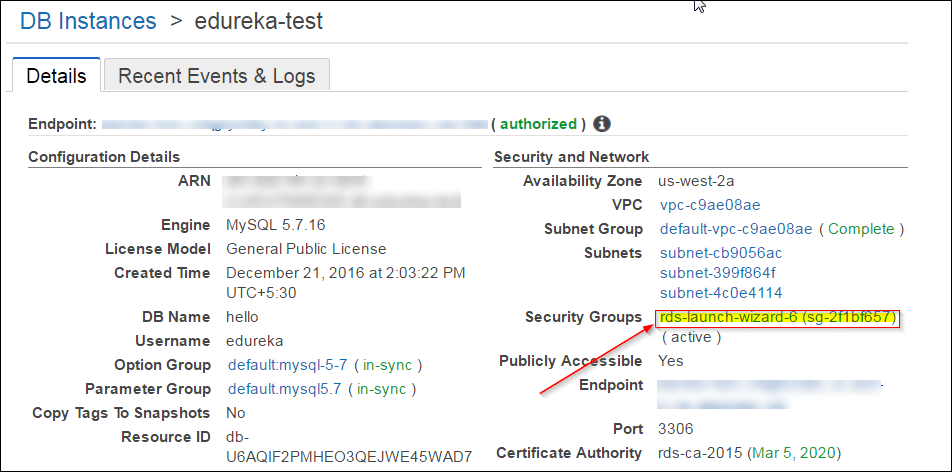
Step 3: Select the Security group, then select the Inbound rules, then click on Edit.

Step 4: Select the MySQL/Aurora, and then enter the Public IP address of your EC2 instance in the second field. Any IP address that you enter here should be followed by a ‘/32’ to convert it into CIDR notation. In the end Click Save.

That’s it! Your RDS instance is ready to receive commands from your EC2 instance.
What next? You would need a MySQL Workbench or a server to connect to your RDS instance. I installed MySQL on the EC2 instance itself, you can do that on your localhost too.
Note: If you are doing it on your localhost, be sure to add your IP address in the Security Group of your RDS instance, like we did in the above step.
Let’s connect to the RDS Instance Now!
Step 1: Open the command prompt and navigate to the bin folder of your MySQL.

Step 2: Next up, copy the endpoint from your RDS instance dashboard, you will be needing this in the next step to connect to your RDS instance. The endpoint is how your RDS instance gets identified. Following the endpoint is the port number ‘3306’ which you shall also need in the next step.

Step 3: Come back to the command prompt and type the following command, you will prompted for the password, enter the password that you entered while you created your RDS instance and you are set!
mysql -h xx.rds.amazonaws.com -P <port number> -u <username> -p

You can create your database and relevant tables here, I have already created mine, for your reference I am creating the sample ones here.

Your RDS service is set now!
Let’s move on, to the most exciting part of this What is AWS blog! Hosting your website!!
Step 1: On your EC2 instance, click on start and then Server Manager.

Step 2: Click on Add roles and features.

Step 3: Click on next on the first page, on the second page, select the following option and click Next.

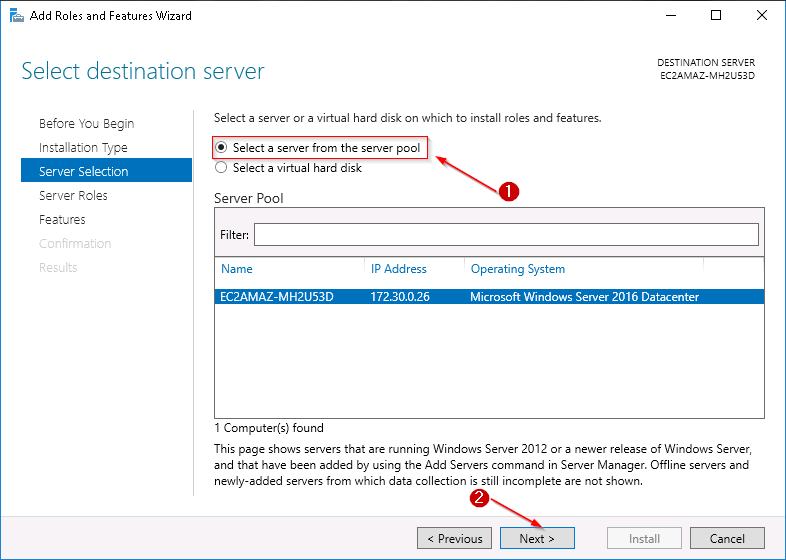
Step 4: Select the server pool option and click on Next.
Step 5: Select the web server IIS from the list and click on Next.

Step 6: Select the .NET Frameworks mentioned here, and click next.

Step 7: This is the confirmation page, go through what is getting installed, and Click on Install.

Once IIS is installed, you will be able to see it on your server manager dashboard.

After this, install Microsoft Web Platform Installer from here.
Step 8: Open IIS now, double click the server, and click on the web platform installer from the Management Section.
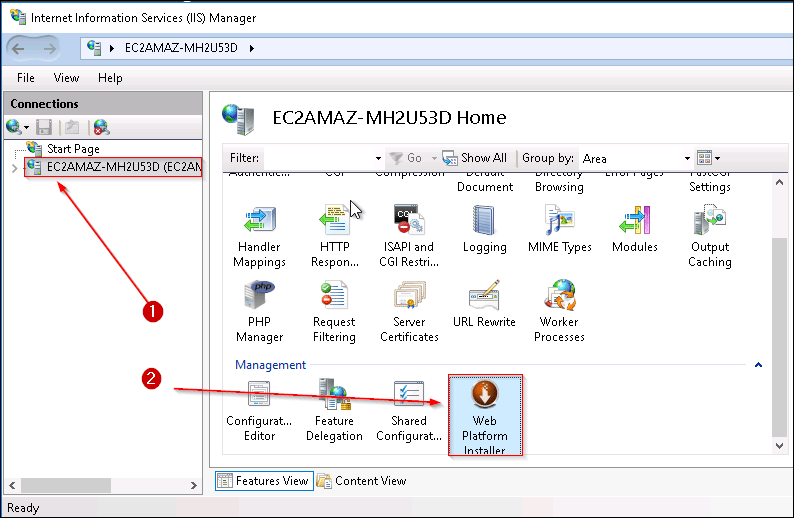
We will be deploying a PHP web application, therefore we need PHP installed on this server, therefore we would be needing Web Platform Installer.
Step 9 : Search for PHP in the search bar of WPI, install the following package.

*Note: If your PHP Manager is failing to install, there are some values that you have to change in the registry.
Step 10: Once installed, you can view your PHP manager in IIS.

Your EC2 server is ready to host a website now!
Related Learning: AWS Well Architected Framework
Let’s upload your website to this EC2 server.
Step 1: First, copy all your files of your website to this folder in “C:/inetpub/wwwroot” on this server.

Step 2: Return to IIS, click on your server and then right click on Sites.
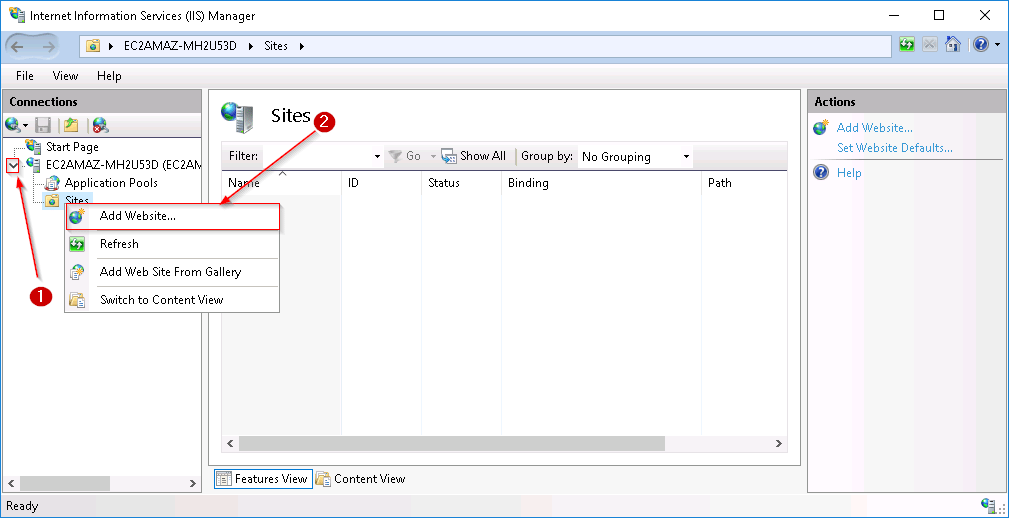
Step 3: In the ‘site name’ give a relevant name to your website, in the next step give the following physical path, and in the end click OK.

Your website is now live!
Step 4 : Enter the public IP address of your EC2 instance and voila! Your website is up and running. Enter the details and click on Add.

Step 5 : This shows that your RDS connection with your EC2 instance is working well. So whatever you entered here, is getting stored on your RDS instance, and your website is stored on your EC2 instance. Click on Go Back.

Step 6 : On the main page, click on View Results. And you shall see this page.

These are the records which are present in your MySQL table.
Need the code for this application? Here you go:
index.php
<!DOCTYPE html>
<html>
<body>
<h1>Registration Page</h1>
<form action="process.php" method="post">
<b> Name: </b> <input type="text" name="name">
<b> Email: </b> <input type="text" name="email">
<input type="Submit" value="add">
<a href="result.php">View Results</a>
</form>

</body>
</html>
process.php
<html>
<body>
<?php
$name=$_POST['name'];
echo '
';
$email=$_POST['email'];
$hostname='edureka-test.cx9qgfyl1dhy.us-west-2.rds.amazonaws.com';
$username='edureka';
$password='hemant1994';
$dbname='edu_test';
$usertable='test';
$yourfield='name';
$con=mysqli_connect($hostname,$username, $password) OR DIE ('Unable to connect to database! Please try again later.');
mysqli_select_db($con,$dbname);
$query = "insert into ".$usertable." values('".$name."','".$email."');";
mysqli_query($con,$query) or die("Not Updated!");
echo "Insertion Successful!!";
?>

<a href="index.php">Go Back</a>
</body>
</html>
result.php
<html>
<?php
$hostname='edureka-test.cx9qgfyl1dhy.us-west-2.rds.amazonaws.com';
$username='edureka';
$password='hemant1994';
$dbname='edu_test';
$usertable='test';
$yourfield1='name';
$yourfield2='email';
var_dump(function_exists('mysqli_connect'));
$con=mysqli_connect($hostname,$username, $password) OR DIE ('Unable to connect to database! Please try again later.');
mysqli_select_db($con,$dbname);
$query = 'SELECT * FROM test';
$result = mysqli_query($con,$query);
echo '<body><center>
<table>
<table border=3>
<tr>
<td><b>Name</b></td>
<td><b>Email</b></td>
</tr>

';
if($result) while($row = mysqli_fetch_array($result)){
$name = $row[$yourfield1];
$email= $row[$yourfield2];
echo '
';
echo '
<tr>
<td>' . $name . '</td>

' ;
echo '
<td> ' . $email . '</td>
</tr>

' ;
}
?>
</table>

<a href="index.php"> Go Back </a>
</body>
</html>
Behind the scenes, AWS works through a global network. Let’s talk how this infrastructure is set up.
The AWS world infrastructure is really big and covers a lot of different areas! There are separate availability zones for each of these areas.
There are three important things to think about when picking the right places for AWS to be located:
Each area is split into at least two availability zones that are meant to be physically separate from each other. This keeps the infrastructure running smoothly, just like in a distributed system. If something goes wrong in one availability zone, the systems in the other zones will still work fine.
There are six availability zones in North Virginia (US-East), which is the largest area. The high-speed fiber-optic networking that connects these zones helps to keep the links strong.
We have a network called CloudFront that delivers material. Did you know that it has over 100 edge locations around the world? At these edge locations, CloudFront is great at caching content that is viewed a lot, like beautiful pictures and exciting live streaming videos. It also helps protect your information from DDOS attacks!
To control all your services, AWS gives you a handy dashboard. Let’s explore what the AWS Management Console looks like.
With the AWS control dashboard, it’s simple to use AWS services through a web link. You will need an AWS account to begin. Even better, you can get an app for your phone! The home page of the console will show you all of AWS’s great services as soon as you log in for the first time. Also, it’s easy to keep an eye on your prices from the computer!
AWS tools are easy to get to through a number of Software Development Kits (SDKs). This makes it simple for developers to use AWS as the backend of their apps.
There are SDKs for .NET, PHP, Ruby, Go, C++, JavaScript, Python, Node.js, and all of the big programming languages. There are also SDKs for Android, iOS, React Native, Unity, and Xamarin if you’re making apps for phones. Using the AWS API to make HTTP calls is another great choice.
AWS has an AWS Command Line Interface (CLI) for people who like to use a command line. This interface lets you access AWS from afar and even use scripts to handle many tasks. You can also use the AWS Console, which is easy to use and comes as an app for both Android and iOS. All you have to do is get the AWS Console app.
Now that you know how to manage services, it’s time to understand the different cloud models AWS offers.
AWS has three types of cloud computing models:
You should know about these different AWS cloud computing models so that you can pick the best way to set up and run your cloud apps.
With all these services and models, how much does AWS actually cost? Let me break down the pricing in simple terms.
Because AWS (Amazon Web Services) uses a pay-as-you-go pricing strategy, businesses of all sizes can be very flexible and grow as needed. AWS gives you a lot of choices to help you save money because the prices change depending on the services you pick.
Let’s look at some of the most important AWS pricing methods and features:
Utilization-based payment is used by AWS, so you only pay for what you actually use. This method for setting prices takes into account things like
This plan works well for businesses whose workloads change all the time.
For consistent use, think about signing a long-term contract (1 or 3 years) with Reserved Instances for services like EC2, RDS, and Redshift. This helps us
With Spot Instances, you can bid on EC2 capacity that isn’t being used right now. Prices change based on supply and demand, which means you could save up to 90% compared to on-demand rates. They work great for jobs that need to be flexible, like data analysis, batch processing, or processing a lot of data at once.
AWS gives new users a “Free Tier” that lets them use a few services for free. These services are:
One great way for businesses to try out AWS for free is with this.
For pricing projections based on your usage, AWS has a tool called the Pricing Calculator. You can use this tool to guess how much your cloud infrastructure will cost in total by picking services and setups that are useful for your business.
AWS gives you tools like AWS Cost Explorer and AWS Budgets to:
Users can effectively manage and optimize their AWS spend and get the most out of their cloud investment by knowing these key pricing features and using the tools that are available.
Of course, nothing is perfect. Let’s wrap up by looking at some of the common drawbacks or limitations of AWS.
A lot of people utilize AWS since it has a lot of valuable features. But consumers should be aware of several problems, such as:
To manage your AWS cloud settings well, you need to be aware of these possible downsides, such as increased complexity, higher costs, and shared security duties.


 Thank you for registering Join Edureka Meetup community for 100+ Free Webinars each month JOIN MEETUP GROUP

I followed the steps and couldn’t get the site up and running. it gave me an authentication error when I ran the test connection. also, the PHP manager component doesnt show in the IIS manager and the 3 files mentioned were never existing which I manually created. will re-produce it tomorrow and post the result as a follow-up of this one.