
Python Scripting Certification Training
- 15k Enrolled Learners
- Weekend
- Self Paced
(5900)


 Copy Link!
According to TechRepublic, web development is one of the 10 hottest tech skills in 2019. Employment of web developers is projected to grow 15 percent from 2016 to 2026, much faster than the average for all occupations. This is the right time to enhance your skills and start your web developer career. In this article, we will discuss some of the Web Development Projects that will help you build applications on your own in the following sequence:
A web developer is a programmer who specializes in the development of World Wide Web applications using a client-server model. They are also responsible for designing, coding and modifying websites, from layout to function and according to a client’s specifications.
You can find professionals trained in web development working as computer programmers, software engineers, and even web-focused graphic designers. Some of the Key job roles are:
Now that you know about career growth, let’s have a look at some of the Web Development Projects that will help you understand the process of web designing better and also build your own projects. Learn and explore web design and development through this Web Development Course with real time projects.
The Web Development Projects are divided into three levels- Basic, Intermediate, and Advance. We will discuss the different levels of projects and how the code works. This will help you understand the process of web development better and provide you the idea to build your own websites using different scripting languages. So, let’s begin with the basic level Project.
Also Read: How To Build A Web Developer Resume
One major role of a front end developer is to understand the responsive design principles and how to implement them on the coding side.
In this project, we will create a basic layout of a single responsive page and how it works in web development for building multi-purpose websites. The first step is to create the HTML Layout and design the head part of the web page.
<!DOCTYPE html>
<html>

<head>
<meta name="viewport" content="width=device-width, initial-scale=1.0">
<style>
* {
box-sizing: border-box;
}

.menu {
float: left;
width: 20%;
text-align: center;
}

.menu a {
background-color: #deeba6;
padding: 8px;
margin-top: 7px;
display: block;
width: 100%;
color: black;
}

.main {
float: left;
width: 60%;
padding: 0 20px;
}

.right {
background-color: #f0b569;
float: left;
width: 20%;
padding: 15px;
margin-top: 7px;
text-align: center;
}

@media only screen and (max-width:620px) {

/* For mobile phones: */
.menu,
.main,
.right {
width: 100%;
}
}
</style>
</head>

<body style="font-family:Verdana;color:#0f0f0f;">

<div style="background-color:#4168bd;padding:15px;text-align:center;">
<h1>Welcome to Edureka</h1>
</div>

<div style="overflow:auto">
<div class="menu">
<a href="https://www.edureka.co/data-science-certification-courses">Data Science</a>
<a href="https://www.edureka.co/cloud-computing-certification-courses">Cloud Computing</a>
<a href="https://www.edureka.co/big-data-and-analytics">Big Data</a>
<a href="https://www.edureka.co/masters-program/full-stack-developer-training">Full Stack</a>
</div>

<div class="main">
<h2>Edureka!</h2>
<p>Your One Stop Solution to Trending Technologies.</p>
</div>

<div class="right">
<h2>About</h2>
<p>Edureka is an online technical training platform that offers Big Data, cloud computing, artificial intelligence
and blockchain</p>
</div>
</div>

<div style="background-color:#96ebf7;text-align:center;padding:10px;margin-top:7px;">© edureka.co</div>

</body>

</html>
In this web development project, we have created a basic responsive layout of a web page that consists of different course links to the edureka website.
Output:

Now, this was all about creating a basic responsive layout page. In the next web development project, we will build a dynamic webpage with the help of responsive design.
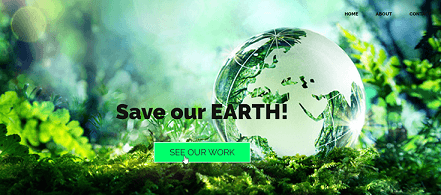
In this example, we will create a dynamic webpage showing environment awareness and adding different sections of the campaign in a single layout page.
The first step is to create the HTML layout with different layers or divisions in a single layout page.
dynamic.html
<!doctype html>

<html>

<head>

<meta name="viewport" content="width=device-width, initial-scale=1"><!-- Critical to responsive design-->
<meta charset="utf-8">
<title>Responsive Layout</title>

</head>
<link rel="stylesheet" href="layout.css">

<body>

<header>

<nav>
<ul>
<li><a href=" ">Home</a></li>
<li><a href=" ">About</a></li>
<li><a href=" ">Contact</a></li>
</ul>
</nav>
</header>

<section class="home-hero">
<!--container class used to ensure contents do not touch edge of box see css-->
<div class="container">
<h1 class="title">Save our EARTH!
</h1>

<a href="" class="button button-accent">See our Work</a>
</div>
</section>

<div class="container">
<section class="home-about">

<div class="home-about-textbox">
<h1>What have we done?</h1>
<p>Climate Change is Real! We have done enough damage to the environment. It's time to pay for our sins. Let's join hands and make this a better place for living and hand over a cleaner environment to our next generation. </p>

</div>

</section>
</div>

<section class="portfolio">
<h1> Bring The Change- Be The Change!</h1>

<!-- portfolio item #1 -->
<figure class="port-item">
<img src="environment.png" alt="portfolio item">
<figcaption class="port-description">
<p>One Plant-One Life</p>
<a href="" class="button button-accent button-small">See project details</a>
</figcaption>
</figure>

<!-- portfolio item #2 -->
<figure class="port-item">
<img src="Plastic.png" alt="portfolio item">
<figcaption class="port-description">
<p>Don't Litter!</p>
<a href="" class="button button-accent button-small">See project details</a>
</figcaption>
</figure>

<!-- portfolio item #3 -->
<figure class="port-item">
<img src="factory.png" alt="portfolio item">
<figcaption class="port-description">
<p>Stop Factory Pollution</p>
<a href="" class="button button-accent button-small">See project details</a>
</figcaption>
</figure>

<!-- portfolio item #4 -->
<figure class="port-item">
<img src="glacier.png" alt="portfolio item">
<figcaption class="port-description">
<p>No more Melting Glaciers</p>
<a href="" class="button button-accent button-small">See project details</a>
</figcaption>
</figure>

<!-- portfolio item #5 -->
<figure class="port-item">
<img src="turtle.png" alt="portfolio item">
<figcaption class="port-description">
<p>Stop Single Use Plastic</p>
<a href="" class="button button-accent button-small">See project details</a>
</figcaption>
</figure>

<!-- portfolio item #6 -->
<figure class="port-item">
<img src="forestfire.png" alt="portfolio item">
<figcaption class="port-description">
<p>Don't Let it Burn!</p>
<a href="" class="button button-accent button-small">See project details</a>
</figcaption>
</figure>

</section>

<section class="cta">
<div class="container">
<h1 class="title title-cta">Make your Contribution!
<span>Let's work together for a better future!</span>
</h1>

<a href="" class="button button-dark">Get Started</a>
</div>
</section>

<footer>
<div class="container">
<div class="col-3"> <!--footer paragraph-->

<p>
This is an initative to spread awareness about climate change. We must join hands and take steps towars saving the Earth!
</p>

</div>

<!-- Footer links 2 -->
<div class="col-1">
<ul class="unstyled-list">
<li><strong>Events</strong></li>
<li>Registration </li>
<li>Rallies</li>
<li>Plantation drive </li>
<li>Clean up drive </li>
</ul>
</div>

</div>

</footer>

</body>

</html>
Once you have created the HTML layout, it’s time to style the webpage and make it look more interesting with the help of CSS.
dynamic.css
* {
box-sizing: border-box; /* this model does not add the padding measurements to the total size of your box*/
transition: all ease-in-out 250ms;
}

body {
margin: 0;
font-family: 'Raleway', sans-serif;
text-align: center;
}

img {
max-width: 100%;
height: auto;
}

.container{
width: 95%;
max-width: 70em;
margin: 0 auto;
}

.clearfix::after,
section::after,
footer::after{
content:'';
display: block;
clear: both;

}

/* Column system (footer items)
==============================================*/

[class^=col-] /*Any class which starts with the string "col" recieves the following properties*/
{
width: 100%;
margin-top: 1em;
}
[class^=col-]:first-child
{
margin-top: 0;
}

.col-1{
width: 33.3333334%;
float: left;
}

@media (min-width:40rem){
[class^=col-] /*Any class which starts with the string "col" recieves the following properties*/
{ float: left;
padding: 0 .5em;
margin-top: 0;
}

[class^=col-]:first-child
{
padding-left: 0;

}

[class^=col-]:last-child
{
padding-right: 0;
}
.col-3{
width: 50%;
}

.col-1{
width:16.666666%
}
}
/* Typography
rem is calculated based on the default h1 value of 16px
for example a media query trigered at 60rem responds to viewports wider than 960px
16*60= 960
==============================================*/
h1{
font-weight: 300;
font-size: 1.8rem;
margin-top: 0;
}

p{
margin-top:0;
line-height: 1.4;
}

p:last-of-type{
margin-bottom: 0;
}

@media (min-width:60rem){

p{
font-size: 1.2rem;
line-height: 1.6;
}
}

.title{
font-size: 2.5em;
margin-botom: 1.5em;
font-weight: 900;
margin-top: 1em;
}
.title span {
font-weight: 300;
display: block;
font-size: .9em;
}

.title-cta{
margin: 0 0 .5em;
}
.unstyled-list{
margin: 0;
padding: 0;
list-style: none;

}

@media (min-width:60rem) {

p {
font-size: 1.2rem;
line-height: 1.6;
}

.title {
font-size: 3.7rem;
}
}

/*==Buttons==*/

.button{
display: inline-block;
font-size: 1.15rem;
text-decoration: none;
text-transform: uppercase;
border-width: 2px;
border-style: solid;
padding: .5em 1.75em;
}

@media(min-width: 60rem){

.button{
font-size: 1.5em;
}
}

.button-small{
font-size: .7rem;
font-weight: 700;
}

.button-accent{
color: #f3f5f4;
border-color: #f3f5f4;
}

.button-accent:hover,
.button-accent:focus {
background: #00ff6c;
color: #232323;
}

.button-dark{
color: #232323;
border-color: #232323;
}

.button-dark:hover,
.button-dark:focus {
background: #232323;
color: #00ff6c;
}

/* HEADER
==============================================*/

header {
position:absolute;
left: 0;
right: 0;
margin: 1em;

}

nav ul {
margin: 0;
padding: 0;
list-style: none;
}

nav li {
display: inline-block;
margin: 1em;

}

nav a {

font-weight: 900;
text-decoration: none;
padding: .5em;
text-transform: uppercase;
color: rgb(24, 24, 26);
font-size: .8rem;

}

nav a:hover ,
nav a:focus {
color: rgb(2, 31, 4);
}

@media (min-width: 60rem) {

.logo{
float: left;
}

nav{
float: right;
}
}

/* hero
==============================================*/

.home-hero {
background: url(earth.jpg);
padding: 10em 0;
color: rgb(19, 18, 18);
background-size: cover;
background-position: center;

}

@media(min-width: 60rem){

.home-hero{
height: 100vh;
padding-top: 35vh;
}
}

/* home-hero-about-textbox
==============================================*/

.home-about-textbox{
background-color: #4b4a4a;
padding: 4em;
width: 100vw;
margin-left: 20%;
outline: 2px solid #00ff6c;
outline-offset: -2.5em;
color: #fff;
position: relative;
}

.home-about-textbox h1 {
color: #00ff6c;
position:absolute;
left: 50%;
transform: translateX(-50%);
top: .75em;
background: #232323;
padding: 0 .145em;
}

@media(min-width: 25rem){

h1{
font-size: 2rem;
}
.home-about-textbox h1 {
top: .6em;
padding: 0 .25em;
}
}

@media(min-width: 40rem){

h1{
font-size: 2.5rem;
}

.home-about{
background-image: url(earth1.jpg);
background-repeat: no-repeat;
padding-bottom: 20em;

}

.home-about-textbox{
width: 50%;
padding: 5em;
outline-offset: -3.75em;
margin-right: -2.5%;
bottom: -25em;
text-align: left;
box-shadow: 0 0 4em rgba(0, 0, 0, .3);

}

.home-about-textbox h1 {
top: .75em;
left: 6rem;
transform: translateX(0);
}
}

/* Portfolio items
==============================================*/

.portfolio {
margin: 7em 0 0;
}

.port-item{
margin: 0;
position: relative;

}

.port-item img{
display:block;
}

.port-description {
position: absolute;
z-index: 100;
bottom: 0em;
left: 0em;
right: 0em;
color: white;
background: rgba(0,0,0,.6);
padding-bottom: 2em;

}

.port-description p {
margin: 1em;
}

@media (min-width: 37rem) {
.port-item{
width: 50%;
float: left;
overflow: hidden;
}
}

@media (min-width: 60rem) {
.port-item img{
width: 100%; /*added this to solve a bug on 1920 * 1080 monitors
remove and view to see bug */
}

.port-item{
width: 33.3333333333333334%;
height: auto;
float: left;

}
.port-description {
transform: translateY(150%);
}

.port-item:hover .port-description{
transform: translateY(0%);
}
.port-item:focus-within .port-description {
transform: translateY(0%);}
}

/* CTA SECTION
==============================================*/
.cta {
background-color: #53e4c4;
padding: 5em 0;
}

/* Footer
==============================================*/
footer {
background: #232323;
color: #fff;
text-align: left;
padding: 5em 0;
}
Output:


Now, we will move on to the final level of our web development projects and create an interesting quiz game with the help of HTML, CSS, and JavaScript.
In this project, we will create a Quiz game with multiple choice answers and a final score based on the number of correct answers.
To set up the structure of our JavaScript quiz, we’ll need to start with the following HTML code:
quiz.html
<html>
    <head>
        <title>Quiz Game</title>
    </head>
        <link rel="stylesheet" href="quiz.css">
        <h1>Do You Know?</h1>
        <div class="quiz-container">
          <div id="quiz"></div>
        </div>
        <button id="previous">Previous Question</button>
        <button id="next">Next Question</button>
        <button id="submit">Submit Quiz</button>
        <div id="results"></div>
<script type="text/javascript", src='quiz.js'></script>
</html>
Next, we’ll need a way to build a quiz, show results, and put it all together. We can start by laying out our functions with the help of JavaScript.
quiz.js
(function() {
const myQuestions = [
{
question: "Which sea creature has three hearts? ",
answers: {
a: "Octopus",
b: "Blue Whale",
c: "Sea Turtle"
},
correctAnswer: "a"
},
{
question: "What is the Italian word for pie?",
answers: {
a: "Donut",
b: "Pie cake",
c: "Pizza"
},
correctAnswer: "c"
},
{
question: "Which is the only mammal that can not jump?",
answers: {
a: "Snake",
b: "Elephant",
c: "Kangaroo",
},
correctAnswer: "b"
}
];

function buildQuiz() {
// we'll need a place to store the HTML output
const output = [];

// for each question...
myQuestions.forEach((currentQuestion, questionNumber) => {
// we'll want to store the list of answer choices
const answers = [];

// and for each available answer...
for (letter in currentQuestion.answers) {
// ...add an HTML radio button
answers.push(
`<label id="${questionNumber}${letter}" href="#">
<input type="radio" name="question${questionNumber}" value="${letter}"} id="${questionNumber}${letter}"">
${letter} :
${currentQuestion.answers[letter]}
</label>`
);
}

// add this question and its answers to the output

output.push(
`<div class="slide">
<div class="question"> ${currentQuestion.question} </div>
<div class="answers"> ${answers.join("")} </div>
</div>`
);
});

// finally combine our output list into one string of HTML and put it on the page

quizContainer.innerHTML = output.join("");
}

function showResults() {
// gather answer containers from our quiz

const answerContainers = quizContainer.querySelectorAll(".answers");

// keep track of user's answers

let numCorrect = 0;

// for each question...

myQuestions.forEach((currentQuestion, questionNumber) => {

// find selected answer

const answerContainer = answerContainers[questionNumber];
const selector = `label input[name=question${questionNumber}]:checked`;
const userAnswer = (answerContainer.querySelector(selector) || {}).value;
const answerID = (answerContainer.querySelector(selector) || {}).id;
const selector1 = `label[id="${answerID}"]`; //Select user's answer
var answerElem = answerContainer.querySelector(selector1);
const selector2 = `label[id="${questionNumber}${currentQuestion.correctAnswer}"]`;
var answerElem1 = answerContainer.querySelector(selector2);

// if answer is correct

if (userAnswer === currentQuestion.correctAnswer) {
// add to the number of correct answers

numCorrect++;

// color the answers green

//console.log(answerElem)

answerElem.style.background = "#70F85A";
answerElem.style.fontWeight = "900";

} else {
// if answer is wrong or blank
// color the answers red

answerElem1.style.color="#70F85A";
answerElem.style.background="#FD2929";
answerElem1.style.fontWeight = "900";
//console.log(answerContainers)
}
});

// show number of correct answers out of total

resultsContainer.innerHTML = `${numCorrect} out of ${myQuestions.length}`;
}

function showSlide(n) {
slides[currentSlide].classList.remove("active-slide");
slides[n].classList.add("active-slide");
currentSlide = n;

if (currentSlide === 0) {
previousButton.style.display = "none";
} else {
previousButton.style.display = "inline-block";
}

if (currentSlide === slides.length - 1) {
nextButton.style.display = "none";
submitButton.style.display = "inline-block";
} else {
nextButton.style.display = "inline-block";
submitButton.style.display = "none";
}
}

function showNextSlide() {
showSlide(currentSlide + 1);
}

function showPreviousSlide() {
showSlide(currentSlide - 1);
}

const quizContainer = document.getElementById("quiz");
const resultsContainer = document.getElementById("results");
const submitButton = document.getElementById("submit");

// display quiz right away

buildQuiz();

const previousButton = document.getElementById("previous");
const nextButton = document.getElementById("next");
const slides = document.querySelectorAll(".slide");
let currentSlide = 0;

showSlide(0);

// on submit, show results

submitButton.addEventListener("click", showResults);
previousButton.addEventListener("click", showPreviousSlide);
nextButton.addEventListener("click", showNextSlide);
})();
Finally, we can use CSS to add different styles to this game.
quiz.css
@import url(https://fonts.googleapis.com/css?family=Work+Sans:300,600);

body{
font-size: 30px;
font-family: 'Work Sans', sans-serif;
color: rgb(24, 23, 23);
font-weight: 300;
text-align: center;
background-color: #f8e8f2;
}
h1{
font-weight: 300;
margin: 0px;
padding: 10px;
font-size: 40px;
background-color: rgb(9, 107, 102);
color: #fff;
}
.question{
font-size: 40px;
margin-bottom: 10px;
}
.answers {
margin-bottom: 20px;
text-align: left;
display: inline-block;
}
.answers label{
display: block;
margin-bottom: 10px;
}
button{
font-family: 'Work Sans', sans-serif;
font-size: 22px;
background-color: rgb(218, 167, 57);
color: #fff;
border: 0px;
border-radius: 3px;
padding: 20px;
cursor: pointer;
margin-bottom: 20px;
}
button:hover{
background-color: #38a;
}

.slide{
position: absolute;
left: 0px;
top: 0px;
width: 100%;
z-index: 1;
opacity: 0;
transition: opacity 0.5s;
}
.active-slide{
opacity: 1;
z-index: 2;
}
.quiz-container{
position: relative;
height: 200px;
margin-top: 40px;
}
Output:


These were some of the Web Development Projects. with this, we have come to the end of this article. I hope you understood the different levels of projects and got the idea of how to build your own web page and design them according to your needs. Start your career journey with Front End Developer internships program today.
Want to learn how to build mobile apps using Flutter? Enroll in a Flutter Certification and start your journey today.
Now that you know about JavaScript Loops, check out the Web Development Certification Training by Edureka. Web Development Certification Training will help you learn how to create impressive websites using HTML5, CSS3, Twitter Bootstrap 3, jQuery and Google APIs and deploy it to Amazon Simple Storage Service(S3).
Got a question for us? Please mention it in the comments section of “Web Development Projects” and we will get back to you.


 Thank you for registering Join Edureka Meetup community for 100+ Free Webinars each month JOIN MEETUP GROUP