_1648290557.jpg)
We often come across scenarios while testing where we have to upload a file. For different UI, there are different ways to upload a file. In this blog, we are going to explain how to upload file in Selenium with examples. The following pointers will be covered:
How to Upload a File in Selenium?
Uploading a file while automating test scripts is no longer a challenge. In this tutorial, I will discuss the easiest way of uploading a file using Selenium. We will use “Sendkeys” to upload the file. The Online Selenium Course can help you acquire a better understanding of Selenium testing.
Before diving into further details, let’s take an example and learn how to upload a file while automating our scripts using Selenium.
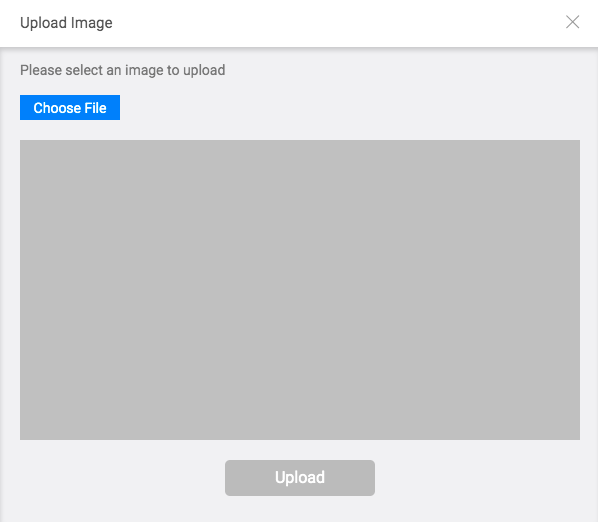
In the above image you can see three things:
Choose File Button: This button allows us to select the file we wish to upload from our machine.
Input type: The input type of the Choose File button in the above image is file type.
Upload Button: On clicking, this button upload function is performed.
Note: I would be using an example of edureka, where we can upload our image by editing personal details. To do this, I first need to log in using an Edureka account. To login, I will be using my username and password, I request you to use yours to practice for the same.
Alternatively, you can check out the Automation Testing Course by Edureka and get certified!
Step-by-Step Guide to File Upload in Selenium
- Set the path of the driver of the browser on which the test script will run.
Example
System.setProperty(“webdriver.chrome.driver”,”/Users/ankita/Downloads/chromedriver”);
- Create an instance of that browser
Example:
WebDriver driver = new ChromeDriver(options);
- Navigate to the Edureka main page and then Login using your username and password
Example:
driver.get("https://www.edureka.co/");
driver.findElement(By.linkText("Log In")).click();
driver.findElement(By.id("si_popup_email")).sendKeys("username");
driver.findElement(By.id("si_popup_passwd")).sendKeys("password");
driver.findElement(By.xpath("//*[@id=\"new_sign_up_mode\"]/div/div/div[2]/div[3]/form/button")).click();
- After logging into your Edureka account using your username and password, navigate to the page where you can upload your image by editing your personal details.
Here, I am navigating right away to the page, from where I will be navigated to the page to upload an image by pressing the image icon.
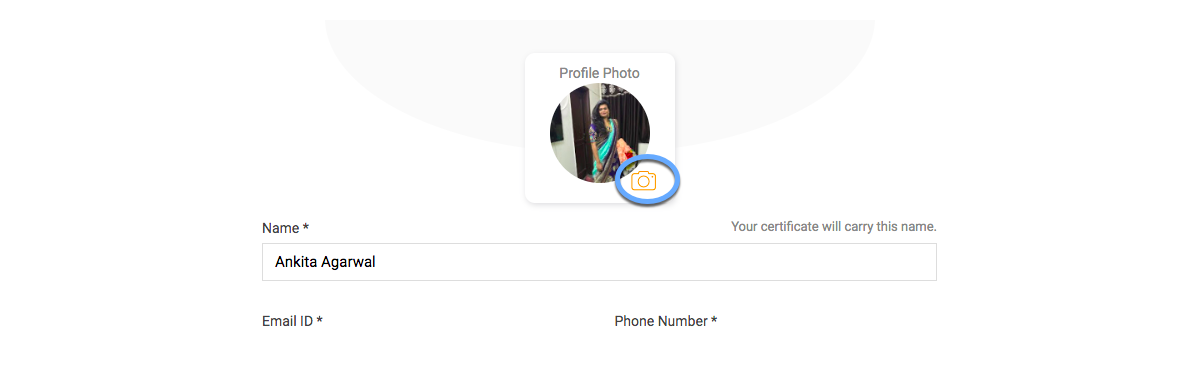
On clicking on the highlighted icon above, you will be navigated to the image upload page.
driver.get("https://learning.edureka.co/onboarding/personaldetails");
driver.findElement(By.xpath("//*[@id=\"collapseOne\"]/div/div/div[2]/a/i")).click();
- As soon as you click on the icon above, you will be directed to the page where you can upload the image(as seen below).
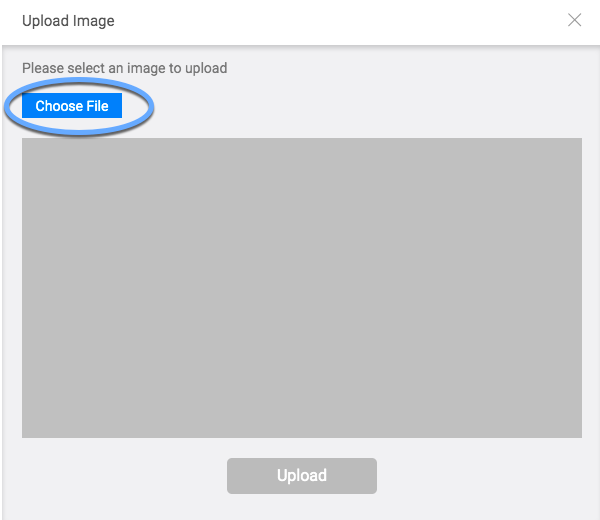
- Now, without clicking the Choose File button we will use Sendkeys to send the absolute path of the image file which we would like to upload.
Example:
WebElement chooseFile = driver.findElement(By.id("custom-input"));
chooseFile.sendKeys("/Users/ankita/Downloads/edureka.png");
NOTE: If you click on the choose file button, you will be taken to your machine window to select a file, and you will not be able to select a file using Selenium. Hence, you will have to use a third tool, either AutoIT or Sikuli.
We will be discussing them in detail in our other tutorials.
- After you pass the absolute path of the file with send keys, the upload button will be enabled and the image selected will be seen as below:
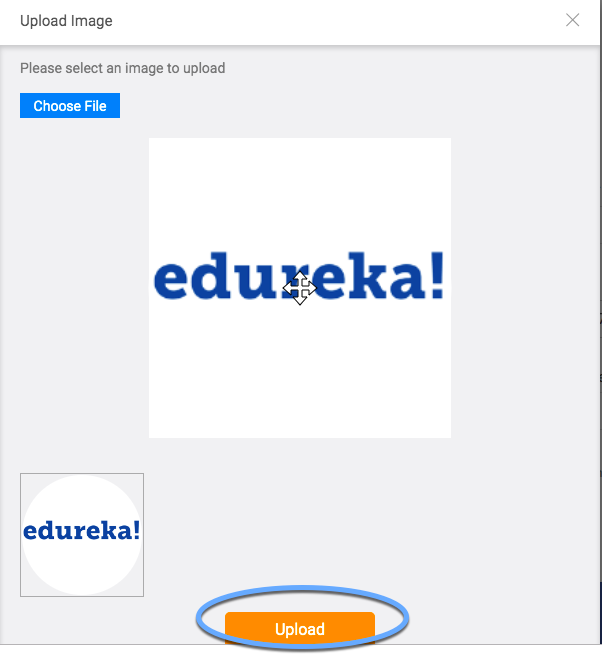
Now, click the upload button:
Example:
driver.findElement(By.cssSelector(“div[class=’submitbtnsec’] > button[type=’submit’]”)).click();
The file has been uploaded, and the new image will now appear in your personal details.
Below is the script to perform the steps mentioned earlier in Selenium using Java
import java.util.concurrent.TimeUnit;
import org.openqa.selenium.By;
import org.openqa.selenium.WebDriver;
import org.openqa.selenium.WebElement;
import org.openqa.selenium.chrome.ChromeDriver;
import org.openqa.selenium.chrome.ChromeOptions;
import org.openqa.selenium.support.ui.ExpectedConditions;
import org.openqa.selenium.support.ui.WebDriverWait;

public class EdurekaUploadTest {

public static void main(String[] args) throws InterruptedException {

System.setProperty("webdriver.chrome.driver","/Users/ankita/Downloads/chromedriver");
WebDriver driver = new ChromeDriver(options);
driver.get("https://www.edureka.co/");

WebDriverWait wait = new WebDriverWait(driver, 10);
wait.until(ExpectedConditions.visibilityOf(driver.findElement(By.linkText("Log In"))));
driver.findElement(By.linkText("Log In")).click();
driver.manage().timeouts().implicitlyWait(100, TimeUnit.SECONDS);
wait.until(ExpectedConditions.visibilityOf(driver.findElement(By.id("si_popup_email"))));
driver.findElement(By.id("si_popup_email")).sendKeys("username");
driver.findElement(By.id("si_popup_passwd")).sendKeys("password");

driver.findElement(By.xpath("//*[@id=\"new_sign_up_mode\"]/div/div/div[2]/div[3]/form/button")).click();

Thread.sleep(2000);
driver.get("https://learning.edureka.co/onboarding/personaldetails");
Thread.sleep(1000);

WebElement imageEdit = driver.findElement(By.xpath("//*[@id=\"collapseOne\"]/div/div/div[2]/a/i"));

imageEdit.click();
Thread.sleep(1000);
WebElement chooseFile = driver.findElement(By.id("custom-input"));
chooseFile.sendKeys("/Users/ankita/Downloads/edureka.png");
Thread.sleep(1000);
driver.findElement(By.cssSelector("div[class='submitbtnsec'] > button[type='submit']")).click();

}

}
How to Uploade File in Selenium to Check Plagiarized Content?
In this case, the user wishes to upload a file to verify if the content they have chosen is unique.
To upload a document, please refer to the screenshot below. In this example, the element is located using link locator and write the whole program.
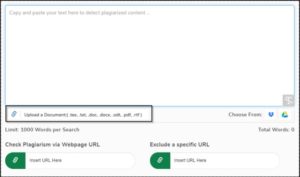
Example of How to Upload File with Selenium-3
import java.io.IOException;
import org.openqa.selenium.By;
import org.openqa.selenium.WebDriver;
import org.openqa.selenium.WebElement;
import org.openqa.selenium.firefox.FirefoxDriver;
public class UploadFile {
public static void main(String[] args) throws IOException {

//Instantiation of driver object to launch Firefox browser
System.setProperty("webdriver.gecko.driver", "Path of the gecko driver");WebDriver driver = new FirefoxDriver();
driver.get("https://www.edureka.co/blog/videos/selenium-tutorial/");

//Locating upload filebutton
WebElement upload =driver.findElement(By.linkText("Upload a Document:( .tex, .txt, .doc, .docx, .odt, .pdf, .rtf )"));
upload.sendKeys("D:pathFile.txt");
driver.close();
}
}
On executing the above code,you can see that the contents of the file will be uploaded as shown below:

As shown above, a file could be uploaded using Selenium. But since this is one of the common activities for any user, it should be checked at times for the smooth user experience the website is providing. So, testers need to know this process as their basics.
With this, we come to the end of this article on how to upload file in Selenium. In this tutorial, we learned how to upload a file using “Sendkeys” in Selenium. The major drawback with this approach is that we can use send keys only when the input type is a file type or there is an editable text box along with the browse button. In such a case, we can give the absolute path of the file instead of clicking the button provided to choose a file from the machine.
Conclusion
This blog is an all-inclusive guide to upload file in Selenium. You went step by step through the process focused on using “Sendkeys” for the automation of file upload. All these methods can be combined to help the testers effectively handle file upload scenarios over various UI designs. Though it would make automation easier, there are several limitations to this approach, such as dependence on a specific type of input or editable text boxes to enter a path. The bottom line is that learning how to automate a file upload using Selenium provides one essential skill set for any tester desiring to ensure flawless user experiences across websites.
Find out our Selenium Training in Top Cities/Countries
| India | Other Cities/Countries |
| Bangalore | US |
| Hyderabad | UK |
| Pune | Canada |
| Chennai | Australia |
| Mumbai | Singapore |
| Kolkata | Edinburgh |
FAQs
How do I upload a file in Selenium?
First, locate the file upload element on the webpage. Most of the time, it is an input element of type=’file’. Now, on that element, use the sendKeys method and pass it to the exact path of the file to be uploaded. Finally, the actual upload action on the upload button, or the form submission element.
How to upload all files in a folder in Selenium?
This can be realized by walking through the files in the folder using Python’s os module and simulating an individual file upload using sendKeys for each of their paths. This assures the correct location of the file upload element at each iteration.
How to test file upload in Selenium Python?
The file upload feature can be tested with Selenium, including but not limited to operating on frameworks such as pytest or unittest, which can initiate the instance of WebDriver, follow the upload page, locate the file input element, and carry out file upload simulations with sendKeys. The assertions should be formulated to depict the effective upload of files or in event of problems; except for file uploading, there should also be mechanisms for exception handling.
How do I upload multiple files in Selenium?
In case of multiple file uploads, if a web application supports it, we can use sendKeys with multiple file paths separated by spaces in Selenium. Make sure the element of the file input used in our selector also supports multiple-select-at-once. Actually, all those file paths are sent as one action, and that way you upload multiple files.
How to upload file by drag and drop in Selenium?
Locate and Upload file with the help of Drag and Drop using Actions class , locate the file input element and identify the webpage’s destination drop area. Using the command drag_and_drop, perform the drag action to the destination drop area by moving the file path. This will always need to simulate the drag-and-drop process quite accurately. It needs to properly handle position and interaction of the elements.