Uploading files is a challenging task for developers but uploading a file with Ajax? It is unbelievably easy! The advancements in Ajax and browser support further reduce the burden in case of file upload. Quick solutions are available with HTML5 uploader, but it is not secure and does not work in all browsers. In this article we will see how to upload files in AJAX:
Important Steps to Upload Files in AJAX
There are a few crucial steps to note while uploading files through Ajax. It may seem a little exhausting, but when done in the right way, it is incredibly easy. You need to be a careful while:
setting up an instance for XMLHttpRequest
setting up objects for various XMLHttpRequest handlers
setting Ajax request to send data to the back end
setting up feedback for the audience
Problems With 3rd Party in File Upload
Are you thinking of including a third party in your Ajax file upload? You might encounter three main problems by involving third parties. Firstly, you will lose control over your access to the infrastructure that is lying behind the storage.

Secondly, you will encounter a problem with privacy when the file includes sensitive data, especially if you are uploading health records, financial records or legal documents. Thirdly, there are legacy systems that cannot be avoided while involving a third party.
Codes
We are going to describe a method of file upload with Ajax, which will work as long as formdata is available. In this method, there are three main components or important files required for upload:
- HTML/CSS file – File input element and its multiple attributes
- PHP file – The new API file and the FileReader object
- JavaScript – XMLHttpRequest2 and the FormData object
The HTML/CSS file Markup and styling
This is a pretty easy step involving codes. Any newbie can do this, and below are the codes for uploading:
HTML Code
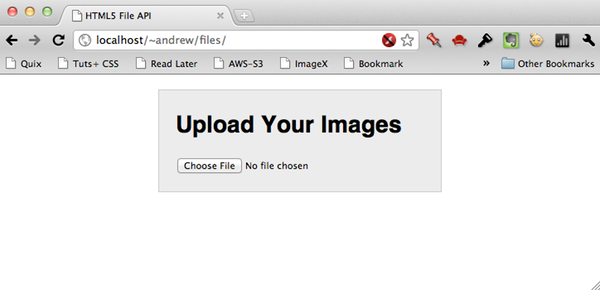
<!DOCTYPE html><html lang="en"><head><meta charset="UTF-8" /><title>HTML5 File API</title><link rel="stylesheet" href="style.css" /></head><body><div id="main"><h1>Upload Your Images</h1><form method="post" enctype="multipart/form-data" action="upload.php"><input type="file" name="images" id="images" multiple /><button type="submit" id="btn">Upload Files!</button></form><div id="response"></div><ul id="image-list"></ul></div><script src="https://ajax.googleapis.com/ajax/libs/jquery/1.6.2/jquery.min.js"></script><script src="upload.js"></script></body></html>
CSS Code
body {font: 14px/1.5 helvetica-neue, helvetica, arial, san-serif;padding:10px;}
h1 {margin-top:0;}
#main {width: 300px;margin:auto;background: #ececec;padding: 20px;border: 1px solid #ccc;}
#image-list {list-style:none;margin:0;padding:0;}#image-list li {background: #fff;border: 1px solid #ccc;text-align:center;padding:20px;margin-bottom:19px;}#image-list li img {width: 258px;vertical-align: middle;border:1px solid #474747;}
Are you stunned by looking at how easily this can be implemented? Now, let’s move on to creating the PHP file. Check out this Full Stack developer course and learn more about PHP today.
PHP: Backend Development
Let’s see how we can handle the file upload at the backend. With advancements in PHP, we need to add a few more lines of code for security purposes. The below code gives you an error-free file upload. It was created to upload a file and later move it to uploads folder. You need to create a file named upload.php
<?php
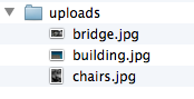
foreach ($_FILES["images"]["error"] as $key => $error) {if ($error == UPLOAD_ERR_OK) {$name = $_FILES["images"]["name"][$key];move_uploaded_file( $_FILES["images"]["tmp_name"][$key], "uploads/" . $_FILES['images']['name'][$key]);}}echo "<h2>Successfully Uploaded Images</h2>";
You need to link a jQuery and upload.js file for the pop up as illustrated below.

The JavaScript
Using Ajax, we can hide the Upload image CAT button. Given below is the code for upload.
(function () {var input = document.getElementById("images"),formdata = false;
if (window.FormData) {formdata = new FormData();document.getElementById("btn").style.display = "none";}}();
Given below are the hidden helper functions that are helpful for file upload.
Showing images after the browser reads it:
function showUploadedItem (source) {var list = document.getElementById("image-list"),li = document.createElement("li"),img = document.createElement("img");img.src = source;li.appendChild(img);list.appendChild(li);}
After you show the image to the user, you need to display the image and upload the file.
The onchange event is fired.
if (input.addEventListener) {input.addEventListener("change", function (evt) {var i = 0, len = this.files.length, img, reader, file;
document.getElementById("response").innerHTML = "Uploading . . ."
for ( ; i < len; i++ ) {file = this.files[i];
if (!!file.type.match(/image.*/)) {
} }
}, false);}
After the upload of the image, we need to confirm if the file is an image and whether it is in the specified length and size.
Check the following code:
if ( window.FileReader ) {reader = new FileReader();reader.onloadend = function (e) { showUploadedItem(e.target.result);};reader.readAsDataURL(file);}if (formdata) {formdata.append("images[]", file);}
We need to pass the file object to the reader.readAsDataURL, this operation creates a data URL for the uploaded image. This data URL will not be passed back from the function, instead, it is used as a part of even object. We need to check if the browser supports FormData and formdata objects.
It holds the values that we have submitted using the form. Adding a square bracket in images[] will append another value instead of overwriting.
Now, the final step of uploading the image will happen with the following piece of code.
if (formdata) {$.ajax({url: "upload.php",type: "POST",data: formdata,processData: false,contentType: false,success: function (res) {document.getElementById("response").innerHTML = res; }});}
Once the upload is over, we need to see if it supports the FormData and since we are uploading it using Ajax, it should avoid all the errors and special cases.
When the user tries to upload an image, the following image will pop up:
After selecting the images, this will appear on the screen:

And once the image upload is complete:
The file upload with Ajax is as simple as taking a walk in the park. With new technology advancements, these tasks should become as simple as possible.
With this, we come to an end of this Upload FIles in AJAX article.
To get in-depth knowledge on jQuery along with its various applications, you can enroll here for live online training with 24/7 support and lifetime access.
Got a question for us? Mention them in the comments section of “Upload Files in AJAX” and we will get back to you.