


Enterprises and startups, both of them set their applications on widely structured web-based systems. Information present in these web-based systems is quite complex and needs extensive processing to be read, understood and analyzed. Well, to this, we need robotic process automation. With the help of UiPath Web Automation, we can automate various kinds of tasks such as form filling, screen scraping, data extraction website testing and so on.
The following topics will be covered in this article :
- What is Robotic Process Automation?
- What is UiPath?
- What is Web Automation?
- Usage of Web Automation
- Hands-On: Web Scraping of Google Contacts
- Hands-On: Extracting Data From a E-Commerce Website and storing in Email
So, let us get started!!
What is Robotic Process Automation?
The Process of automating the workflows with the help of robots/software to reduce the involvement of humans is said to be Robotic Process Automation.
Over here there are mainly three terms that you need to understand: Robotic, Process and Automation. Let me explain you each of these terms one by one.
- Robotic: Entities which mimic human actions are called Robots.
- Process: Sequence of steps which lead to meaningful activity. For example, the process of making tea or your favorite dish etc.
- Automation: Any process which is done by a robot without human intervention.
If we summarize all the terms together then, mimicking human actions to perform a sequence of steps that lead to meaningful activity, without any human intervention is known as Robotic Process Automation.
Now, to implement Robotic Process Automation, we need tools, and one such tool is, UiPath. So, next in this article on UiPath Web Automation, let us get a brief on UiPath.
What is UiPath?
UiPath is a Robotic Process Automation tool used mainly for Windows Desktop Automation. This tool offers a Community Edition, which is free for lifetime and works on the feature of Drag and Drop functionalities. With UiPath, you can perform various types of automation such as Excel Automation, Citrix Automation, Web Automation, PDF Automation and so on. Well, in this article we will focus on Web Automation. For details, You can even check RPA earning the key concepts to design RPA solutions using UiPath Community Edition with the RPA developer foundation.


Web Automation is a process of automation through which you can identify the web elements by their attributes and manipulate them accordingly. This kind of automation works with any website, and can also be remotely deployed on various machines in the network. UiPath provides a built-in recorder that can read and enact web-based activities with the help of an intuitive graphical workflow editor.
You may also go through the recording of UiPath Web Automation where our certified experts of Uipath RPA certification have explained the concepts in depth.
UiPath Web Automation | Automate Web Data Extraction – UiPath | Edureka

This video will help you know how to automate web using UiPath.
Future-Proof Your Career with Our Advanced Automation Testing Certification Courses.
Now, let us look into the top implementations of Web Automation in UiPath.
Usage of Web Automation


- Data Extraction: Humongous amount of data can be extracted and stored into files and databases from various websites.
- Recording: Actions performed on a website can be recorded to implement them further in the future.
- Website Testing: Your website functionalities and features can be tested according to the requirement of the user.
- Report Generation: A report can be generated by extracting all data and then analyzing it on various parameters.
- Application Transfer: Applications can be transferred from one domain to another, on the basis of use-requirement.
Web scraping can be used for various types of web page formats such as JSON, HTML. Now, that you what is web automation, let us see a practical approach on how to use UiPath to perform Web Automation.We will see two hands-on in this article. They are:
- Scraping data from Google Contacts
- Scraping data from an E-Commerce Website and storing in e-mail
Let us start with the first hands-on in this article on UiPath Web Automation.
Find out our Automation Testing Training in Top Cities/Countries
| India | Other Cities/Countries |
| Bangalore | UK |
| Hyderabad | USA |
| Pune | Canada |
| Chennai | Singapore |
Hands-On: Web Scraping of Google Contacts
Task
Extract data from Google Contacts and store it in a file.
Steps To Automate
Follow the below steps to achieve the task:
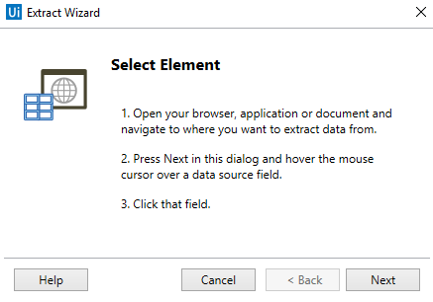
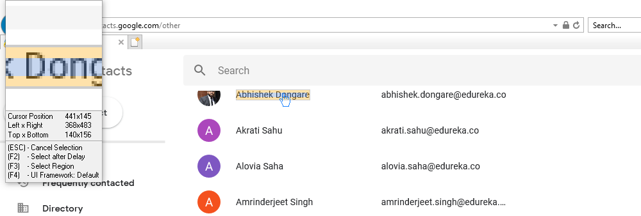
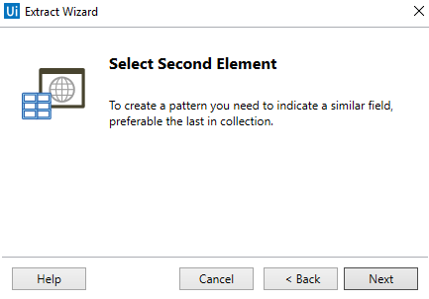
- Use the Data Scraping tool to extract data.
- Extract the correlated values accordingly.
- Store the data in a CSV file by using the Write CSV activity.
Solution
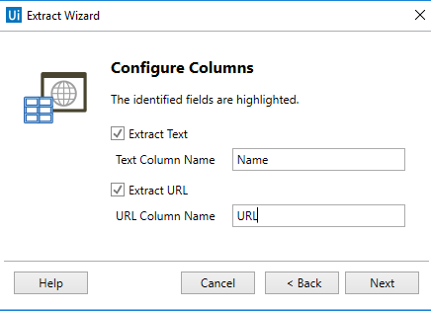
Step 1: Open the Google Contacts page to extract data.
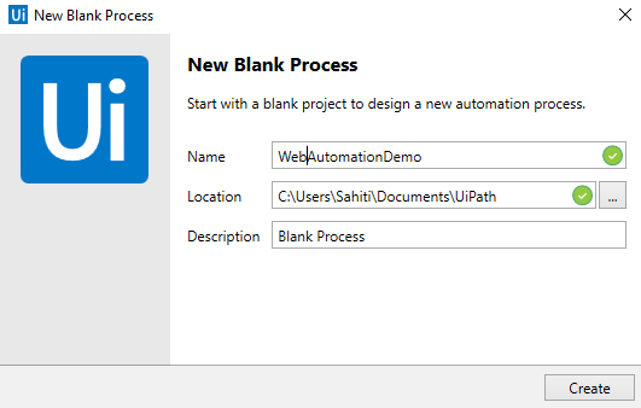
Step 2: Now, open UiPath Studio and create a Black Project.


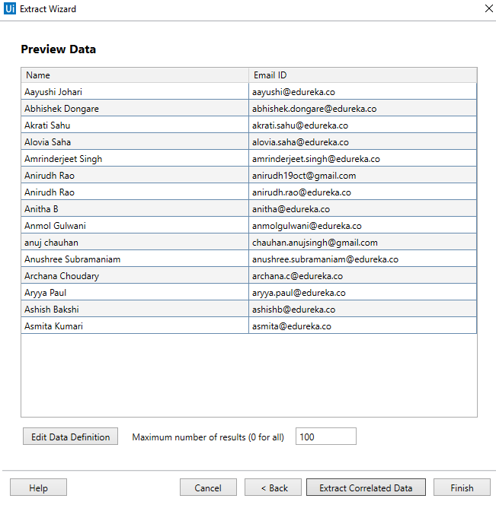

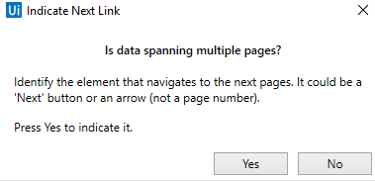
Step 6: Once you are done extracting all the required data, click on Finish. This action would open a dialog box which will ask you if you wish to span the data across multiple pages. Refer below.

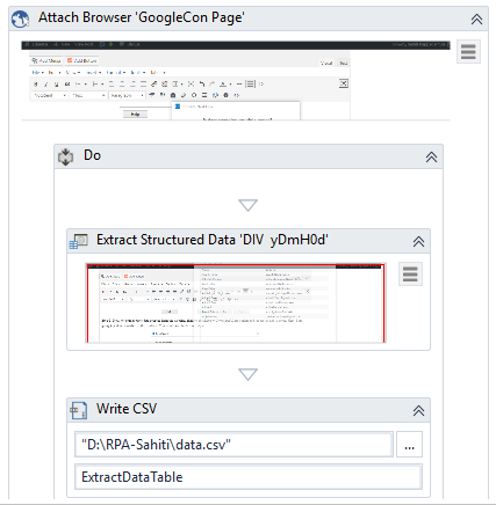
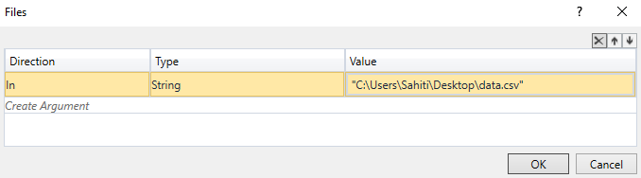
Step 8: Now to store all the extracted data into a .csv file, drag a Write CSV activity into the Do section of the Data Scraping.
Step 9: In the File Path section of this activity, mention the path of the .csv file where you want to store the extracted data and then mention the ExtractDataTable variable in the DataTable section. Refer below.
Step 10: Execute this sequence by clicking on the Run button. You would see that the data is getting stored in the .csv file.
So, folks. that’s how you can extract data from a website. Now, that you know how to scrape data from a website, let us move on to our second hands-on in this article on UiPath Web Automation.
Hands-On: Extracting Data From an E-Commerce Website
Task
In this hands-on, my task is to design automation which reads the subject line of an email and performs a custom search. So, for example, if my subject line says LG TV then, the designed automation must search for LG TVs’ in Flipkart and extract the name, URL, and the price.
Steps To Automate
Follow the below steps to achieve the task:
- Drag the Get IMAP Mail messages activity and configure the activity.
- Drag the For Each activity to perform a set of actions.
- Drag the Open Browser activity and mention the URL
- Use the Data Scraping tool and extract the data.
- Extract the correlated values accordingly.
- Drag the Write CSV activity and mention the path of file.
- Use the Send SMTP Mail Messages activity to send an email.
Solution
Step 1: Create a Blank project
Step 2: Our first task is to get an email with a subject line. Here I want the subject line to be apple phones. So, to do that, drag the Get IMAP Mail Messages activity.
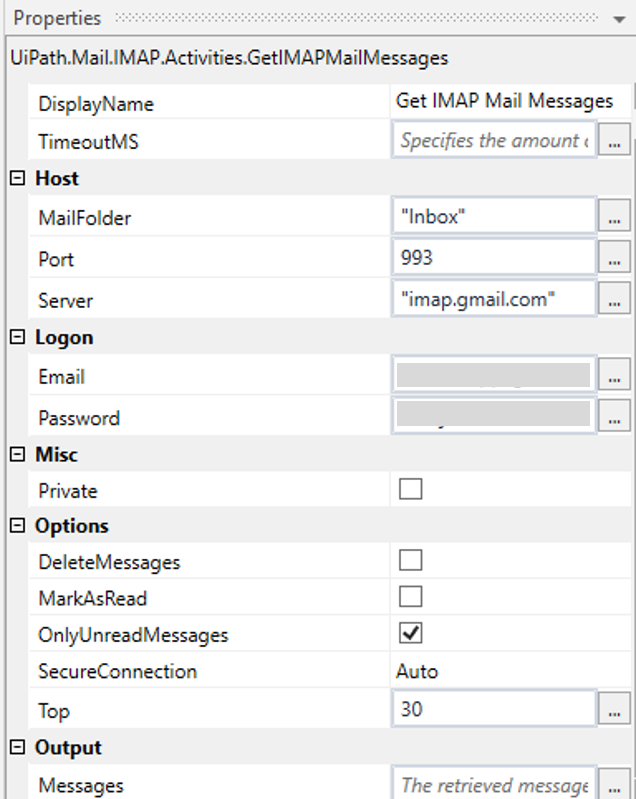
Step 2.1: Go to the Properties Pane of this activity, and mention the following:
- Port Number: 993
- Server Name: “imap.gmail.com”
- Email: Mention your email ID
- Password: Mention your password
- Top: 1 (This would read only the 1st email in your Inbox.)
- Check the box of Read only Unread Messages. (This would read only the Unread Messages.)
Refer below.

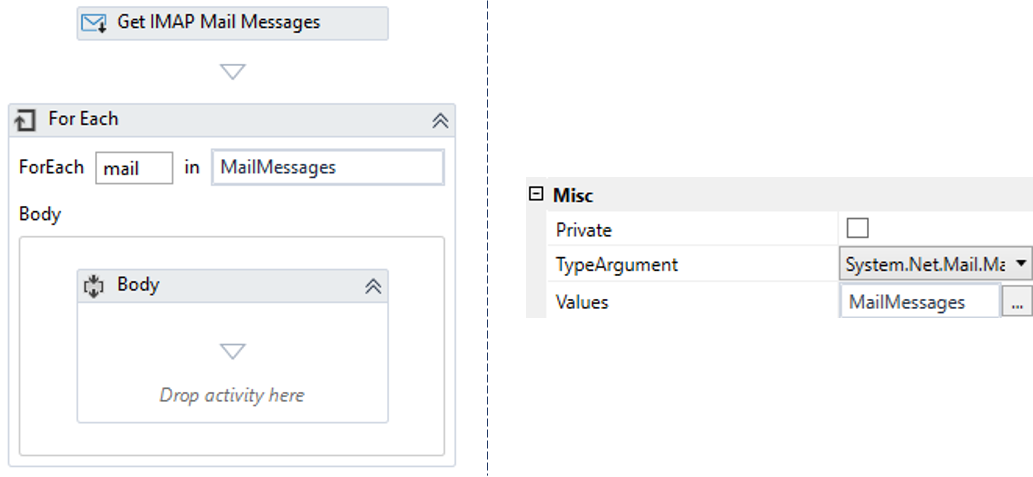
Step 2.3: Now, in the <T>, you have to mention the Mail Message. To do that, Browse for Types in the variable section and search for System.Net.Mail. Under this section, you have to choose the MailMessage. Refer below.
![]()

Step 3: Now, to enable the information to be read for ‘n’ number of emails, you have to drag the For Each activity, below the Get IMAP Mail Messages activity.
Step 3.1: Next, in the item section mention mail, and in the expression section, mention the MailMessages variable. This will enable you to perform a set of actions mentioned in the Body section for each and every mail. Also, in the Properties section of this activity, mention the Type Argument to be System.Net.MailMessage. Refer below.

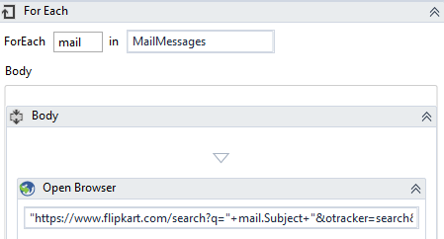
Step 5: Now, since our task is to read the subject line and then search for the items mention in the subject line, we have to modify the URL mentioned in the Open Browser activity.
So, if your URL was as follows:
https://www.flipkart.com/searchq=fossil%20watches&otracker=search&otracker1=search&marketplace=FLIPKART&as-show=on&as=off, then you have change the item under the search parameter and include +mail.Subject+ in quotes. So, your new URL should be something like below.
https://www.flipkart.com/search?q=”+mail.Subject+”&otracker=search&otracker1=search&marketplace=FLIPKART&as-show=on&as=off
Refer below.

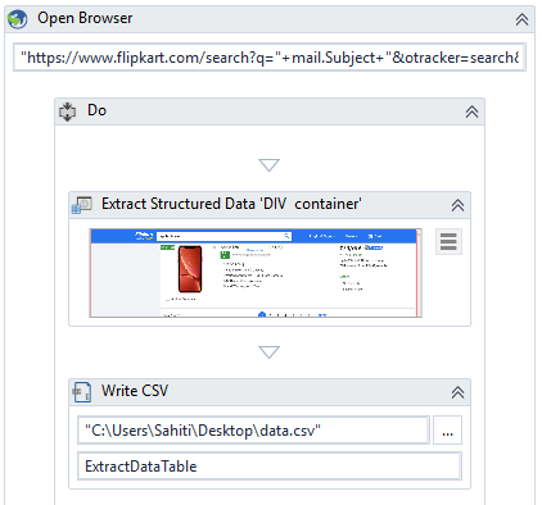
Now, our next task is to perform data scraping.
Step 6: To perform Data Scraping, you can refer to our previous hands-on and perform the Steps from 1-7.
Step 7: Now, once you have scraped the data and have been redirected to the UiPath Dashboard, you have to remove the Attach Browser activity and just keep the ExtractDataTable section in the Body section of For Each activity.
Step 8: After that, store all the extracted data into a .csv file, drag a Write CSV activity into the Do section of the For Each Activity.
Step 9: Next, in the File Path section of this activity, mention the path of the .csv file where you want to store the extracted data and then mention the ExtractDataTable variable in the DataTable section. Refer below.

Step 10.1: In this activity you have to mention the following:
- To email address: “abc@gmail.com”
- Subject: “attachment”
- Body: “PFA”
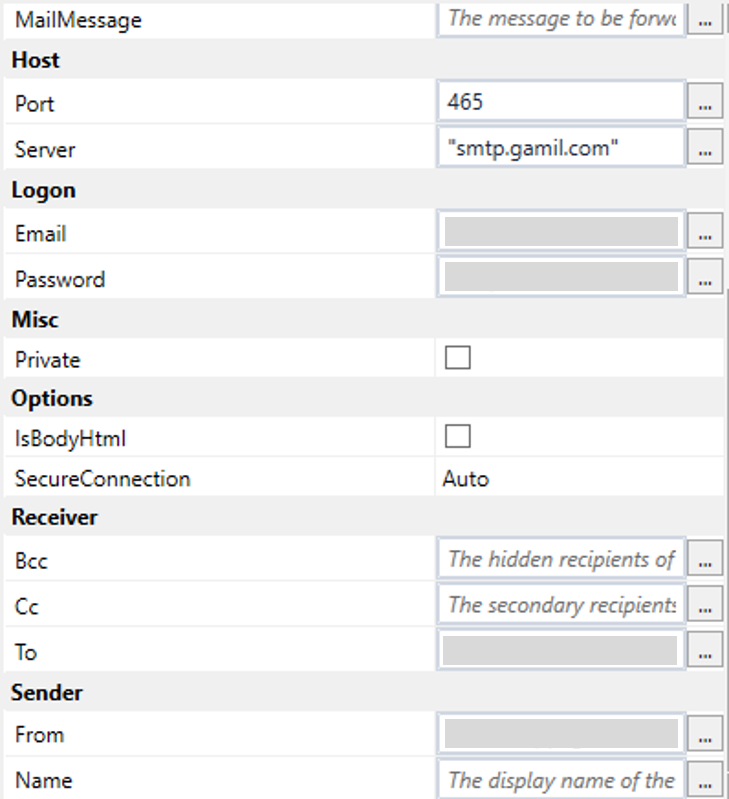
This step would design the task to send an email containing the scraped data, to the mentioned To email address with the subject line attachment and the Body be PFA. Refer below.


- Port Number -> 465
- Server Name: “smtp.gmail.com”
- Email: Mention the FROM email address
- Password: Mention the Password of FROM email address
- From: Mention the FROM email address

Step 11: Now, compose a mail to yourself with the subject line apple%20phones (%20 is used to identify space in UiPath). Once you have received the mail, go back to the UiPath Dashboard and click on Run to execute the automation. You would see a mail with an attachment of the scraped data. Refer below.
![]()

Got a question for us? Please mention it in the comments section of ”UiPath Web Automation” and I will get back to you.