


The following topics are covered in this article:
Introduction To RPA
To understand RPA, you have to first understand three terms: Robotic, Process and Automation. Let me explain you each of these terms one by one.
- Robotic: Entities which mimic human actions are called Robots.
- Process: Sequence of steps which lead to a meaningful activity.
- Automation: Any process which is done by a robot without human intervention.
Now, if we summarize all the terms together then, mimicking human actions to perform a sequence of steps that will lead to meaningful activity, without any human intervention is known as Robotic Process Automation.
RPA Tools
UiPath Studio
UiPath Studio is one of the products offered by UiPath. It is a dashboard, where you can create your automation workflow with the help of activities and execute the designed automation.
The following are the features of UiPath Studio:
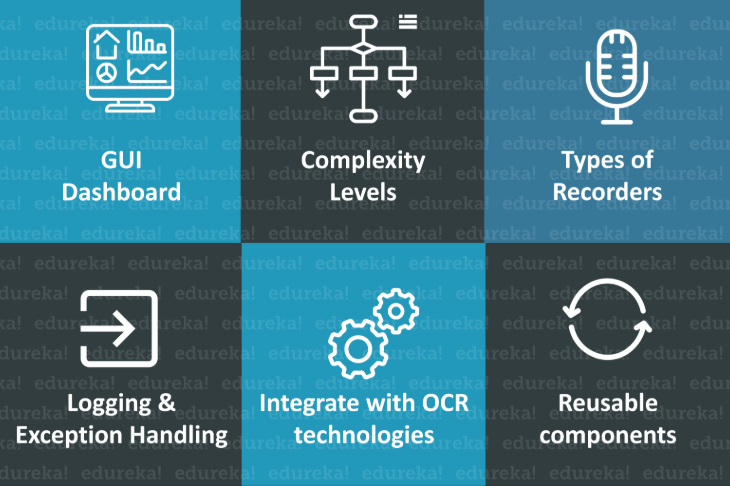

- GUI Dashboard – Offers a GUI dashboard which consists of pre-defined activities to build automation workflows.
- Complexity Levels – Allows you to create projects based on complexity levels such as Sequence, Flowchart and State Machine.
- Types of Recorders – Offers various types of recorders to record actions on multiple platforms such as Basic, Desktop, Web, Image, and Native Citrix.
- Logging & Exception Handling – Allows you to perform debugging and exception handling If you wish to learn how to use these options you can refer to my article on Error Handling.
- Integrate with OCR technologies – UiPath Studio can integrate with various OCR technologies to perform screen scraping.
- Reusable Components – With the UiPath Studio, you can create reusable components to publish them together as Libraries.
Introduction To UiPath Studio | UiPath Components Explained | Edureka

This Edureka session on UiPath Studio will give you an overview of UiPath Studio and its components.
Next in this article, I will show you the installation steps of UiPath Studio.
Install UiPath Studio
Before you go forward with the installation of UiPath on your system, make sure you have at least 8 GB of RAM and have Windows 7 or higher versions. Once you have the basic requirements, choose the edition you wish to install. UiPath offers various editions such as Community Cloud, Studio, Enterprise Cloud, Enterprise Server. All these editions differ by their functionalities and features.
So, once you choose the edition, you can refer to the steps mention in this article for the installation of UiPath.
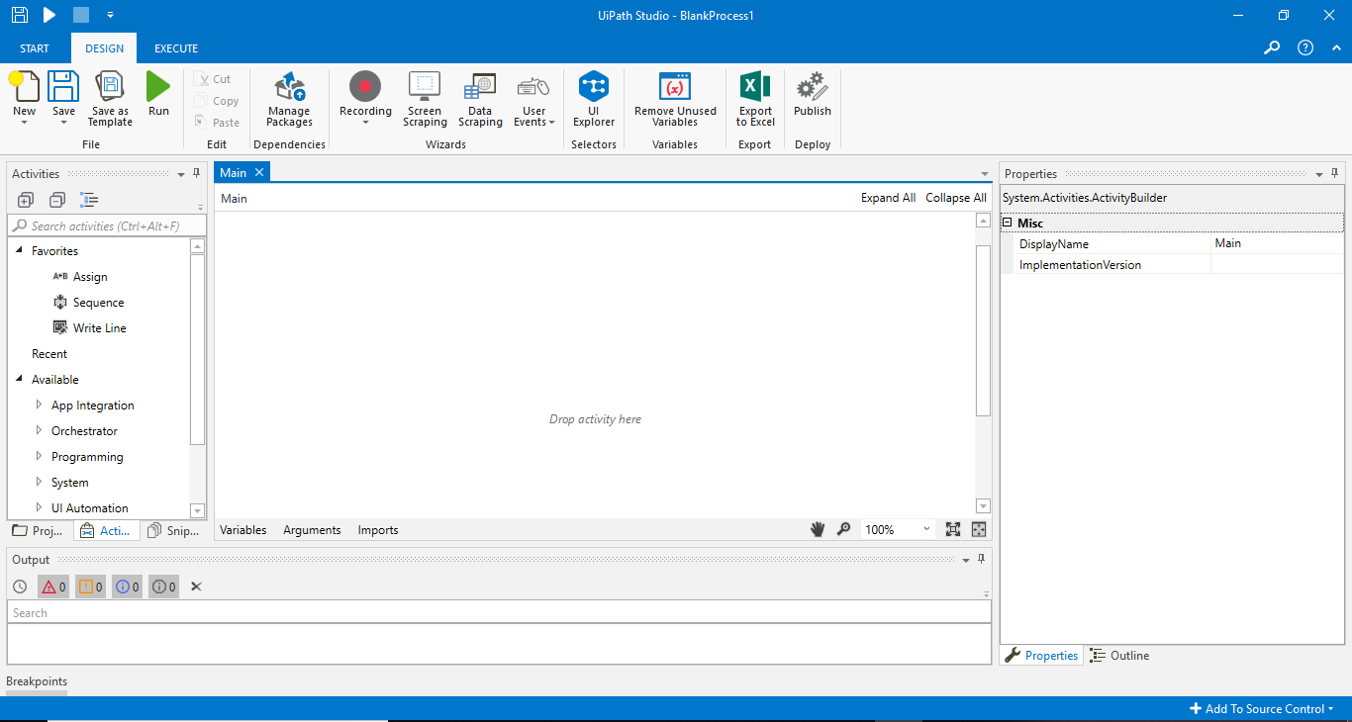
After you install UiPath, this is how UiPath Studio looks:


Projects in UiPath Studio
There are mainly 7 types of Projects in UiPath Studio. They are:
Process

Library
The library is used to create reusable components and publish them together as a Library. Apart from this, Libraries can be added as dependencies to automation processes.

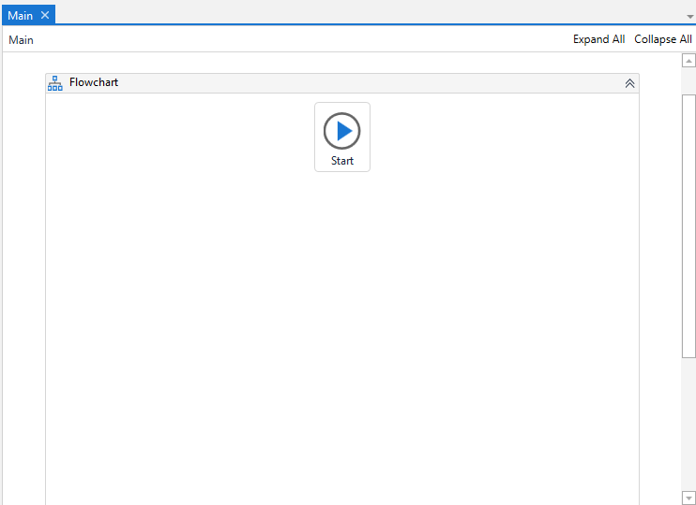
Orchestration Process
The Orchestration Process template is used to implement a process through long transactions and service orchestration. Below is the screenshot of an Orchestration process, which just has a start node.

Background Process
This type of template is used to create processes that do not require user interactions and can run as a background process. Multiple background processes can run simultaneously on the same robot in UiPath. Refer below.

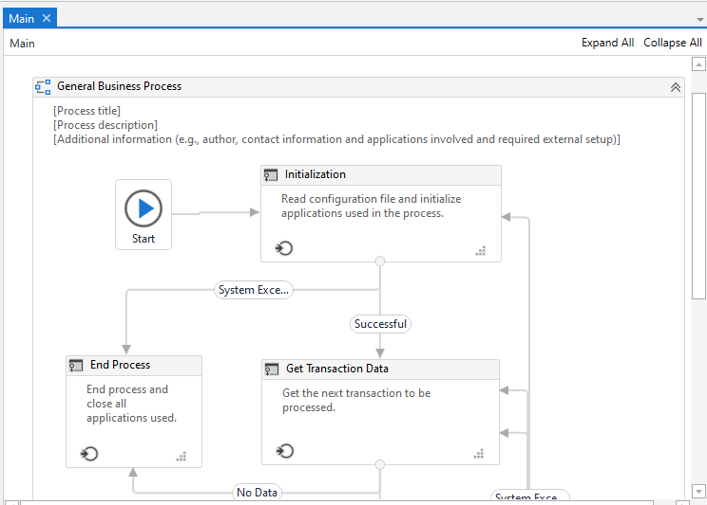
Robotic Enterprise Framework
The Robotic Enterprise Framework is used to create a business process suitable for large scale deployments. It comes with pre-defined states which you can use to create a business process. Refer below.

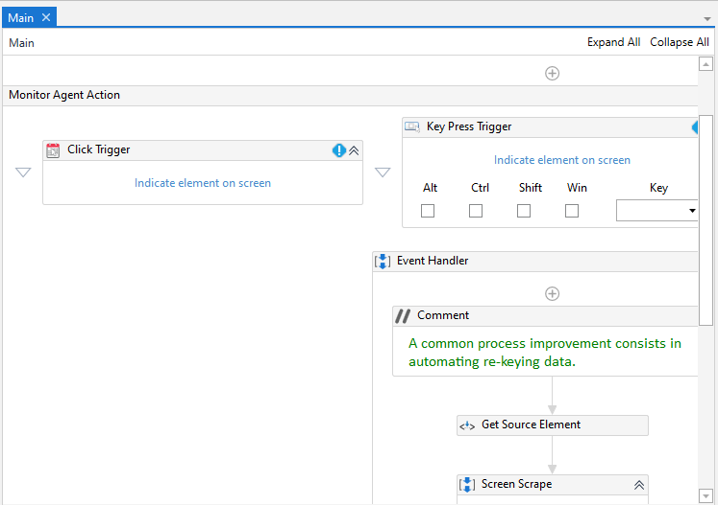
Trigger Based Attended Automation
This type of project is used to trigger automation in response to a mouse or keyboard user events.

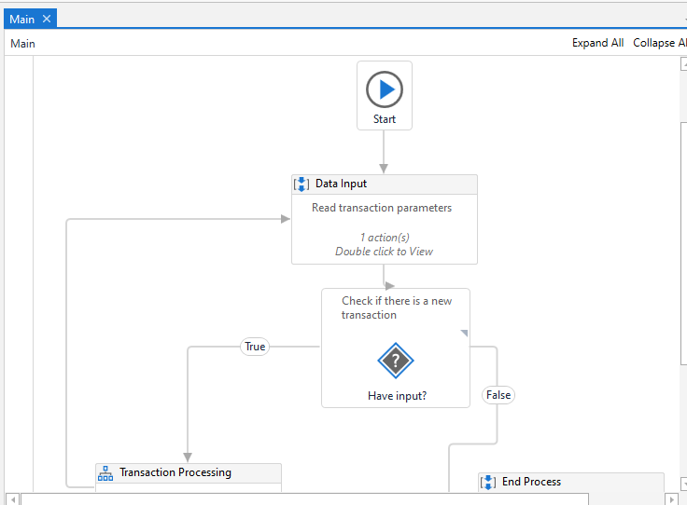
Transactional Process
This template is used to model the automation workflow as a flowchart. Refer below for a snapshot of the transactional process.

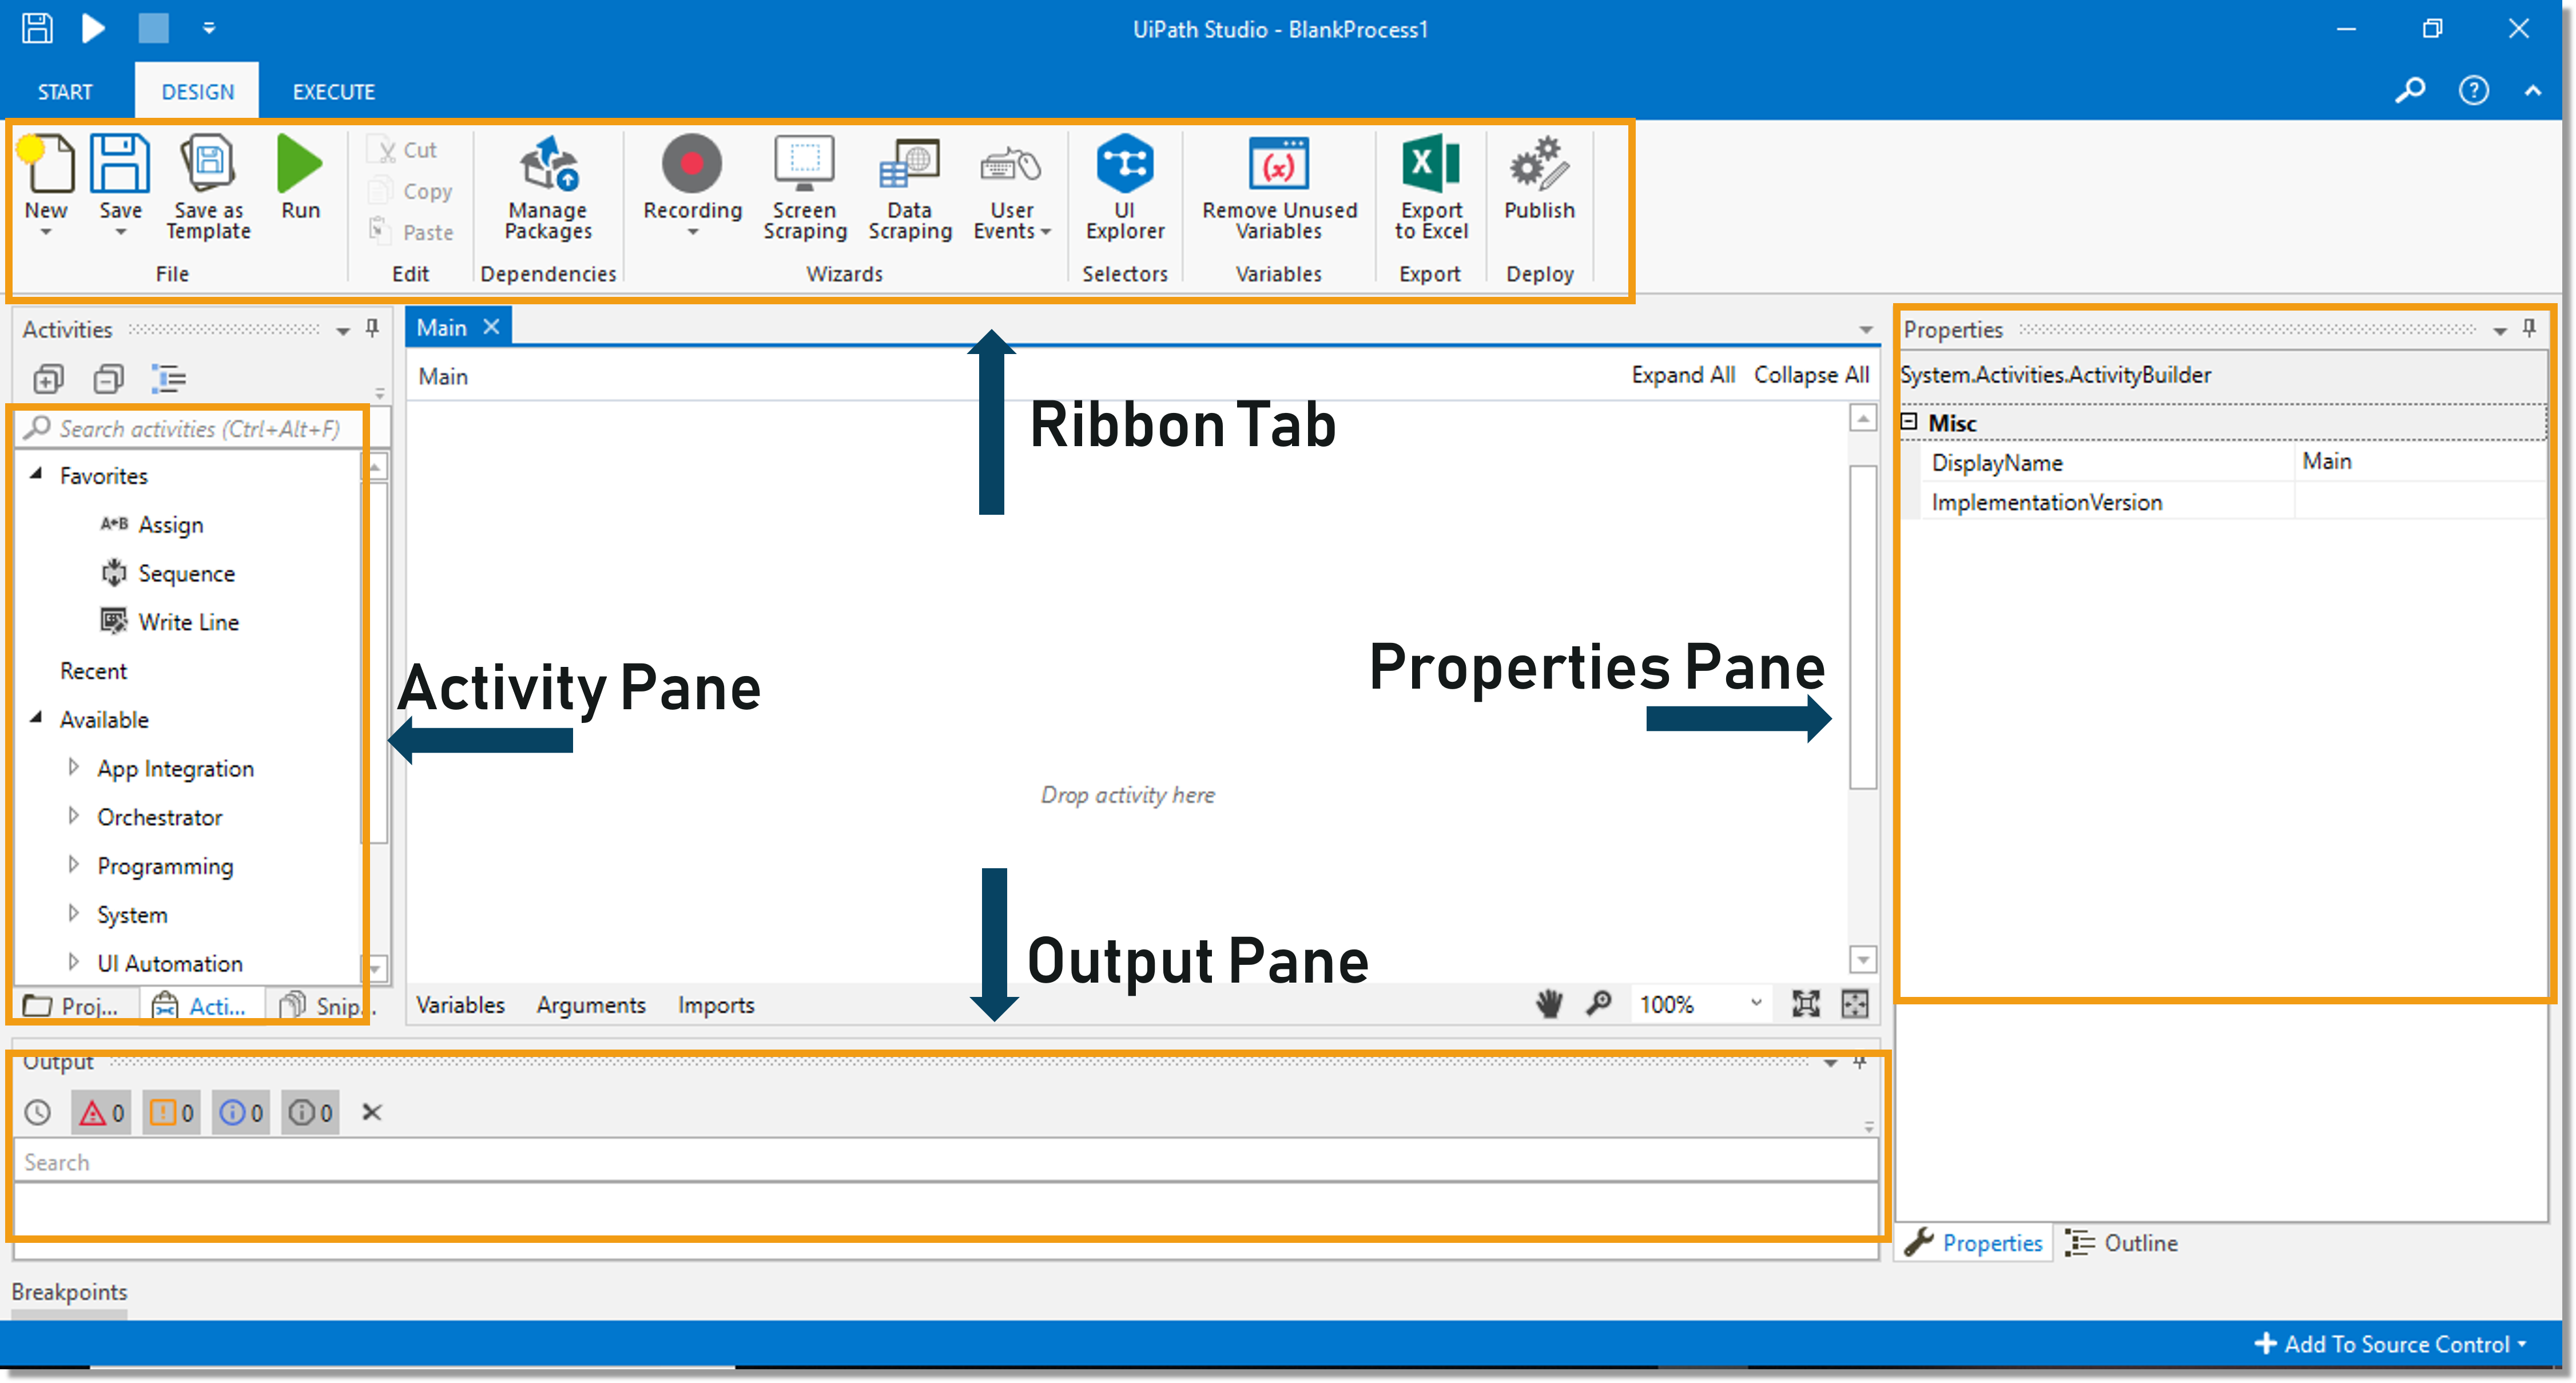

Ribbon Tab
The Ribbon Tab consists of mainly three tabs (Start, Design and Execute) and each of these has various options to perform different tasks. So, let’s discuss each one of them one by one.
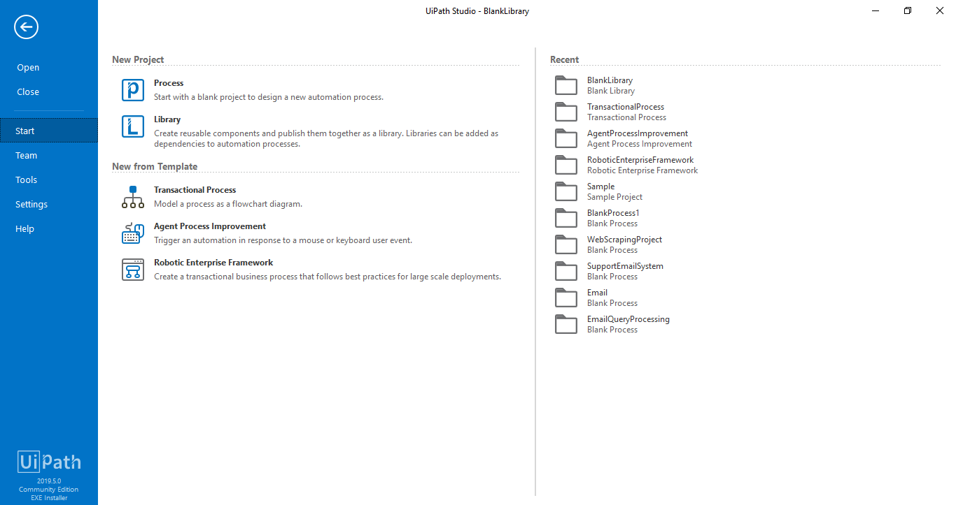
The Start section of Ribbon Tab
When you click on the Start option on the Ribbon tab, you will be redirected to the screen which has options of various projects and the recent projects. Refer below.

The Design section of Ribbon Tab
The Design section of the Ribbon tab provides you with the below options:


- New: This option is used to create either a new Sequence, Flowchart or a State machine.
- Save: This option is used to save the existing file or automation workflow.
- Save as Template: You can use this option to save the current file or the automation workflow as a Template.
- Run: The Run option is used to execute the designed automation workflow.
- Manage Packages: This section is used to view the project dependencies and also install the required packages for your project.
- Recording: This option allows users to record UI mouse movements and keyboard activities to generate automation scripts.
- Screen Scraping: The Screen Scraping wizard is used to scrape data from an application of a specific screen.
- Data Scraping: The Data Scraping wizard is used to scrape data and store it in an Excel file.
- User Events: You can use this option to capture mouse or keyboard events.
- Remove Unused Variables: With the help of this option, you can remove all the unused variables from the workflow
- Export To Excel: This option is used to export the automation workflow to an excel file.
- Publish: You can use this option to publish the designed automation/project to the Orchestrator server. With the help of this, you can use the project to automate humongous amounts of the front office and back office processes.
Now, let us move forward with this article, and look into the next tab of Ribbon i.e. the Execute Tab.
The Execute section of Ribbon Tab
The Execute tab provides you with the following options:

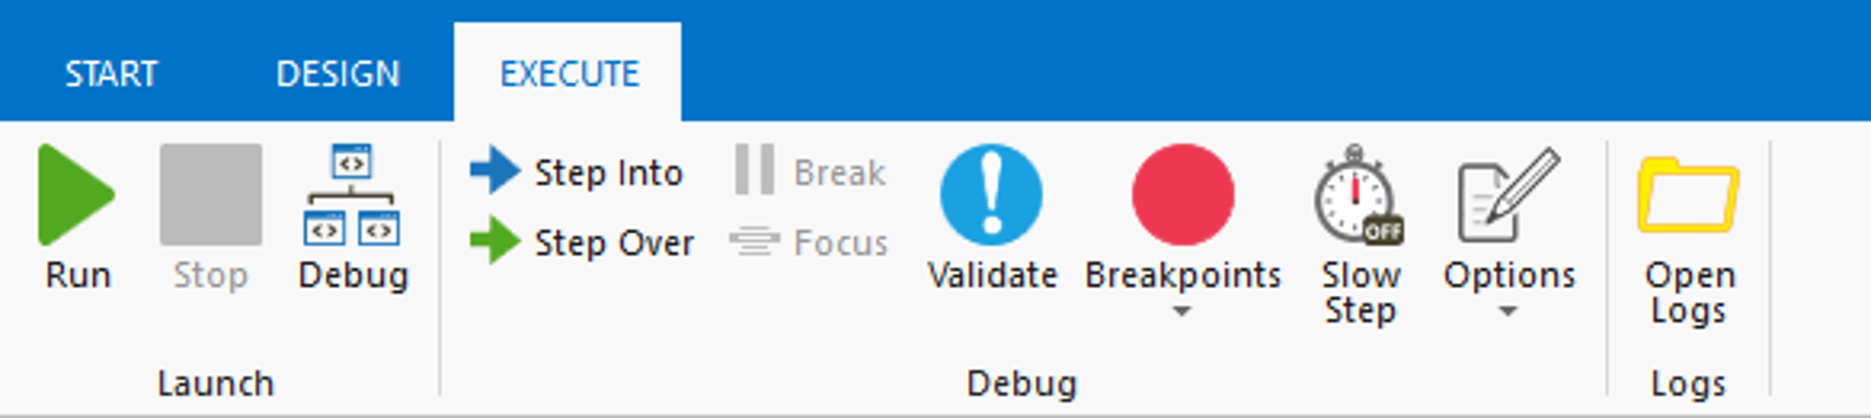
- Run: The Run option is used to execute the designed automation workflow.
- Stop: The Stop option is used to stop the execution of your project.
- Debug: This option is used to start debugging the project to see the execution of every activity.
- Step Into & Step Over: These options are used to check the step by step execution of the complete automation workflow.
- Validate: The Validate option is used to validate your project.
- Breakpoints: The Breakpoints option is used to define breakpoints while debugging the project.
- Slow Step: This option is used to reduce the speed of execution
- Options: This option offers various highlighting options to highlight activities based on your requirement.
- Open Logs: The Open Logs option is used to various highlighting options
So, this was about the Ribbon Tab. Now, let us move forward and look into the next pane i.e. Activity Pane.
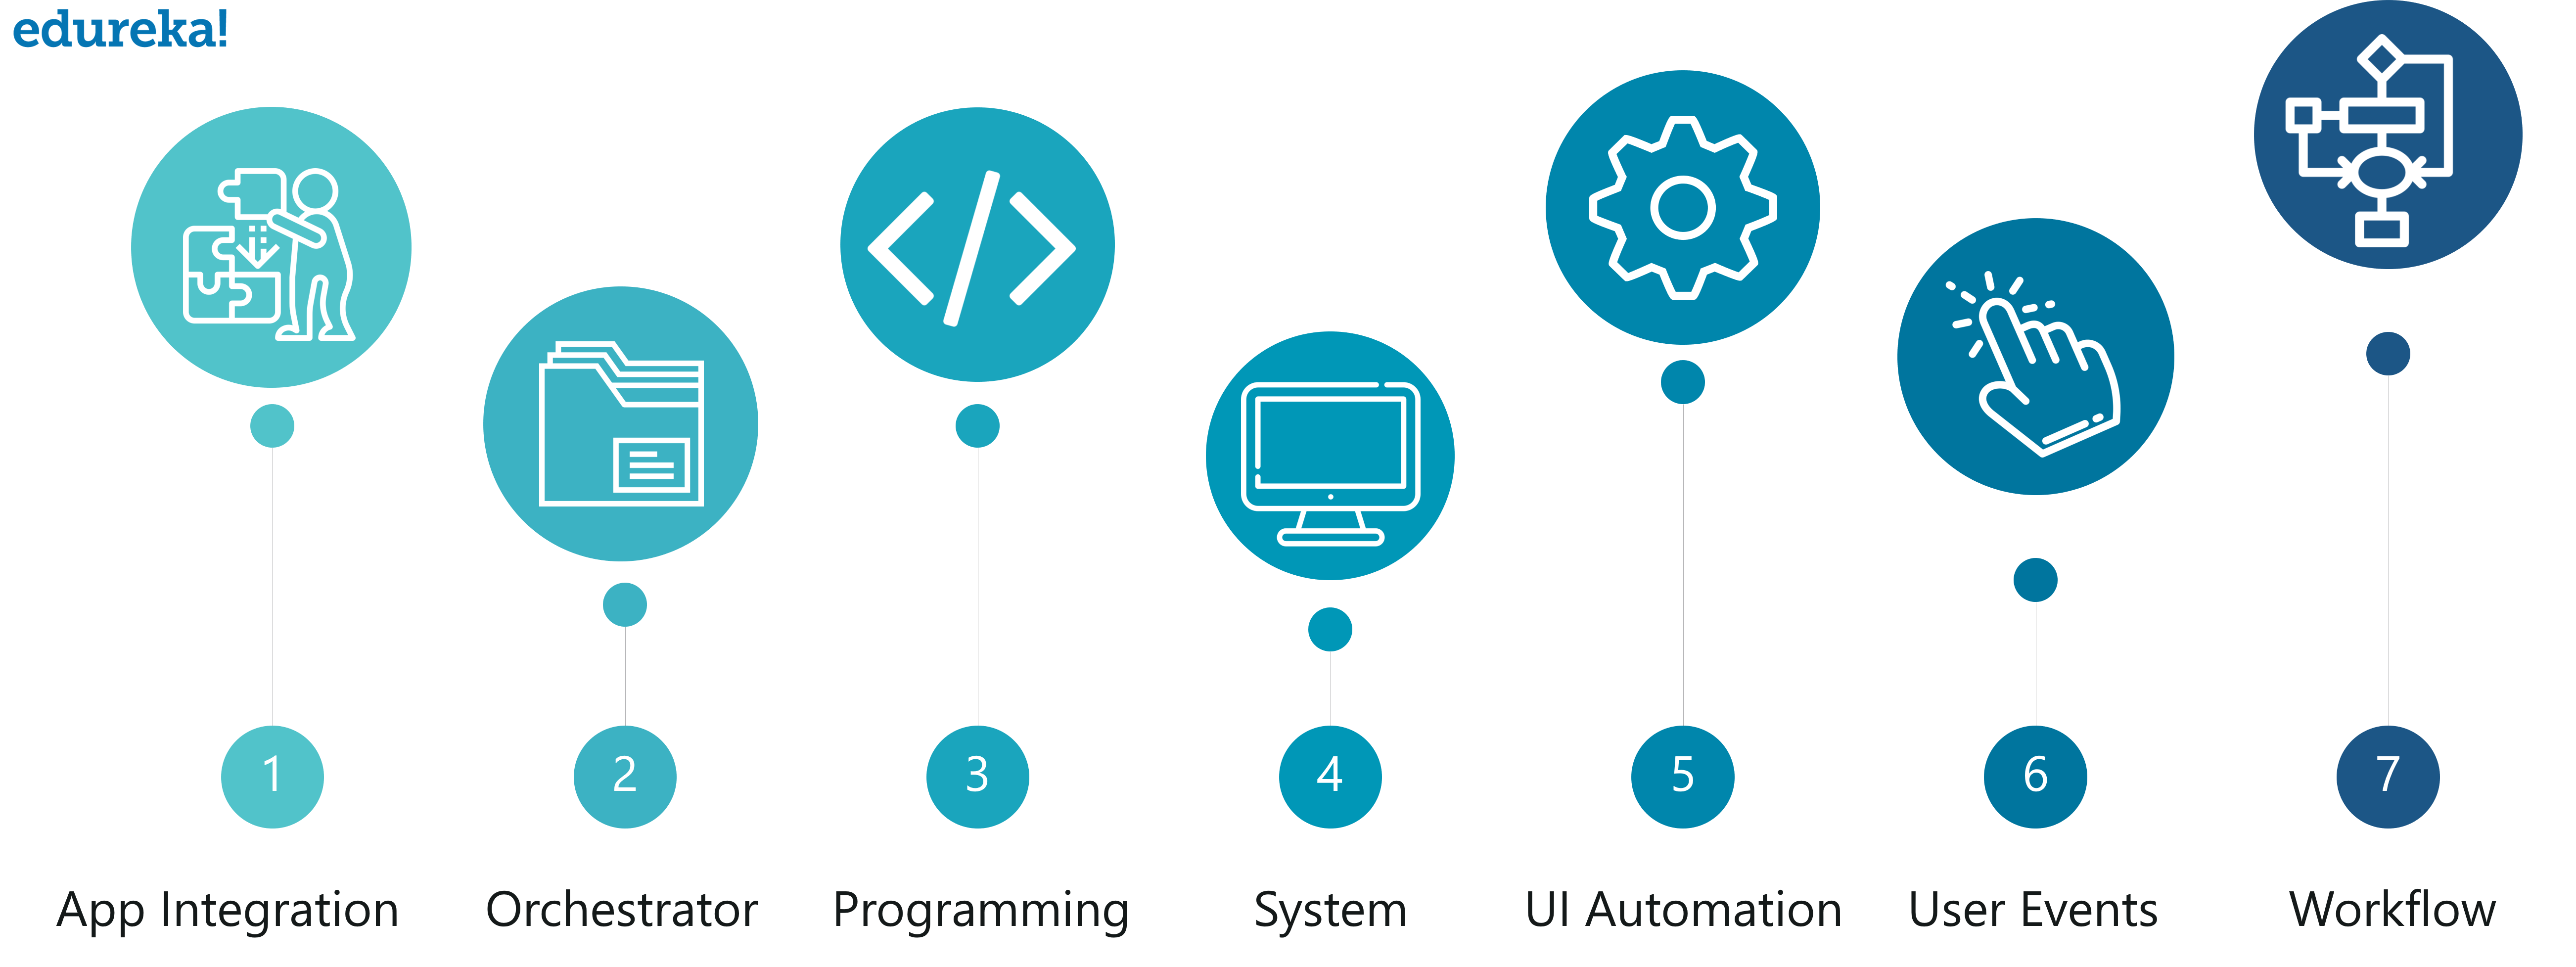
Activity Pane
The Activity Pane consists of various activities which you can drag and drop into the workspace. The activities offered by UiPath are segregated as you can refer below.

Properties Pane
Output Pane
As the name suggests, output pane is used to check the output of the running automation workflow.
Now, that I told you the different components of UiPath Studio, let us implement these concepts in the UiPath.
Hands-On
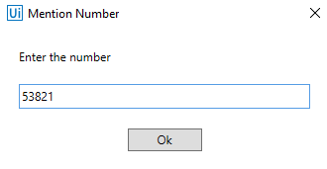
Problem Statement: Let’s create a simple project to find out whether a number is even or odd.
Solution:
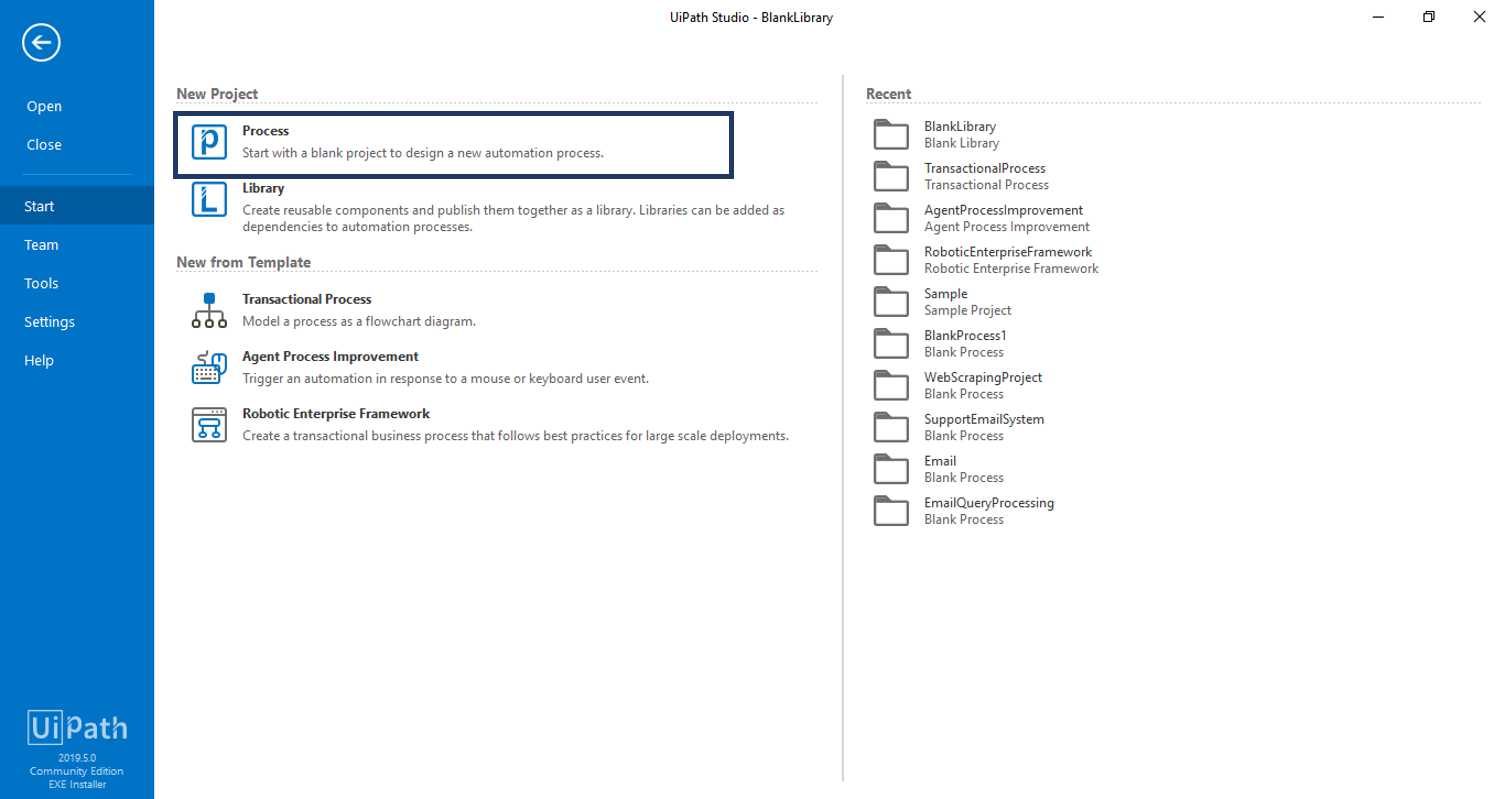
Step 1: Open your UiPath Studio and click on the “Process” project.

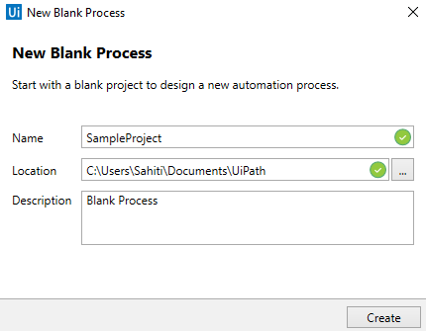
Step 2: Mention the name, path and description of the project and click on Create.

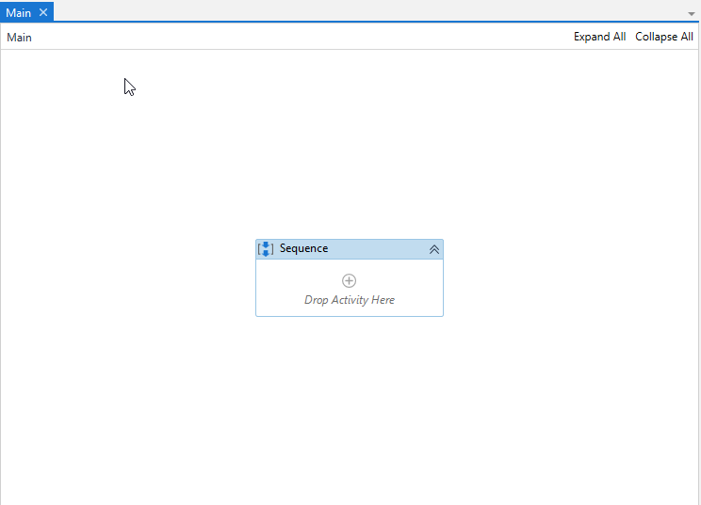
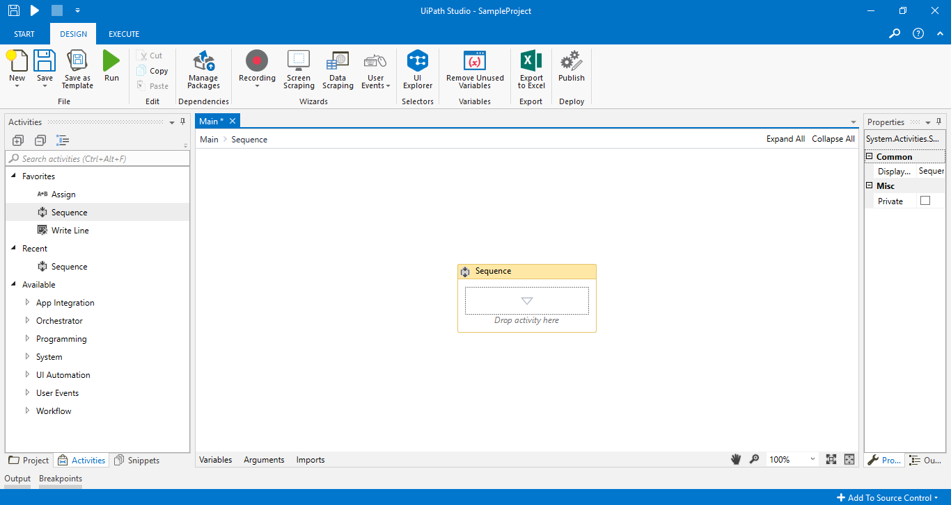
Step 3: Once you have created the project, drag and drop a Sequence in your workspace. Refer below.

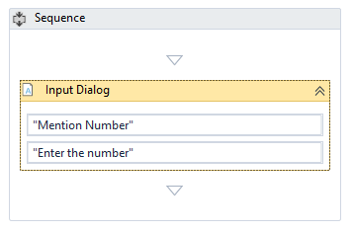
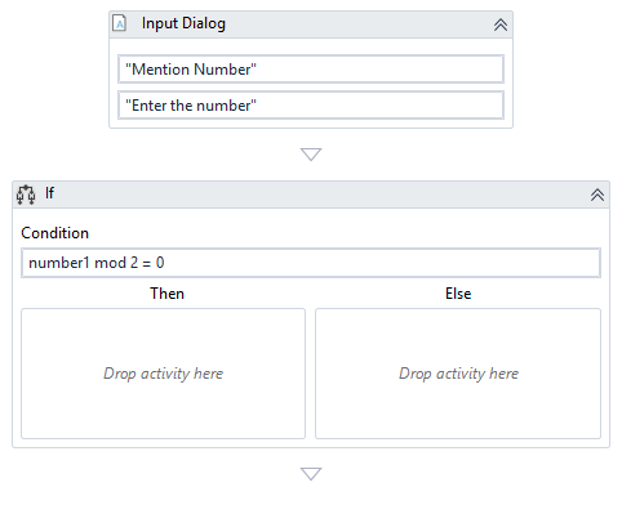
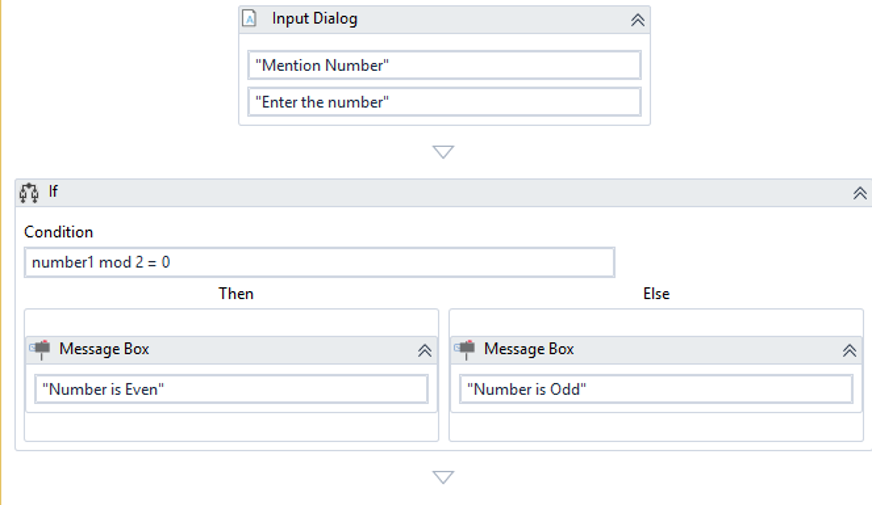
Step 4: Now, drag and drop an Input Dialog activity into the sequence. In the Title and the Label section of this activity mention the text as you can see below:
- Title: “Mention Number”
- Label: “Enter the number”

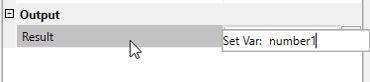
Step 5: Now, go to the Properties Pane of this activity and mention a variable in the Output section. To mention a variable, press on CTRL + K and mention the variable name. After that click on Enter. Here I will mention as number1.

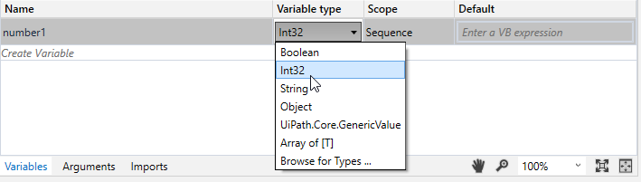
Step 6: Now, go to the Variable Manager and mention the datatype of the variable to be Int32. Refer below.

Step 7: Next, you have to drag an If loop to mention the condition. So, drag and drop the If activity into your workspace and mention the condition: number1 mod 2 = 0 in the condition section of the activity. Refer below.

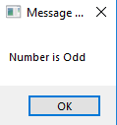
Step 8: Now, in the Then section and Else section of the If activity drag and drop a Message Box activity to display whether the number is even or odd. In the Message Box present in the Then section, mention the Text “Number is Even”. Similarly, in the Message Box present in the Else section, mention the Text “Number is Odd”. Refer below.

Step 9: Now, save your task and execute it by clicking on the Run button.
Step 10: Once, the task starts executing, you will see an Input Dialog in which you have to enter and then click on Ok. Refer below.

Step 11: Since we entered an odd number you will see the output as below.

Got a question for us? Please mention it in the comments section of this UiPath Studio article and we will get back to you.