What do you mean by Automation? How to automate tasks using RPA Tools? What are the various UiPath Automation Examples?
I believe you must have wondered what could be the answers to these questions. Well, in this article on UiPath Automation Examples, I am going to answer all your questions on how Robotic Process Automation helps us to automate tedious tasks with the help of RPA Tools such as UiPath, Blue Prism and Automation Anywhere. Apart from this, if you wish to master yourself in RPA and become an RPA Certified expert, then I believe this article will help you learn various kinds of automation such as PDF, Excel, Email, Web and so on.
The following topics will be covered in this article:
So, let us get started.
What is Automation?
Consider a scenario where a person’s sole job is to collect data from multiple sources and then aggregate them in an Excel file. Refer to the below image. Now, do you think this person should do this job on a daily basis or instead automate this task to use his talents in a better way? Obviously, the second option sounds better.
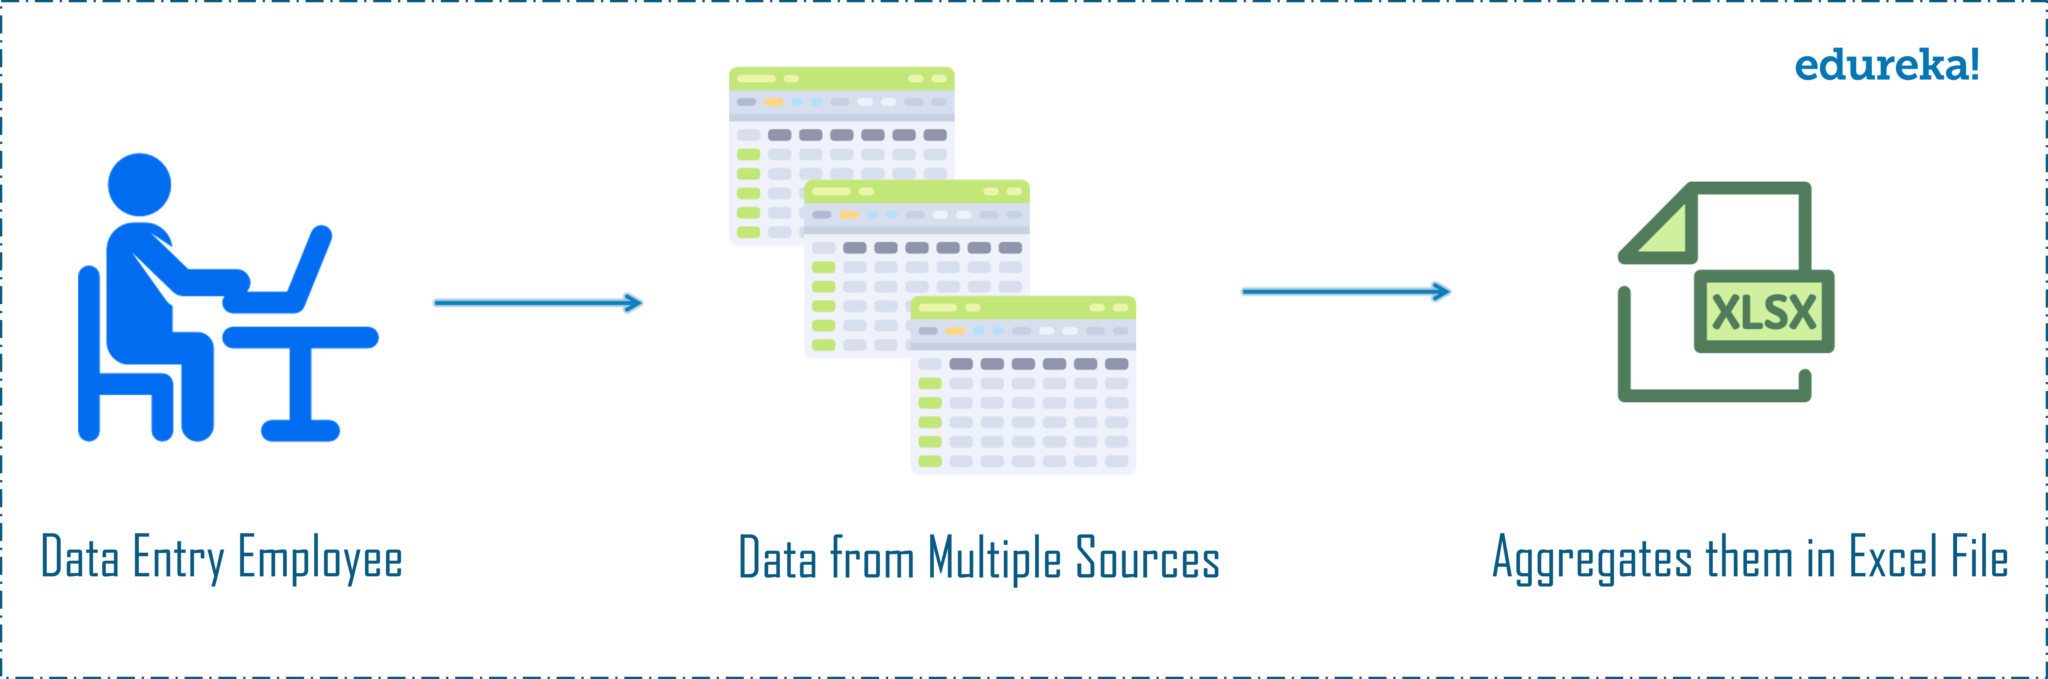 So, a person can just automate this task of collecting data from various sources and aggregating them into a single file by using Robotic Process Automation.
If I have to define Automation for you, then Automation is the technique of reducing human effort and improve the performance simultaneously.
To automate tasks, we need RPA Tools to do so, and one of such tools is UiPath. So, next in this article on UiPath Automation Examples, let me tell you in short, what UiPath is.
What is UiPath?
![]()
UiPath is a Robotic Process Automation tool which offers desktop automation with the help of drag and drop functionality of activities. This tool comes with a Community Edition that is free for lifetime. So, if you are new to automation, then you can start learning to automate tasks and eliminate human intervention by using this tool.
If you want a video lecture on the top automation examples in UiPath, you can refer to the following video:
UiPath Automation Examples | Top 5 Automation Examples in UiPath
This video covers the different types of automation you can perform with UiPath.
Now, let us get into the main topic and start with the UiPath Automation Examples.
UiPath Automation Examples
In this section of the article, we will see different types of automation one by one. The following are the automation’s that you would see:
- Moving Files from Source Folder to Destination Folder
- Web Automation
- Email Automation
- Excel Automation
- PDF Automation
So, folks let us get started with this article on UiPath Automation Examples.
Moving Files from Source Folder to Destination Folder
Task
The aim is to automate the process of moving files from the source folder to the destination folder.
Steps To Automate
Follow the below steps to achieve the aim:
- Assign the source directory to a variable.
- Count the number of files to be moved by using a Counter variable.
- Mention the Destination path in the Move file activity.
- For each item in the source path, use the counter variable to move the files to the destination path.
Solution
Step 1: Create the variables NumberOfFiles, sourcepath and Counter. Now, assign the default value of sourcepath variable to the Path of Source Directory. Refer below.
 Step 2: Drag the Assign activity and assign the To section to NumberOfFiles and the value section to directory.GetFiles(sourcepath) function. This would take all the files from the source path.
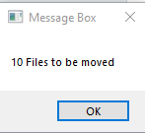
Step 3: Output the number of files to be moved in the message box. To do that, drag the Message Box activity and mention NumberOfFiles.Count.ToString+” Files to be Moved”. This will count the number of files in the source folder and will Print the output as x Files to be moved. Refer below.
 Step 4: Create a Counter variable and then drag an assign activity. Now, in the assign activity, assign the To section to the Counter variable and the value section to 0. This will assign the count to 0. Your sequence should look like below till now.
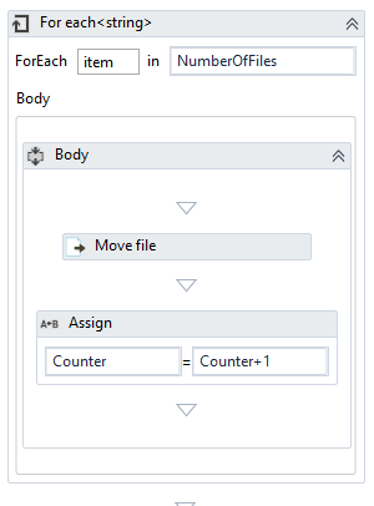
 Step 5: Now, drag the For Each activity and mention for each item in NumberOfFiles, you have to move the file to the Destination path. To do so, follow the below steps:
Step 5.1: In the Body section of this activity, drag the Move File activity, and mention the Destination path in the Destination section of Properties Pane.
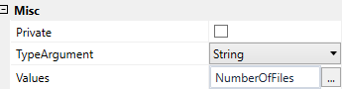
Step 5.2: Go to the properties section of For Each activity and in the Type Argument mention String. Refer to the snapshot below.
 Step 5.3: To move all the files from the source folder to the destination folder, drag the assign activity and assign the To value to Counter variable and the value section to Counter + 1. Refer below.
Step 6: Execute this sequence by clicking on the Run button. You would see that all the files from the source folder would be moved to the destination folder.
Want to master automation? Enroll for the Automation Testing Course and become certified.
Find out our Automation Testing Training in Top Cities/Countries
| India | Other Cities/Countries |
| Bangalore | UK |
| Hyderabad | USA |
| Pune | Canada |
| Chennai | Singapore |
Now, in this article on UiPath Automation Examples let us move onto the next automation i.e. the Web Automation.
Web Automation
Task
The aim is to scrape data from a website and store it in a .csv File.
Steps To Automate
Follow the below steps to achieve the aim:
- Use the Data Scraping tool and record the data that you want to extract.
- Extract the correlated values accordingly.
- Use the Write CSV activity and mention the path of the .csv file
Solution
Step 1: Choose the website from where you want to extract data.
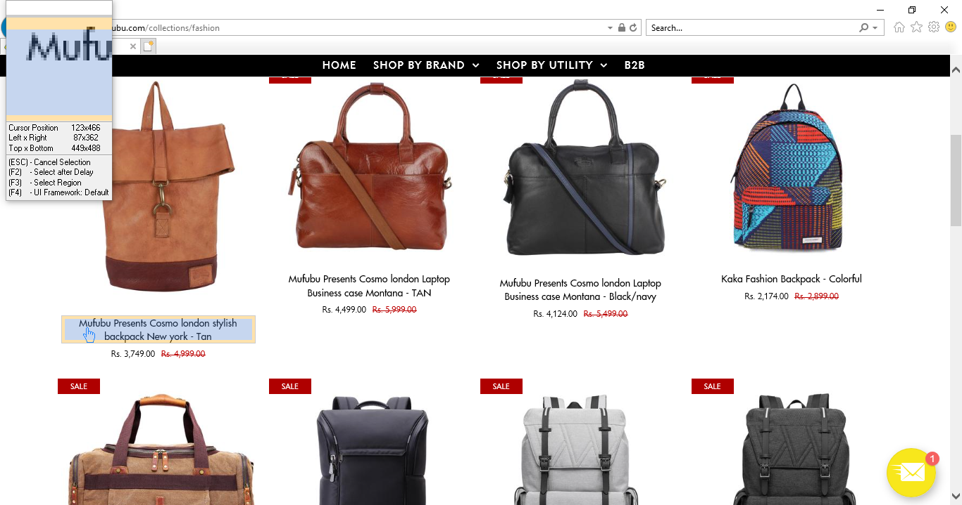
Step 2: Choose the Data Scraping option from the Ribbon and select the element you want to choose. Press Next in the below Dialog Box.

Step 2.1: Hover the mouse over a data source field and then click on the data source field.
 Step 3: After that you will see another Dialog box which will ask you to choose the second element to create a pattern.

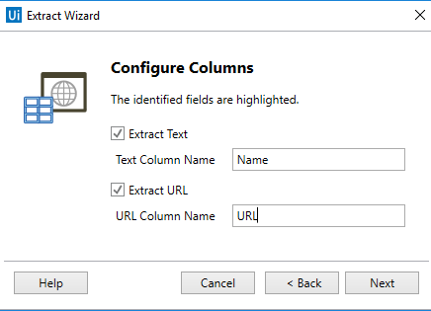
Step 4: Once you choose the second element to create a pattern, you will get an option to Configure Columns. In the Dialog Box, that opens up, you can rename the Column name and extract URL also. After that click on Next. Refer Below.
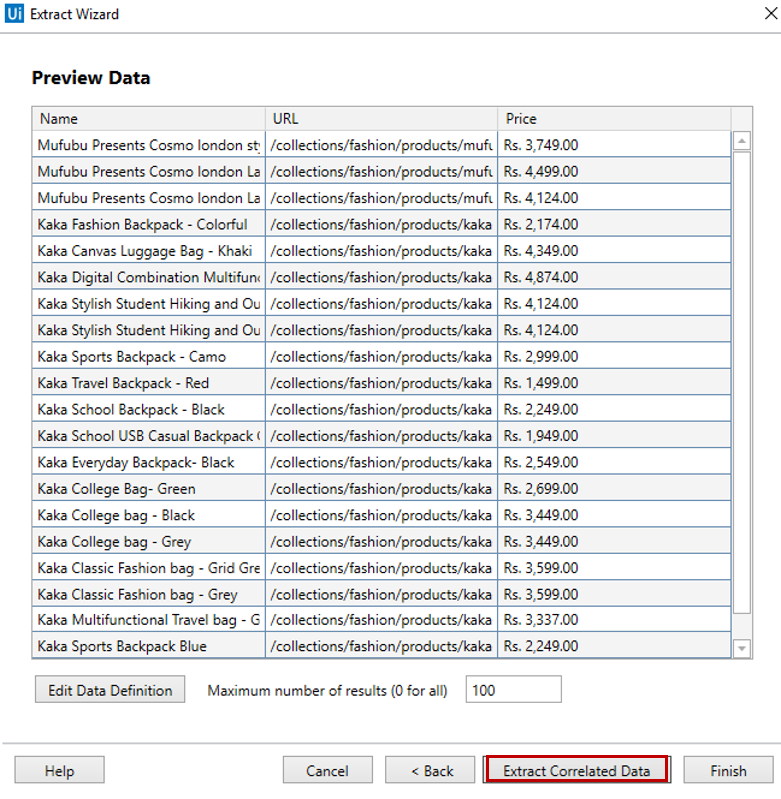
 Step 5: You would see the below output. Now, to extract other data sources from the website, click on the Extract Correlated Data option and repeat the above steps.
 Step 6: Once you are done extracting all the required data, click on Finish. This action would open a dialog box which will ask you if you wish to span the data across multiple pages. Refer below.
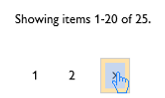
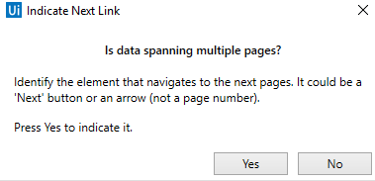 Step 7: To span across multiple pages, choose Yes and hover the mouse over the region which redirects you to the next page. Then you will be redirected to your UiPath Dashboard. Refer below.
 Step 8: Now to store all the extracted data into a .csv file, drag a Write CSV activity into the Do section of the Data Scraping.
Step 9: In the File Path section of this activity, mention the path of the .csv file where you want to store the extracted data and then mention the ExtractDataTable variable in the DataTable section. Refer below.
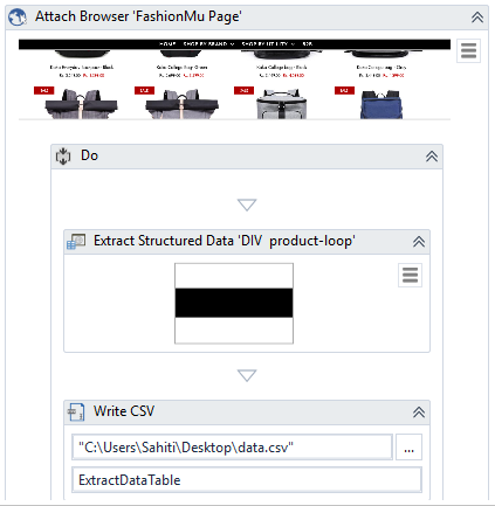
Step 10: Execute this sequence by clicking on the Run button. You would see that the data is getting stored in the .csv file as below.

Now, in this article on UiPath Automation Examples let us move onto the next automation i.e. the Email Automation.
Email Automation
Task
The aim is to save the attachments of the top 30 emails which have a keyword in the subject line. The attachments will be stored in a particular folder.
Steps To Automate
Follow the below steps to achieve the aim:
- Assign the Email address to a variable and mention the password in the Get Password activity.
- Use the Get IMAP mail messages activity and mention the folder, port number and server.
- For each mail mention the keyword that you want to consider and then use an If-else loop.
- In the If section, use the Save Attachments activity and mention the destination directory.
Solution
Step 1: Create variables such as Email, Password, and GetMailMessages of String, String and List<Mail Message> respectively. Refer below.
 Step 2: Drag the Assign activity and assign the To section of the activity to Email variable and value to the email address from which you want the details to be read.
Step 3: Drag the Get Password activity, and mention Password for your email ID in the Password section of the Properties pane. Also, mention the Password variable in the Result pane.
Step 4: Drag the Get IMAP Mail Message activity and mention the following details in the Properties pane.
In the section of :
- MailFolder – “Inbox”
- Port – 993
- Server – “imap.gmail.com”
- Email – Email variable
- Password – Password variable
- Top – 30
- Messages – GetMailMessages
Refer to the snapshot below.

Your execution should look like below till the above step.
 Step 5: Drag the For Each activity, and then mention mail in the item section and the GetMailMessages in the variable expression section.
Step 6: Now, in the Body section of this activity, drag the If activity. In this activity, you have to specify the condition to save the attachments if the subject line contains a keyword. To do so, follow the below steps.
Step 6.1: In the Condition section of the If activity, mention mail.Subject.Contains(“example”), where ‘example’ is the keyword that has to be considered.
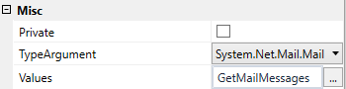
Step 6.2: Go to the properties section of For Each activity and in the Type Argument mention System.Net.Mail.Message. Refer to the snapshot below.
 Step 6.3: In the Then section of the If-activity, drag the Save Attachments activity. In this activity, mention the mail variable in the mail message area and the path of the folder where all the attachments have to be saved. Refer below.
 Step 7: Execute this sequence by clicking on the Run button. You would see that all the emails having the keyword example, in the subject line, would be read and the attachments would be stored in the mentioned folder.
Now, in this article on UiPath Automation Examples let us move onto the next automation i.e. the Excel Automation.
Excel Automation
Task
The aim is to fill a google form from the data stored in a .csv file automatically.
Steps To Automate
Follow the below steps to achieve the aim:
- Create a Google form and mention details you want to fill in.
- Create a .csv file and mention all the details that you want to fill in the google form.
- Now use the Open Browser activity and mention the URL.
- Use the For Each Row in the Excel Table, configure to fill the values in the google form by using the Type Into activity.
- Use the Mouse Click activity and hover your mouse over the Submit button.
- Then, use the Delay activity and mention the time you want to consider for delay.
- Drag the Go Back activity so that you are redirected to the Google form again and to fill in the details numerous times.
Solution
Step 1: Create a variable dataTable of the DataTable type. Refer below.
![]() Step 2: Create a .csv file and mention all the details that you want to fill in the google form. Now, drag a Read CSV activity and mention the path of the csv file. In the output section of this activity mention the variable dataTable. Refer below.
Step 2: Create a .csv file and mention all the details that you want to fill in the google form. Now, drag a Read CSV activity and mention the path of the csv file. In the output section of this activity mention the variable dataTable. Refer below.
 Step 3: Now drag another Sequence and then drag an Open Browser activity. In this activity mention the URL of the google form in double quotes.
Step 4: In the Do section of this activity, drag the For Each Row activity and mention ForEach row in dataTable.
Step 5: Next, in the Body section of this activity drag the Type Into activity. Your sequence should look like below till now.
 Step 5.1: Now, indicate on the screen i.e. on the google form where you want to fill in the data. Refer below.
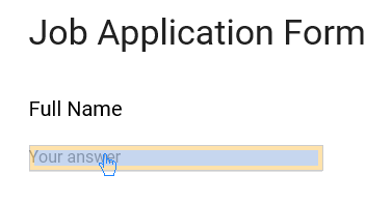 Step 5.2: In the Type Into activity, mention row(“Full Name”).ToString, where Full Name is the row name of the CSV file.
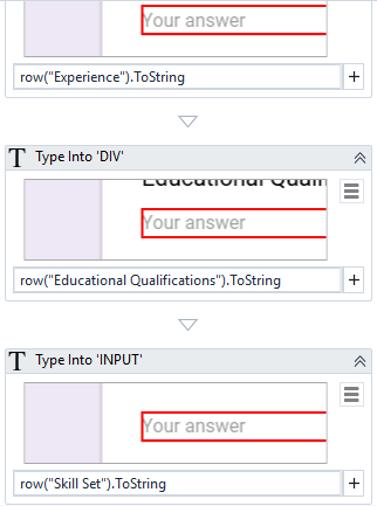
Step 6: Now, you have to repeat the above step for all the values that you want to fill in the Google form. Here I want to fill in the details for Phone Number, Past Experience in Years, Educational Qualifications, Skill Set, and Position. So, mention row(“Phone Number”).ToString, row(“Experience”).ToString, row(“Educational Qualifications”).ToString,row(“Skill Set”).ToString, row(“Position”).ToString respectively. Refer below.
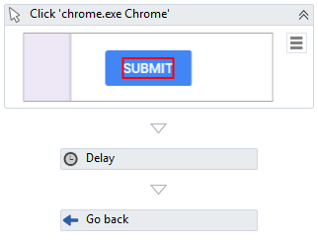
 Step 7: Now, after indicating all the elements you have to click on the Submit button. To do that, drag the Click activity and then indicate on the Submit button as below.
 Step 8: Add the Delay activity and mention the duration to be 3-5 seconds. This is done to consider the page load time of the google form.
Step 9: Now, if you have to add multiple records from the .csv file, to do so, you have to drag the Go back activity at the end of the Sequence. Your final three steps of automation should look like below.
 Step 10: Now connect the flowchart starting point to the sequence containing Read CSV activity and then connect this particular node to the Sequence containing all the actions related to Google Form.

Step 11: Execute this sequence by clicking on the Run button. You would see that all the details would be extracted from .csv file and will be filled automatically in the google form.
Now, in this article on UiPath Automation Examples let us move onto the next automation i.e. the PDF Automation.
PDF Automation
Task
The aim is to extract text and images from a PDF File and store the output in a Message Box/Text File.
Steps To Automate
Follow the below steps to achieve the aim:
- To extract Text only use the Read PDF Text activity and use a message box to display the output.
- To extract Text inside images use the Read PDF with OCR activity and use a message box to display the output.
Solution
Step 1: Follow the below steps to extract Text only from PDF documents.
Step 1.1: Drag the Read PDF Text Activity. In the activity, mention the path of the PDF Document from which data has to be extracted.
Step 1.2: Now, in the Properties Pane, of the Read PDF Text Activity, mention an output variable to see the output. To set an output variable, press on CTRL + K,and give a name. Here I have mentioned as output.
Step 1.3: After that, drag a message box in the same sequence and mention the output variable in it.
Step 1.4: Execute this sequence by clicking on the Run button. Your complete sequence and the output should look as shown in the below snapshots, respectively.

Step 2: Now, similarly if you want to extract the text in the images follow the below steps.
Step 2.1: Drag and drop the Read PDF with OCR Activity. In the activity, mention the path of the PDF Document from which data has to be extracted.
Step 2.2: Now, search for an OCR Engine, and drag and drop an OCR Engine based on whichever is installed. Here I have used Google OCR Engine.
Step 2.3: Now, in the Properties Pane, of the Read PDF with OCR Activity, mention an output variable to see the output. To set an output variable Press on CTRL + K, and give a name. Here I have mentioned as output.
Step 2.4: After that, drag a message box in the sequence and then mention the output variable in it.
Step 2.5: Execute this sequence by clicking on the Run button. Your complete sequence and the output should look as shown in the below snapshots, respectively.

If you wish to further know how to extract specific elements from PDF Documents, refer to the article on UiPath PDF Extraction.
So, folks, that’s an end to this article on UiPath Automation Examples. I hope you enjoyed reading this article on UiPath Automation Examples and learnt how to automate tasks. If you wish to further learn about Robotic Process Automation and build your career as an RPA Developer, then you can check out our course on Robotic Process Automation Using UiPath. This course will let you enhance your knowledge on RPA and will give you an extensive hands-on experience in UiPath.
Got a question for us? Please mention it in the comments section of this UiPath Automation Examples article and we will get back to you.