
Python Scripting Certification Training
- 15k Enrolled Learners
- Weekend
- Self Paced
(5900)


 Copy Link!
TypeScript is a strongly typed superset of JavaScript that compiles to plain JavaScript. You can use this language for application-scale JavaScript development. Also, it can be executed on any browser, any host, and any Operating System. In this TypeScript Tutorial, we will get into the depth of TypeScript and understand the basics in the following sequence:
TypeScript is a typed superset of JavaScript that compiles to plain JavaScript. TypeScript is pure object-oriented with classes, interfaces and statically typed programming languages like C# or Java. It requires a compiler to compile and generate in JavaScript file. Basically, TypeScript is the ES6 version of JavaScript with some additional features.
A TypeScript code is written in a file with .ts extension and then compiled into JavaScript using the compiler. You can write the file in any code editor and the compiler needs to be installed on your platform. After the installation, the command tsc <filename>.ts compiles the TypeScript code into a plain JavaScript file.
Syntax:
var message:string = "Welcome to Edureka!"
console.log(message)
On compiling, it generates the following JavaScript code:
//Generated by typescript 1.8.10
var message = "Welcome to Edureka!";
console.log(message);
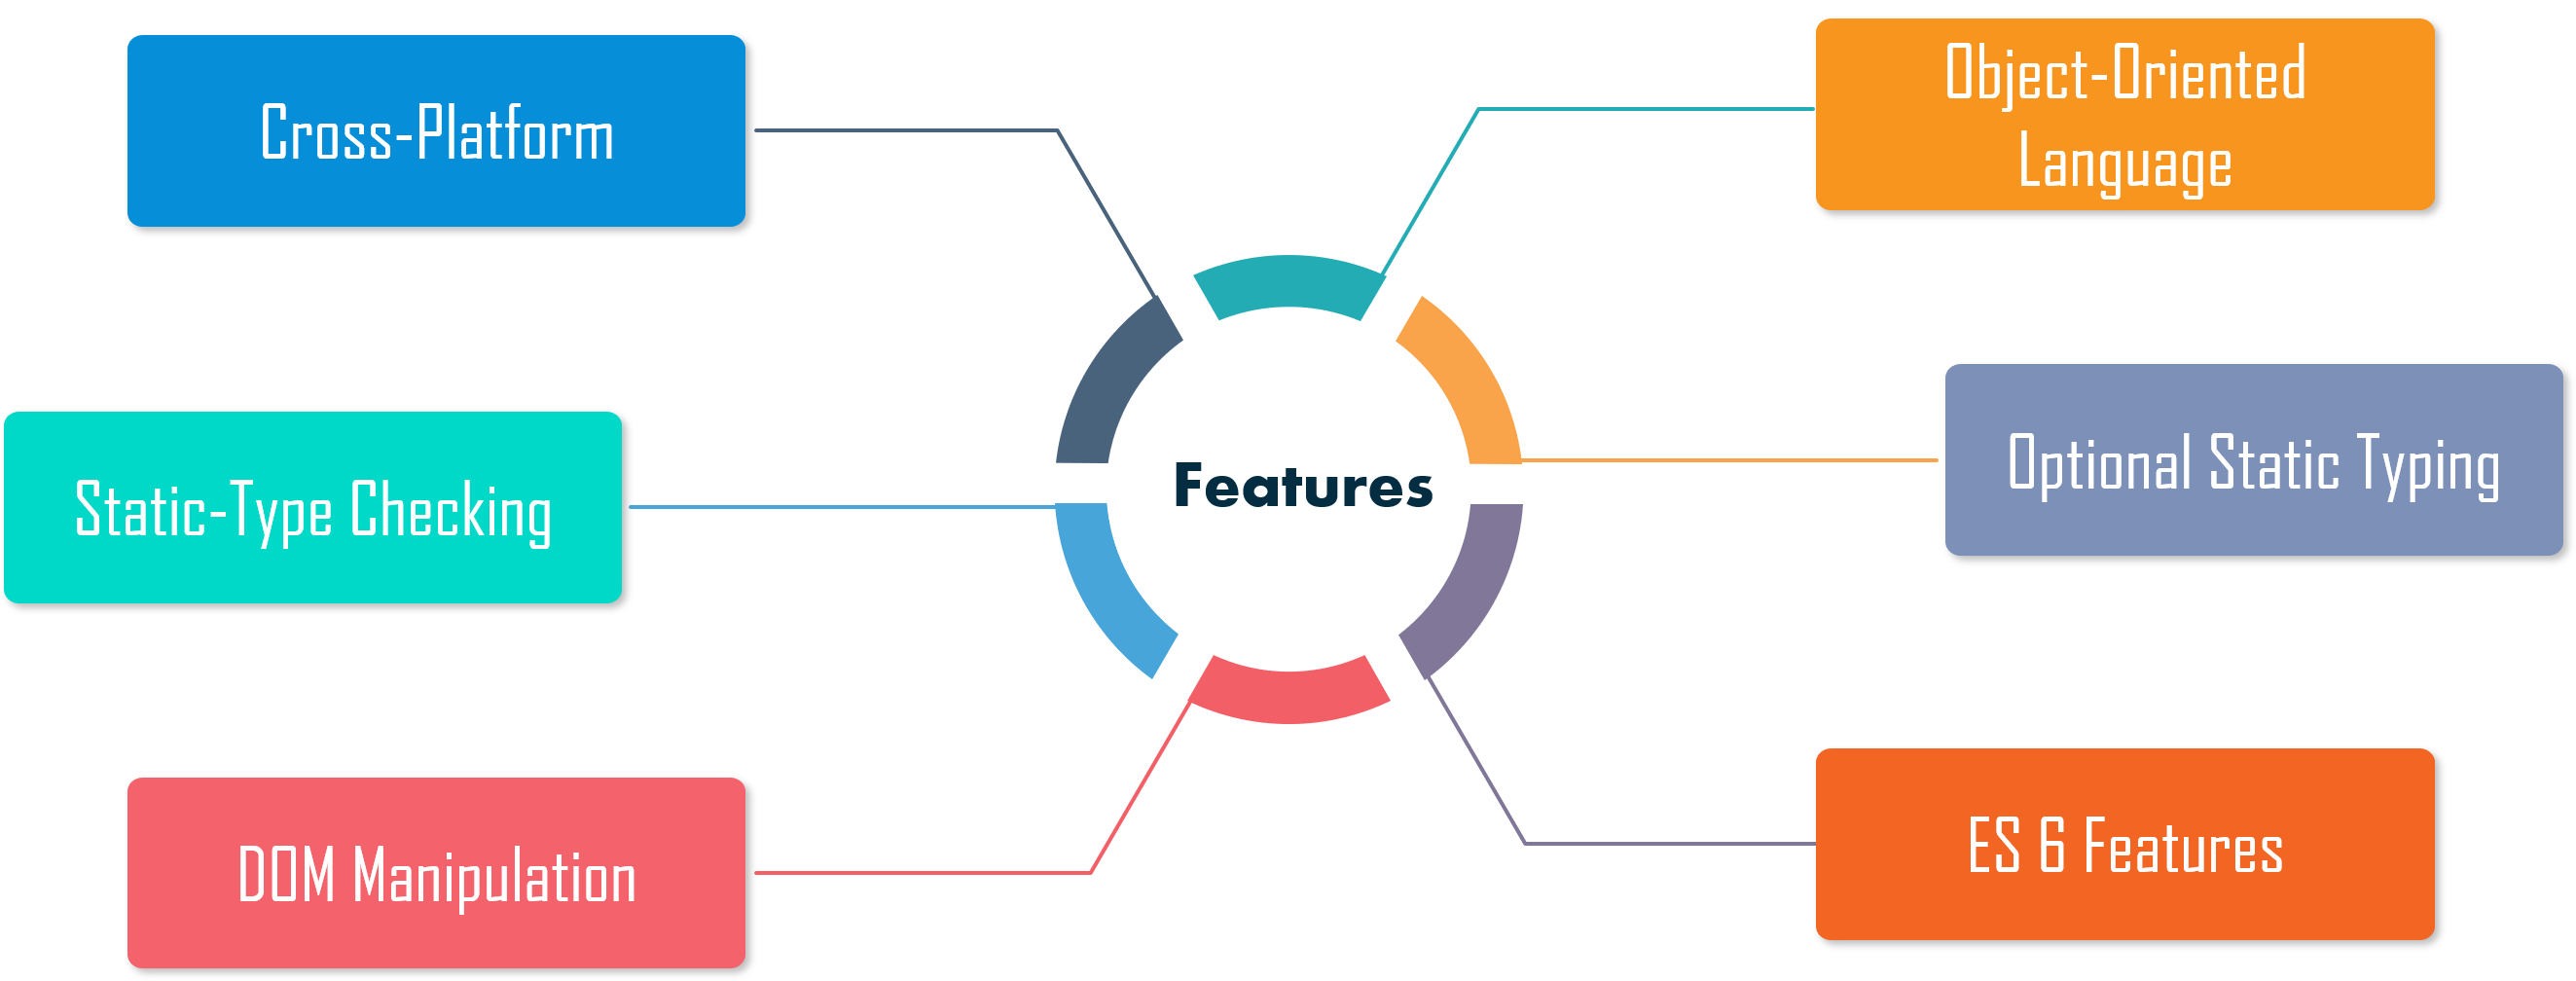
Cross-Platform: The TypeScript compiler can be installed on any Operating System such as Windows, MacOS and Linux.
Object-Oriented Language: TypeScript provides features like Classes, Interfaces, and Modules. Thus, it can write object-oriented code for client-side as well as server-side development.
Static type-checking: TypeScript uses static typing and helps type checking at compile time. Thus, you can find errors while writing the code without running the script.
Optional Static Typing: TypeScript also allows optional static typing in case you are using the dynamic typing of JavaScript.
DOM Manipulation: You can use TypeScript to manipulate the DOM for adding or removing elements.
ES 6 Features: TypeScript includes most features of planned ECMAScript 2015 (ES 6, 7) such as class, interface, Arrow functions, etc.
TypeScript is fast, simple, easy to learn and runs on any browser or JavaScript engine.
It is similar to JavaScript and uses the same syntax and semantics.
This helps backend developers write front-end code faster.
TypeScript code can be called from an existing JavaScript code. Also, it works with existing JavaScript frameworks and libraries without any issues.
The Definition file, with .d.ts extension, provides support for existing JavaScript libraries like Jquery, D3.js, etc. So, TypeScript code can add JavaScript libraries using type definitions to avail the benefits of type-checking, code autocompletion, and documentation in existing dynamically-typed JavaScript libraries.
It includes features from ES6 and ES7 that can run in ES5-level JavaScript engines like Node.js.
Now that you have understood what is TypeScript, let’s move on with this TypeScript Tutorial and have a look at the different types.
The Type System represents the different types of values supported by the language. It checks the validity of the supplied values before they are stored or manipulated by the program.

It can be classified into two types such as:
Now let’s move on with this TypeScript Tutorial and understand more about variables.
A variable is a named space in the memory which is used to store values.
The type syntax for declaring a variable in TypeScript includes a colon (:) after the variable name, followed by its type. Similar to JavaScript, we use the var keyword to declare a variable.
There are four options when we declare a variable:
var [identifier] : [type-annotation] = value;
var [identifier] : [type-annotation];
var [identifier] = value;
var [identifier];
Example:
var name:string = "Daisy";
var empid:number = 1001;
console.log("name"+name)
console.log("employee id "+empid)
On compiling, it will generate following JavaScript code:
//Generated by typescript 1.8.10
var name = "Daisy";
var empid = 1001;
console.log("name" + name);
console.log("employee id: " + empid);
Output:
name:Daisyemployee id:1001
Now let’s move on to the next topic of our TypeScript Tutorial.
An operator is used to define functions that will be performed on the data. The data on which operators work are called operands. There are different types of operators in TypeScript such as:
| Operators | Description |
Addition (+) | returns the sum of the operands |
Subtraction (-) | returns the difference of the values |
Multiplication (*) | returns the product of the values |
Division (/) | performs division operation and returns the quotient |
Modulus (%) | performs division operation and returns the remainder |
Increment (++) | Increments the value of the variable by one |
Decrement (–) | Decrements the value of the variable by one |
var num1:number = 10
var num2:number = 2
var res:number = 0

res = num1 + num2
console.log("Sum: "+res);

res = num1 - num2;
console.log("Difference: "+res)

res = num1*num2
console.log("Product: "+res)
Output:
Sum: 12Difference: 8Product: 20
| Operators | Description |
AND (&&) | It returns true only if all the expressions specified return true |
OR (||) | This returns true if at least one of the expressions specified return true |
NOT (!) | It returns the inverse of the expression’s result. |
Example:
var avg:number = 20;
var percentage:number = 90;

console.log("Value of avg: "+avg+" ,value of percentage: "+percentage);

var res:boolean = ((avg>50)&&(percentage>80));
console.log("(avg>50)&&(percentage>80): ",res);
Output:
Value of avg: 20 ,value of percentage: 90(avg > 50)&&(percentage > 80): false
| Operators | Description |
> | Greater than |
< | Lesser than |
>= | Greater than or equal to |
<= | Lesser than or equal to |
== | Equality |
!= | Not Equal |
Example:
var num1:number = 10;
var num2:number = 7;

console.log("Value of num1: "+num1);
console.log("Value of num2 :"+num2);

var res = num1>num2
console.log("num1 greater than num2: "+res)

res = num1<num2
console.log("num1 lesser than num2: "+res)
Output:
Value of num1: 10Value of num2 :7num1 greater than num2: truenum1 lesser than num2: false
| Operators | Description |
Bitwise AND (&) | performs a Boolean AND operation on each bit of its integer arguments. |
Bitwise OR (|) | It performs a Boolean OR operation on each bit of its integer arguments. |
Bitwise XOR (^) | It performs a Boolean exclusive OR operation on each bit of its integer arguments. |
Bitwise NOT (~) | This is a unary operator and operates by reversing all the bits in the operand. |
Left shift (<<) | It moves all the bits in its first operand to the left by the number of places specified in the second operand. |
Right Shift (>>) | The left operand’s value is moved right by the number of bits specified by the right operand. |
Right Shift with Zero (>>>) | It is similar to >> operator, except that the bits shifted in on the left are always zero. |
Example:
var a:number = 2; // Bit presentation 10
var b:number = 3; // Bit presentation 11

var result;

result = (a & b);
console.log("(a & b) => ",result)

result = (a | b);
console.log("(a | b) => ",result)
Output:
(a & b) => 2(a | b) => 3
| Operators | Description |
Simple Assignment (=) | Assigns values from the right side operand to the left side operand |
Add and assignment (+=) | It adds the right operand to the left operand and assigns the result to the left operand. |
Subtract and assignment (-=) | It subtracts the right operand from the left operand and assigns the result to the left operand. |
Multiply and assignment (*=) | It multiplies the right operand with the left operand and assigns the result to the left operand. |
Divide and assignment (/=) | It divides the left operand with the right operand and assigns the result to the left operand. |
Example:
var a: number = 12
var b:number = 10

a = b
console.log("a = b: "+a)

a += b
console.log("a+=b: "+a)

a -= b
console.log("a-=b: "+a)
Output:
a = b: 10a += b: 20a -= b: 10
These were the different operators. Now let’s move on with our TypeScript Tutorial and learn about loops.
There may be situations when a block of code needs to be executed several numbers of times. A loop statement allows us to execute a statement or group of statements multiple times.
The TypeScript loops can be classified as:

The for loop is an implementation of a definite loop.
Syntax:
for (first expression; second expression; third expression ) {
// statements to be executed repeatedly
}
Here, the first expression is executed before the loop starts. The second expression is the condition for the loop to execute. And the third expression is executed after the execution of every code block.
Example:
for (let i = 0; i < 2; i++) {
console.log ("Execute block statement" + i);
}
Output:
Execute block statement 0
 Execute block statement 1
The while loop executes the instructions each time the condition specified evaluates to true.
Syntax:
while (condition expression) {
// code block to be executed
}
Example:
let i: number = 1;

while (i < 3) {
console.log( "Block statement execution no." + i )
i++;
}
Output:
Block statement execution no.1
 Block statement execution no.2
The do…while loop is similar to the while loop except that it doesn’t evaluate the condition for the first time the loop executes.
Syntax:
do { // code block to be executed } while (condition expression);Example:
let i: number = 1;
do {
console.log("Block statement execution no." + i )
i++;
} while ( i < 3)
Output:
Block statement execution no.1
 Block statement execution no.2
Apart from these, there are the break and continue statements in TypeScript that are used in a loop.
The break statement is used to take control out of a construct. Using the break statement in a loop helps the program in exiting the loop.

Example:
var i:number = 1
while(i<=10) {
if (i % 5 == 0) {
console.log ("The first multiple of 5 between 1 and 10 is : "+i)
break //exit the loop if the first multiple is found
}
i++
} //outputs 5 and exits the loop
Output:
The first multiple of 5 between 1 and 10 is : 5
The continue statement skips the subsequent statements in the current iteration and takes the control back to the beginning of the loop.

Example:
var num:number = 0
var count:number = 0;

for(num=0;num<=10;num++) {
if (num % 2==0) {
continue
}
count++
}
console.log (" The count of odd values between 0 and 10 is: "+count)
Output:
The count of odd values between 0 and 10 is: 5
These were the different loops in TypeScript. Now, let’s move ahead with our TypeScript Tutorial and understand functions.
In JavaScript, functions are one of the most important part as it is a functional programming language. Functions ensure that the program is maintainable and reusable, and organized into readable blocks. While TypeScript provides the concept of classes and modules, functions still are an integral part of the language.
A named function is used to declare and call a function by its given name.
Example:
function display() {
console.log("TypeScript Function");
}

display();
Output:
TypeScript Function
An anonymous function is one which is defined as an expression. This expression is stored in a variable. These functions are invoked using the variable name that the function is stored in.
Example:
let greeting = function() {
console.log("TypeScript Function");
};

greeting();
Output:
TypeScript Function
Fat arrow notations are used for anonymous functions i.e for function expressions. They are also called lambda functions in other languages.
Syntax:
(param1, param2, ..., paramN) => expression
Using the fat arrow (=>) drops the need to use the ‘function’ keyword. Parameters are passed in the angular brackets <>, and the function expression is enclosed within the curly brackets {}.
Example:
let sum = (x: number, y: number): number => {
return x + y;
}

sum(10, 30); //returns 40
TypeScript provides the concept of function overloading. Thus, you can have multiple functions with the same name but different parameter types and return type.
Example:
function add(a:string, b:string):string;
function add(a:number, b:number): number;
return a + b;
}
add("Hello ", "Edureka"); // returns "Hello Edureka"
add(10, 10); // returns 20
In the above example, we have the same function add() with two function declarations and one function implementation. The first signature has two parameters of type string, whereas the second signature has two parameters of the type number.
These are the different types of functions. Now, let’s move on with our TypeScript Tutorial and understand strings in TypeScript.
The string is another primitive data type that is used to store text data. String values are surrounded by single quotation marks or double quotation marks.
Syntax:
var var_name = new String(string);
There are different properties of methods available in String object such as:
Example:
let name = new String("Welcome to Edureka!");
console.log("Message: " +name);
console.log("Length: "+name.length);
Output:
Message: Welcome to Edureka!Length: 19
The List of Methods in String Object include:
| Method | Description |
charAt() | It returns the character at the specified index |
charCodeAt() | It returns a number indicating the Unicode value of the character at the given index |
concat() | Combines the text of two strings and returns a new string |
indexOf() | Returns the index within the calling String object of the first occurrence of the specified value |
lastIndexOf() | It returns the index within the calling String object of the last occurrence of the specified value |
match() | Used to match a regular expression against a string |
localeCompare() | Returns a number indicating whether a reference string comes before or after or is the same as the given string in sort order |
search() | This executes the search for a match between a regular expression and a specified string |
replace() | Used to find a match between a regular expression and a string, and to replace the matched substring with a new substring |
slice() | It extracts a section of a string and returns a new string |
split() | Splits a String object into an array of strings by separating the string into substrings |
substr() | Returns the characters in a string beginning at the specified location through the specified number of characters |
substring() | It returns the characters in a string between two indexes into the string |
toLocaleLowerCase() | The characters within a string are converted to lower case while respecting the current locale |
toLocaleUpperCase() | The characters within a string are converted to the upper case while respecting the current locale |
toLowerCase() | It returns the calling string value converted to lower case |
toUpperCase() | It returns the calling string value converted to uppercase |
toString() | Returns a string representing the specified object |
valueOf() | Returns the primitive value of the specified object |
Example:
let str: string = 'Welcome to Edureka';
str.charAt(0); // returns 'w'
str.charAt(2); // returns 'l'
"Welcome to Edureka".charAt(2); returns 'l'

let str1: string = 'welcome';
let str2: string = 'Edureka';
str1.concat(str2); // returns 'welcomeEdureka'
str1.concat(' ', str2); // returns 'welcome Edureka'
str1.concat(' 'to' '); // returns 'welcome to'
Now that you know about strings, let’s move on with this TypeScript tutorial and understand arrays.
An array is a special type of data type that stores multiple values of different data types sequentially using a special syntax. Array elements are identified by a unique integer called the subscript or index of the element.
Syntax:
var array_name[:datatype]; //declaration
array_name = [val1,val2,valn..] //initialization
Example:
let names: Array<string>;
names = ['John', 'Daisy', 'Rachel'];

let ids: Array<number>;
ids = [101, 700, 321];
Here is a list of different Array methods which can be used for different purposes:
| Method | Description |
filter() | Creates a new array with all of the elements of this array for which the provided filtering function returns true |
every() | Returns true if every element in this array satisfies the provided testing function |
concat() | Returns a new array comprised of this array joined with other arrays |
indexOf() | Returns the first or least index of an element within the array equal to the specified value |
forEach() | Calls a function for each element in the array |
join() | Joins all elements of an array into a string |
lastIndexOf() | Returns the last or greatest index of an element within the array equal to the specified value |
map() | Creates a new array with the results of calling a provided function on every element in this array |
push() | Adds one or more elements to the end of an array and returns the new length of the array |
pop() | Removes the last element from an array and returns that element |
reduce() | Apply a function simultaneously against two values of the array from left to right as to reduce it to a single value |
reduceRight() | Apply a function simultaneously against two values of the array from right to left as to reduce it to a single value |
reverse() | Reverses the order of the elements of an array |
shift() | Removes the first element from an array and returns that element |
slice() | Extracts a section of an array and returns a new array |
some() | It returns true if at least one element in this array satisfies the provided testing function |
sort() | It sorts the elements of an array |
toString() | Returns a string representing the array and its elements |
splice() | It adds and/or removes elements from an array |
unshift() | Adds one or more elements to the front of an array and returns the new length of the array |
Example:
var name: Array<string> = ['John', 'Daisy', 'Tara'];
name.sort();
console.log(name); //output: [ 'Daisy', 'John', 'Tara' ]

console.log(name.pop()); //output: Tara

name.push('Rachel');
console.log(name); //output: ['John', 'Daisy', 'Rachel']
Now let’s move ahead with this TypeScript Tutorial and learn about Interfaces.
The interface is a structure that defines the contract in your application. It defines the syntax for classes to follow. It contains only the declaration of the members and it is the responsibility of the deriving class to define the members.
Example:
interface Employee {
empID: number;
empName: string;
getSalary: (number) => number; // arrow function
getManagerName(number): string;
}
In the above example, the Employee interface includes two properties empID and empName. It also includes a method declaration getSalaray using an arrow function which includes one number parameter and a number return type. The getManagerName method is declared using a normal function.
TypeScript introduced classes so that they can avail the benefits of object-oriented techniques like encapsulation and abstraction. The class in TypeScript is compiled to plain JavaScript functions by the TypeScript compiler to work across platforms and browsers.
A class includes the following:
Example:
class Employee {
empID: number;
empName: string;

constructor(ID: number, name: string) {
this.empName = name;
this.empID = ID;
}

getSalary() : number {
return 40000;
}
}
TypeScript supports Inheritance as it is the ability of a program to create new classes from an existing class. The class that is extended to create newer classes is called the parent class or the super class. The newly created classes are called the child or sub classes.
A class inherits from another class using the ‘extends’ keyword. Child classes inherit all properties and methods except private members and constructors from the parent class. But, TypeScript does not support multiple inheritance.
Syntax:
class child_class_name extends parent_class_name
Example:
class Person {
name: string;

constructor(name: string) {
this.name = name;
}
}

class Employee extends Person {
empID: number;

constructor(empID: number, name:string) {
super(name);
this.empID = empid;
}

displayName():void {
console.log("Name = " + this.name + ", Employee ID = " + this.empID);
}
}

let emp = new Employee(701, "Jason");
emp.displayName(); // Name =Jason, Employee ID = 701
Now that you know about classes, let’s move ahead with this TypeScript Tutorial and learn about Objects.
An object is an instance that contains a different set of key-value pairs. The values can be scalar values or functions or even an array of other objects.
Syntax:
var object_name = {
key1: “value1”, //scalar value
key2: “value”,
key3: function() {
//functions
},
key4:[“content1”, “content2”]
An object can contain scalar values, functions and structures like arrays and tuples.
Example:
var person = {
firstname:"Danny",
lastname:"Green"
};
//access the object values
console.log(person.firstname)
console.log(person.lastname)
On compiling, it will generate the same code in JavaScript.
Output:
DannyGreen
These were the different important elements of TypeScript. Now, let’s move on with this TypeScript Tutorial and have a look at an example to understand the use case.
Here, we will learn how to convert an existing JavaScript project to TypeScript.
When we compile a TypeScript file, it produces corresponding JavaScript file with the same name. Here, we need to ensure that our original JavaScript file which acts as input cannot be in the same directory so that TypeScript does not override them.

The process to migrate from JavaScript to TypeScript includes the following steps:
You need to add a tsconfig.json file to the project. TypeScript uses a tsconfig.json file for managing the compilation options of the project, such as which files you want to include and exclude.
{
"compilerOptions": {
"outDir": "./built",
"allowJs": true,
"target": "es5"
},
"include": [
"./src/**/*"
]
}Most JavaScript projects have an integrated build tool like gulp or webpack. You can integrate projects with webpack in the following ways:
$ npm install awesome-typescript-loader source-map-loader
In webpack integration, you use awesome-typescript-loader combined with source-map-loader for easier debugging of source code.
In this step, you have to rename the .js file to .ts file. Similarly, if the file uses JSX, you will need to rename it to .tsx. Now, if we open that file in an editor that support TypeScript, some of the codes might start giving compilation errors. So, converting files one by one allows handling compilation errors more easily. If TypeScript finds any compilation errors during conversion, it still able to translate the code.
After moving js file to ts file, immediately, TypeScript will start Type Checking of our code. So, you might get diagnostic errors in the JavaScript code.
JavaScript projects use third-party libraries like jQuery or Lodash. In order to compile files, TypeScript needs to know the types of all objects in these libraries. The TypeScript Type definition files for JavaScript libraries are already available at DefinitelyTyped. So, there is no need to install this type externally. You need to install only those types which are used in our project.
For jQuery, you can install the definition:
$ npm install @types/jquery
After this, make the changes to the JavaScript project, run the build tool. Now, you should have the TypeScript project compiled into plain JavaScript that can be run in the browser.
With this, we have come to the end of this TypeScript Tutorial. I hope you understood all the important elements of TypeScript.
Check out the Web Development Certification Training by Edureka. Web Development Certification Training will help you Learn how to create impressive websites using HTML5, CSS3, Twitter Bootstrap 3, jQuery and Google APIs and deploy it to Amazon Simple Storage Service(S3).
Got a question for us? Please mention it in the comments section of “TypeScript Tutorial” and we will get back to you.


 Thank you for registering Join Edureka Meetup community for 100+ Free Webinars each month JOIN MEETUP GROUP