


Data Science and Machine Learning Internship ...
- 22k Enrolled Learners
- Weekend/Weekday
- Live Class
(8500)
This Tkinter tutorial blog will help you start learning about the Tkinter library in Python and give you an in-depth insight into how Python is used to create Graphical User Interfaces (GUI) applications. The number of applicatio ns of Tkinter is endless and it is a very popular and easy library to learn.
In this Tkinter Tutorial, we will be covering the following concepts:
Graphical User Interface (GUI) is nothing but a desktop application which helps you to interact with the computers. They perform different tasks in the desktops, laptops and other electronic devices.
They are some different types of GUI apps which we daily use on the laptops or desktops. We are going to learn how to create those type of apps.
As this is an Introduction to GUI, make sure you stay tuned till the end as we will create a really simple and nice GUI app.
Well, it is a personal preference that I prefer GUI over command line. Not that there is something wrong with the command line but I prefer more intuitive and interactive applications with a lot of visuals.
What do you prefer? Head to the comment section and let me know.
Next up on this Tkinter tutorial blog, let us check out the Python libraries that are present for designing our own GUI.
Python has a plethora of libraries and these 4 stands out mainly when it comes to GUI. There are as follows:
Among all of these, Tkinter is the first choice for a LOT of learners and developers just because of how simple and easy it is.
I am sure you will have the same opinion in a while as well.
Note: It is at this point that I’d like to mention that you will require a little bit of knowledge about Python to start working with Tkinter. There is nothing to worry if you don’t have any prior programming experience with Python. I have created an in-depth python tutorial specifically for beginners which I have linked at the end of this blog, I am getting some really good feedback on it so I’d recommend you guys to check it out when you’re done reading this Tkinter tutorial blog.
Next up on this Tkinter tutorial blog, let us check out what Tkinter actually is.
Tkinter is actually an inbuilt Python module used to create simple GUI apps. It is the most commonly used module for GUI apps in the Python.
You don’t need to worry about installation of the Tkinter module as it comes with Python default.
I am going to use Python 3.6 version for this tutorial. So, kindly update Python if you’re using below versions.
Another advice for you guys is to not blindly copy the code. Try to write by modifying it as you like and then observing and understanding the resulting changes.
Next up on this Tkinter tutorial blog, let us check out the fundamentals of Tkinter so that we can go about creating our own GUIs.
Consider the following diagram, it shows how an application actually executes in Tkinter:

To start out with, we first import the Tkinter model. Followed by that, we create the main window. It is in this window that we are performing operations and displaying visuals and everything basically. Later, we add the widgets and lastly we enter the main event loop.
If you noticed, there are 2 keywords here that you might not know at this point. These are the 2 keywords:
An event loop is basically telling the code to keep displaying the window until we manually close it. It runs in an infinite loop in the back-end.
Check out the following code for better clarity:
import tkinter

window = tkinter.Tk()

# to rename the title of the window window.title("GUI")

# pack is used to show the object in the window

label = tkinter.Label(window, text = "Hello World!").pack()

window.mainloop()
As you can see, we are importing the Tkinter package and defining a window. Followed by that, we are giving a window title which is shown on the title tab whenever you open an application.
For example, Microsoft Word is shown on the title tab when you open a word application, correct? Similarly here we call it GUI. We can call it anything we want based on the requirement.
Lastly, we have a label. A label is nothing is but what output needs to be shown on the window. In this case as you can already see, it is hello world.
Check out the output for the above code:

Next up on this Tkinter tutorial blog, let us look at the massive range of widgets offered by Tkinter.
The first question we need to ask is, what are widgets?
Widgets are something like elements in the HTML. You will find different types of widgets to the different types of elements in the Tkinter.
Let’s see the brief introduction to all of these widgets in the Tkinter.
Check out this diagram for the list of the majorly used Tkinter widgets:
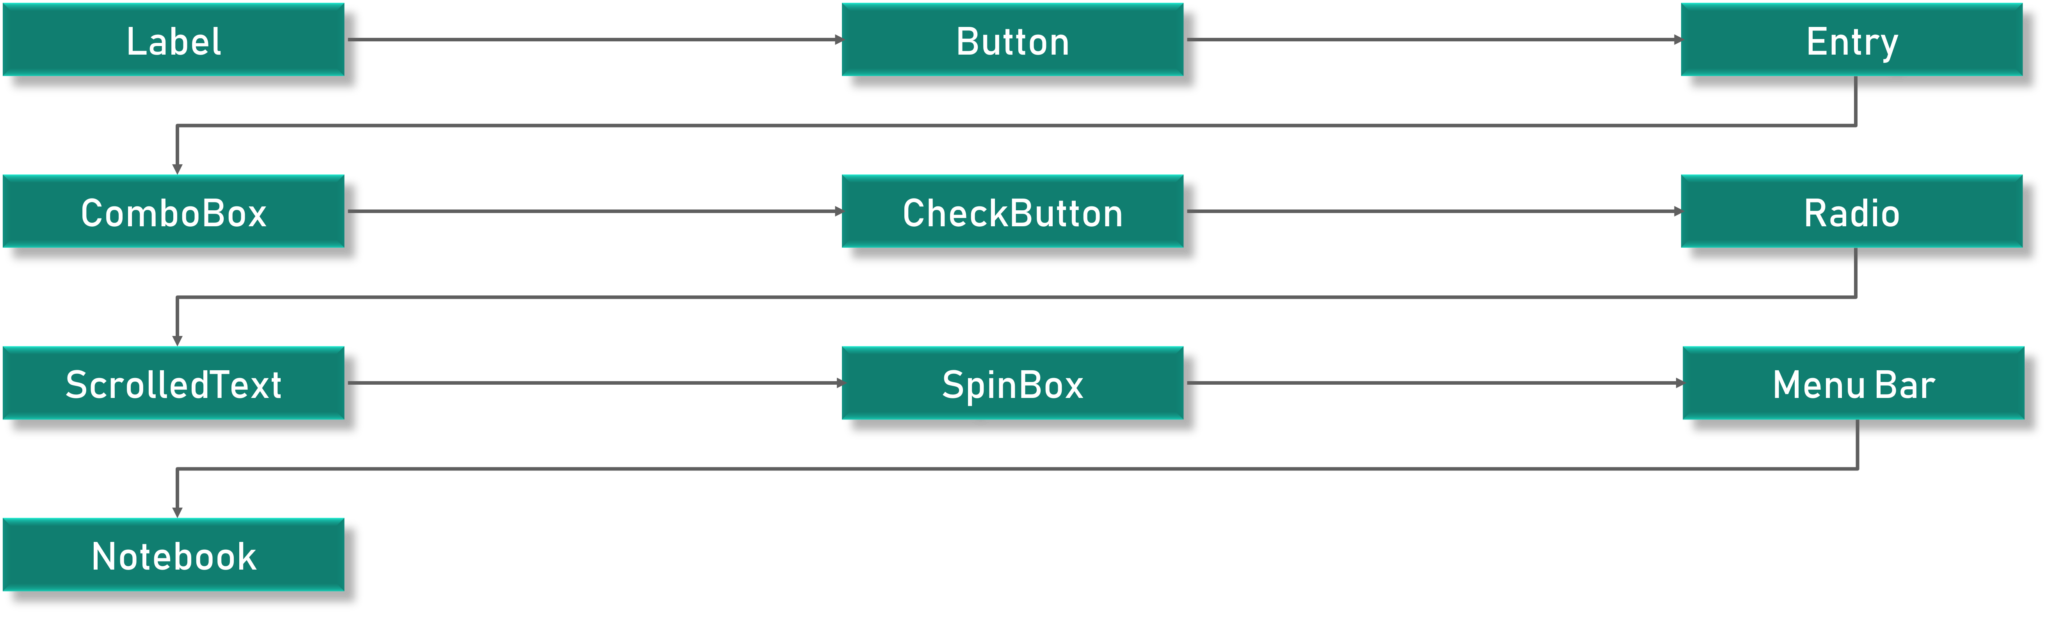
These widgets are the reason that Tkinter is so popular. It makes it really easy to understand and use practically.
Let us walk through all of these widgets individually for better understanding.
Do note that I will not overwhelm you with the complete syntax for every single widget. The code snippets are more than sufficient to make your learning easier and I’ve done this just so you can avoid any sort of confusion or ambiguity while learning.
The first widget we will be checking out is the label widget.
As mentioned earlier, labels are used to create texts and images and all of that but it is important to note that it has to be a single line definition only.
Here’s the code snippet:
l1 = Label (window, text="edureka!“ font=("Arial Bold", 50))

l1.grid (column=0, row=0)
We have entered our text as Edureka and that is printed as it is. Simple, right?
Check out the output below:

There is something called as the geometry function. We will be walking through this in the coming sections as well.
At this point of time all you need to know is that it is basically used to change the window size and set as per our requirement.
Check out the code snippet below:
l1 = Label (window, text="edureka!“ font=("Arial Bold", 50))

window.geometry('350x200')

l1.grid (column=0, row=0)
Well, in this case, we have set it to be 350 pixels in width and 200 pixels in height.
And here is the output for the same:

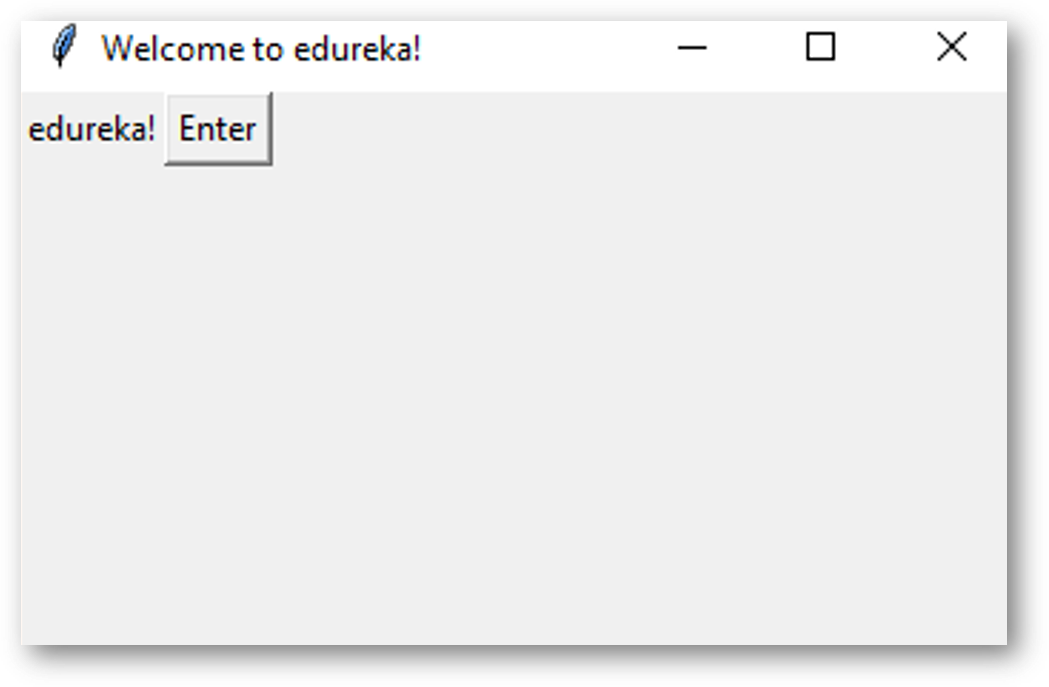
The next widget we will check on this Tkinter tutorial blog is the button widget.
The button widget is very similar to the label widget. We create a variable and use the widget syntax to define what the button has to say.
Check out the below code snippet:
bt = Button (window, text="Enter")

bt.grid (column=1, row=0)
Here, we used a function called as the grid function which is used to set the position of the button on our window.
The output of the code is as follows:
We can also change the foreground for a button or any other widget as well. We will be using the parameter FG as shown in the code. Similarly, the background colour can be changed as well using the BG property.
Check out the code:
bt = Button (window, text="Enter", bg="orange", fg="red")

bt.grid (column=1, row=0)
Output:
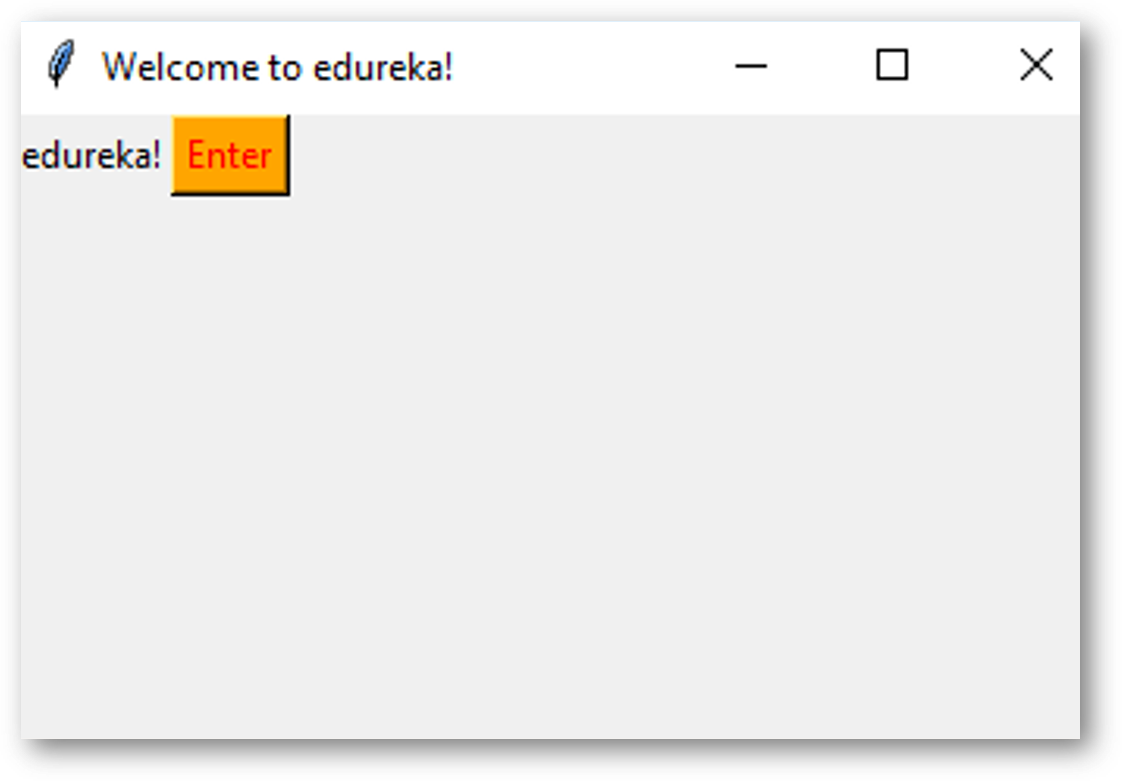
As per the output we got, our foreground is the text which is red color as defined and the background is orange as we’ve set it using the bg parameter.
So at this point, we have a clickable button. Well, what happens when we actually go ahead and click it?
Check out this snippet:
def clicked():

     l1.configure (text="Button was clicked !!")

bt = Button (window, text=“Enter”, command=clicked)
So we call this the click event. We need to write the functionality as to what should happen when we click the button or in other terms when the click event is fired.
For that purpose we have a function called clicked, we are displaying a text message saying button was clicked.
We will need to add a parameter called command in the button definition as shown.
Pretty easy, right?
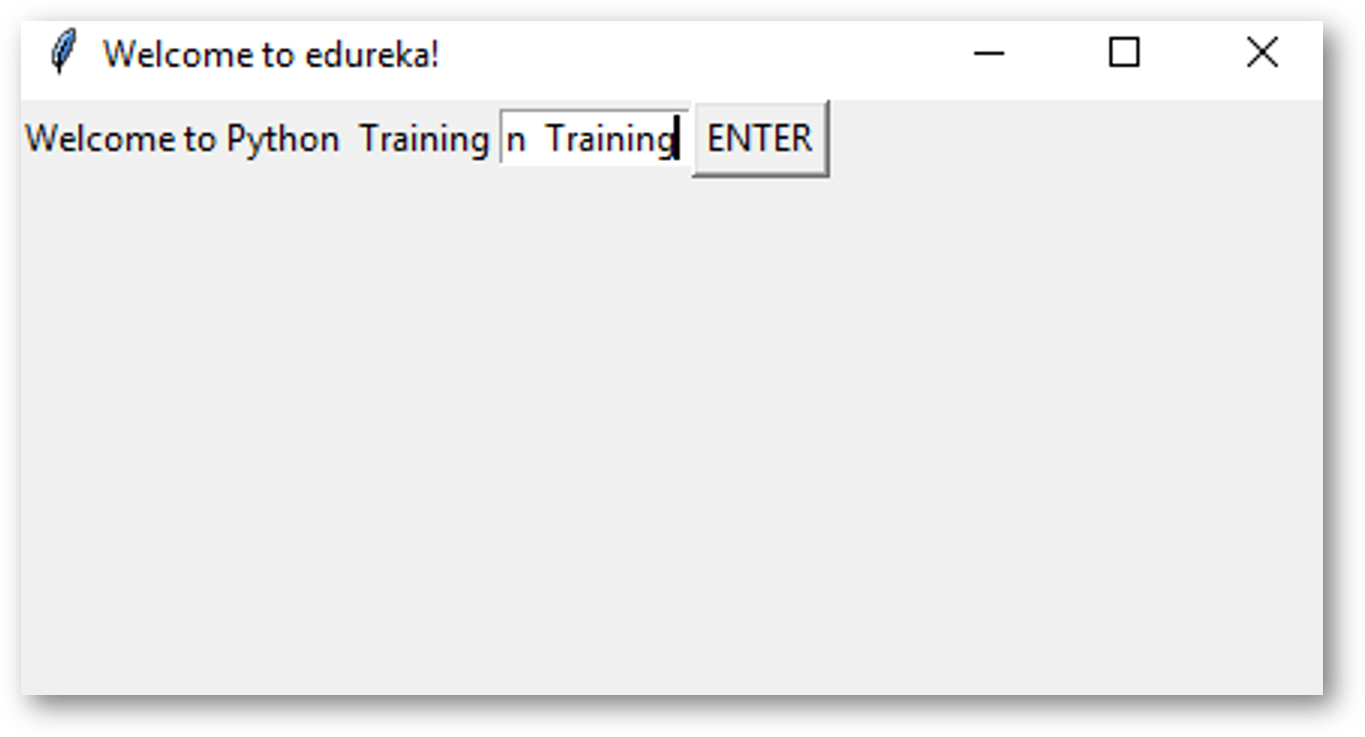
The next widget we will check on this Tkinter tutorial blog is the entry widget.
What is an entry widget used for?
It is used to create input fields in the GUI to take in textual input.
Check out the example code shown below:
txt = Entry(window,width=10)

txt.grid(column=1, row=0)

def clicked():

      res = "Welcome to " + txt.get()

      l1.configure(text= res)

bt = Button (window, text=“Enter”, command=clicked)
Here, we are creating a textbox using the Tkinter entry class. The grid tells the code where we want the widget on the window.
What should happen when the button is clicked?
Well, we have a message that says ‘Welcome to’ and later whatever is input into the text area will be concatenated along with this and printed.
Check out the output. We’ve typed Python Training and so it displays welcome to python training.
Output:
All these widgets are really simple and more than that they always come in handy as well.
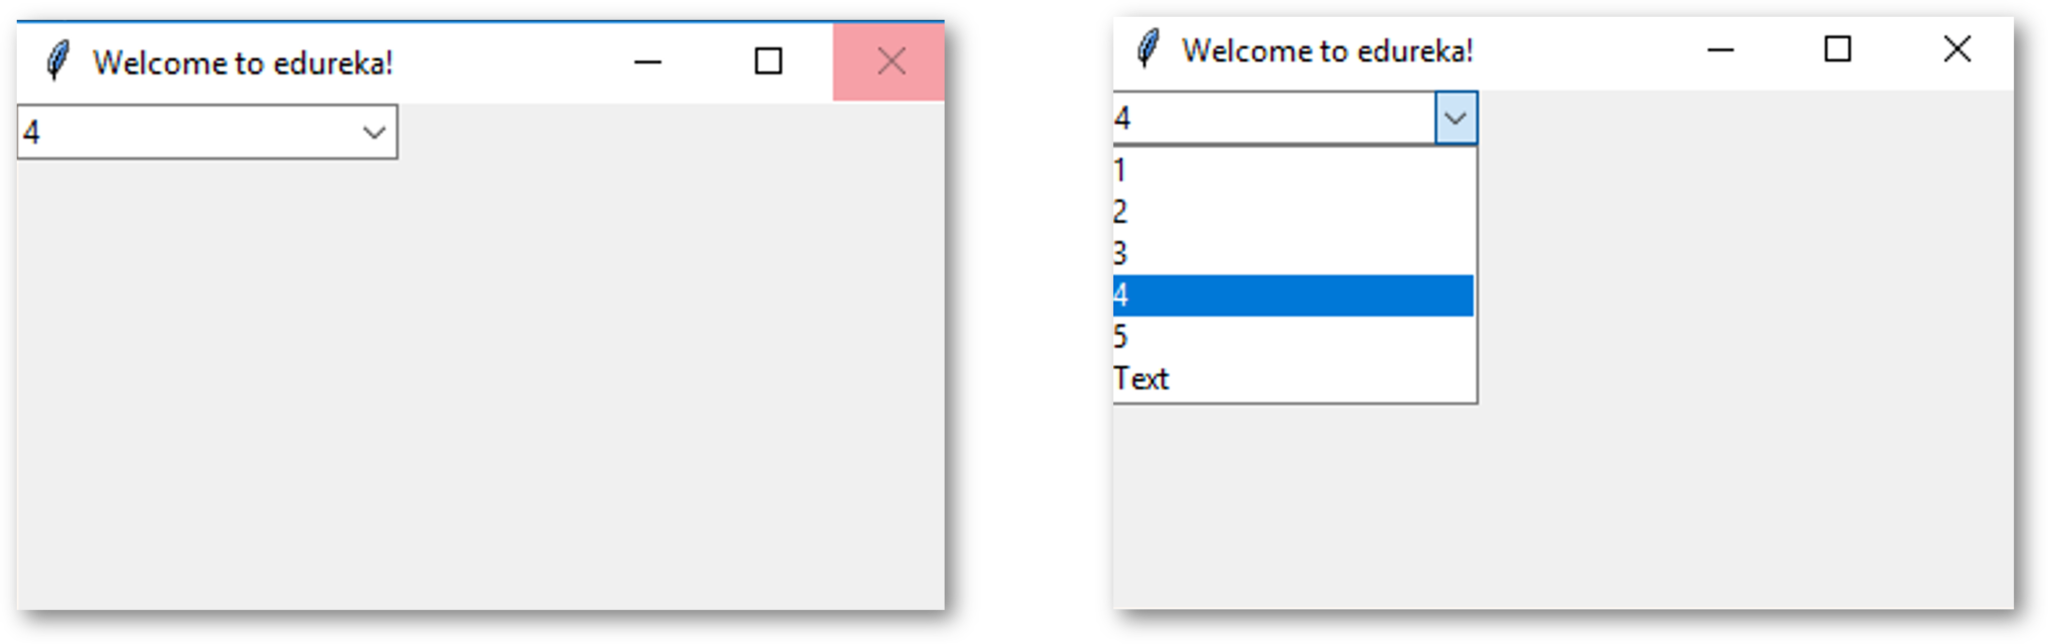
The next widget we will check on this Tkinter tutorial blog is the combobox widget.
Can you take a quick guess on what a combobox widget is?
Well, it is just a drop-down menu with certain options.
Here’s the code snippet:
from tkinter.ttk import *
combo = Combobox(window)
combo['values']= (1, 2, 3, 4, 5, "Text")
combo.current(3)
combo.grid(column=0, row=0)
So check out that there are no other parameters for the combobox definition apart from the window. And in the next line, we have defined certain values such numbers ranging from 1 to 5 and next, we have text. 1 to 5 were numeric inputs but we can have a textual input too.
It is defined using double quotes and we later will set the selected input. Followed by that, we have the grid function to place the widget on the window.
So we have the drop-down menu and it displays all that we’ve defined in the code. Here is the output for the code:
Another easy widget, done!
The next widget we will check on this Tkinter tutorial blog is the Checkbutton widget.
The checkbutton is widely used in almost all the sites.
So basically we use the checkbutton class to create the widget.
Code snippet:
chk_state = BooleanVar()
chk_state.set (True)
chk = Checkbutton(window, text=‘Select', var=chk_state)
chk.grid(column=0, row=0)
We start by creating a variable of the type booleanvar.
But this is not a standard python variable, correct? Well nothing to worry, this is a Tkinter variable.
By default, we keep the set state to be true which means that the button is checked already. And next, we are passing chk_state to the checkbutton class to set the check state for us.
Output:
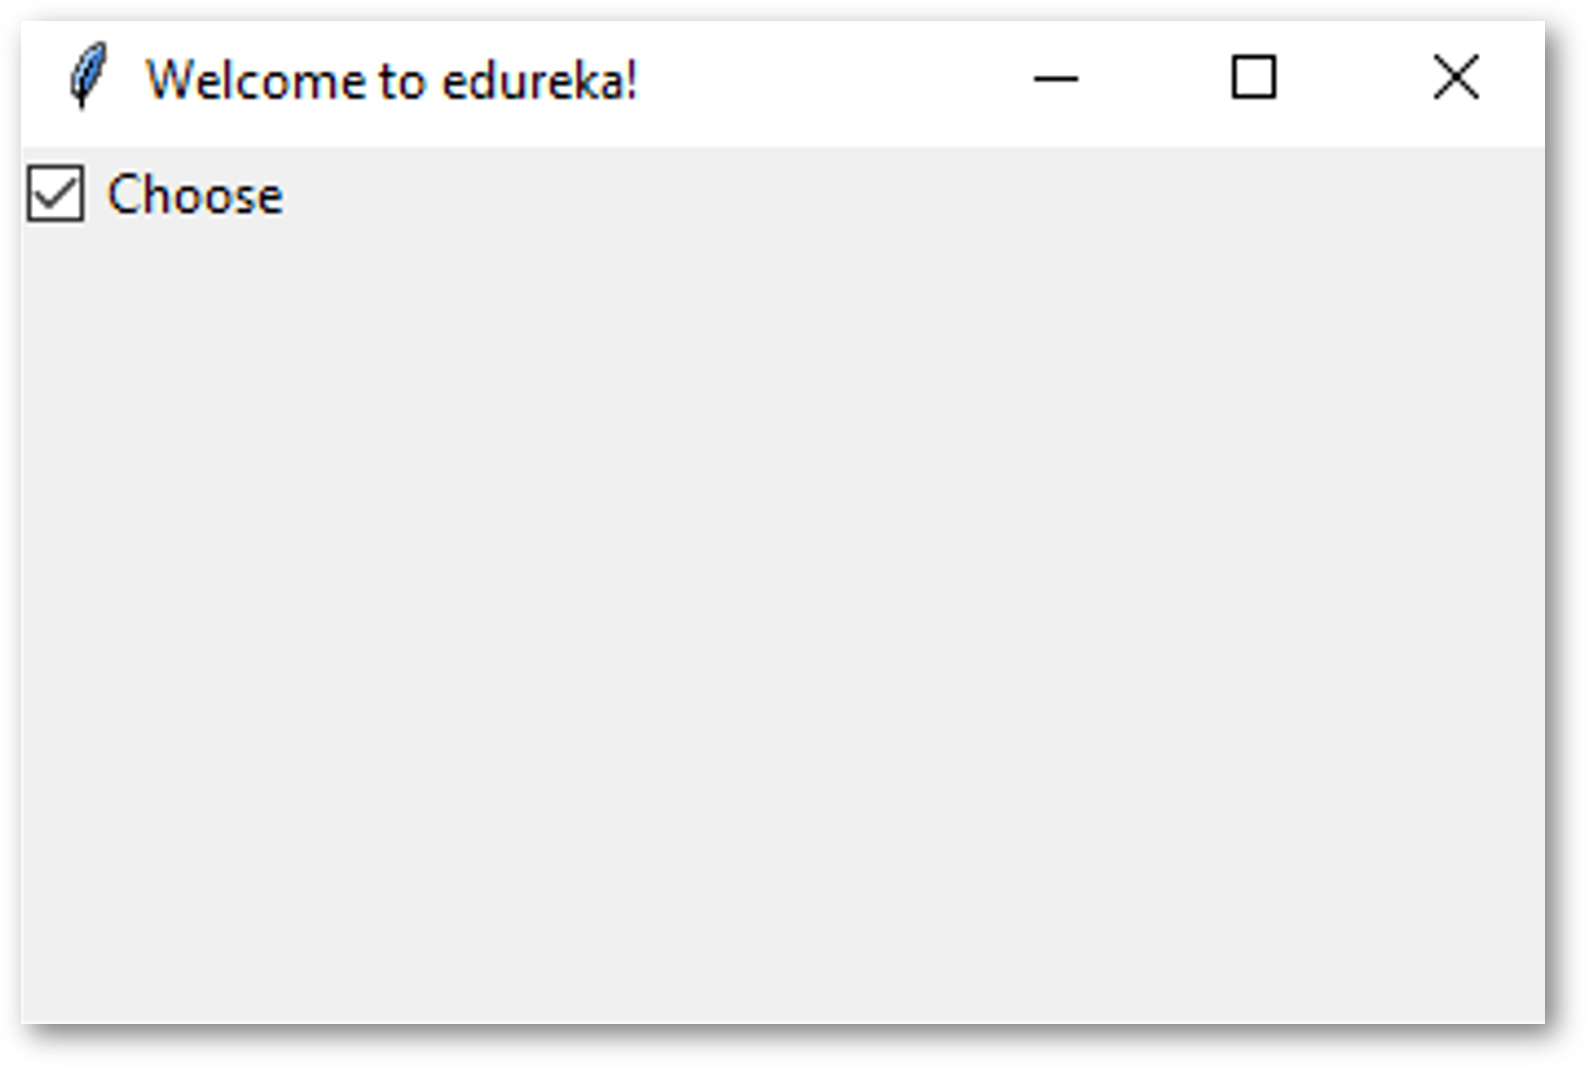
Check out the above output. So we have a really simple checkbutton widget with a certain text.
So what other easy widgets like these are available?
The next widget we will check on this Tkinter tutorial blog is the radio button widget.
The radio button widget is quite popular and I can give you a guarantee that you have seen and used this widget before.
We will use the radiobutton class to add the widget.
Take a look at the code:
rad1 = Radiobutton(window, text=Python', value=1)
rad2 = Radiobutton(window, text=Java', value=2)
rad3 = Radiobutton(window, text=Scala', value=3)
rad1.grid(column=0, row=0)
rad2.grid(column=1, row=0)
rad3.grid(column=2, row=0)
Here, we have the value parameters to be different. 1,2 and 3. However, if they are same, it will lead to conflict and there will be an error. So it is to be noted that a unique value is used to address the radio buttons.
The value should be unique but the textual data can be the same, however. Here we have considered Python, Java, and Scala. It can be whatever you want it to be based on the requirements.
Similarly, the grid function used to place the widget on the window.
Output:
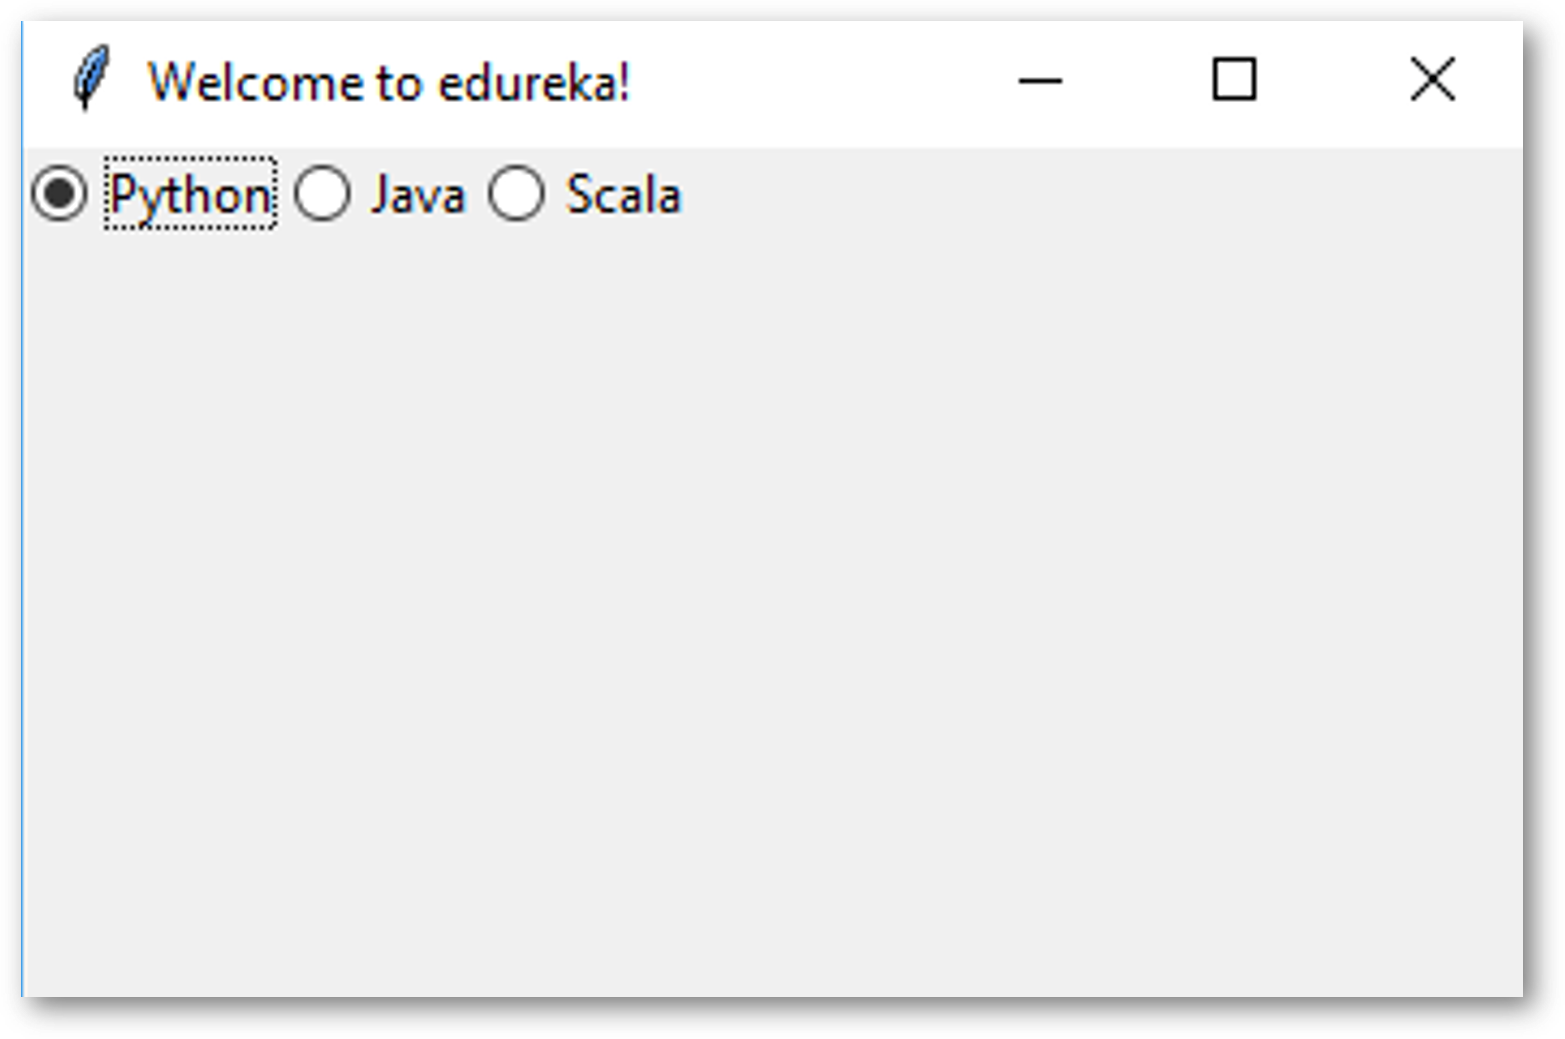
From the above output, do note that unlike a checkbutton where you can try selecting multiple, here in case of radio button you can only select one at a time.
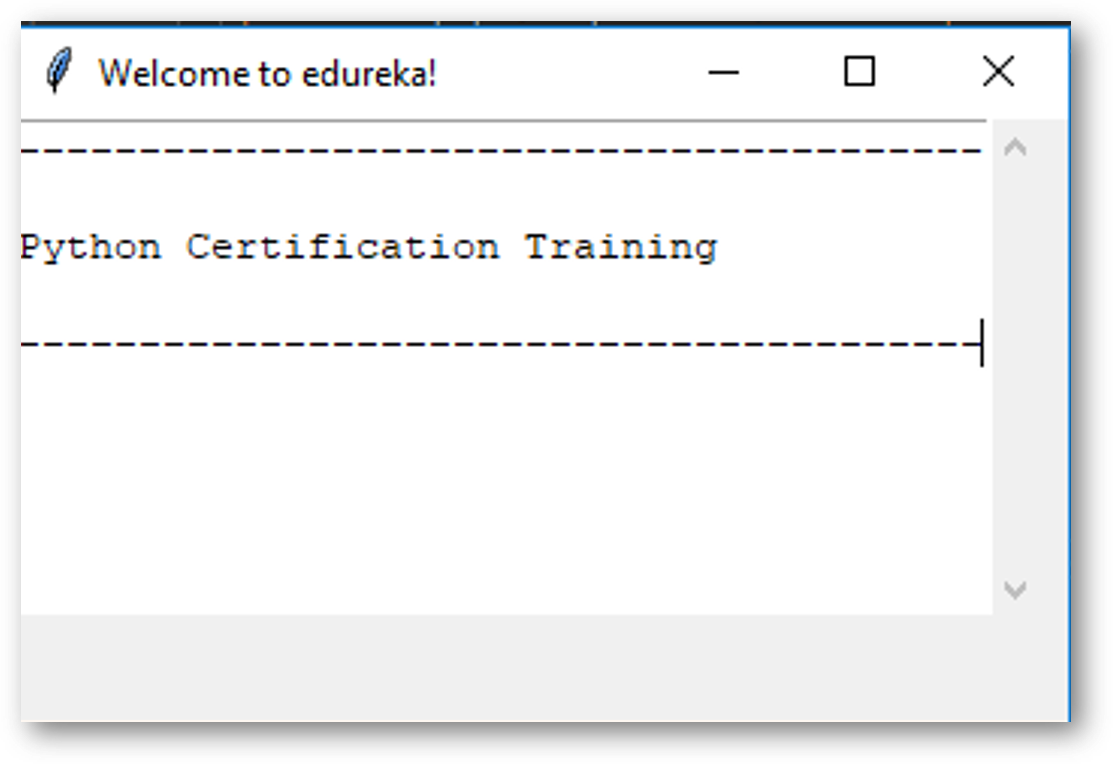
The next widget we will check on this Tkinter tutorial blog is the scrolled text widget.
Another nice widget we have is the scrolled text widget. This can be added using the scrolled text class.
Code:
from tkinter import scrolledtext
txt = scrolledtext.ScrolledText(window, width=40,height=10)
One thing you must note here which is very important is that you need to specify the width and the height of the scrolled text widget. Well if we do not specify the same, the entire window is filled up.
You can set the scrolled text content by using the insert method. The syntax is pretty simple. We need to use txt.insert with the message as a parameter.
Output:
The next widget we will check on this Tkinter tutorial blog is the message box widget.
Let us quickly walk through this simple widget. We are using the messagebox library here as well.
Code:
from tkinter import messagebox
messagebox.showinfo('Message title’, 'Message content')
Importing the library and displaying the message. But we need to define the message title and the message content here.
See, this is where things get interesting. Look at the snippet below:
def clicked():
    messagebox.showinfo('Message title', 'Message content')

btn = Button(window,text=‘ENTER', command=clicked)
Here we have made use of two of the widgets we learnt. We are using a button click to show a message box for us.
Here’s the output:

Pretty easy, right?
Last but not least, we will check out the Spinbox widget on this Tkinter tutorial.
Spinbox is a popular widget as well. There are two tabs, the up and down scroll tabs present. This is how it differs from the scroll down widget. Here the static number will change over a certain range of values.
Code:
spin = Spinbox(window, from_=0, to=100, width=5)
We have 3 parameters – from, to and width. From – tells the start and the default value of the range and to – gives us the upper threshold of the range.
Width is basically to set the size of the widget to 5 character spaces. But since are doing 0 to 100, 3 is sufficient for us but I have gone ahead and put 5 just so it looks well placed.
You can put whatever you want here and it’s valid but make sure it is more than what the range can offer.
Output:

And that’s a wrap to the majorly used widgets in Tkinter.
Next up on this Tkinter tutorial blog, we need to check out geometry management.
All widgets in the Tkinter will have some geometry measurements. These measurements give you to organize the widgets and their parent frames, windows and so on.
Tkinter has the following three Geometry Manager classes.
We already looked at the grid in almost all of the previous codes. If you have any doubts, head to the comment section and leave a comment, let’s interact there.
Next up on this Tkinter tutorial blog, we need to check out how we can organize layouts and widgets.
To arrange the layout in the window, we will use Frame, class. Let’s create a simple program to see how the Frameworks.
Steps:-
Note – The parameter of any widget method must be where to place the widget.
In the below code, we use to place in the window, top_frame, bottom_frame.
import tkinter
window = tkinter.Tk()
window.title("GUI")
# creating 2 frames TOP and BOTTOM
top_frame = tkinter.Frame(window).pack()
bottom_frame = tkinter.Frame(window).pack(side = "bottom")
# now, create some widgets in the top_frame and bottom_frame
btn1 = tkinter.Button(top_frame, text = "Button1", fg = "red").pack()# 'fg - foreground' is used to color the contents
btn2 = tkinter.Button(top_frame, text = "Button2", fg = "green").pack()# 'text' is used to write the text on the Button
btn3 = tkinter.Button(bottom_frame, text = "Button2", fg = "purple").pack(side = "left")# 'side' is used to align the widgets
btn4 = tkinter.Button(bottom_frame, text = "Button2", fg = "orange").pack(side = "left")
window.mainloop()
Above code produces the following window, if you didn’t change the above code.

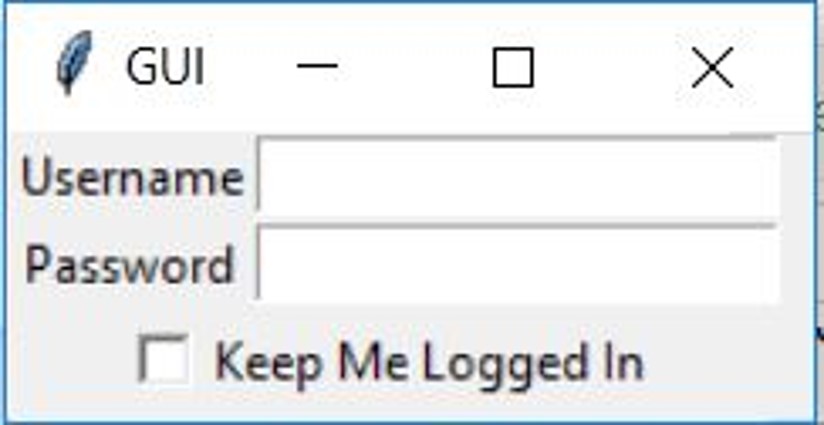
See the below example to get an idea of how it works.
import tkinter
window = tkinter.Tk()
window.title("GUI")
# creating 2 text labels and input labels
tkinter.Label(window, text = "Username").grid(row = 0) # this is placed in 0 0
# 'Entry' is used to display the input-field
tkinter.Entry(window).grid(row = 0, column = 1) # this is placed in 0 1
tkinter.Label(window, text = "Password").grid(row = 1) # this is placed in 1 0
tkinter.Entry(window).grid(row = 1, column = 1) # this is placed in 1 1
# 'Checkbutton' is used to create the check buttons
tkinter.Checkbutton(window, text = "Keep Me Logged In").grid(columnspan = 2) # 'columnspan' tells to take the width of 2 columns
# you can also use 'rowspan' in the similar manner
window.mainloop()
You will get the following output:
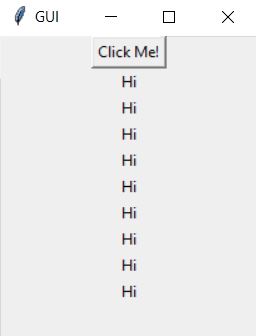
Next up on this Tkinter tutorial blog, we need to check out a concept called binding functions.
Calling functions whenever an event occurs refers to a binding function.
import tkinter
window = tkinter.Tk()
window.title("GUI")
# creating a function called say_hi()
def say_hi():

    tkinter.Label(window, text = "Hi").pack()
tkinter.Button(window, text = "Click Me!", command = say_hi).pack() # 'command' is executed when you click the button
# in this above case we're calling the function 'say_hi'.
window.mainloop()
The above program will produce the following results:
Another way to bind functions is by using events. Events are something like mousemove, mouseover, clicking, and scrolling.
The following program also produces the same output as the above one:
import tkinter
window = tkinter.Tk()
window.title("GUI")
# creating a function with an arguments 'event'
def say_hi(event): # you can rename 'event' to anything you want

    tkinter.Label(window, text = "Hi").pack()
btn = tkinter.Button(window, text = "Click Me!")
btn.bind("Button-1", say_hi) # 'bind' takes 2 parameters 1st is 'event' 2nd is 'function'
btn.pack()
window.mainloop()
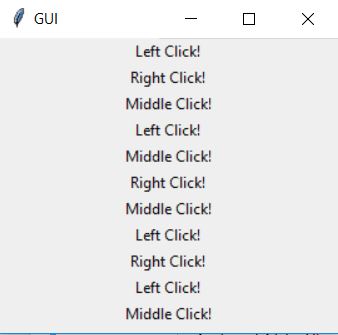
Clicking events are of 3 different types namely leftClick, middleClick, and rightClick.
Now, you will learn how to call a particular function based on the event that occurs.
import tkinter
window = tkinter.Tk()
window.title("GUI")
#creating 3 different functions for 3 events
def left_click(event):

    tkinter.Label(window, text = "Left Click!").pack()
def middle_click(event):

    tkinter.Label(window, text = "Middle Click!").pack()
def right_click(event):

    tkinter.Label(window, text = "Right Click!").pack()
window.bind("Button-1", left_click)
window.bind("Button-2", middle_click)
window.bind("Button-3", right_click)
window.mainloop()
If you run the above program, you will see a blank window. Now, click the left, middle and right button to call respective functions.
You get the something similar results to the following:
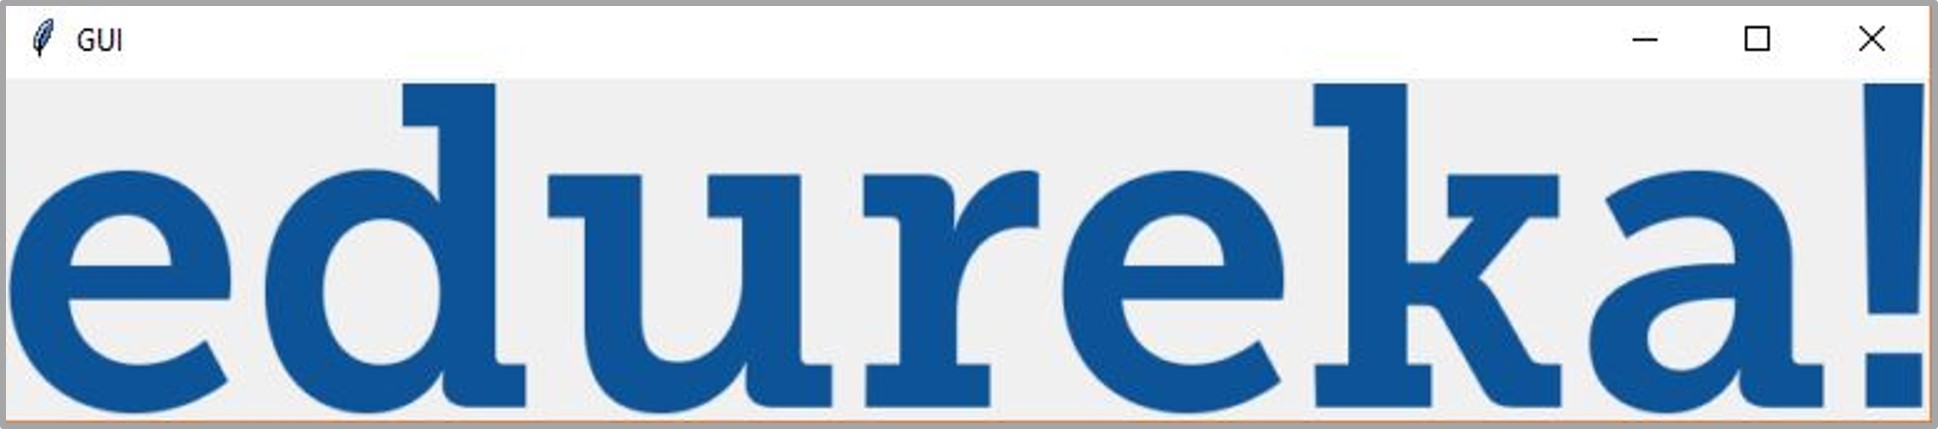
Next up on this Tkinter tutorial blog, we need to check out how we can add images to our window.
You can add Images and Icons using PhotoImage method.
Let’s how it works:
import tkinter
window = tkinter.Tk()
window.title("GUI")
# taking image from the directory and storing the source in a variable
icon = tkinter.PhotoImage(file = "images/edureka.png")
# displaying the picture using a 'Label' by passing the 'picture' variriable to 'image' parameter
label = tkinter.Label(window, image = icon)
label.pack()
window.mainloop()
You can see the icon in the GUI:
Now, you’re able to:-
So next up on this Tkinter Tutorial blog, we’re going to create a simple Calculator GUI with all the stuff that we’ve learned till now.
Every GUI apps include two steps:
from tkinter import *
# creating basic window
window = Tk()
window.geometry("312x324") # size of the window width:- 500, height:- 375
window.resizable(0, 0) # this prevents from resizing the window
window.title("Calcualtor")
################################### functions ######################################
# 'btn_click' function continuously updates the input field whenever you enters a number
def btn_click(item):

    global expression

    expression = expression + str(item)

    input_text.set(expression)
# 'btn_clear' function clears the input field
def btn_clear():

    global expression

    expression = ""

    input_text.set("")

# 'btn_equal' calculates the expression present in input field

def btn_equal():

    global expression

    result = str(eval(expression)) # 'eval' function evalutes the string expression directly

    # you can also implement your own function to evalute the expression istead of 'eval' function

    input_text.set(result)

    expression = ""

expression = ""

# 'StringVar()' is used to get the instance of input field

input_text = StringVar()

# creating a frame for the input field

input_frame = Frame(window, width = 312, height = 50, bd = 0, highlightbackground = "black", highlightcolor = "black", highlightthickness = 1)

input_frame.pack(side = TOP)

# creating a input field inside the 'Frame'

input_field = Entry(input_frame, font = ('arial', 18, 'bold'), textvariable = input_text, width = 50, bg = "#eee", bd = 0, justify = RIGHT)

input_field.grid(row = 0, column = 0)

input_field.pack(ipady = 10) # 'ipady' is internal padding to increase the height of input field

# creating another 'Frame' for the button below the 'input_frame'

btns_frame = Frame(window, width = 312, height = 272.5, bg = "grey")

btns_frame.pack()

# first row

clear = Button(btns_frame, text = "C", fg = "black", width = 32, height = 3, bd = 0, bg = "#eee", cursor = "hand2", command = lambda: btn_clear()).grid(row = 0, column = 0, columnspan = 3, padx = 1, pady = 1)

divide = Button(btns_frame, text = "/", fg = "black", width = 10, height = 3, bd = 0, bg = "#eee", cursor = "hand2", command = lambda: btn_click("/")).grid(row = 0, column = 3, padx = 1, pady = 1)

# second row

seven = Button(btns_frame, text = "7", fg = "black", width = 10, height = 3, bd = 0, bg = "#fff", cursor = "hand2", command = lambda: btn_click(7)).grid(row = 1, column = 0, padx = 1, pady = 1)

eight = Button(btns_frame, text = "8", fg = "black", width = 10, height = 3, bd = 0, bg = "#fff", cursor = "hand2", command = lambda: btn_click(8)).grid(row = 1, column = 1, padx = 1, pady = 1)

nine = Button(btns_frame, text = "9", fg = "black", width = 10, height = 3, bd = 0, bg = "#fff", cursor = "hand2", command = lambda: btn_click(9)).grid(row = 1, column = 2, padx = 1, pady = 1)

multiply = Button(btns_frame, text = "*", fg = "black", width = 10, height = 3, bd = 0, bg = "#eee", cursor = "hand2", command = lambda: btn_click("*")).grid(row = 1, column = 3, padx = 1, pady = 1)

# third row

four = Button(btns_frame, text = "4", fg = "black", width = 10, height = 3, bd = 0, bg = "#fff", cursor = "hand2", command = lambda: btn_click(4)).grid(row = 2, column = 0, padx = 1, pady = 1)

five = Button(btns_frame, text = "5", fg = "black", width = 10, height = 3, bd = 0, bg = "#fff", cursor = "hand2", command = lambda: btn_click(5)).grid(row = 2, column = 1, padx = 1, pady = 1)

six = Button(btns_frame, text = "6", fg = "black", width = 10, height = 3, bd = 0, bg = "#fff", cursor = "hand2", command = lambda: btn_click(6)).grid(row = 2, column = 2, padx = 1, pady = 1)

minus = Button(btns_frame, text = "-", fg = "black", width = 10, height = 3, bd = 0, bg = "#eee", cursor = "hand2", command = lambda: btn_click("-")).grid(row = 2, column = 3, padx = 1, pady = 1)

# fourth row

one = Button(btns_frame, text = "1", fg = "black", width = 10, height = 3, bd = 0, bg = "#fff", cursor = "hand2", command = lambda: btn_click(1)).grid(row = 3, column = 0, padx = 1, pady = 1)

two = Button(btns_frame, text = "2", fg = "black", width = 10, height = 3, bd = 0, bg = "#fff", cursor = "hand2", command = lambda: btn_click(2)).grid(row = 3, column = 1, padx = 1, pady = 1)

three = Button(btns_frame, text = "3", fg = "black", width = 10, height = 3, bd = 0, bg = "#fff", cursor = "hand2", command = lambda: btn_click(3)).grid(row = 3, column = 2, padx = 1, pady = 1)

plus = Button(btns_frame, text = "+", fg = "black", width = 10, height = 3, bd = 0, bg = "#eee", cursor = "hand2", command = lambda: btn_click("+")).grid(row = 3, column = 3, padx = 1, pady = 1)

# fourth row

zero = Button(btns_frame, text = "0", fg = "black", width = 21, height = 3, bd = 0, bg = "#fff", cursor = "hand2", command = lambda: btn_click(0)).grid(row = 4, column = 0, columnspan = 2, padx = 1, pady = 1)

point = Button(btns_frame, text = ".", fg = "black", width = 10, height = 3, bd = 0, bg = "#eee", cursor = "hand2", command = lambda: btn_click(".")).grid(row = 4, column = 2, padx = 1, pady = 1)

equals = Button(btns_frame, text = "=", fg = "black", width = 10, height = 3, bd = 0, bg = "#eee", cursor = "hand2", command = lambda: btn_equal()).grid(row = 4, column = 3, padx = 1, pady = 1)

window.mainloop()
The concepts discussed in this tutorial should help you make your own GUI apps and add functionality to the same.
This will be very handy when you are trying to create a customized application with a GUI that suits your personal needs. Now, you should also be able to use these widgets and images to develop applications easily with the help of Python.
After reading this blog on Tkinter tutorial using Python, I am pretty sure you want to know more about Python. To know more about Python you can refer the following blogs:
I hope you have enjoyed this post on Tkinter Tutorial. If you have any questions regarding this tutorial, please let me know in the comments.
| Course Name | Date | Details |
|---|---|---|
| Python Programming Certification Course | Class Starts on 27th April,2024 27th April SAT&SUN (Weekend Batch) | View Details |
| Python Programming Certification Course | Class Starts on 25th May,2024 25th May SAT&SUN (Weekend Batch) | View Details |


 REGISTER FOR FREE WEBINAR
  Thank you for registering Join Edureka Meetup community for 100+ Free Webinars each month JOIN MEETUP GROUP


