
Advanced DevOps Certification Training with G ...
- 24k Enrolled Learners
- Weekend
- Live Class
(7990)


 Copy Link!
Git, as you know, is the most popular versioning tool used today to store, track and version any kind of data.
Some of the key features of git are its speed, distributed nature, security, painless branching and merging along with collaborative work among multiple contributors.
Starting our discussion from here, let us focus on how git helps you to collaborate and share your work with the peers so that everybody can work on the same code simultaneously without corrupting each other’s data.
This is where the concept of remote repositories come into the picture.
I assume that you have mastered the art of editing, adding and moving your data from your working directory(filesystem) to the Staging area and finally committing it to your local repository(database).
This inspires us to push our data to the next level “Remote repo” to publish it on a remote repository.
Yes, it is! However, as indicated in the diagram below your data is still in on the local database after you commit it and not shared with your colleagues yet.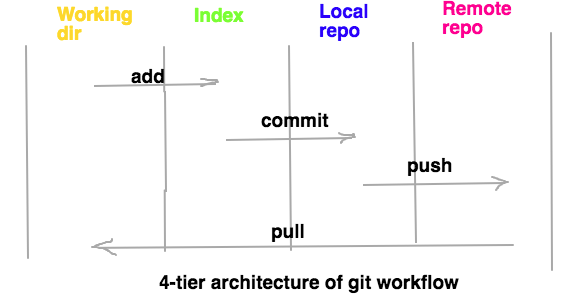
This article fills the gap between picking up our data from your local repository and taking it to the next layer called the remote repository.
A database of collected information stored in a location that can be shared with your teammates by giving them access.
It is ideally hosted on a cloud or on a server (local or remote) on the internet or your local network.
A remote repository is just like your local git repository, except that it is generally declared as a bare repository so in order not to have a working copy like your local one.
This is done to restrict the direct changes made on the remote repository.
 Bare repository concept is an added advantage for a remote repository to keep it protected and be used for its sole purpose of sharing the code among team members.
This is achieved by declaring the remote repository as bare by using the ‘--bare‘ flag at the time of initializing it as a git repository.
By doing so, your repo is created with git metadata or in other words git objects stored under the hidden ‘.git’ directory alone and no working copy is available for anyone to directly add data.
Command: git init --bare .
With this in mind, moving forward we shall see more ways to manage a remote repo and how do we sync up our local work with the remote.
First and foremost, you need to decide on a location you want to place your remote repo on.
There are quite a few popular cloud-based git hosting repositories such as – GitLab, BitBucket, GitHub, Perforce and CloudForge to name a few.
In this post, I am considering GitHub as this is the place I first started keeping my git repositories. To begin, all you have to do is sign into a GitHub account and then create a new repository, this creates a URL pointing to this remote repo.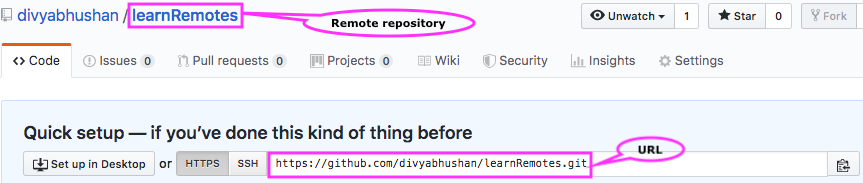
Git supports ssh, git, http and https protocols to address a repository URL.
Alternatively, you can also place your project elsewhere say a Linux server following the below commands-cd $HOMEmkdir remote_repocd remote_repogit init --bare .
Attaching a remote to your working copy simply means to create a pointer reference handler for the remote or simply called a “remote handler“.
Let’s jump to my project that I want to publish- cd learnRemotes
Syntax: git remote add <remote_name> <url>
Command: git remote add origin https://github.com/divyabhushan/learnRemotes.git
“Origin is the default reference name for the remote handler.” (remote name must be some relevant name)
Let’s see if that worked, using the command: git remote![]()
It did :)
Print the remote URL as well along with the name:
git remote -v
Well done! You are all set with establishing a connection to your remote repository from your local working directory.
Syntax: git push --all --tags [-u | --set-upstream] <repository>
Command: git push origin master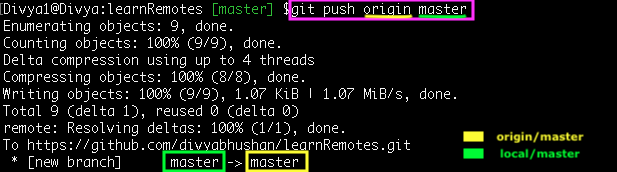
So, you read this as “push the diff of commits to origin from local master”.
If you check your GitHub account, your local commits(data) must be displayed there-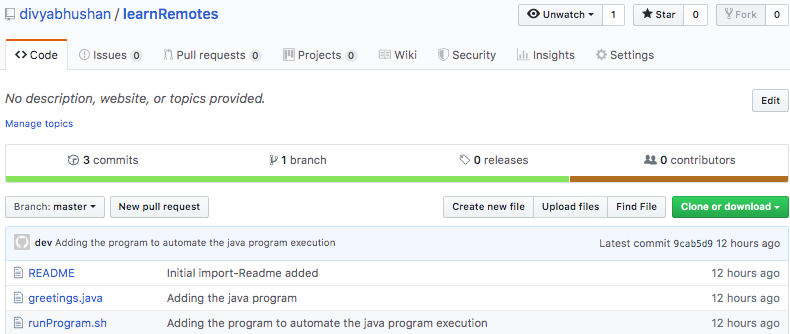
So, you have successfully published your work on the remote repository.
However, it is important that you set up your local branch to track the changes on the remote branch automatically.
Use the ‘--set-upstream or -u‘ flag along with the ‘git push’ command
Command: git push -u origin master
![]()
Let’s further create a new commit on the ‘master’ branch and verify how git detects it-
Command: git status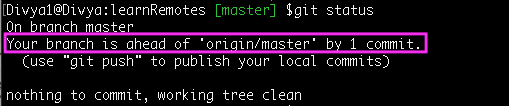
Show the tracking branches in verbose mode
Command: git branch -vv![]()
Hence every time, there is a difference in commits between your local and remote repository on the tracked branch, Git will let you know.
Isn’t that cool!!!
It is a piece of cake when you clone a remote repository!!! 
So, cloning from a remote repository does 2 things first, your remote reference is added automatically, and the second default branch is set to track remote branch automatically.
Step1: Clone your remote repo as a different user-
Command: git clone https://github.com/divyabhushan/learnRemotes.git developer2cd developer2
Step2: Show the remote and its url
Command: git remote -v
Step3: List the tracking branches
Command: git branch -vv![]()
The fun begins when ‘developer2’ will start his/her own work and push to the remote.![]()
You can connect and contribute to more than one remote repository from a single project.
Command: git branch -r
Use the ‘-a’ option to print both local and remote branches, try it in your local repo after creating few local branches.
Initial setup
Developer2 decides to change a couple of things such as:
a. Create a new ‘feature’ from the latest commit on the ‘master’ branch and make a new commit on ‘feature’ branch
Commands:git checkout -b featureecho "feature enhancements">feature.txtgit add . && git commit -m 'feature enhancements'
b. Create a different ‘feature2’ branch from an older commit on the ‘master’ branch
Commands:git checkout -b feature2 95651fbecho "feature2 added">feature2.txtgit add . && git commit -m 'Adding feature2 changes'
Let’s visualize the branches on developer2 machine along with the tracking information:
As you must have noticed, the new branches are not set up to track the remote branches.
Pushing changes to remote
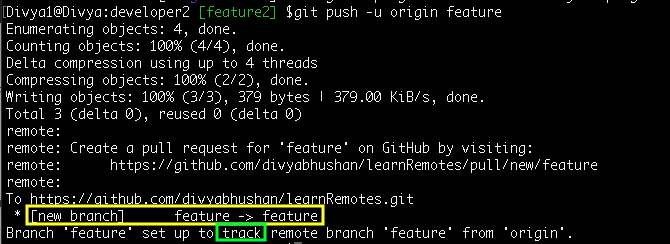
Firstly let me push the ‘feature’ branch to remote with ‘–set-upstream or -u’ flag
Command: git push -u origin feature
![]()
A new branch will be created on the remote, if it does not exists already!!!
At this moment, list the remote branches with the command: ‘git branch -r’

Another way to track remote branch
Furthermore, let’s set the ‘feature2’ branch also to point to the same ‘feature’ branch on the remote
Command: git branch --set-upstream-to=origin/feature feature2
![]()
![]()
A quick tip: You may omit the local branch name if you are already on that branch, in other words, the local branch is already checked-out.
List the branches in verbose mode yet again, command: git branch -vv

Notice, both local branches ‘feature’ and ‘feature2’ pointing to the same remote branch ‘feature’.
Let’s consider the part where the remote branch you are tracking has already been updated, what then?
A simple ‘git status‘ or a ‘git checkout <branch_name>‘ or even the ‘git branch -vv‘ command warns us with such a mismatch-
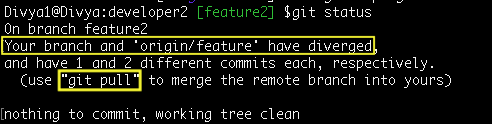
‘Developer2’ must first update the local references and objects (‘git fetch‘) and then merge the remote and local changes (‘git merge’).
Interestingly, you can replace these two commands by a single ‘git pull’ command.
Syntax: git pull <options> <remote_repository> <local_refspec...>
–for un-tracked branch
Syntax: git pull <remote_repository> [<remote_branch>:<local_branch>]
Command: git pull origin feature:feature2
–for tracked branch
Syntax: git pull <remote_repository>
Command: git pull
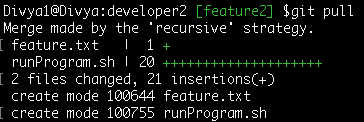
=> In practice, there may be conflicts arising at this stage when you pull from remote for simplicity I have generated a no-conflict commit change.
After ‘developer2’ pull (fetch and merge) the remote latest changes must now publish his own work-
Command: git push origin HEAD:feature
Note: upstream branch ‘feature’ does not match the local branch ‘feature2’ name, you have to provide it explicitly
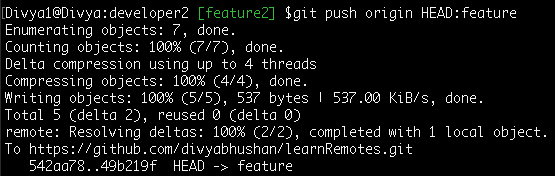
Reminder: ‘HEAD’ is the latest commit on the local ‘feature2’ branch.
When to use ‘git fetch’?
At times when you have the need to just update your reference heads without actually downloading(pulling) from the remote.
Or when the remote branches have been modified/deleted on updated, you will have to run the fetch command with the ‘--prune‘ option.
As a best practice, you must run ‘git fetch’ command every time you start working on your local repo.
Finally, you would want to carry out some housekeeping tasks such as renaming or removing remotes and branches.
These are just as important as the previous commands.
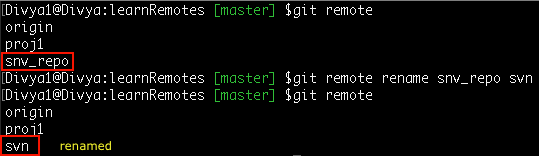
Syntax: git remote rename <old_name> <new_name>
Command: git remote rename snv_repo svn
For example, consider a project manager associated with 3 projects-
Suppose you no more synch up with a remote repository, you are likely to delete the pointer reference to it.
However, this is not going to affect the remote repository and other’s work.
Syntax: git remote remove <remote_ref_name>
Command: git remote remove proj1

![]() What if you had a local branch set to track a branch from the removed ‘proj1’ repository?
What if you had a local branch set to track a branch from the removed ‘proj1’ repository?
Well, your local branch(and hence the work) is safe and still present, just its remote tracking reference and configuration settings will be auto-removed
Say you accidentally pushed your personal rough work on a branch to the remote but do not want others to check it yet –
Remove the ‘unfinishedWork’ branch from the remote ‘svn’-
Command: git branch -vv #List the remote-tracking branches

Syntax: git push --delete <remote_repo> <branch_name>
Command: git push --delete svn unfinishedWork


With this, we come to an end of this article. If you found this “Tutorial” relevant, check out the DevOps Training by Edureka, a trusted online learning company with a network of more than 250,000 satisfied learners spread across the globe. The Edureka DevOps Certification Training course helps learners gain expertise in various DevOps processes and tools such as Puppet, Jenkins, Nagios and GIT for automating multiple steps in SDLC.


 Thank you for registering Join Edureka Meetup community for 100+ Free Webinars each month JOIN MEETUP GROUP