Ever since the concept of Automation Testing has been introduced, a lot of testing methodologies have evolved, paradigms have changed but the requirements somehow triumphed to remain constant. One such methodology is TestNG which helps us to group the test cases into different sections of code with the help of Annotations. But how does it work? Let’s understand this concept through the medium of this article on TestNG Annotations in Selenium. For further understanding, check out the Selenium Course.
Introduction to TestNG
TestNG stands for Test Next Generation and it is an open-source test automation framework inspired by JUnit and NUnit. Well, TestNG is not just inspired but, it is an upgraded version of these two frameworks. So what is the upgrade here? The upgrade with TestNG is that it provides additional functionality like test annotations, grouping, prioritization, parameterization and sequencing techniques in the code which was not possible earlier.
 It not only manages test cases, but even detailed reports of tests can also be obtained by using TestNG. There will be a detailed summary which will display the number of test cases that have failed. Also, the bugs can be located accurately and fixed at the earliest. Now that you know what is TestNG, let’s see why to use TestNG in Selenium.
Why use TestNG in Selenium?

TestNG also supports the following features:
- It generates the report in a proper format that includes a number of executed test cases, the number of failed test cases, and test cases that have been skipped.
- Multiple test cases can be grouped more easily by converting them into TestNG.xml file. Here, you can set the priorities to execute the test cases.
- Using TestNG, you can execute multiple test cases on multiple browsers, i.e., cross-browser testing.
- The testing framework can be easily integrated with tools like Maven, Jenkins, etc.
Now that you know what is TestNG and why it is used, let’s move further and know the various Annotations that TestNG support in Selenium.
TestNG Annotations
TestNG Annotations in Selenium are used to control the next method to be executed. Test annotations are defined before every method in the test code. In case any method is not prefixed with annotations, then that method will be ignored and it will not be executed as a part of the test code. To define them, methods need to be simply annotated with ‘@Test‘.
Types of TestNG Annotations:
Below is the list of annotations that TestNG support in selenium.
- @BeforeMethod: A method with this annotation will be executed before every @test annotated method.
- @AfterMethod: This annotation will be executed after every @test annotated method.
- @BeforeClass: This annotation will be executed before first @Test method execution. It runs only once per class.
- @AfterClass: This annotation will be executed after all the test methods in the current class have been run
- @BeforeTest: A method with this annotation will be executed before first @Test annotated method.
- @AfterTest: A method with this annotation will be executed when all @Test annotated methods complete the execution of those classes which are inside <test> tag in TestNG.xml file.
- @BeforeSuite: This annotation will run only once before all tests in the suite have run
- @AfterSuite: A method with this annotation will run once after the execution of all tests in the suite have run
- @BeforeGroups: This annotated method will run before the first test run of that specific group.
- @AfterGroups: This annotated method will run after all test methods of that group completes its execution.
So this is all about Annotations in TestNG. Now let’s move further and understand how to write a first test case using TestNG.
Creating Test Cases using TestNG Annotations
The various steps involved in creating test cases using TestNG Annotation are as follows:
- Create a project and add the TestNG Library.
- Create a class file and code the program
- Finally, write XML file and execute it on TestNG Suite.
If you wish to get into more details about writing a test case using TestNG, then kindly check this article on TestNG Tutorial. Now, let’s move further and understand how TestNG annotations will help you to group the test cases and configure your program.
In this test case, I will use three different Annotations and code the program. Let’s understand how to do that with the below example.
package co.edureka.pages;

import org.openqa.selenium.WebDriver;
import org.openqa.selenium.chrome.ChromeDriver;
import org.testng.Assert;
import org.testng.annotations.AfterTest;
import org.testng.annotations.BeforeTest;
import org.testng.annotations.Test;

public class AnnotationExample {
public String baseUrl = "https://www.edureka.co/";
String driverPath = "C://Users//Neha_Vaidya//Desktop//chromedriver_win32//chromedriver.exe";
public WebDriver driver ;

@BeforeTest
public void launchBrowser() {
System.out.println("launching Chrome browser");
System.setProperty("webdriver.chrome.driver", driverPath);
driver = new ChromeDriver();
driver.get(baseUrl);
}
@Test
public void verifyHomepageTitle() {
String expectedTitle = "Instructor-Led Online Training with 24X7 Lifetime Support | Edureka";
String actualTitle = driver.getTitle();
Assert.assertEquals(actualTitle, expectedTitle);
}
@AfterTest
public void terminateBrowser(){
driver.close();
}
}
Basically, I want to check whether the actual title of the Edureka webpage matches with the expected title or not. So, I am first using ‘@BeforeTest’ Annotation and creating an instance of browser driver and navigating through Edureka website using the driver.get() method. So these are the steps that should be performed before the test.
Next, during this test, I want to check whether the expected title and actual title matches or not. That’s why I am specifying all the steps with @Test Annotation. Finally, I want to close the driver and terminate the browser after the test. That’s why I am using @AfterTest Annotation and closing the driver. So this is how I am grouping the entire code into various annotations and executing the test case. Let’s run the program as TestNG Test and check the output.
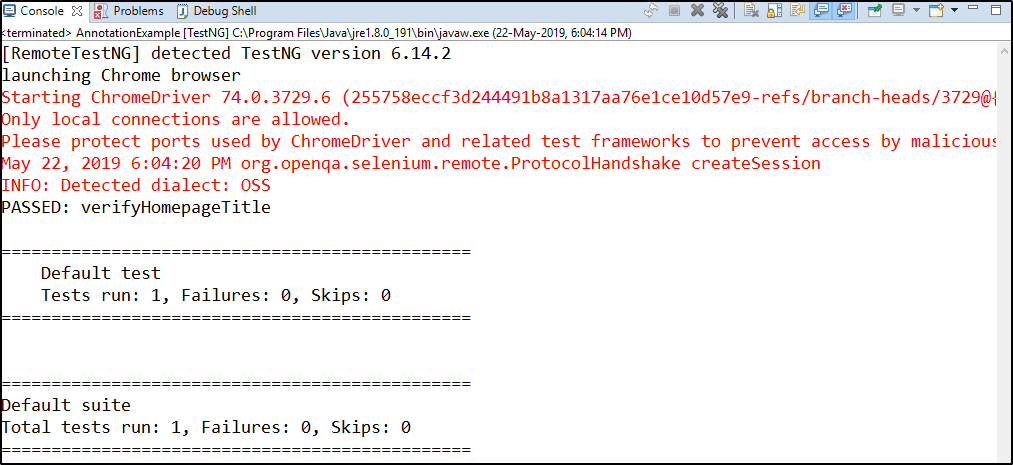
You can see in the snapshot that the test case run successfully on a default test and suite. Also, the test case passed and there is no failure as well.
Now let’s see one more example to understand the execution flow of various annotations in depth. It is very necessary to know the flow of execution of the annotations. So, let’s take a look at the snapshot below to know about it.
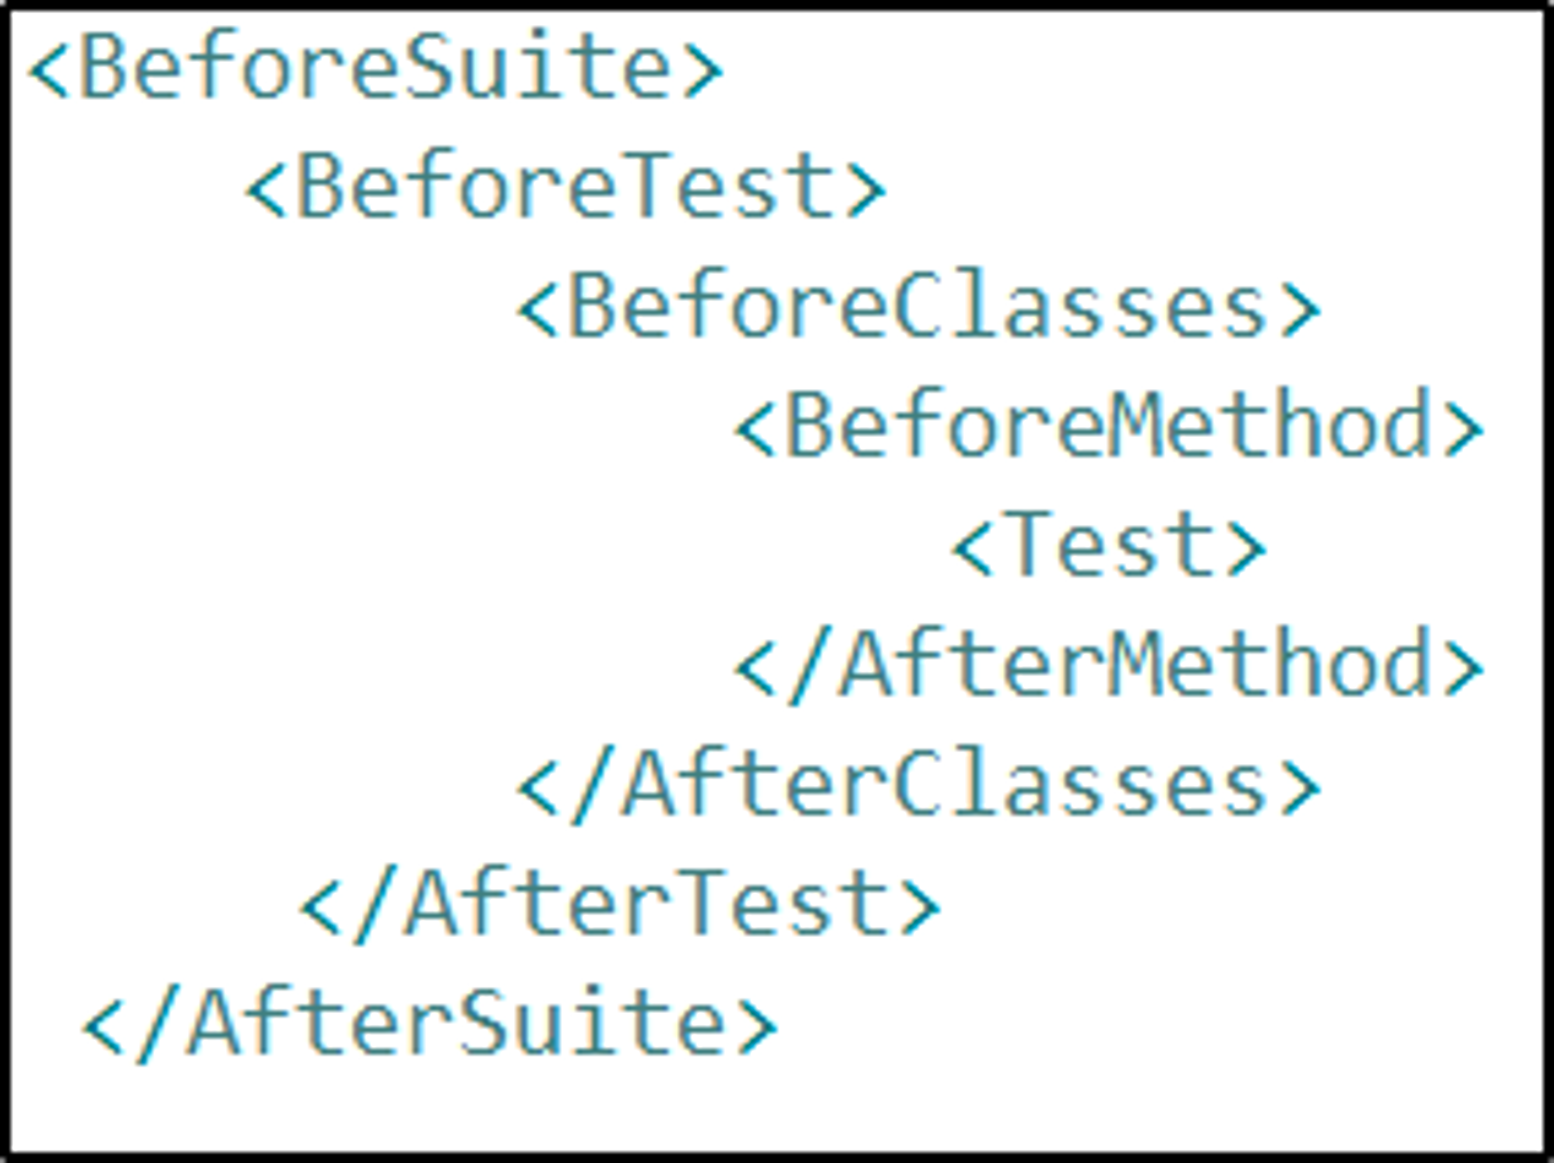
The flow of execution of annotations will be as shown in the above snapshot. Now let’s see one more example to understand the same.
Test Case 2:
package co.edureka.pages;

import org.testng.annotations.AfterClass;
import org.testng.annotations.AfterMethod;
import org.testng.annotations.AfterSuite;
import org.testng.annotations.AfterTest;
import org.testng.annotations.BeforeClass;
import org.testng.annotations.BeforeMethod;
import org.testng.annotations.BeforeSuite;
import org.testng.annotations.BeforeTest;
import org.testng.annotations.Test;

public class testngAnnotations {

// Test Case 1
@Test
public void testCase1() {
System.out.println("Test Case 1");
}

// Test Case 2
@Test
public void testCase2() {
System.out.println("Test Case 2");
}

@BeforeMethod
public void beforeMethod() {
System.out.println("Before Method");
}

@AfterMethod
public void afterMethod() {
System.out.println("After Method");
}

@BeforeClass
public void beforeClass() {
System.out.println("Before Class");
}

@AfterClass
public void afterClass() {
System.out.println("After Class");
}

@BeforeTest
public void beforeTest() {
System.out.println("Before Test");
}

@AfterTest
public void afterTest() {
System.out.println("After Test");
}

@BeforeSuite
public void beforeSuite() {
System.out.println("Before Suite");
}

@AfterSuite
public void afterSuite() {
System.out.println("After Suite");
}

}
In the above code, I am randomly writing all the methods with Annotations. I am not following the sequence of it. But, when I execute the program, it will follow the same order. Let’s now check the output.
[RemoteTestNG] detected TestNG version 6.14.2
Before Suite
Before Test
Before Class
Before Method
Test Case 1
After Method
Before Method
Test Case 2
After Method
After Class
After Test
PASSED: testCase1
PASSED: testCase2

===============================================
Default test
Tests run: 2, Failures: 0, Skips: 0
===============================================

After Suite

===============================================
Default suite
Total tests run: 2, Failures: 0, Skips: 0
===============================================
From the above output, you can notice that it executed both the test cases and Before Suite and After Suite executed only once. Also, the test ran successfully on the default test and suite. This is how you need to execute the test cases using Annotations. So that brings us to the end of this article on TestNG Annotations in Selenium.
I hope you understood the concepts and it added value to your knowledge. Now, if you want to get more insights into Selenium, you can check out the article on Selenium Tutorial.
Find out our Selenium Training in Top Cities/Countries
| India | Other Cities/Countries |
| Bangalore | US |
| Hyderabad | UK |
| Pune | Canada |
| Chennai | Australia |
| Mumbai | Singapore |
| Kolkata | Edinburgh |
Got a question for us? Please mention it in the comments section of TestNG Annotations in Selenium article and we will get back to you.