In this Swift Tutorial blog, I am going to introduce you to some of the basic concepts of Swift. But, before moving ahead, I would get you guys familiar with “What is Swift” & how can you install Swift on your system. So, let’s get started now!!
In this blog on Swift Tutorial, I would be covering the following topics:
- What is Swift?
- How to install Swift?
- Basic Syntax
- Variables, Datatypes & TypeCasting
- Operators
- Conditional Statements
- Iterative Loops
- Arrays & Tuples
- Sets & Dictionaries
- Functions
- Closures & Structures
- Class & Inheritance
- Protocols
- Extensions
- Generics
- Enumerations
Swift Tutorial: What is Swift?
Swift is a programming language which adopts the best of C and Objective-C and is developed by Apple Inc. for iOS/OS X development to run on many existing iOS 6 and OS X 10.8 platforms.
Swift Tutorial: How to install Swift?
To use Swift, you need Xcode software to run your Swift coding in the Playground and once you are comfortable with Swift, you can use Xcode IDE for iOS/OS x application development.
So, assuming that you have an account at Apple Developer website, you just have to go to Download for Apple Developers.
Once, you go to the link, select the latest version of Xcode available and download it by clicking on the given link near the disc image.
After downloading the dmg file, you can install it by simply double-clicking on it.
Alright!! So, once you have your xCode, just double-click on it to open and then go to File -> New and choose Playground. Then choose iOS and mention the playground’s name. Once you are done with that click on Create.
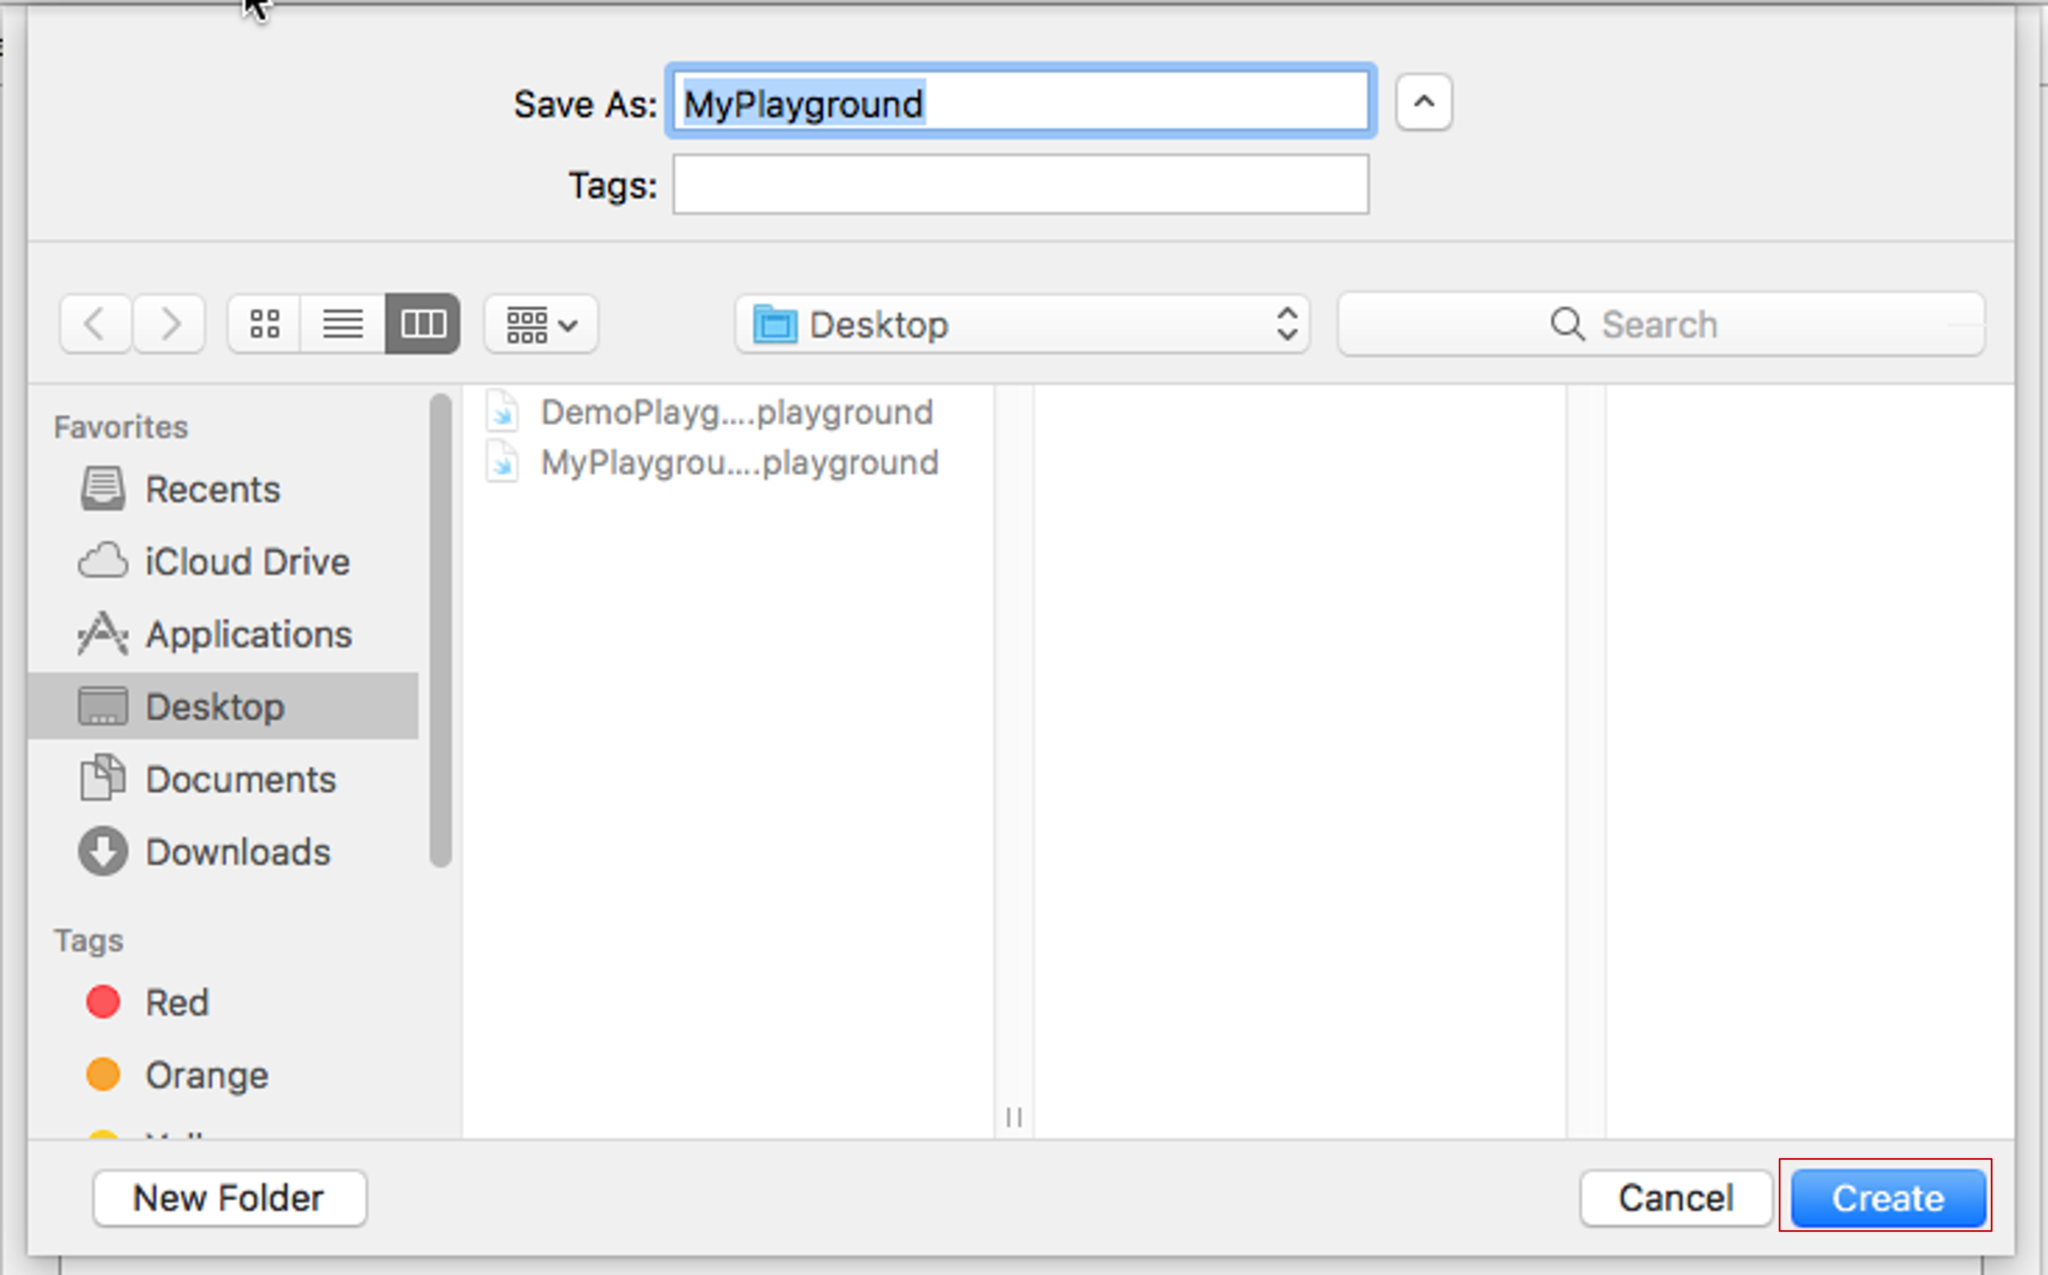
Fig 1: Creating Playground In Xcode IDE – Swift Tutorial
So, now that your playground is ready, let’s get started with some coding!
So, initially let’s start with basic syntax and then let’s write a hello world program.
Swift Tutorial: Basic Syntax
- Tokens – A token is either a keyword, an identifier, a constant, a string literal, or a symbol.
- Semicolons – In Swift you do not have to type a semicolon (;) after each statement in the code. Only in the case of using multiple statements in the same line, a semicolon is used as a delimiter.
- Keywords – Keywords are reserved words in the coding languages which may not be used as constants or variables or any other identifier names unless they’re escaped with backticks(`…`).
- Literals – A literal is mainly the source code representation of a value of an integer, floating-point number, or string type. So, a literal can be an Integer literal, Floating literal, String literal or a Boolean literal.
- Comments – Comments help compilers to ignore the texts which are not to be compiled. Multi-line comments start with /* and terminate with */ whereas Single-line comments are written using // at the beginning of the comment.
- Identifiers – Swift is a case-sensitive language and does not allow special characters such as @, $, and % within identifiers. An identifier starts with an alphabet A to Z or a to z or an underscore _ followed by more letters, underscores, and digits (0 to 9).
- White spaces – Whitespace is used in Swift to describe blanks, tabs, newline characters, comments and also separate one part of a statement from another. This helps the compiler to identify where one element in a statement, ends and the next element begins.
Hello World Program
/*Hello World Program */
import UIKit // Since we are creating the program for iOS playground, we have to import UiKit
var myString ="Hello World!";print (myString)// Semicolon used since 2 statements are used together
Output:
Hello World!Now, that you have written your first program, let’s understand more about variables and data types.
Swift Tutorial: Variables, Datatypes & TypeCasting
Variables
Variables are nothing but reserved memory locations to store values. This means that when you create a variable you reserve some space in memory.
var a = 42 //Declaring variable
var a: Int = 42 // You can also declare variable by specifying the data type.
let b = 32 // Declaring a constant
print(varA)
Datatypes
Like any other programming language, swift provides the built-in data types, that you can refer in the following table:
| Type | Typical Bit Width | Typical Range |
| Int8 | 1 byte | – 127 to 127 |
| UInt8 | 1 byte | 0 to 255 |
| Int32 | 4 bytes | -2147483648 to 2147483647 |
| UInt32 | 4 bytes | 0 to 4294967295 |
| Int64 | 8 bytes | -9223372036854775808 to 9223372036854775807 |
| UInt64 | 8 bytes | 0 to 18446744073709551615 |
| Float | 4 bytes | 1.2E-38 to 3.4E+38(~6 digits) |
| Double | 8 bytes | 2.3E-308 to 1.7E+308(~15digits) |
Now, let me tell you an interesting fact over here.
In Swift, you don’t have to necessarily define the data type, when you declare a variable.
So, suppose you declare a variable var b = “Hi”, then Swift will automatically understand that b is a String type variable, based on the input you have given.
Type Casting
Now you can even perform type conversion or typecasting.
For example, you can convert the integer value to a float value and vice-versa.
Consider the example below:
let a: Int = 5679 // Declare 2 constants
let b: Float = 2.9999
//Converting Float to Int
print(“This number is an Int now (Int(b))”)
//Converting Int to Float
print(“This number is a Float now (Float(a))”)
Output:
This number is an Int now 2
This number is a Float now 5679.0
Swift Tutorial: Operators
Operators are the constructs which can manipulate the values of the operands. Consider the expression 7 + 3 = 10, here 7 and 3 are operands and + is called operator. Swift supports the following types of operators:
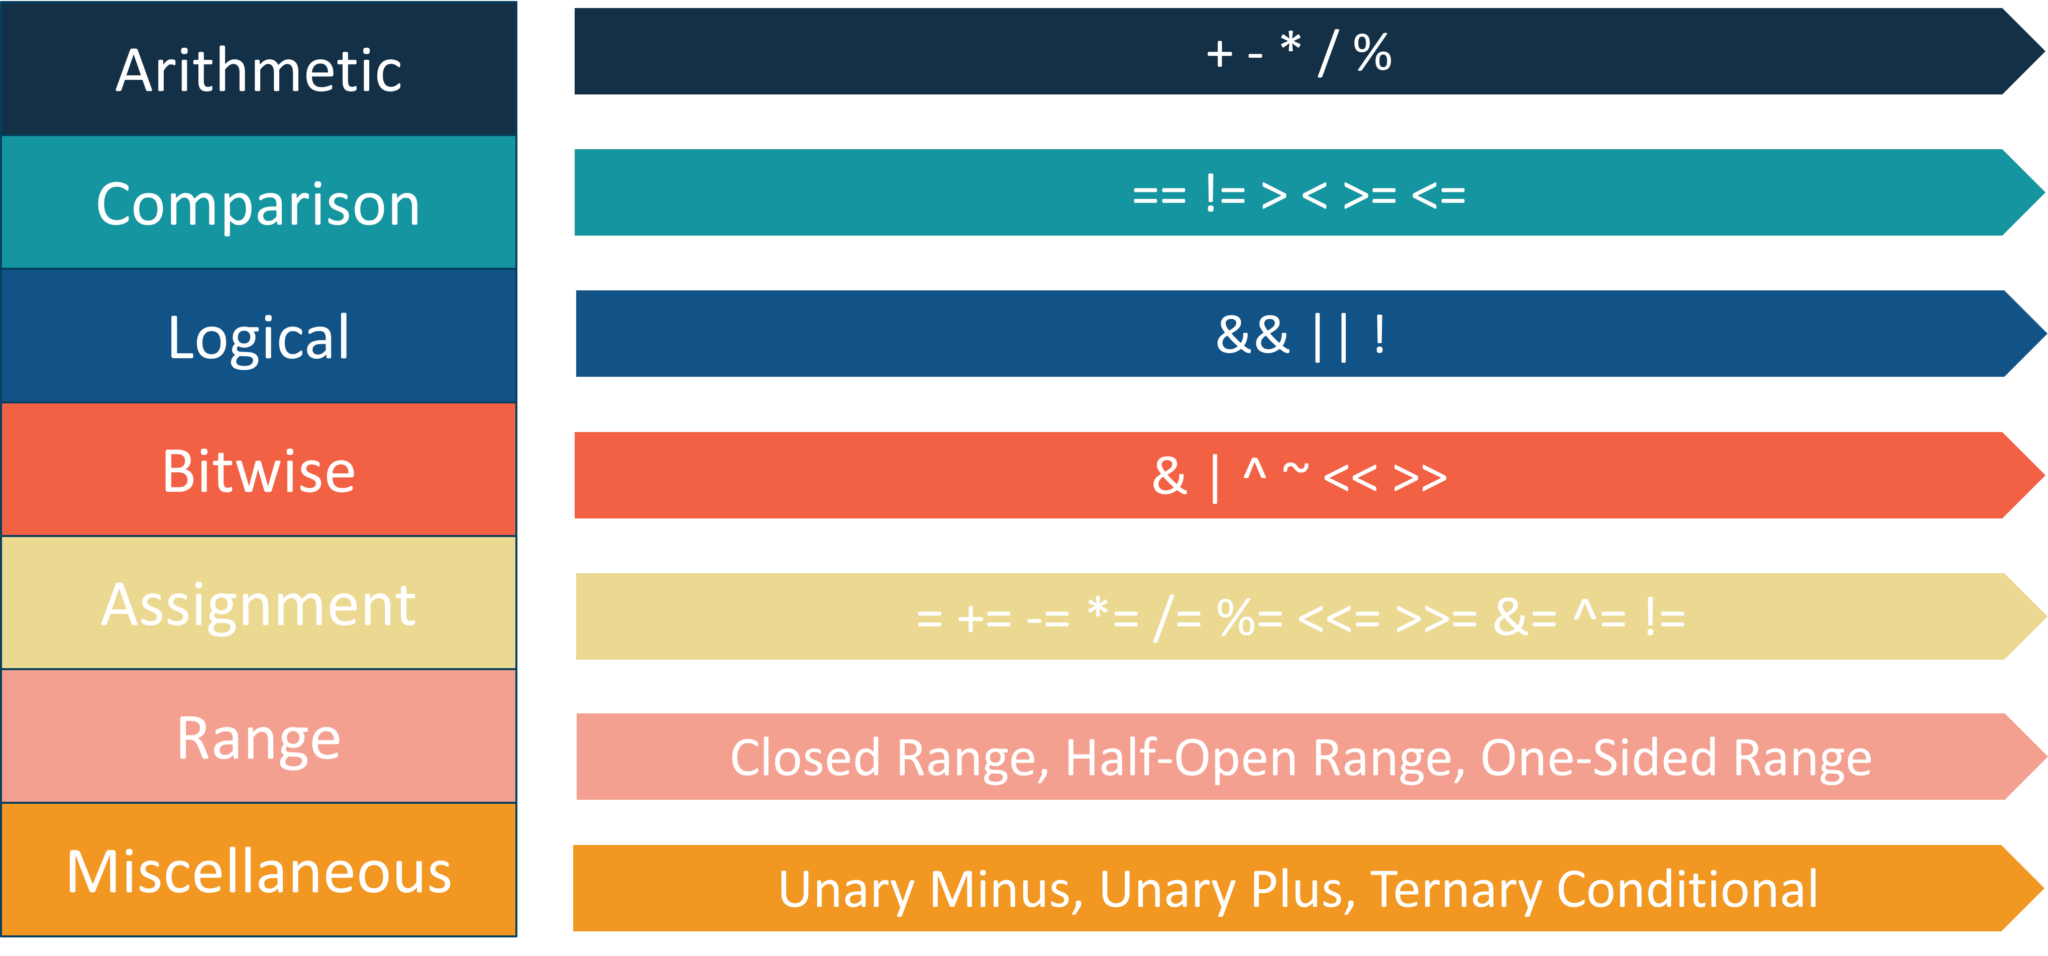
Fig 2: Different Operators In Swift – Swift Tutorial
Now, I’m not going to go in depth guys, but let me show you a few simple operations in Swift. Consider the example below:
print(" 5 + 3 = (5 + 3 ) ") // Addition
print(" 5 - 3 = (5 - 3 ) ") // Subtraction
print(" 5 * 3 = (5 * 3 ) ") // Multiplication
print(" 5 / 3 = (5 / 3 ) ") // Division
print(" 5 % 3 = (5 % 3 ) ") // Modulus
Output:
5 + 3 = 8
5 - 3 = 2
5 * 3 = 15
5 / 3 = 1
5 % 3 = 2.3
Alright!! Now, that you guys know the basic operators, let’s get started with the conditional statements.
Swift Tutorial: Conditional Statements
Conditional statements are used to execute a statement or a group of statements when some condition is true. There are namely three conditional statements – If, If-Else and Switch statements.
So, let’s start with the If statement now.
If statement
An, if statement could be either just a simple if, or a nested if statement.
So, a simple If statement is the most simple decision-making statement that decides whether a certain statement or block of statements will be executed or not.
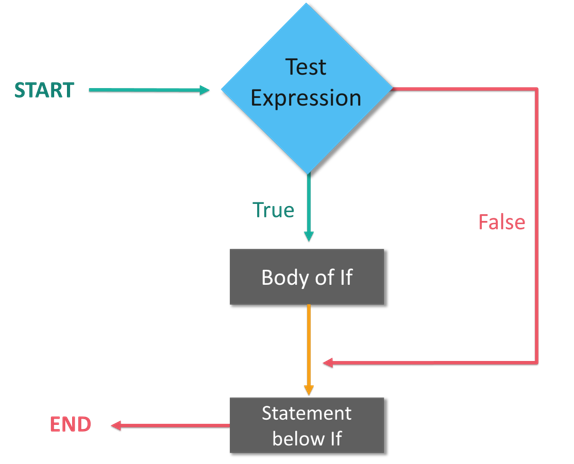
Fig 3: Flow Chart Of If Conditional Statement – Swift Tutorial
Consider the below example:
var x:Int = 10
if x < 20 {
print("x is less than 20") }
print("Value of variable x is (x)")
Output:
x is less than 20
Value of variable x is 10
Nested-If
Now, nested if is an if statement or an if-else statement within an if statement.
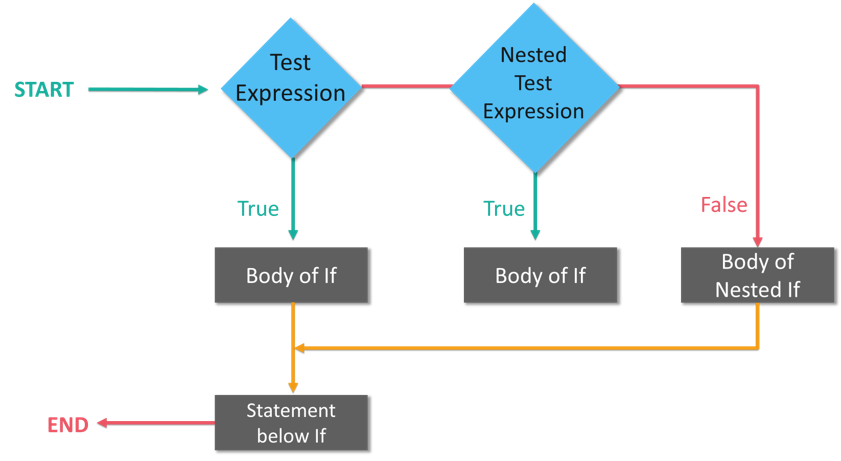
Fig 4: Flow Chart Of Nested If Conditional Statement – Swift Tutorial
Consider the below example:
var x:Int = 100
var y:Int = 200
if x == 100 {
print("First condition is satisfied")
if y== 200 {
print("Second condition is also satisfied") }
}
print("Value of variable x is (x)")
print("Value of variable y is (y)")
Output:
First condition is satisfied
Second condition is satisfies
Value of variable x is 100
Value of variable y is 200
If-Else statement
If-else statement tests the condition and if the condition is false then ‘else’ statement is executed.
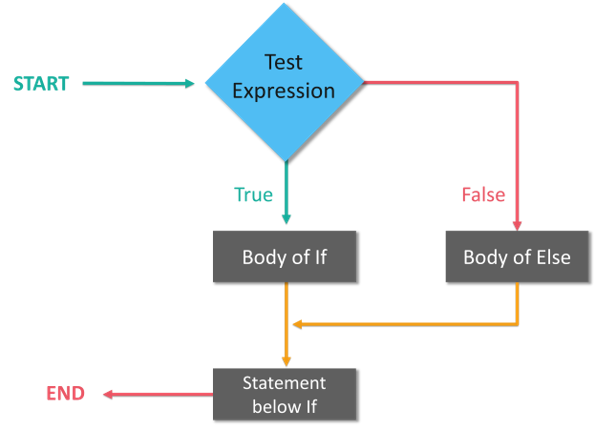
Fig 5: Flow Chart Of If – Else Conditional Statement – Swift Tutorial
Consider the example below:
var x:Int = 10
if x < 20 {
print("x is less than 20") }
else {
print("x is not less than 20")}
print("Value of variable x is (x)")
Output:
x is less than 20If-else..if-else (If-else ladder)
Now, you can also have an if-else ladder. So, If-else-if ladder allows the user to use many if else statements within a loop and in case one of the condition holds true the rest of the loops is bypassed.
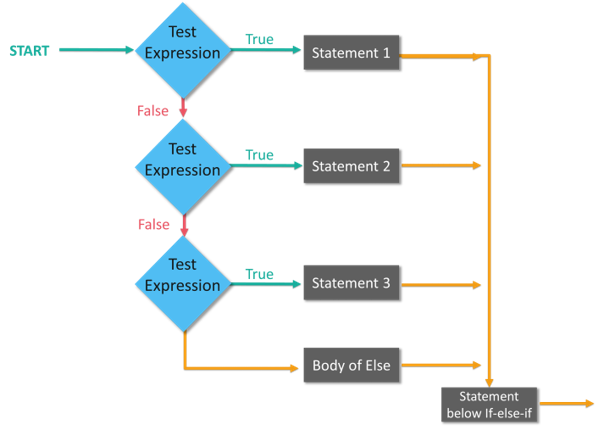
Fig 6: Flow Chart Of If – Else Ladder Conditional Statement – Swift Tutorial
Consider the example below:
var x: Int = 100
var y:Int = 200
if x < y {
/* If condition is true then print the following */
print("x is less than y") }

else if x > y {
/* If condition is true then print the following */
print("x is greater than y") }

else {
/* If condition is false then print the following */
print("x is equal to y") }

print("Value of variable x and y are:(x) and (y)")
Output:
x is less than y
Value of variable x and y are: 100 and 200
Switch
The switch statement provides an easy way to execute conditions to different parts of the code.
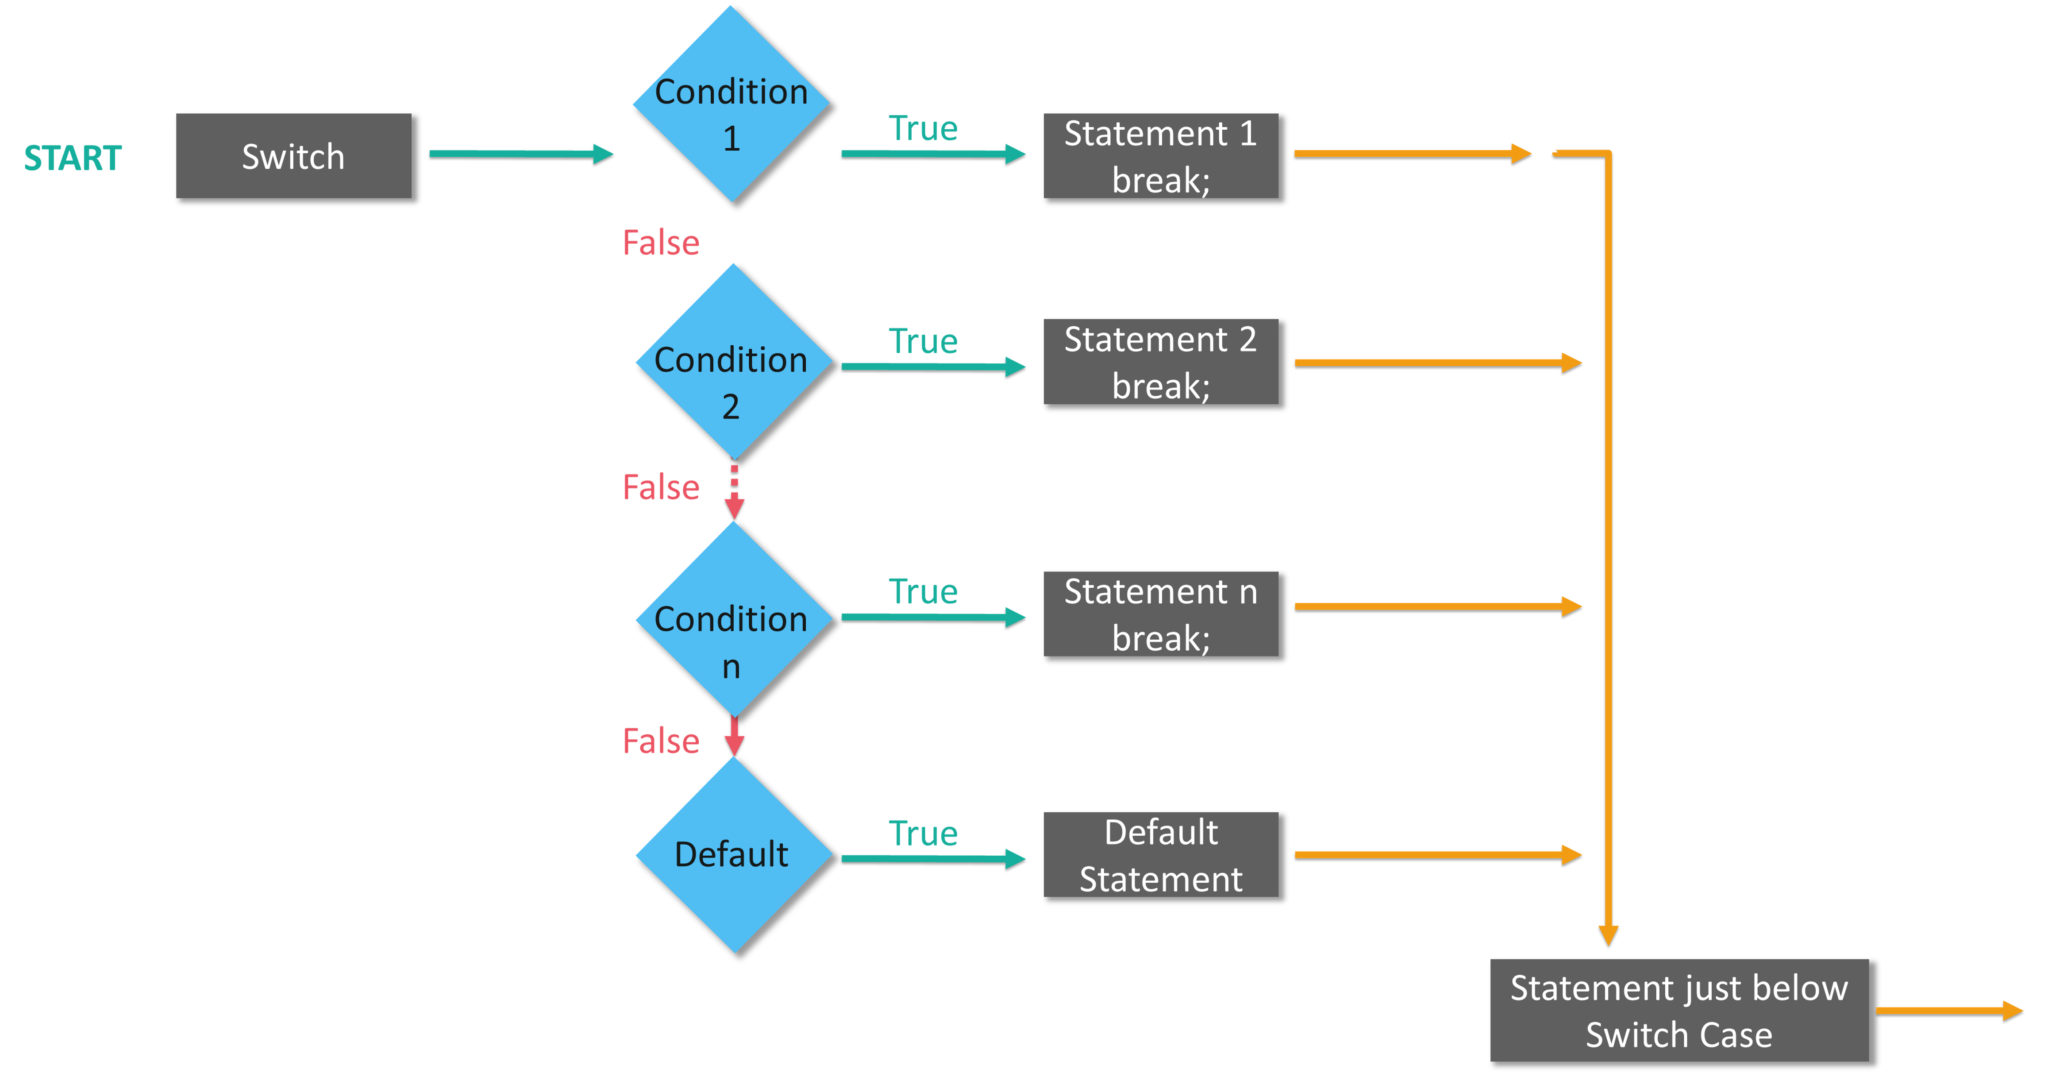 Fig 7: Flow Chart Of Switch Conditional Statement – Swift Tutorial
Consider the example below:
var a = 20
switch index {
case 10 :
               print( "Value of index is 10")
                     fallthrough
case 15,20 :
               print( "Value of index is either 15 or 20")
                     fallthrough
case 30 :
               print( "Value of index is 30")
default :
               print( "default case") }
Output:
Value of index is either 15 or 20
Value of index is 30
Now, if you observe the output, even after our condition is satisfied, we are getting the next statement also printed. That’s because we are using the statement fallthrough. So, if you do not use a fallthrough statement, then the program will come out of the switch statement after executing the matching case statement.
Now, let’s move on to iterative loops.
Swift Tutorial: Iterative Loops
In general, statements are executed sequentially. The first statement in a function is executed first, followed by the second, and so on. There may be a situation when you need to execute a block of code several times.
A loop statement allows us to execute a statement or group of statements multiple times. So, iterative loops are mainly For-In, While and Do-While loop.
For-In Loop
The for-in loop iterates over collections of items, such as ranges of numbers, items in an array, or characters in a string.
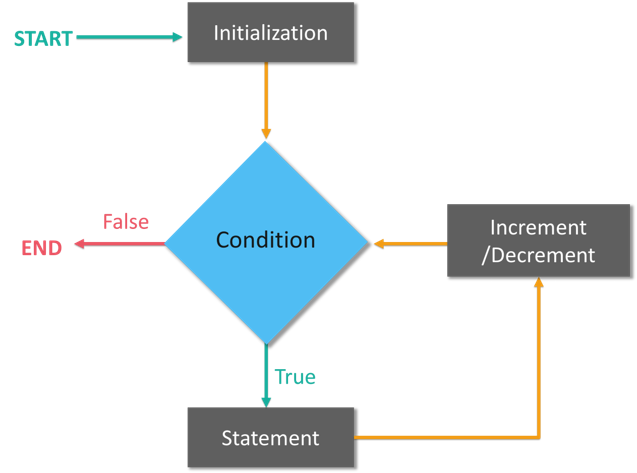
Fig 8: Flow Chart Of For-In Loop – Swift Tutorial
Consider the example below:
for i in 1...3 {
print("Hello world! and Value of i is (i)")
}
Output:
Hello world! and Value of i is 1
Hello world! and the Value of i is 2
Hello world! and Value of i is 3
While Loop
A while loop statement in the Swift programming language repeatedly executes a target statement as long as a given condition is true.
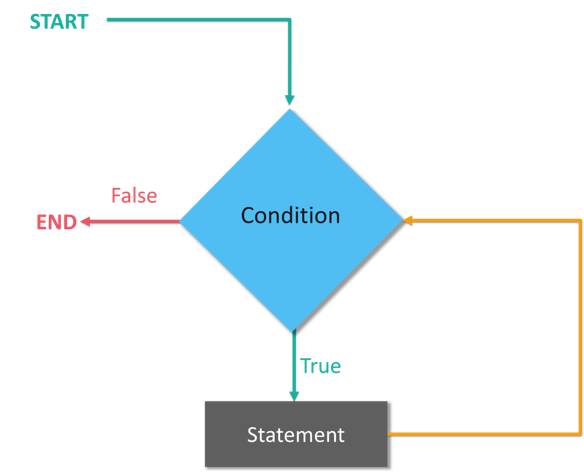
Fig 9: Flow Chart Of While Loop – Swift Tutorial
Consider the example below:
var current: Int = 0 //Initialize variables
var final: Int = 3
let Completed = true
while (current <= final) // condition
{ //play game if Completed
        {
print("You have passed the level (current)")
current = current + 1 //statement to be executed if the condition is satisfied
     }
}
print("The while loop ends") //Statement executed after the loop ends
Output:
You have passed the level 0
You have passed the level 1
You have passed the level 2
You have passed the level 3
The while loop ends
Do-while/ Repeat while Loop
Unlike for and while loops, which test the loop condition at the top of the loop, the repeat…while loop checks its condition at the bottom of the loop.
Fig 10: Flow Chart Of Do-While Loop – Swift Tutorial
Consider the example below:
var val = 5 repeat {
print( "Value is (val)")
val = val + 1 }
while index < 10
Output:
Value is 5
Value is 6
Value is 7
Value is 8
Value is 9
Alright, Guys! That’s an end to loops, now let’s quickly jump into Arrays & Tuples.
Swift Tutorial: Arrays & Tuples
Arrays
An array is a data structure that contains a list of elements. These elements are all of the same data type, such as an integer or string. So, suppose if you want to store the names of your friends. You can write a program as follows:
var friends: Array <String> = ["Akash", "Sanjana", "Avinash", "Swatee"]
You can also add new elements into the array by using the append() method. Refer to the example below:
friends.append("Aayushi")
print(friends)
Output:
Akash Sanjana Avinash Swatee AayushiTuples
Tuples are used to group multiple values in a single compound value. Consider the example below:
var failure404 = (404, “Gateway not found”)
print(“The code is(failure404.0)”)
print(“The definition of error is(failure404.1)”)
var failure404 = (failureCode: 404, description: “Gateway not found”)
print(failure404.faliureCode)   // prints 404.
Output
The code is 404
The definition of error is Gateway not found
404
Alright, now that you guys have understood Arrays, it’s time to get started with sets and dictionaries.
Swift Tutorial: Sets & Dictionaries
Sets
Sets are used to store distinct values of same types, without having any definite ordering as that of arrays. So, you can use sets instead of arrays if you want to ensure that there are no duplicate values or if the ordering of elements is not an issue.
A Set is created by placing all the items (elements) inside curly braces [], separated by a comma. Consider the example below:
let evenNumber: Set = [2,4,6,8,12]
Now, let me tell you that you can also perform the set operations such as Union, Intersection, Subtraction.
Union: Union of A and B is a set of all the elements from both sets. The union is performed using .union() method.
Intersection: Intersection of A and B is a set of elements that are common in both sets. An intersection is performed using the .intersection() method.
Subtracting: Difference of A and B (A – B) is a set of elements that are only in A but not in B. Similarly, B – A is a set of elements, i.e. in B but not in A. Refer to the code below:
let evenNumber: Set = [10,12,14,16,18,20]
let oddNumber: Set = [5,7,9,11,13,15]
let primeNumber: Set =  [2,3,5,7,13,17,19]
oddNumber.union(evenNumber).sorted()
oddNumber.intersection(evenNumber).sorted()
oddNumber.subtracting(primeNumber).sorted()
Output:
[5,7,9,10,11,12,13,14,15,16,18,20]
[]
[9, 11, 15]
Dictionaries
Dictionaries are used to store unordered lists of values of the same type and Swift does not allow you to enter a wrong type in a dictionary. Consider the example below.
var exampleDict:[Int:String] = [1:"One", 2:"Two", 3:"Three"] //Creating Dictionaries
var accessval = exampleDict[1] //Accessing Dictionary Values
print( "Value of key = 1 is (accessVal" )
print( "Value of key = 2 is (exampleDict[2])" )
print( "Value of key = 3 is (exampleDict[3])" )
Output:
Value of key = 1 is Optional("One")
Value of key = 2 is Optional("Two")
Value of key = 3 is Optional("Three")
Swift Tutorial: Functions
A function is basically a set of statements organized together to perform a specific task. You can call a function, have a function with/without parameters, have a function with/without return values, have function types, and also use nested functions. Refer to the example below, to understand how to define and call functions. Consider the example below:
func Employee(empname: String) -> String {
//Defining a function
return empname }
print(Employee(empname: "Sayantini")) //Calling a function
print(Employee(empname: "Kislay"))
Output:
Sayantini
Kislay
Now, let’s move to the next section of the blog i.e. Closures & Structures.
Swift Tutorial: Closures & Structures
Closures
Closures generally confuse everyone, but they are just self-contained codes, like function organized as blocks. They can be anonymous whereas function has to have a function name. Consider the example below.
let name = { print("Welcome to Swift Closures") }
name()
Output:
Welcome to ClosuresStructures
struct employeeDetails { //Defining a Structure
var name = "Bob"
var id = 11021
varphonenumber= 9876543210
}
let details = employeeDetails()  //Accessing the structure and properties
print("Name of employee is (details.name)")
print("Id of employee is (details.id)")
print("Phone number of employee is (details.phonenumber)")
Output:
Name of employee is Bob
Id of employee is 11021
Phone number of employee is 9876543210
Now, that you guys have understood the structures, let’s understand Classes & Inheritance.
Swift Tutorial: Classes & Inheritance
Classes
Classes in Swift are basically the building blocks of flexible constructs. So, similar to constants, variables, and functions the user can define class properties and methods.
class DetailsStruct { //Defining a class
var id:Int
init(id:Int) {
self.id= id }
}
class studentDetails {
var id = 125612
}
let studentid = studentDetails()
print("Student id is (studentid.id)")
Output:
Student id is 125612Inheritance
Inheritance is the process of creating new classes, from existing classes. The derived class inherits all the capabilities of the base class and can add its own functionalities too.
Classes can be further categorized to subclass and superclass.
Subclass: If a class inherits properties, methods, and functions from another class, then it is called as a subclass.
Superclass: A class which contains properties, methods, and functions to let the other classes inherit from itself is called a superclass. Consider the example below.
class EmployeeDetails{
var id:Int;
var number:Int;
init(detail1:Int, detail2:Int) {
id = detail1;
number = detail2;
}
func print() {
print("Employee id is :(id), employee phone number is :(number)")
}
}
class display : EmployeeDetails {
init() {
super.init(detail1:94567, detail2: 9876543210) //super keyword is used to call the parameters & methods from super class
}
}
let employeeinformation = display()
employeeinformation.print()
Output:
Employee id is 94567, employee phone number is 9876543210Now, that you guys have an idea about the main concepts in Swift. Let’s now start learning the extended topics such as Protocols, Extensions, Generics, and Enumerations.
Swift Tutorial: Protocols
protocol Fly {
var flies: Bool { get set }
func flyable(milesCovered: Double) -> String
}
class Vehicle : Fly{
var flies: Bool = false
var name: String = "Default name"
func flyable(milesCovered: Double) -> String {
if(self.flies){
return "(self.name) flies (milesCovered) miles"
}
else {
return "(self.name) cannot fly"
}
}
}
var BMWX1 = Vehicle()
BMWX1.name = "BMW X1"
BMWX1.flies = false
print(BMWX1.flyable(34))
BMW X1 cannot flySwift Tutorial: Extensions
Extensions are basically used to add the functionalities of an existing class, structure or enumeration type. With extensions, you can add computed properties and computed type properties, define and use new nested types, define instance and type methods, provide new initializers, define subscripts, and also make an existing type conform to a protocol.
Consider the example below:
extension Int{
var add:Int{returnself+10}
varsubtract:Int{returnself- 34}
var multiply:Int{returnself* 5}
var divide:Int{returnself/5}
}
let addition = 3.add
print("The value after adding is (add)")
let subtraction = 120.subtract
print("The value after subtracting is (subtraction)")
let multiplication = 25.multiply
print("The value is mutiplying is (multiplication)")
let division = 55.divide
print("The value after division is (division)")
let mix = 10.add+34.subtract
print("Value calculated is (mix)")
Output:
The value after adding is 13
The value after subtracting is 86
The value is multiplying is 125
The value after division is 11
Value calculated is 20
Swift Tutorial: Generics
Generic types are used to write flexible and reusable functions and types. So, basically can use generics to avoid duplication. Consider the example below:
func swap<T>(x: inout T, y: inout T){
let temp = x
x = y
y= temp
}
var str1 ="Hello"
var str2 ="Edureka"
print("Before Swapping String values are: (str1) and (str2)")
swap(x:&str1, y:&str2)
print("After Swapping String values are: (str1) and (str2)")
var num1 = 1996
var num2 = 1865
print("Before Swapping Int values are: (num1) and (num2)")
swap(x:&num1, y:&num2)
print("After Swapping Int values are: (num1) and (num2)")
Output:
Before Swapping String values are: Hello and Edureka
After Swapping String values are: Edureka and Hello
Before Swapping String values are: 1996 and 1865
After Swapping String values are: 1865 and 1996
Swift Tutorial: Enumerations
An enumeration in simple terms is a user-defined data type which consists of a set of related values. The keyword enum is used to define the enumerated data type. Consider the example below:
enum Color: Int {
case blue
case green
case red
case yellow
init() {
self = .red
}
func getDetails() -> String {
switch(self){
case .blue: return "Color is blue"
case .green: return "Color is green"
case .red: return "Color is red"
case .yellow: return "Color is yellow"
default: return "Color not found" }
}
}
var chooseColor = Color
print(chooseColor.rawValue)
var favColor = Color.green
print(favColor.rawValue)
if(favColor == Color.green)
{
print("Favourite color is green")
}
print(favColor.getDetails())
Output:
2
1
Favourite color is green
green
I hope you have enjoyed reading this Swift Tutorial. We have covered all the basics of Swift, so you can start practicing now.
To get in-depth knowledge on Swift along with its various applications, you can enroll here for live online training with 24/7 support and lifetime access.
Got a question for us? Mention them in the comments section of “Swift Tutorial” and we will get back to you.