Python Scripting Certification Training
- 15k Enrolled Learners
- Weekend
- Self Paced
(5900)


 Copy Link!
If you are looking for a Java framework that can help you in developing JEE web applications quickly and efficiently, then Struts 2 is the perfect solution for you. Struts 2 is an open-source framework that is heavily used in the market. Through this Struts 2 Tutorial, I will help you to get started with it along with practical implementations.
Below are the topics I will be discussing in this Struts tutorial:
In layman terms, Struts is a Java-based open-sourced framework that helps in developing web application in J2EE. It extends the Java Servlet API and promotes the Model, View, Controller (MVC) architecture. This makes the web applications developed in standard technologies like JSP, JavaBeans, and XML, more maintainable, extensible, and flexible.
The Struts Framework was initially developed by Craig McClanahan and was handed over to Apache Foundation in May 2000. Gradually, it captures the position of a top-level Apache project in 2005 and later on February 2007, it was replaced by Struts 2.
The Struts Framework was extensively based on the MVC(Model-View-Controller) design paradigm. Its main aim was to separate the Model from the View and the Controller in the application to reduce dependency and promote Separation of Concerns (SoC). In other words, it helped in separating the application logic that mainly communicates with the database from the HTML pages through which the user interacts with the application and the instance which helps in channeling information between Model and View.
Here XHTML is the default theme for Struts 2 and is mainly used for common look and feel.
Now that you know what is Struts and its various features, lets now move ahead with the this Struts Tutorial article and learn about its architecture.
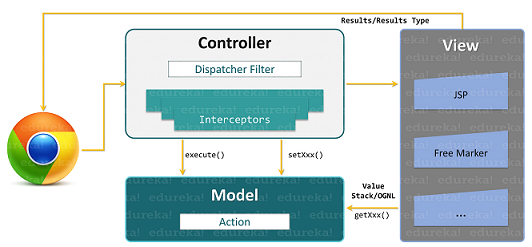 As you can see in the above diagram, Struts uses high-level MVC architecture. Here the Struts2 dispatch servlet filter is used to implement the Controller while actions are used to implement the Model and the View is implemented by combining result types and results. In this architecture, the common thread, linking, and integration with other components is enabled by the value stack and OGNL. On top of this, configurations for the web applications along with actions, interceptors, results, etc also help in channeling a lot of information.
Now, let me explain the complete workflow during the life cycle of a request generated by the user. Below I have listed down the step by step workflow for your better understanding of how Struts work:
I hope this clears the workflow within a Struts application. Lets now see what all you need in your system to get started with Struts in the next section of this Struts 2 Tutorial
Below I have listed down the basic necessities to get started with Struts 2:
Once done, you are ready to get your feet wet with Struts. In the next section of this Struts 2 Tutorial, I will give you a brief on the fundamental concepts of Struts 2.
In any, struts application there are two main configuration files:
Actions or Action Classes are the core concepts in any Struts 2 application, as they act as the controller in the MVC pattern. In other words, Action classes contain the business logic which helps in processing the data. Other than this, action class is also responsible for responding to a users request, executing business logic. It also helps the framework in determining and returning a result on the basis of the configuration file (struts.xml), back to the user for rendering the View page.
Stuts2 actions classes are not singleton in nature i.e one instance of this class will be created with each request. Thus they need not to be thread-safe and are simple and independent. This makes testing of these classes much easier.
An action file can be created in three ways, which are as follows:
package com.edureka.struts2.action;

public class DemoAction {
	public String execute(){
		return "Welcome!";
	}
}package com.edureka.struts2.action;
import com.opensymphony.xwork2.Action;
public class DemoAction implements Action{
public String execute(){
return SUCCESS;
}
}Action classes in Struts 2 generally extend the Action Support class which is the default implementation of Action interface. It provides various imperative functionalities for the web application development such as data validation, action level message, action level error message, field-level error message and read resource bundled, etc.
Below is the implementation of the same:
package com.edureka.struts2.action;
import  com.opensymphony.xwork2.ActionSupport;

public class  DemoAction extends  ActionSupport
{
  @Override
  public  String execute() throws  Exception {
    return  SUCCESS;
  }
}Interceptor act as one of the major pillars of the Struts 2 framework. It is nothing but an object which is invoked during the preprocessing and postprocessing of a request. It helps in controlling and maintaining the smooth transition of request and response cycle.
The main advantage of using interceptors is that it is pluggable. What I mean is, in case you no longer have any use of a specific concern like validation, exception handling, logging, etc., you can easily remove it from the application without having to redeploy it. For this, all you need to do is delete the entry from the struts.xml file.
The Struts2 framework provides a comprehensive set of pre-defined interceptors and common interceptor stacks which I have listed in the below table:
ValueStack in Struts2 framework is the storage area where the entire application’s data is stored for processing a request. This data is held within the ActionContext objects which makes use of the ThreadLocal for retrieving the values specific to any specific client request thread.
OGNL stands for Object-Graph Navigation Language. It is a powerful expression language much like JSP and is mostly used for the reference and manipulation of data present in the ValueStack. Moreover, it also aids in transferring and converting the type of data.
Similar to JSP, OGNL contains a root object within the application context. Thus, you can provide the reference of the default object using markup notation which in this case is denoted using pound symbol. Struts 2 framework implements OGNL by building an ActionContext map. Below I have listed down the components of the ActionContext map:
With this, you are through the basics of Struts 2. In the next section of this Struts 2 article lets directly jump into the code and implement all you have learned till now.
Here I will be creating a simple application where you need to input your name and the application will welcome you. Below is the screenshot of the complete project structure:

As you can see, in this project we will be creating 5 files which are:
Note: Before you start this project make sure you already have Tomcat installed on your system.
STEP I: In your Eclipse, go to File > New > Dynamic Web Project. Enter the Project Name and click on New Runtime.
 STEP II: Here you need to select the version of Apache Tomcat you have downloaded on your system and click on Next.

STEP III: Next, click on Browse and navigate to the directory where Tomcat dependencies have been saved. Once done click on Finish and proceed with the Project Creation.
STEP IV: Let’s now add the Struts jar files which will be required for the successful execution of this project. You can download the JARs from here. Once you are ready with the JAR files, copy the JARs and paste them under WebContent > WEB-INF > lib.
STEP V: Now that we are ready with all the configurations lets set up the code files, starting with HelloWorld.java. For this, right-click on the project > New > Class. Fill out package and class name and click on finish.
STEP VI: Type in the below code in the HelloWorld.java file.
package com.edureka;

public class HelloWorld {
	private String name;

	public String getName() {
		return name;
	}

	public void setName(String name) {
		this.name = name;
	}

	public String execute() {
		return "success";
	}

}
STEP VII: Next create a new index.jsp file under WebContent and type in the below code:
<%@ taglib prefix="s" uri="/struts-tags" %>

<s:form action="verify">
  <s:textfield name="name" label="Enter Username" />
  <s:submit value="Click" align="center" />
</s:form>
STEP VIII: Now, again create a new welcome.jsp file under WebContent and type in the below code:
<%@ taglib prefix="s" uri="/struts-tags" %>

Welcome: <s:property value = "name"/>
STEP IX: Now go to WebContent > WEB-INF and type in the below code in the web.xml file.
<?xml version="1.0" encoding="UTF-8"?>
<web-app xmlns:xsi="http://www.w3.org/2001/XMLSchema-instance" xmlns="http://java.sun.com/xml/ns/javaee" xsi:schemaLocation="http://java.sun.com/xml/ns/javaee http://java.sun.com/xml/ns/javaee/web-app_3_0.xsd" id="WebApp_ID" version="3.0">
  <display-name>Struts2Demo</display-name>
  <welcome-file-list>
    <welcome-file>index.html</welcome-file>
  </welcome-file-list>
  <filter>
  <filter-name>struts2</filter-name>
  <filter-class>org.apache.struts2.dispatcher.ng.filter.StrutsPrepareandExecuteFilter</filter-class>
  </filter>
  <filter-mapping>
  <filter-name>struts2</filter-name>
  <url-pattern>/*</url-pattern>
  </filter-mapping>
</web-app>
STEP X: Finally, under Java Resources > src, create struts.xml file
<?xml version="1.0" encoding="UTF-8" ?>
<!DOCTYPE struts PUBLIC "-//Apache Software Foundation//DTD Struts Configuration 2.1//EN" "http://struts.apache.org/dtds/struts-2.1.dtd">

<struts>
	<package name = "default" extends = "struts-default">
	<action name = "verify" class = "com.edureka.HelloWorld">
	<result name = "success">welcome.jsp</result>
	</action>
	</package>
</struts>
STEP XI: Now go to the index.jsp page and right-click on it. Select Run on Server to execute the application.
This brings us to the end of this article on Struts 2 Tutorial. If you want to know more about Java you can refer to our other Java Blogs.
Now that you have understood what is a Struts 2 Tutorial, check out the Java Certification Training by Edureka, a trusted online learning company with a network of more than 250,000 satisfied learners spread across the globe. Edureka’s Java J2EE and SOA training and certification course is designed for students and professionals who want to be a Java Developer. The course is designed to give you a head start into Java programming and train you for both core and advanced Java concepts along with various Java frameworks like Hibernate & Spring.
Got a question for us? Please mention it in the comments section of this “Struts 2 Tutorial” article and we will get back to you as soon as possible.


 Thank you for registering Join Edureka Meetup community for 100+ Free Webinars each month JOIN MEETUP GROUP