

SQL Essentials Training
- 13k Enrolled Learners
- Weekend/Weekday
- Self Paced
(4800)


 Copy Link!
In today’s market, where around 2.5 Quintillion bytes of data gets generated every day, it is very important to understand how to handle such a humongous amount of data. Well, this is where Structured Query Language or SQL comes into the picture. So, in this article on SQL Tutorial, I will discuss the following important concepts, which are a must to one’s journey on becoming a Database Administrator.
Developed by Donald D.Chamberlin in the 1970s, Structured Query Language or most commonly known as SQL is one of the most popular languages used to manipulate, store, update and retrieve data from a relational database. SQL consists of various commands segregated into 4 categories i.e. DDL, DML, DCL, and TCL to play with data in databases. Also, relational databases like MySQL Databases, Oracle, MS SQL Server, Sybase etc use SQL to modify data.
The applications of SQL are as follows:
Now that you know the basics of SQL, next in this SQL tutorial, let us understand what are the different SQL Data Types.
SQL Data Types are divided into the following categories:
If you wish to get a detailed understanding of the different SQL data types, you can refer to detailed guide on SQL Data Types.
Operators are the constructs which can manipulate the values of the operands. Consider the expression 4 + 6 = 10, here 4 and 6 are operands and + is called operator.
SQL supports the following types of Operators:
To know the different operators supported by SQL, in an elaborated manner, you can click here. So, now that you know what is SQL and its’ basics, let us understand the top commands or statements in SQL.
Immerse yourself in the world of NoSQL databases with our MongoDB Certification.
SQL consists of various commands or statements to add, modify, delete or update data in the database. In this article on SQL tutorial, we are going to discuss the following statements:
In this SQL tutorial, I am going to consider the below database as an example, to show you how to write queries using these SQL commands.
| CustomerID | CustomerName | PhoneNumber | Address | City | Country |
| 1 | Simon | 9876543210 | Donald Street 52 | Hyderabad | India |
| 2 | Akash | 9955449922 | Queens Road 74 | Mumbai | India |
| 3 | Patrick | 9955888220 | Silk Board 82 | Delhi | India |
| 4 | Sameer | 9647974327 | IG Road 19 | Hyderabad | India |
| 5 | John | 9674325689 | Brigade Road Block 9 | Bangalore | India |
The CREATE statement is used to create a table, view or a database in the following way:
Used to create a database.
CREATE DATABASE DatabaseName;
CREATE DATABASE CustomerInfo;
This statement is used to create a table.
CREATE TABLE TableName (
Column1 data type,
Column2 data type,
....

ColumnN data type
);
CREATE TABLE Customers
(
CustomerID int,
CustomerName varchar(255),
PhoneNumber int,
Address varchar(255),
City varchar(255),
Country varchar(255)
);
Used to create a view.
CREATE VIEW OR REPLACE ViewName AS
SELECT Column1, Column2, ..., ColumnN
FROM TableName
WHERE Condition;
CREATE VIEW OR REPLACE HydCustomers AS
SELECT CustomerName, PhoneNumber
FROM Customers
WHERE City = "Hyderabad";
Note: Before you start creating a table and entering values, you have to use the database, using the USE statement as [USE CustomersInfo;]
DROP
The DROP statement is used to drop an existing table, view or a database.
Used to drop the database. When you use this statement, complete information present in the database will be lost.
DROP DATABASE DatabaseName;
DROP DATABASE CustomerInfo;
Used to drop the table. When you use this statement, complete information present in the table will be lost.
DROP TABLE TableName;
DROP TABLE Customers;
Used to drop the view. When you use this statement, complete information present in the view will be lost.
DROP VIEW ViewName;
DROP VIEW HydCustomers;
The ALTER statement is used to add, delete or modify constraints or columns in an existing table.
The ALTER statement is used to delete, add, modify columns in an existing table. You can use ALTER TABLE with ADD/ DROP column to either add or drop a column in the table. Apart from this, you can also ALTER/MODIFY a specific column.
ALTER TABLE TableName
ADD ColumnName Data Type;
ALTER TABLE TableName
DROP COLUMN ColumnName;

ALTER TABLE TableName
ALTER COLUMN ColumnName Data Type;
--ADD Column Gender:
 ALTER TABLE Customers
ADD  Gender varchar(255);

--DROP Column Gender:
ALTER TABLE Customers
DROP COLUMN Gender ;

--Add a column DOB and change the data type from Date to Year.

ALTER TABLE DOB
ADD DOB date;

ALTER TABLE DOB
ALTER DOB year;
The TRUNCATE statement is used to delete the information present in the table, but not the table itself. So, once you use this command, your information will be lost, but not the table will still be present in the database.
TRUNCATE TABLE TableName;
TRUNCATE Table Customers;
The EXPLAIN and DESCRIBE statements are synonyms used to obtain a query execution plan and the information about a table structure respectively. This statement can be used with INSERT , DELETE, SELECT, UPDATE and REPLACE statements.
--Syntax for DESCRIBE
DESCRIBE TableName;

--Sample syntax for EXPLAIN
EXPLAIN ANALYZE SELECT * FROM TableName1 JOIN TableName2 ON (TableName1.ColumnName1 = TableName2.ColumnName2);
DESCRIBE Customers;

EXPLAIN ANALYZE SELECT * FROM Customers1 JOIN Orders ON (Customers.CustomerID = Orders.CustomerID);
The INSERT INTO statement is used to insert new records into a table.
INSERT INTO TableName (Column1, Column2, Column3, ...,ColumnN)
VALUES (value1, value2, value3, ...);

--If you do not want to mention the column names then use the below syntax, but the order of values entered should match the column data types :

INSERT INTO TableName
VALUES (Value1, Value2, Value3, ...);
INSERT INTO Customers(CustomerID, CustomerName, PhoneNumber, Address, City, Country)
VALUES ('06', 'Sanjana', '9654323491', 'Oxford Street House No 10', 'Bengaluru', 'India');

INSERT INTO Customers
VALUES ('07', 'Himani','9858018368', 'Nice Road 42', 'Kolkata', 'India');
The UPDATE statement is used to modify the records already present in the table.
UPDATE TableName
SET Column1 = Value1, Column2 = Value2, ...
WHERE Condition;
UPDATE Customers
SET CustomerName = 'Aisha', City= 'Kolkata'
WHERE EmployeeID = 2;
The SELECT statement is used to select data from a database and store it in a result table, called the result-set.
SELECT Column1, Column2, ...ColumN
FROM TableName;

--(*) is used to select all from the table
SELECT * FROM table_name;

-- To select the number of records to return use:
SELECT TOP 3 * FROM TableName;
SELECT CustomerID, CustomerName
FROM Customers;

--(*) is used to select all from the table
SELECT * FROM Customers;

-- To select the number of records to return use:
SELECT TOP 3 * FROM Customers;
Apart from this, you can use the SELECT keyword with DISTINCT, ORDER BY, GROUP BY, HAVING Clause and INTO.
This operator is used with a WHERE clause to search for a specified pattern in a column of a table. There are mainly two wildcards that are used in conjunction with the LIKE operator:
SELECT ColumnName(s)
FROM TableName
WHERE ColumnName LIKE pattern;
SELECT * FROM Customers
WHERE CustomerName LIKE 'S%';
The GRANT command is used to provide privileges or access on the database and its objects to the users.
GRANT PrivilegeName
ON ObjectName
TO {UserName |PUBLIC |RoleName}
[WITH GRANT OPTION];
where,
-- To grant SELECT permission to Customers table to admin
GRANT SELECT ON Customers TO admin;
Now that you know the top SQL Commands, let us understand what are the different types of keys used in the database. Well, this concept will help you understand how each table is related to the other table in a relational database management system.
The following are the 7 types of keys, which can be considered in a database:
I hope you have understood the different types of keys in the database, next in this article on SQL tutorial, let us discuss the constraints in the database. Well, SQL constraints are used to increase the accuracy and reliability of data that goes into the database through a table.
SQL constraints make sure that there is no violation in terms of a transaction of data if found then the action will be terminated. The main use of the following constraints is to limit the type of data that can go into a table.
If you want to know about the following constraints in-depth with syntax and examples, you can refer to other articles on SQL. So, now that you about keys and constraints in the database, next in this article on SQL tutorial, let us take a look an interesting concept Normalization.
For details, You can even check out how to manage databases on SQL Server and its concepts with the SQL certification course.
Normalization is the process of organizing data to avoid duplication and redundancy. There are many successive levels of normalization and those are called normal forms. Also, each consecutive normal form depends on the previous one. The following are the normal forms present:
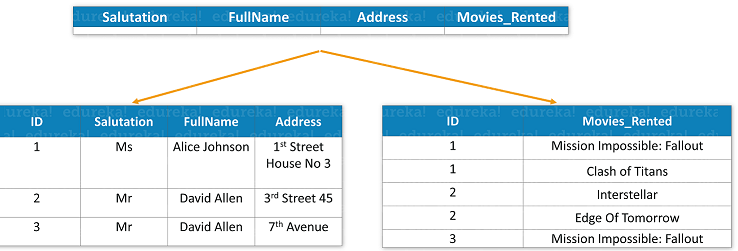
 To understand the above normal forms, let us consider the following table:

By observing the above table, you can clearly make out the data redundancy and duplication of data. So, let’s normalize this table. To start normalizing the databases, you should always start with the lowest normal form i.e. 1NF and then go to the higher normal forms eventually.
Now, let us see how we can perform the first normal form, for the above table.
For a detailed, You can even check out the details of relational databases, functions, and queries, variables, etc with the SQL Online Course.
To make sure that the database must in 1NF, each table cell should have a single value. So, basically all the records must be unique. The above table will be normalized into 1NF as below:

If you observe in the above table, all the records are unique. But, yet there is a lot of data redundancy and duplication. So, to avoid that, let us normalize database into second normal form.
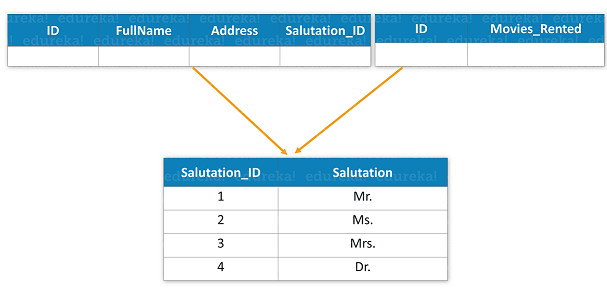
To make sure that the database must in 2NF, the database should be 1NF and should also have a single-column primary key. The above table will be normalized into 2NF as below:
If you observe the above tables, each table has a single-column primary key. But there is a lot of data redundancy and duplication of a few columns. So to avoid that, let us normalize database into third normal form.
To make sure that the database must in 3NF, the database should be in 2NF and must not have any transitive functional dependencies. The above tables will be normalized into 3NF as below:
 If you observe the above tables, the database does not have any transitive dependency. So, after this step, we do not have to normalize our database further. But, if you see any anomalies present or more than a single candidate key, then you can go forward with the next higher normal form i.e. BCNF.
To make sure that the database must in BCNF, the database must be present in 3NF and the tables must be divided further, to make sure only one candidate key present.
With this, we come to an end to normalization. Now, next in this SQL tutorial, let us discuss an important concept in SQL, which is Joins.
Joins are used to combine rows from two or more tables, based on a related column between those tables and also on few conditions. There are mainly four types of joins:
So, this was a short description on JOINS, but if you want a detailed description on JOINS with a detailed example, you can refer to my article on SQL JOINS. Next, in this SQL tutorial, let us discuss the last concept for this article i.e. Views.
A view in SQL is a single table, which is derived from other tables. A view contains rows and columns similar to a real table and has fields from one or more tables. Refer to the below image:

To understand how to create and drop a view, you can refer to the CREATE and DROP statements mentioned above. With that, we come to an end to this article on SQL tutorial. I hope you found this article informative. Also, if you are preparing for Database Administrator interviews, and are searching for a comprehensive list of questions, you can refer to our article on SQL Interview Questions.
If you wish to learn more about MySQL and get to know this open-source relational database, then check out our MySQL DBA Certification Training which comes with instructor-led live training and real-life project experience. This training will help you understand MySQL in-depth and help you achieve mastery over the subject.
Got a question for us? Please mention it in the comments section of this SQLTutorial and we will get back to you.


 Thank you for registering Join Edureka Meetup community for 100+ Free Webinars each month JOIN MEETUP GROUP