


In today’s world data is everything. But to manage it, one has to master the art of data management. With that comes the language i.e, SQL which is the basis to all. SQL is the core of relational type databases which is used among most of the companies. Through this article, I will help you in getting started with the SQL basics.
We are going to cover each of these categories one by one, so let’s get started.
Introduction to SQL


SQL was developed at IBM by Donald D. Chamberlin and Raymond F. Boyce in the early 1970s. This was initially called SEQUEL(Structured English QUERY Language). The main objective of SQL is to update, store, manipulate and retrieve data stored in a relational database. Over the years SQL has undergone a lot of changes. A lot of functionality such as support for XML, Triggers, Stored Procedures, Regular Expression Matching, Recursive Queries, Standardised Sequences and much more are added.
So, how is SQL different from MySQL?

There is a misconception or confusion regarding this topic and I would like to clarify it here.
SQL is a standard language which is used to operate on database in the form of queries. But MySQL is Open Source Database Management System or simply a Database Software. MySQL will organize and then store the data in its database.
Advantages:
- SQL has well-defined standards
- SQL is interactive in nature
- With the help of SQL, one can create multiple views
- Portability of code in SQL is a prominent feature
Data and Database
First and foremost we need to understand what is data. Data is a collection of facts about the object of interest. A data about a student may include information like name, unique id, age, address, education, etc. The software has to store the data as it is required to answer a question e.g, How many students are of age 15?
Database:
A database is an organized collection of data, which is generally stored and accessed electronically from a computer system. In simple words, we can say a database in a place where the data is stored. The best analogy is the library. The library contains a huge collection of books of different genres, here library is database and books are the data.
For details, You can even check out how to manage databases on SQL Server and its concepts with the Best SQL courses.
The database can be classified broadly into the following groups:
- Centralized database
- Distributed database
- NoSQL database
- Operational database
- Relational database
- Cloud database
- Object-oriented database
- Graph database
Now we will be focusing more on the relational database which uses SQL for its operations. Let’s use some of the
How to Create a database?
We use CREATE DATABASE statement to create a new database.
CREATE DATABASE databasename;
Example:
CREATE DATABASE School;
So the database of name School will be created. If you want to delete this database, you have to use the following syntax.
How to Drop a database?
Syntax:
DROP DATABASE databasename;
Example:
DROP DATABASE School;
The database with name School will be deleted.
Table
A table in a database is nothing but a collection of data in a tabular way. It consists of columns and rows. The table contains data elements also known as values using a model of vertical columns and horizontal rows. The point of intersection of a row and a column is called a CELL. A table can have any number of rows but should have a specified number of columns.

Create a Table
So to create a table in database we use the following SQL query.
Syntax
CREATE TABLE table_name (
column1 datatype,
column2 datatype,
column3 datatype, ....);
Here the keyword Create Table is used to say to a database that we are going to create a new table. Then we need to mention the table name. This name has to be unique. SQL is case insensitive, but the data stored inside the table will be case sensitive. We add the columns inside the open and close brackets. We specify each column with a certain data type. To learn more about Data Types in SQL check for Edureka’s SQL articles.
Example:
CREATE TABLE Student (
studentID int,
FName varchar(25),
LName varchar(25),
Address varchar(50),
City varchar(15),
Marks int);
We have created a table with the name Student and added a few parameters into the table. This is how we can create a table using SQL.
Drop a Table
If we want to delete the entire table with all its data then we have to use the DROP command.
Syntax:
DROP TABLE table_name;
DROP TABLE Student;
So the student table will be deleted.
Truncate the Table
What if we wanted to delete only the data inside the table but not the table itself? Then we have to use the Truncate Query.
Syntax:
TRUNCATE TABLE table_name;
Example:
TRUNCATE TABLE Student;
When we execute the above query the data inside the table will be deleted but the table remains. To know more, you can check this article on Altering a table.
We can increase the accuracy and reliability of data that goes into the database through a table with the help of the concept called SQL CONSTRAINTS. These constraints make sure that there is no violation in terms of a transaction of data if found then the action will be terminated. The main use of constraints is to limit the type of data that can go into a table. Since this article is related to SQL Basics, I shall discuss the most used constraints only. To learn about it in-depth check out our other SQL blogs.
- DEFAULT – When no value is specified then a set of default values for a column is added
- NOT NULL – This makes sure that a NULL value will not be stored in a column
- UNIQUE – The values entered to the table will be unique if this constraint is applied
- INDEX – This is used to create and also retrieve data from the database
- PRIMARY KEY – It is the candidate key that is selected to uniquely identify a tuple in a relation.
- FOREIGN KEY – A foreign key is a set of one or more columns in the child table whose values are required to match with corresponding columns in the parent table
- CHECK – If we want to satisfy a specific condition in a column then we use CHECK constraint
Discover the secrets of efficient data management through our SQL Online Course.
SQL BASIC QUERIES
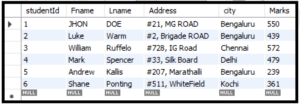
Now, let’s focus on some SQL basic commands that one should know when they start learning about SQL. There are many queries that seem to be basic, but I have covered few that are really essential for a beginner. For explaining all the query I have considered the Student table, which I will be using.
SELECT
It is the most basic SQL query one can use for manipulating a database. The select command is used to select the data from the database and display it to the user.
Syntax:
Select column 1, column 2…..column N
From Table;
Example:
Select name From Student;
The above example will display all the names from the student table. If we want to display all the fields in the table then we have to use *(Star) operator. This will display the entire table.
Example:
Select * from Student;
If we want to display certain field without any duplicates then we use the DISTINCT keyword along with the select command.
Select DISTINCT FName From Student;
WHERE
If we need only certain records from the table then we use the where clause. Where clause acts as a Filtering mechanism. Under the Where section we need to specify certain conditions, only if those conditions are met the records will be extracted.
Syntax:
SELECT column1, column2, ...column N
FROM table_name
WHERE condition;
SELECT FName FROM Students
WHERE City='Delhi';
AND, OR, NOT
If we need to add two or more conditions in the where clause then we can use the above-mentioned operators. These keywords will add more complexity to the query.
- AND Operator: This operator displays a record if all the conditions separated by AND are TRUE.
Syntax:
SELECT column1, column2, ...
FROM table_name
WHERE condition1 AND condition2 AND condition3 ...;
Example:
SELECT * FROM Student
WHERE FName='John' AND Lname='Doe';
- OR Operator: This operator displays a record if any of the conditions separated by OR is TRUE.
Syntax:
SELECT column1, column2, ...
FROM table_name
WHERE condition1 OR condition2 OR condition3 ...;
Example:
SELECT * FROM Student
WHERE FName='John' OR Lname='Doe';
- NOT Operator: This operator displays a record if the condition/conditions are NOT TRUE.
Syntax:
SELECT column1, column2, ...
FROM table_name
WHERE NOT condition;
SELECT * FROM Student
WHERE NOT Lname='Doe';
INSERT INTO
If we want to insert any new record or data into a table then we can use the INSERT query. We can use the Insert into in two ways:
- Here we specify the column names for which we need to insert the record.
Syntax:
INSERT INTO table_name (column1, column2,...)
VALUES (value1, value2, value3, ...);
Example:
Insert into Student(studentID, FName, LName, Address, City, Marks)
Values (101, ‘JHON’,’DOE’,’#21, MG ROAD’,  ‘Bengaluru’, 550);
- In this, we don’t have to specify the columns of the table. But make sure the order of the values is in the same order as the columns in the table.
Syntax:
INSERT INTO table_name
VALUES (value1, value2, value3, ...);
Example:
INSERT INTO Student VALUES (102, ‘Alex’,’Cook’,’#63, Brigade ROAD, NEAR HAL’, ‘Bengaluru’, 490);
If we want to insert into specific columns then we need to follow the below method.
INSERT INTO Student(studentID, FName) VALUES (103, ‘Mike’);
AGGREGATE FUNCTIONS
An aggregate function is a function where the values of multiple rows are grouped together as input on certain criteria and a single value is returned. We often use aggregate functions with the GROUP BY and HAVING clauses of the SELECT statement. We will be discussing GROUP BY, ORDER BY and HAVING later in this section. Some of the Aggregate functions are COUNT, SUM, AVG, MIN, MAX.
Let’s discuss each one by one.
- COUNT(): This function returns the number of rows that match specified criteria.
Syntax:
SELECT COUNT(column_name)
FROM table_name
WHERE condition;
Example:
SELECT COUNT (studentID)
FROM Student;
- AVG(): This function returns the average value of a numeric column.
Syntax:
SELECT AVG(column_name)
FROM table_name
WHERE condition;
Example:
SELECT AVG(Marks)
FROM Student;
- SUM(): This function returns the total sum of a numeric column.
Syntax:
SELECT SUM(column_name)
FROM table_name
WHERE condition;
Example:
SELECT SUM(Marks)
FROM Student;
- MIN(): This function returns the smallest value of the selected column.
Syntax:
SELECT MIN(column_name)
FROM table_name
WHERE condition;
Example:
SELECT MIN(Marks) AS LeastMarks
FROM Student;
- MAX(): This function returns the largest value of the selected column.
Syntax:
SELECT MAX(column_name)
FROM table_name
WHERE condition;
SELECT MAX(Marks) AS HighestMarks
FROM Student;
Note: We have used aliasing here (AS new_name), Which we will be discussing in a short while.
GROUP BY, HAVING, ORDER BY
These keywords (GROUP BY, HAVING, ORDER BY) are used in a query to increase the functionality. Each one of them has a specific role to play.
- GROUP BY: This functionality is used to arrange a similar type of data into a group. For instance, if the column in a table consists of similar data or value in different rows then we can use GROUP BY function to group the data.
Syntax:
SELECT column_name(s)
FROM table_name
WHERE condition
GROUP BY column_name(s);
Example:
SELECT COUNT(StudentID), Fname
FROM Student
GROUP BY Fname;
- HAVING: This clause is used to place conditions where we need to decide which group will be the part of final result-set. Also, we can not use the aggregate functions like SUM(), COUNT() etc. with WHERE clause. At such situation, we have to use HAVING condition.
Syntax:
SELECT column_name(s)
FROM table_name
WHERE condition
GROUP BY column_name(s)
HAVING condition;
Example:
SELECT Fname, SUM(Marks)
FROM Student
GROUP BY Fname
HAVING SUM(Marks)>500;
- ORDER BY: This keyword is used to sort the result-set in ascending or descending order. The ORDER BY keyword shall sort the records in ascending order by default. If we want to sort the records in descending order, use the DESC keyword.
Syntax:
SELECT column1, column2, ...
FROM table_name
ORDER BY column1, column2, ... ASC|DESC;
SELECT COUNT(StudentID), City
FROM Student
GROUP BY City
ORDER BY COUNT(StudentID) DESC;
NULL VALUES
In SQL we use the NULL term to represent a missing value. A NULL value in a table is a value appears to be blank. A field with a NULL value is a field with no value in SQL. Keep note that a NULL value is different than a zero value or a field that contains spaces.
To check the null value we are not supposed to use the operators such as <, >, = etc. It’s not supported in SQL. We have special keywords i.e, IS NULL and IS NOT NULL.
- IS NULL Syntax:
SELECT column_names
FROM table_name
WHERE column_name IS NULL;
Example:
Select Fname, Lname
From Student
Where Marks IS NULL;
- IS NOT NULL Syntax:
SELECT column_names
FROM table_name
WHERE column_name IS NOT NULL;
Select Fname, Lname
From Student
Where Marks IS NOT NULL;
UPDATE and DELETE
- UPDATE: The Update command is used to modify rows in a table. The update command can be used to update a single field or multiple fields at the same time.
Syntax:
UPDATE table_name
SET column1 = value1, column2 = value2,...
WHERE condition;
Example:
UPDATE Student
SET Fname = 'Robert', Lname= 'Wills'
WHERE StudentID = 101;
- DELETE: The SQL DELETE command is used to delete rows that are no longer required from the database tables. It deletes the whole row from the table.
Syntax:
DELETE FROM table_name
WHERE condition;
Example:
DELETE FROM Student
WHERE FName='Robert';
There is a special case here, if we need to delete the entire table records then we have to specify the table name. The data of that particular table will be divided.
Example:
Delete From Student;
One of the major questions that arise now is: What is the difference between DELETE and TRUNCATE command? The answer is simple. DELETE is a DML command whereas TRUNCATE is DDL command, also DELETE deletes records one by one and makes an entry for each and every deletion in the transaction log, whereas TRUNCATE de-allocates pages and makes an entry for deallocation of pages in the transaction log.
IN and BETWEEN operators
- IN operator is used to specify multiple values inside the WHERE clause. It acts as a short for multiple OR.
Syntax:
SELECT column_name(s)
FROM table_name
WHERE column_name IN (value1, value2, ...);
Example:
SELECT StudentID, Fname, Lname
FROM Student
WHERE City IN ('Delhi', 'Goa', 'Pune','Bengaluru');- BETWEEN operator will select a particular value within the specified range. It is compulsory to add the beginning and the end value (Range).
Syntax:
SELECT column_name(s)
FROM table_name
WHERE column_name BETWEEN value1 AND value2;
SELECT StudentID, Fname, Lname FROM Student
WHERE Marks BETWEEN 400 AND 500;
Aliases in SQL
Alias is a process of giving a table or a column a temporary name so that it helps when the query is complex. It increases the readability of the query. This renaming is temporary and the table name does not change in the original database. We can alias a column or a table. Below I have mentioned both syntaxes.
The syntax for Column Aliasing:
SELECT column_name AS alias_name
FROM table_name;
Example for Column Aliasing:
SELECT CustomerID AS ID, CustomerName AS Customer
FROM Customers;
Syntax for Table Aliasing:
SELECT column_name(s) FROM table_name AS alias_name;
Example for Table Aliasing:
SELECT S.Fname, S.LName
FROM Student as S
This brings us to the end of this SQL Basics article. I hope you understood the concepts of SQL basics.
If you wish to learn more about MySQL and get to know this open-source relational database, then check out our MySQL DBA Certification Training which comes with instructor-led live training and real-life project experience. This training will help you understand MySQL in-depth and help you achieve mastery over the subject.
Got a question for us? Please mention it in the comments section of this SQL Basics and we will get back to you.