Java Course Online
- 82k Enrolled Learners
- Weekend/Weekday
- Live Class
(30350)


 Copy Link!
One of the most popular Java frameworks for developing web applications is Spring. Almost every web application integrates with Spring Framework because it doesn’t require web server activation. With Spring MVC, this support is built-in. You are not bound to any container life cycle that you need to manipulate. In this Spring MVC Tutorial, I will tell you how to develop a Spring MVC web application using the Spring Tool Suite.
Below topics are covered in this article:
Let’s get started!
It is a Java framework which is used to build web applications. It follows the Model-View-Controller design pattern. Not just that, it also implements all the basic features of a core Spring Framework like Inversion of Control, Dependency Injection. Spring MVC provides a dignified solution to use MVC in Spring Framework by the help of DispatcherServlet. In this case, DispatcherServlet is a class that receives the incoming request and maps it to the right resource such as Controllers, Models, and Views.
Having understood this, now let’s move further and understand the fundamentals of Spring Web MVC.
It comprises four main components as shown in the below figure:
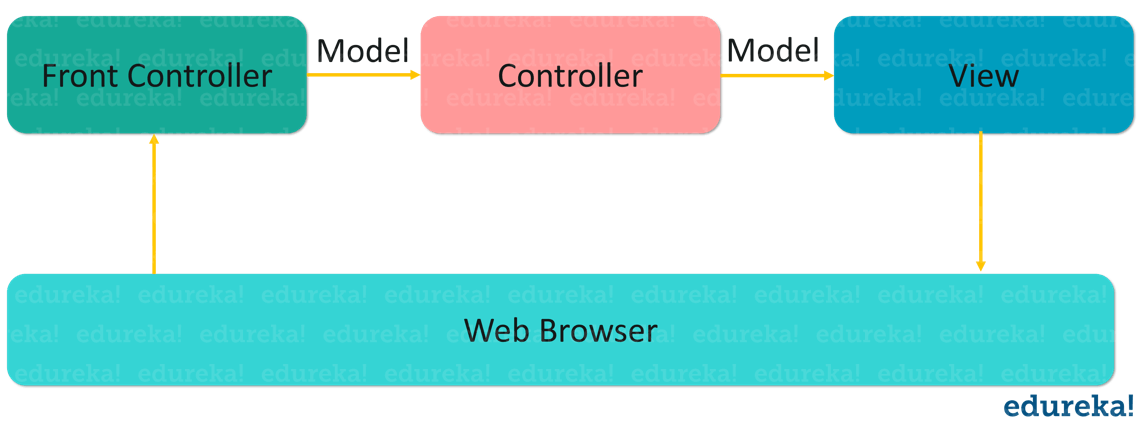 Now let’s get into the details of each of these components:
Now let’s see how internally Spring integrates with a Model, View and Controller approach.

This DispatcherServlet gets an entry of handler mapping from the XML file and forwards the request to the Controller.
After that, the Controller returns an object of ModelAndView.
Finally, the DispatcherServlet checks the entry of view resolver in the XML file and then invokes the specified view component.
That was all about the workflow of Spring MVC. Now that you know how actually it works, let’s dive deeper into the Spring MVC Tutorial article and know its working with the help of examples.
To create a Spring MVC application, you need to follow the below steps:
Create a Maven Project and add the Spring Dependencies into the pom.xml file. If you wish to learn how to configure Spring Framework you can refer to this Spring Framework Tutorial.
To create a Maven Project for Spring MVC, install Eclipse for JEE developers and follow these steps.
Click on File -> New -> Other-> Maven Project -> Next-> Choose maven-archetype-webapp-> Specify GroupID -> Artifact ID -> Package name and then click on finish.
The directory structure of your project should look like as shown below:
Once you create a Maven Project, the next thing that you have to do is to add maven dependencies in the pom.xml file.
Your pom.xml file should consist of the below-mentioned dependencies for Spring MVC.
<project xmlns="http://maven.apache.org/POM/4.0.0" xmlns:xsi="http://www.w3.org/2001/XMLSchema-instance" xsi:schemaLocation="http://maven.apache.org/POM/4.0.0 http://maven.apache.org/maven-v4_0_0.xsd">
<modelVersion>4.0.0</modelVersion>
<groupId>com.edureka</groupId>
<artifactId>SpringMVC</artifactId>
<packaging>war</packaging>
<version>0.0.1-SNAPSHOT</version>
<name>SpringMVC Maven Webapp</name>
<url>http://maven.apache.org</url>
<dependencies>
<dependency>
<groupId>junit</groupId>
<artifactId>junit</artifactId>
<version>3.8.1</version>
<scope>test</scope>
</dependency>
<dependency>
<groupId>junit</groupId>
<artifactId>junit</artifactId>
<version>3.8.1</version>
<scope>test</scope>
</dependency>
<!-- https://mvnrepository.com/artifact/org.springframework/spring-context -->
<dependency>
<groupId>org.springframework</groupId>
<artifactId>spring-context</artifactId>
<version>5.1.8.RELEASE</version>
</dependency>
<!-- https://mvnrepository.com/artifact/org.springframework/spring-webmvc -->
<dependency>
<groupId>org.springframework</groupId>
<artifactId>spring-webmvc</artifactId>
<version>5.1.8.RELEASE</version>
</dependency>
<!-- https://mvnrepository.com/artifact/mysql/mysql-connector-java -->
<dependency>
<groupId>mysql</groupId>
<artifactId>mysql-connector-java</artifactId>
<version>8.0.16</version>
</dependency>
<dependency>
<groupId>javax.servlet</groupId>
<artifactId>jstl</artifactId>
<version>1.2</version>
</dependency>
</dependencies>
<build>
<finalName>SpringMVC</finalName>
</build>
</project>
After configuring your pom.xml file, all the required jar files will be imported. You can also copy and paste the required jar files dependency code from the maven repository.
After this, the next step is to create a Controller class.
In order to create a Controller class, I am using two annotations @Controller and @RequestMapping.
The @Controller annotation marks this class as Controller.
The @RequestMapping annotation is used to map the class with the specified URL name.
Now let’s see how to do that with the help of the below code:
Addition.java
package com.edureka;
import org.springframework.stereotype.Controller;
import org.springframework.web.bind.annotation.RequestMapping;
@Controller
public class Addition {
@RequestMapping("/")
public void add(){
int i = Integer.parseInt(req.getParameter("num1"));
int j = Integer.parseInt(req.getParameter("num2");
int k= i+j;
System.out.println("Result is" + k) //returns the result from jsp file
}
}In this XML file, I am specifying the Servlet class which is DispatcherServlet that acts as the front Controller in Spring Web MVC. All the incoming requests for the HTML file will be forwarded to the DispatcherServlet. Let’s now write the web.xml file. This file will take the mappings and the URL pattern for executing the program.
web.xml
<!DOCTYPE web-app PUBLIC "-//Sun Microsystems, Inc.//DTD Web Application 2.3//EN" "http://java.sun.com/dtd/web-app_2_3.dtd" >
<web-app>
<display-name>Archetype Created Web Application</display-name>
<servlet>
<servlet-name>spring</servlet-name>
<servlet-class>org.springframework.web.servlet.DispatcherServlet</servlet-class>
<load-on-startup>1</load-on-startup>
</servlet>
<servlet-mapping>
<servlet-name>spring</servlet-name>
<url-pattern>/add</url-pattern>
</servlet-mapping>
</web-app>
After this, the next step is to define the bean class file.
This file is necessary to specify the View components. In this, the context:component-scan element defines the base-package where DispatcherServlet will search the Controller class. This file should be present inside the WEB-INF Directory.
add-servlet.xml
<?xml version="1.0" encoding="UTF-8"?>
<beans xmlns="http://www.springframework.org/schema/beans" xmlns:ctx="http://www.springframework.org/schema/context" xmlns:xsi="http://www.w3.org/2001/XMLSchema-instance" xmlns:mvc="http://www.springframework.org/schema/mvc" xsi:schemaLocation="http://www.springframework.org/schema/beans http://www.springframework.org/schema/beans/spring-beans-2.5.xsd http://www.springframework.org/schema/mvc http://www.springframework.org/schema/mvc/spring-mvc-3.0.xsd http://www.springframework.org/schema/context http://www.springframework.org/schema/context/spring-context-2.5.xsd ">
<ctx:annotation-config></ctx:annotation-config>
<ctx:component-scan base-package="com.edureka">
</ctx:component-scan>
<mvc:annotation-driven/>
</beans>
Now the final step is to write the request in the index.jsp file.
This is the simple JSP page, in which I will perform addition of 2 numbers.
<html>
<body>

<form action ="add">
Enter 1st number: <input type="text" name="num1">
Enter 2nd number: <input type="text" name="num2">
<input type ="submit">
</form>

</body>
</html>
After all this, you can run the program by starting the server. You will get the desired output. Take a look at the below snap-shot to refer the output:
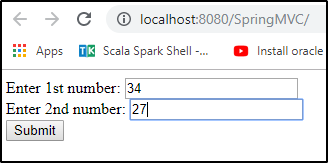
Once you hit the submit button, the result will be displayed on the screen. Basically, that’s how it works.
That was all about how to create a Spring MVC Application. Having understood this, let’s move further in Spring MVC Tutorial, and know what are the advantages of using Spring MVC.
Lightweight: As Spring is a lightweight framework, there will not be any performance issues in Spring-based web application.
High productive: Spring MVC can boost your development process and hence is highly productive.
Secure: Most of the online banking web applications are developed using Spring MVC because it is highly secure. For enterprise-grade security implementation, Spring security is a great API.
MVC Supported: As it is based on MVC, it is a great way to develop modular web applications.
Role Separation: It comprises of a separate class for specific roles like Model, Command, Validator, etc.
These were some of the advantages of using Spring MVC Framework.
This brings us to the end of the article on Spring MVC Tutorial. I tried my best to keep the concepts short and clear. I hope you were able to understand what is Spring MVC Framework and how to create a web application using Spring MVC.
Now that you are done with Spring MVC Tutorial, check out the Spring Course by Edureka, a trusted online learning company with a network of more than 250,000 satisfied learners spread across the globe.
Got a question for us? Please mention it in the comments section of Spring MVC Tutorial article and we will get back to you.


 Thank you for registering Join Edureka Meetup community for 100+ Free Webinars each month JOIN MEETUP GROUP