
Python Scripting Certification Training
- 15k Enrolled Learners
- Weekend
- Self Paced
(5900)


 Copy Link!
In the previous Spring blog, you learned about Spring Framework and how to develop a simple application. But, to increase the modularity of Spring Applications, a new technique called AOP (Aspect-Oriented-Programming) was developed. In this Spring AOP Tutorial, you will learn about aspect-oriented programming and how to use it.
Below are the topics to be covered in Spring AOP Tutorial.
You may also go through this recording of Spring AOP Tutorial Concepts where you can understand the topics in a detailed manner with examples.
Aspect Oriented Programming (AOP) compliments OOPs because it provides modularity. But, the key unit of modularity here is considered as an aspect rather than class. Here, AOP breaks the program logic into distinct parts (called concerns). It is used to increase modularity by cross-cutting concerns.
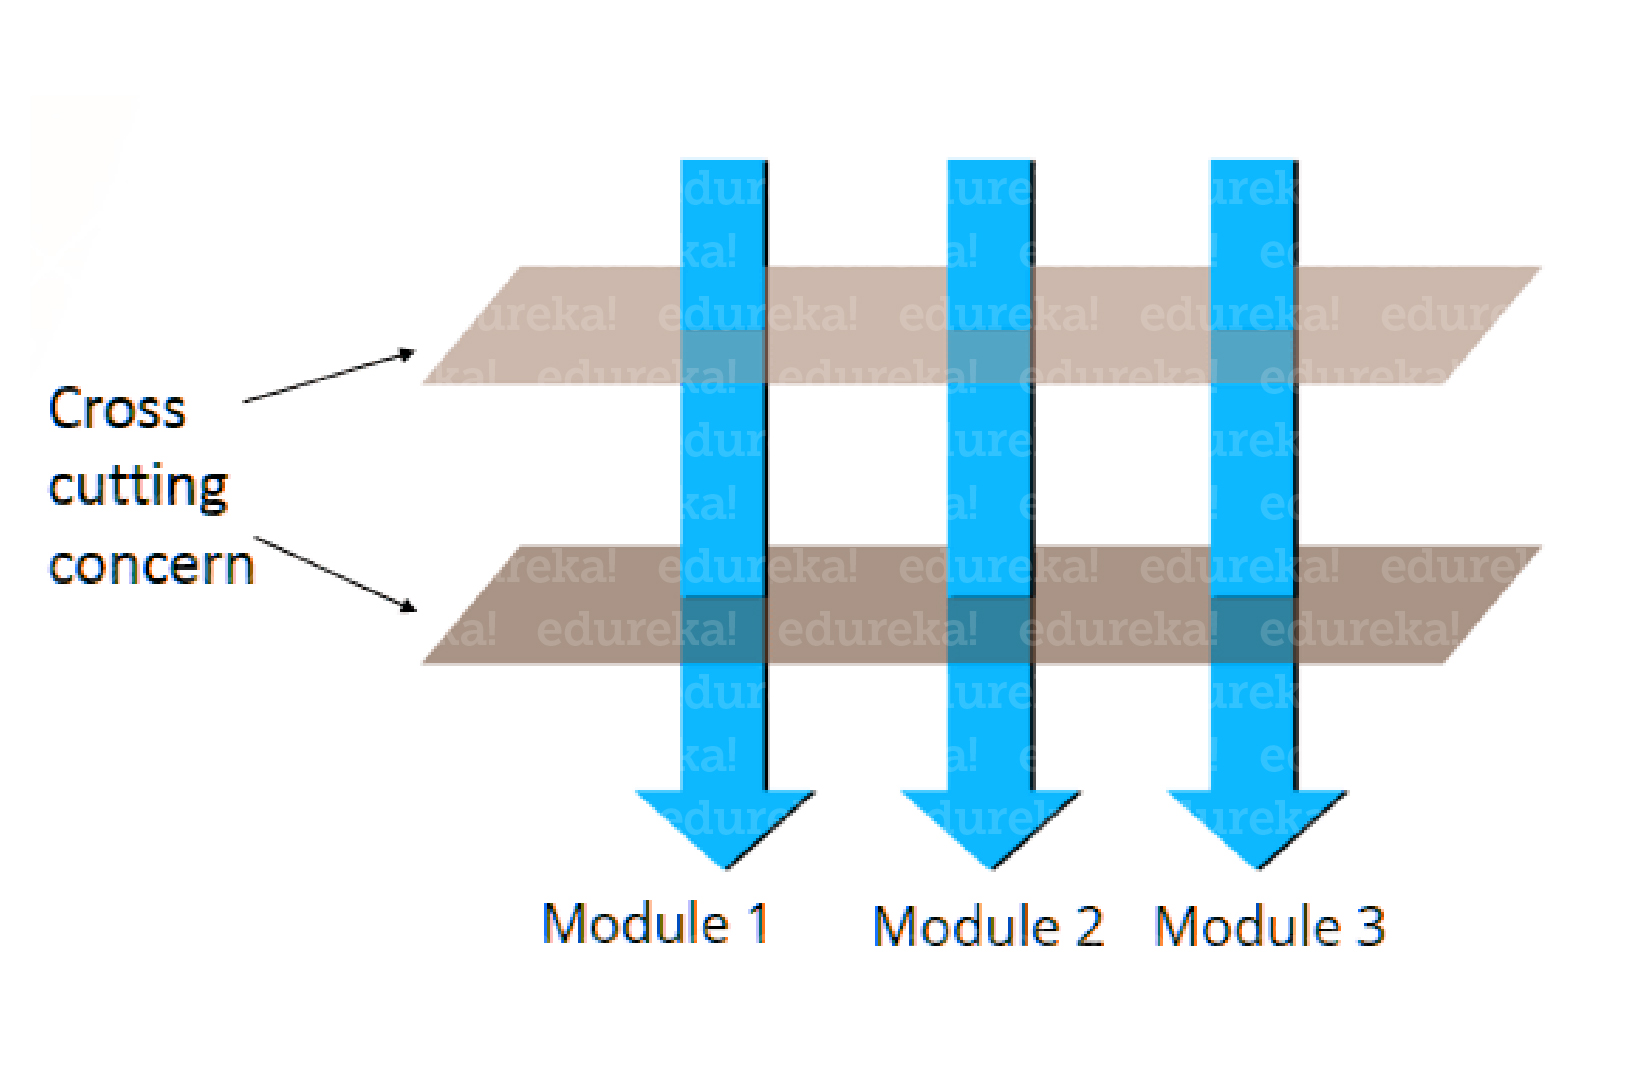 A cross-cutting concern is the one that affects the whole application and should be centralized under the same block in the code, such as transaction management, authentication, logging, security etc. As we know Spring AOP enables Aspect-Oriented Programming in spring applications. Here, aspects enable the modularization of concerns such as transaction management, logging or security that cut across multiple types and objects (often termed crosscutting concerns). In this case, AOP provides a way to dynamically add the cross-cutting concern before, after or around the actual logic using simple pluggable configurations. By doing this, it makes easy to maintain code in the present and future as well. So, you can add/remove c/concerns without recompiling complete source code simply by changing configuration files (if you are applying aspects suing XML configuration).
I hope you understood the concepts of AOP and cross-cutting concerns. Now, let’s move further and see why we need AOP.
The most important functionality is AOP provides the pluggable way to dynamically add the additional concern before, after or around the actual logic. Suppose there are 10 methods as shown in the figure:
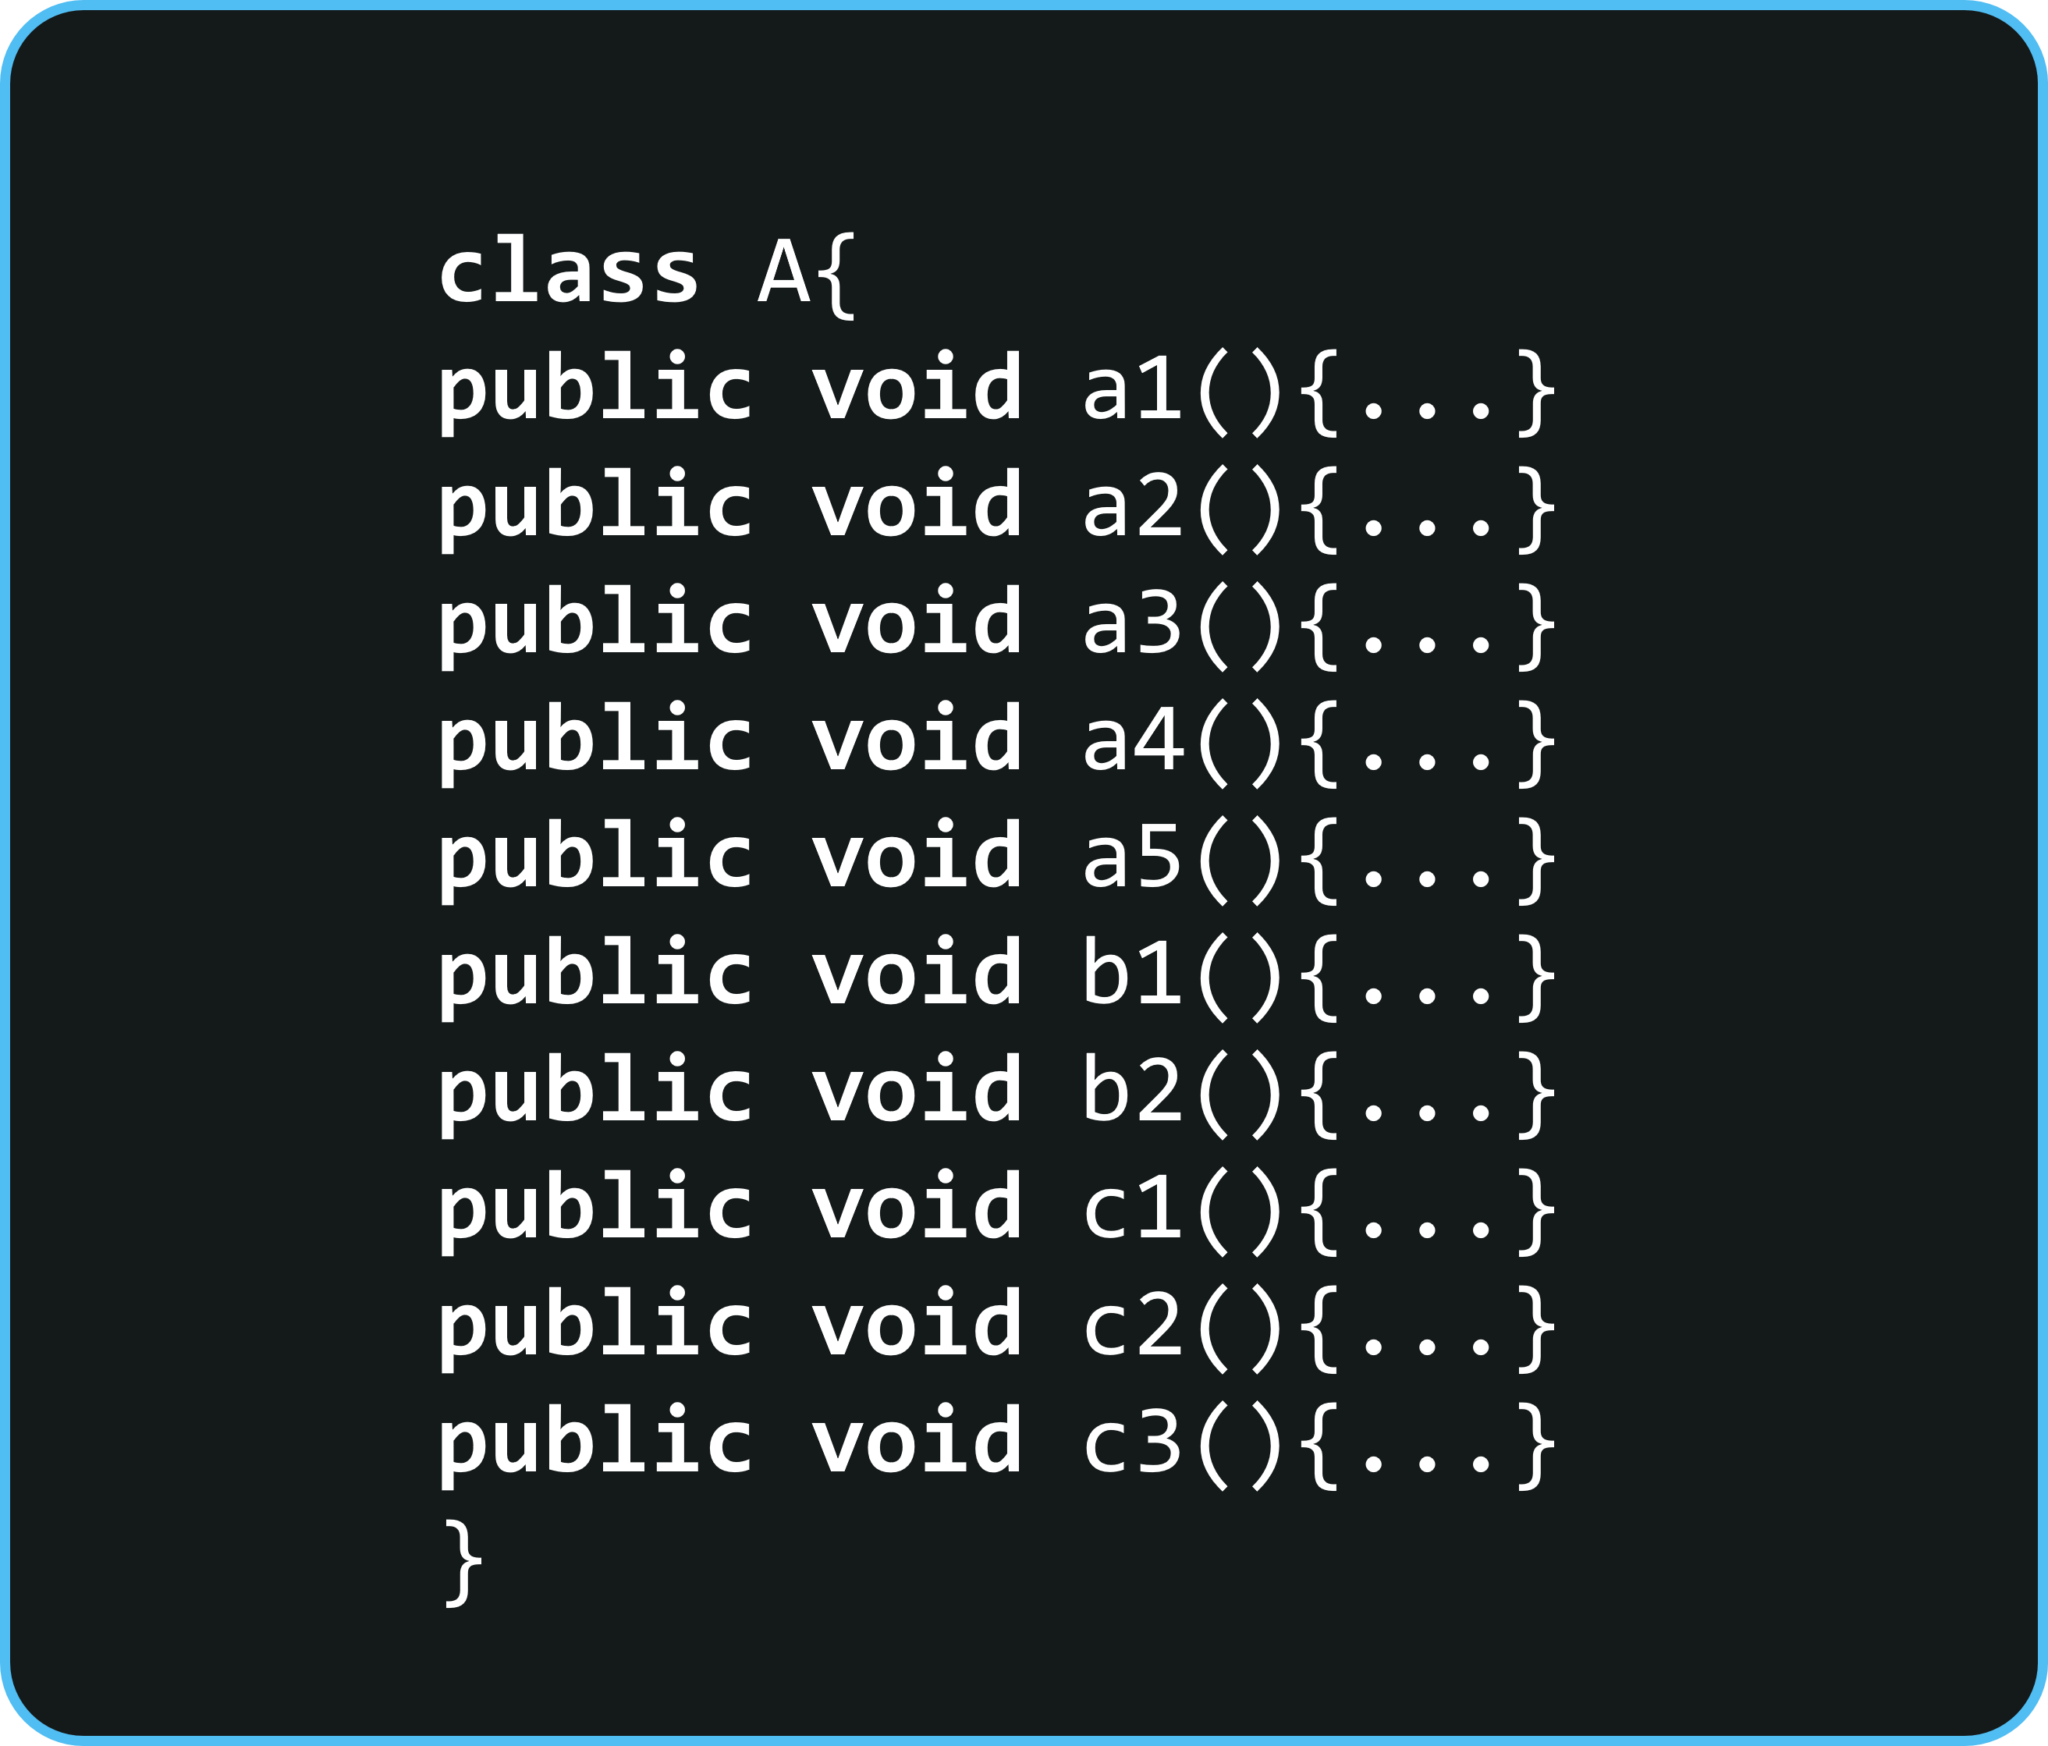 You can see that there are 5 methods that start from a, 2 methods that start from b and 3 methods that starts from c.
First, let’s understand Scenario- Here, I have to maintain a log and send notification after calling methods that start from m. So what is the problem without AOP? Here, We can call methods (that maintains a log and sends notification) from the methods starting with a. In such a scenario, we need to write the code in all the 5 methods. But, in case if a client says in future, I don’t have to send a notification, you need to change all the methods. It leads to a maintenance problem. So with AOP, we have below solution.
The solution with AOP– With AOP, we don’t have to call methods from the method. We can simply define the additional concern like maintaining a log, sending notification etc. in the method of a class. Its entry is given in the XML file. Suppose in future, if a client says to remove the notifier functionality, we need to change only in the XML file. So, maintenance is easy in AOP.
That’s the whole concept of why we need Aspect Oriented Programming in Springs. Now let’s move further in this Spring AOP Tutorial blog and understand some core concepts of Aspect Oriented Programming.
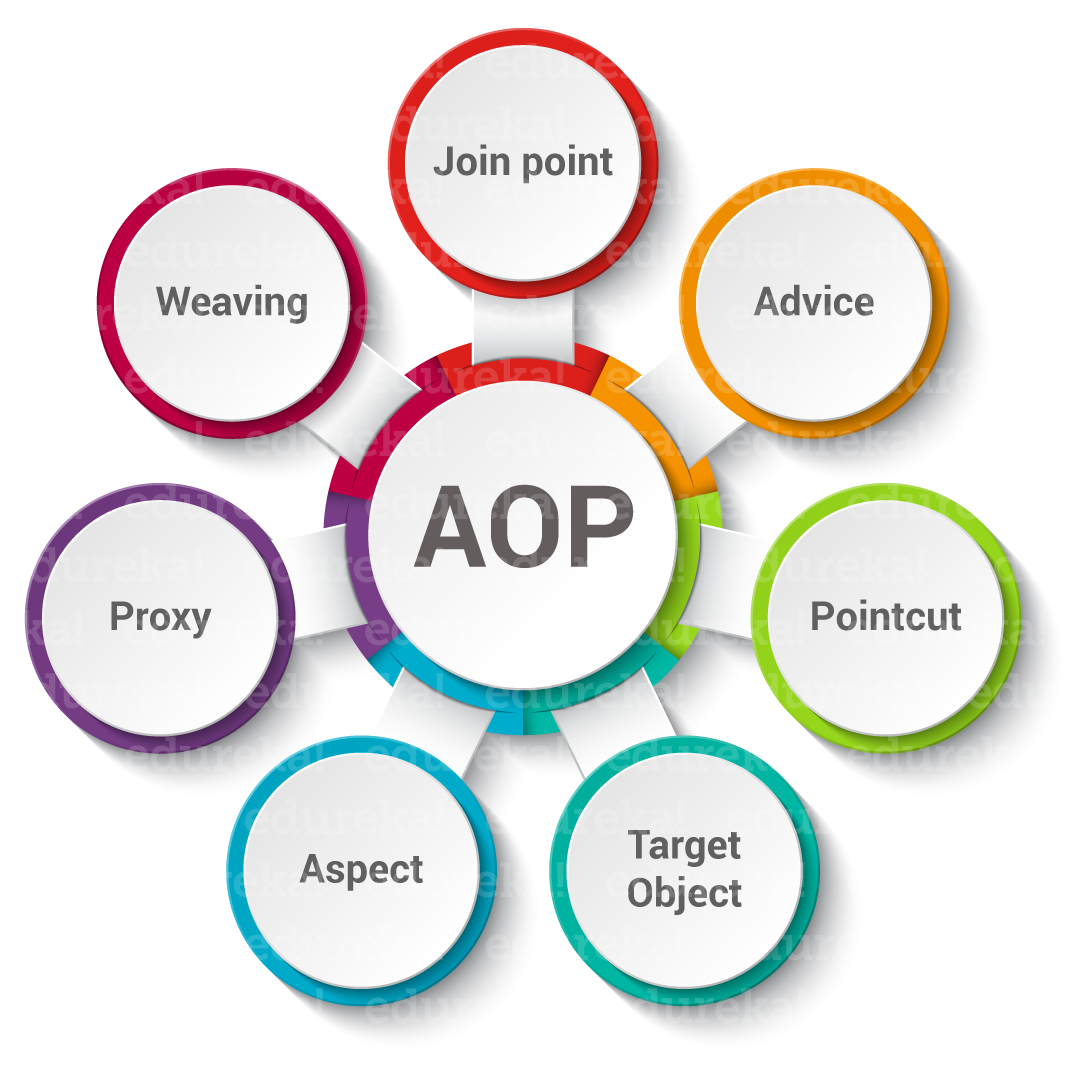
Spring AOP consists of 7 core concepts which are depicted in the following diagram:
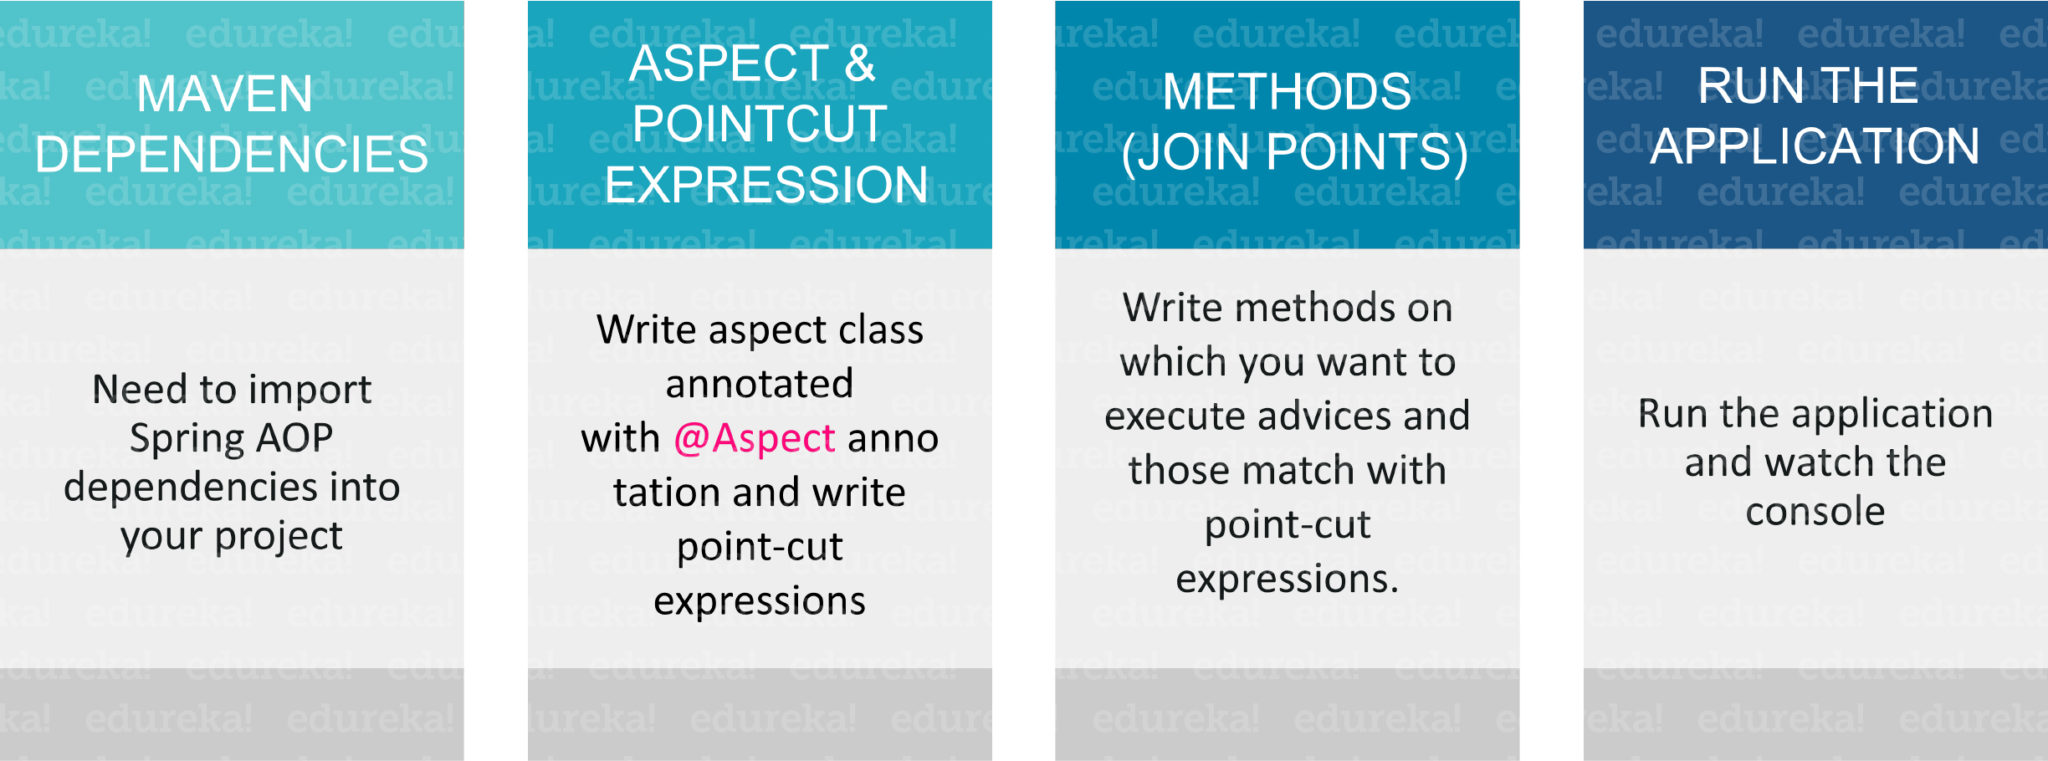
Having understood this, let’s move further and see what are the steps required to create an AOP
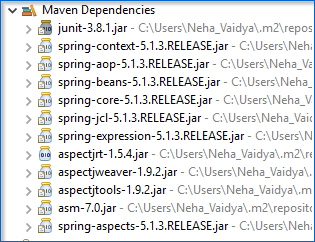
<project>
xmlns="http://maven.apache.org/POM/4.0.0" xmlns:xsi="http://www.w3.org/2001/XMLSchema-instance"
xsi:schemaLocation="http://maven.apache.org/POM/4.0.0 http://maven.apache.org/xsd/maven-4.0.0.xsd">
<modelVersion>4.0.0</modelVersion><groupId>com.edureka</groupId>
<artifactId>AOP</artifactId>
<version>0.0.1-SNAPSHOT</version>
<packaging>jar</packaging><name>AOP</name>
<url>http://maven.apache.org</url><properties>
<project.build.sourceEncoding>UTF-8</project.build.sourceEncoding>
</properties><dependencies>
<dependency>
<groupId>junit</groupId>
<artifactId>junit</artifactId>
<version>3.8.1</version>
<scope>test</scope>
</dependency>
<dependency>
<groupId>org.springframework</groupId>
<artifactId>spring-context</artifactId>
<version>5.1.3.RELEASE</version>
</dependency>
<!-- https://mvnrepository.com/artifact/aspectj/aspectjrt -->
<dependency>
<groupId>aspectj</groupId>
<artifactId>aspectjrt</artifactId>
<version>1.5.4</version>
</dependency>
<!-- https://mvnrepository.com/artifact/org.aspectj/aspectjweaver -->
<dependency>
<groupId>org.aspectj</groupId>
<artifactId>aspectjweaver</artifactId>
<version>1.9.2</version>
</dependency>
<!-- https://mvnrepository.com/artifact/org.aspectj/aspectjtools -->
<dependency>
<groupId>org.aspectj</groupId>
<artifactId>aspectjtools</artifactId>
<version>1.9.2</version>
</dependency>
<!-- https://mvnrepository.com/artifact/org.ow2.asm/asm -->
<dependency>
<groupId>org.ow2.asm</groupId>
<artifactId>asm</artifactId>
<version>7.0</version>
</dependency>
<!-- https://mvnrepository.com/artifact/org.springframework/spring-aspects -->
<dependency>
<groupId>org.springframework</groupId>
<artifactId>spring-aspects</artifactId>
<version>5.1.3.RELEASE</version>
</dependency></dependencies>
</project>
Now let’s create a basic customer service class with a few print methods. In the below code I have used some setters and getters to display the results of name and URL.
package com.edureka.Edureka;
public class CustomerService {
private String name;
private String url;
public void setName(String name) {
this.name = name;
}
public void setUrl(String url) {
this.url = url;
}
public void printName() {
System.out.println("Customer name : " + this.name);
}
public void printURL() {
System.out.println("Customer website : " + this.url);
}
public void printThrowException() {
throw new IllegalArgumentException();
}
}
Here, next step is to write XML bean configuration file. In this, we will write a bean class with Bean id, class name, value etc. Let’s see how:
<?xmls version="1.0" encoding="UTF-8"?>;
<beans xmlns="http://www.springframework.org/schema/beans" xmlns:xsi="http://www.w3.org/2001/XMLSchema-instance" xsi:schemaLocation="http://www.springframework.org/schema/beans http://www.springframework.org/schema/beans/spring-beans-2.5.xsd">
<bean id="customerService" class="com.edureka.Edureka.CustomerService">;
<property name="name" value="Edureka" />;
<property name="url" value="http://www.edureka.co" />;
</bean>;
</beans>;
Finally, we will write the main class to execute the program as shown in the below code
package com.edureka.Edureka;
import org.springframework.context.ApplicationContext;
import org.springframework.context.support.ClassPathXmlApplicationContext;
import com.edureka.Edureka.CustomerService;
public class App {
public static void main(String[] args) {
ApplicationContext appContext = new ClassPathXmlApplicationContext("Customer.xml");
CustomerService cust = (CustomerService) appContext.getBean("customerServiceProxy");
System.out.println("--------------------");
cust.printName();
System.out.println("--------------------");
cust.printURL();
System.out.println("--------------------");
try {
cust.printThrowException();
} catch (Exception e) {
}
}
}
This program on execution will display customer name and website in the console. So basically, this is how you can configure and write your AOP program. Now let’s delve deeper into Spring AOP Tutorial and understand different advice types.
Several types of advices present in Spring AOP are as follows:
Now let’s see an example to understand how advices occur before and after the program execution. First, let’s see how it occurs before method execution. Let’s create a class that implements the MethodBeforeAdvice interface.
package com.edureka.Edureka;
import java.lang.reflect.Method;
import org.springframework.aop.MethodBeforeAdvice;
public class BeforeMethod implements MethodBeforeAdvice
{
	@Override
	public void before(Method method, Object[] args, Object target)
		throws Throwable {
	        System.out.println("BeforeMethod : Before method executed!");
	}
}
Next, in the bean configuration file (Spring-Customer.xml), let’s create a bean for BeforeMethod class, and a new proxy object named ‘customerServiceProxy‘.
<?xmls version="1.0" encoding="UTF-8"?>
<beans xmlns="http://www.springframework.org/schema/beans" xmlns:xsi="http://www.w3.org/2001/XMLSchema-instance" xsi:schemaLocation="http://www.springframework.org/schema/beans http://www.springframework.org/schema/beans/spring-beans-2.5.xsd">
<bean id="customerService" class="com.edureka.Edureka.CustomerService">
<property name="name" value="Edureka" />
<property name="url" value="http://www.edureka.co" />
</bean>
<bean id="BeforeMethodBean" class="com.edureka.Edureka.BeforeMethod" />
<bean id="customerServiceProxy" class="org.springframework.aop.framework.ProxyFactoryBean">
<property name="target" ref="customerService" />
<property name="interceptorNames">
<list>
<value>beforeMethodBean</value>
</list>
</property>
</bean>
</beans>
Finally, let’s create a main class and execute the program.
package com.edureka.Edureka;
import org.springframework.context.ApplicationContext;
import org.springframework.context.support.ClassPathXmlApplicationContext;
import com.edureka.Edureka.CustomerService;
public class App {
public static void main(String[] args) {
ApplicationContext appContext = new ClassPathXmlApplicationContext("Customer.xml");
CustomerService cust = (CustomerService) appContext.getBean("customerServiceProxy");
System.out.println("--------------------");
cust.printName();
System.out.println("--------------------");
cust.printURL();
System.out.println("--------------------");
try {
cust.printThrowException();
} catch (Exception e) {
}
}
}
When you execute, it will execute the BeforeMethod’s before() method, before every customerService’s methods get executed.
Now, let’s see how after returning advice() occurs with the help of below example.
package com.edureka.Edureka;
import java.lang.reflect.Method;
import org.springframework.aop.AfterReturningAdvice;
public class AfterMethod implements AfterReturningAdvice {
@Override
public void afterReturning(Object returnValue, Method method, Object[] args, Object target) throws Throwable { System.out.println("AfterMethod : After method Executed!");
}
}
Now let’s configure bean xml configuration file
<?xmls version="1.0" encoding="UTF-8"?>
<beans xmlns="http://www.springframework.org/schema/beans" xmlns:xsi="http://www.w3.org/2001/XMLSchema-instance" xsi:schemaLocation="http://www.springframework.org/schema/beans http://www.springframework.org/schema/beans/spring-beans-2.5.xsd">
<bean id="customerService" class="com.edureka.Edureka.CustomerService">
<property name="name" value="Edureka" />
<property name="url" value="http://www.edureka.co" />
</bean>
<bean id="afterreturningMethodBean" class="com.edureka.Edureka.afterreturningMethod" />
<bean id="customerServiceProxy" class="org.springframework.aop.framework.ProxyFactoryBean">
<property name="target" ref="customerService" />
<property name="interceptorNames">
<list>
<value>afterreturningMethodBean</value>
</list>
</property>
</bean>
</beans>
Finally, we will write the main class and execute the code.
package com.edureka.Edureka;
import org.springframework.context.ApplicationContext;
import org.springframework.context.support.ClassPathXmlApplicationContext;
import com.edureka.Edureka.CustomerService;

public class App {
	public static void main(String[] args) {
		ApplicationContext appContext = new ClassPathXmlApplicationContext(new String[] { "Spring-Customer.xml" });
		CustomerService cust = (CustomerService) appContext.getBean("customerServiceProxy");
		System.out.println("------------------------");
		cust.printName();
		System.out.println("------------------------");
		cust.printURL();
		System.out.println("------------------------");
		try {
			cust.printThrowException();
		} catch (Exception e) {

		}
}
}
Here, It will run the AfterMethod’s afterReturning() method, after every customerService’s methods that are returned result. So that’s all about the different types of advices. Now let’s jump into the last topic of Spring AOP Tutorial article and understand AspectJ Annotations.
The important aspect of Spring is the Aspect-Oriented Programming (AOP) framework. As we all know, the key unit of modularity in OOP(Object Oriented Programming) is the class, similarly, in AOP the unit of modularity is the aspect. Aspects enable the modularization of concerns such as transaction management that cut across multiple types and objects. To implement these concerns, AspectJ comes into the picture. AspectJ, a compatible extension to the Java programming language, is one implementation of AOP. It has grown into a complete and popular AOP framework. Since AspectJ annotations are supported by more and more AOP frameworks, AspectJ-style aspects are more likely to be reused in other AOP frameworks that support AspectJ.
Now, let’s jump into the last part of this Spring AOP Tutorial and write an example on Spring AspectJ Annotation. As you all know, advices need to be implemented, thus in order to specify the advices, point-cuts are necessary. So, before we write aspects, let’s understand what a point-cut is.
The pointcut is an expression language of Spring AOP. @Pointcut annotation defines the pointcut. Here, we can refer the pointcut expression by its name also. Let’s see a simple example.
@Pointcut("execution(*Operation.*(..))")
private void dotask() {}
As you can see here, a name of the pointcut expression is dotask(). It will be applied on all the methods of Operation class regardless of the return type.
Now let’s see how Annotations can be applied and executed before the method execution.
The AspectJ Before Advice is applied before the actual business logic method. You can perform any operation here such as conversion, authentication etc.
Now, let’s create a class that contains actual business logic.
File: Operation.java
package com.edureka;
public class Operation{
public void msg(){System.out.println("msg method invoked");}
public int a(){System.out.println("a method invoked");return 2;}
public int b(){System.out.println("b method invoked");return3;}
}
Now, create the aspect class that contains before advice.
File: TrackOp.java
package com.edureka;
import org.aspectj.lang.JoinPoint;
import org.aspectj.lang.annotation.Aspect;
import org.aspectj.lang.annotation.Before;
import org.aspectj.lang.annotation.Pointcut;
@Aspect
public class TrackOp{
@Pointcut(“execution(* Operation.*(..))")
public void k(){}
@Before(“k()”)//applying pointcut on before advice
public void myadvice(JoinPoint jp){
System.out.println(“additional concern”);
}
}
Now create the applicationContext.xml file that defines beans.
File: applicationContext.xml
<?xml version="1.0" encoding="UTF-8"?>
<beans xmlns="http://www.springframework.org/schema/beans"
xmlns:xsi="http://www.w3.org/2001/XMLSchema-instance"
xmlns:aop="http://www.springframework.org/schema/aop"
xsi:schemaLocation="http://www.springframework.org/schema/beans
http:<span class="comment">//www.springframework.org/schema/beans/spring-beans.xsd
http://www.springframework.org/schema/aop
http:<span class="comment">//www.springframework.org/schema/aop/spring-aop.xsd">
<bean id="opBean"class="com.edureka.Operation"></bean>
<bean id="trackMyBean" class"com.edureka.TrackOp"></bean>
<bean class="org.springframework.aop.aspectj.annotation.AnnotationAwareAspectJAutoProxyCreator">
</beans>
Now, let’s call the actual method.
File: Test.java
package com.edureka;
import org.springframework.context.ApplicationContext;
import</span> org.springframework.context.support.ClassPathXmlApplicationContext;
public class Test{
public static void main(String[] args){
ApplicationContext context= new ClassPathXmlApplicationContext"applicationContext.xml");
Operation e=(Operation)context.getBean("opBean");
System.out.println("calling msg...");
e.msg();
System.out.println("calling a..."):
e.a();
System.out.println(calling b...");
e.b();
}
}
calling msg...
additional concern
msg()method invoked
calling a...
additional concern
a() method invoked
calling b...
additional concern
b() method invoked
As you can see, additional concern is printed before msg(), a() and b() method is invoked.
Now if you change the pointcut expression as given below:
@Pointcut("execution(*Operation.a*(..))")
Now additional concern will be applied for the methods starting with ‘a‘ in Operation class. The output will be as this:
calling msg...
additional concern
msg() method invoked
calling a...
additional concern
a()method invoked
calling b..
b() method invoked
Now you can see additional concern is not printed before b() method is invoked. Same goes with other types of advices as well. This is how you need to configure your code for aspectJ Annotation.
This brings us to the end of the blog on Spring AOP Tutorial. I tried my best to keep the concepts short and clear. Hope it helped you in understanding Spring AOP and its various features.
Now that you are done with Spring AOP Tutorial, check out the Spring Course by Edureka, a trusted online learning company with a network of more than 250,000 satisfied learners spread across the globe.
Got a question for us? Please mention it in the comments section of Spring AOP Tutorial blog and we will get back to you.


 Thank you for registering Join Edureka Meetup community for 100+ Free Webinars each month JOIN MEETUP GROUP