In the previous blog, you’ve learnt about what Smart Contracts are, different Smart Contract Languages and how to set up a Smart Contract Development Environment. In this article, you will learn how to build your first smart contract. I will be using Remix IDE for developing and testing a smart contract.
Below topics are covered in this smart contract development tutorial:
Building your Smart Contract
A simple purchase order smart contract will be developed as a part of this blog series. As this series progresses and as new concepts of solidity programming language are introduced, the purchase order smart contract will evolve and improve.
Structure of Smart Contract
Solidity smart contract, in essence, is a collection of following
- data — which maintains the current state of the contract
- function – which apply the logic to transition the state of the contract
Solidity smart contracts follow a standard structure. Any smart contract begins with the following statement
Pragma directive
The “pragma” keyword can be used to enable certain compiler features or checks. The statement below defines that the source file (smart contract) will not compile with compiler earlier than 0.4.0 and compiler version after 0.6.0. This declaration ensures no unintended behavior is introduced when a new compiler version is introduced.
pragma solidity >=0.4.0 <=0.6.0
Contract declaration
The contract is declared using the keyword “contract”. This declares an empty contract which is identified by the name “PurchaseOrder”.
contract PurchaseOrder{
 }
Storing relevant data to the contract
Every contract or in generic terms every program may require to store some data. Adding data to the program provides it a level of flexibility. Moving away from hard-coded values in the program to user provided values is an important feature. Variables allow you to store the data, label the data, retrieve the data and manipulate the data.
Smart Contract Development: Introducing Variables
In solidity, the variables are of two types
- Value Type: These type of variables are passed by value, i.e. they are always copied when they are used as function arguments or in assignments. For example: integers, booleans address, etc.
- Reference Types: These type of variable are of complex types and are passed by reference, these variables do not fit into 256 bit and have to be managed carefully as copying them is expensive.
Adding data to Smart Contract
Let’s add some data variable to the contract. For every purchase order, there has to be some quantity of product associated to it. Let us add a variable product_quantity which will be of data type integer or number.
The variable we are introducing now is an unsigned integer and is represented by uint256, 256 here signifies the 256 bits storage.
- U – unsigned (meaning this type can only represent positive integers, not positive and negative integers)
- INT – integer
- 256 – 256 bits in size
- minimum value uint256 can be assigned is 0
- maximum value uint256 can be assigned is 2^256-1 [a very large number]
Product quantity is only a positive value and current assumption is we are going to cater to a very large value for product quantity.
The “product_quantity” variable declared is part of the contract state and hence is persisted or stored in contract space. Currently, this variable will default to value 0.
contract PurchaseOrder{
   uint256 product_quantity;
}
Defining the constructor
The constructor is called when the contract is deployed. The constructor initializes the contract with some values. In the current scenario, the product quantity is set to 100, when the contract is deployed. A parameterized constructor can also be created by passing a variable and initializing product_quantity using the passed in value.
The key point to be noted here is the access modifier “public” associated with the constructor. Public keyword specifies that anyone can access this function, this is not a restricted function.
constructor() public{
   product_quantity = 100;
}
Adding functions
Let us now add function to make our program interactive. Functions are controlled capabilities which can be added to a program. Any function is preceded by keyword function. Overall this is how the function declaration looks like “function <function name> <access modified> <state mutator> <return value>”.
Get function
One of the most common requirements, for any of the program, is to read the stored value. In the following contract, we are going to need to read the “product_quantity” value. In order to provide this capability, a read function or a get function is added. In this function we are not doing any manipulation to the stored value, we are just retrieving the stored value.
Let us now break down our get function (get_quantity)
| No. | Keyword | Value |
| 1 | <function name> | get_quantity(){no parameters are passed} |
| 2 | <access modifier> | public {anyone can access the function} |
| 3 | <state-mutator> | view {signifies the function only reads the state of the contract, does not changes the state of contract, hence view} |
| 4 | <returns> | returns a variable of type uint256 {defined what is returned by the function} |
function get_quantity() public view returns(uint256){
   return product_quantity;
}
Setter functions
Reading the data is necessary and we have accomplished it in the last section, but most of the scenario also requires the capability to write/update the data as well. This specific capability is provided by adding a setter function. This function takes a value from the user in the form of an input parameter. Using the value provided to the function by the user the value of variable “product_quantity” is written to/updated.
Let us now break down our set function (update_quantity)
Adding a function to update the value of product quantity
| No. | Keyword | Value |
| 1 | <function name> | update_quantity (uint256 value){parameter value of type uint256 is passed } |
| 2 | <access modifier> | public {anyone can access the function} |
| 3 | <state-mutator> | Not required as the state is getting updated by the functions |
| 4 | <returns> | returns a variable of type uint256 (defined what is returned by the function) |
function update_quantity(uint256 value) public {
        product_quantity = product_quantity + value;
}
Plugging all this together, this is how the overall contract should look like.
pragma solidity >=0.4.0 <=0.6.0;

contract PurchaseOrder{
   uint256 product_quantity; //state variable

   /*Called with the contract is deployed and initializes the value*/
   constructor() public{
        product_quantity = 100;
    }

    // Get Function
    function get_quantity() public view returns(uint256){
        return product_quantity;
    }

    // Set Function
    function update_quantity(uint256 value) public {
        product_quantity = product_quantity + value;
    }
}
Deploying the Smart Contract
Time to test the smart contract. In order to test this smart contract, we will use Remix Online IDE.
Remix is an online playground for ethereum smart contract. Remix is completely browser based. Remix provides you an online IDE (Integrated development environment) where you can write your smart contracts. Remix provides you an online solidity compiler capability. The smart contract in Remix IDE can be compiled using a specific compiler version seamlessly.
Remix also provides the capability to quickly test the smart contract.
Remix provides a complete toolset to start development of smart contract and unit testing the smart contract, without doing any installation on your local machine. This is of tremendous use for the starting with solidity as developers just need to focus on writing a smart contract, rather worry about the infrastructure.
With Remix IDE all you need is a browser and an internet connection to get started with smart contract development. Quick development, testing, and validation of an idea for a smart contract.
Remix has recently upgraded their UI.

Click on the file icon as highlighted in the above image, file explorer will open up.
- Clicking on the plus icon, a new file can be created, name the file PurchaseOrder.sol
- This will create an empty file named PurchaseOrder.sol, click and open this file.
- Let us copy paste the whole contract in the PurchaseOrder.sol.
- Click on the second icon, in the left menu just below the file icon, solidity compiler option should appear.
- Under the Compiler label, select the compiler version. The current selected version is 0.5.8.
- Post selection of compiler version, click on “Compile PurchaseOrder.sol”. This will compile the smart contract.
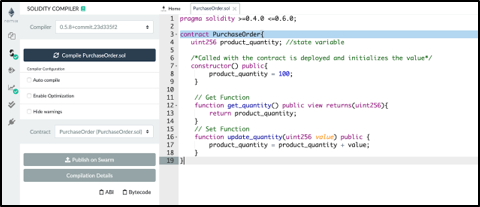
7. Once the smart contract compiles successfully, click on the “Compilation Details” button and the following details should come up. Post compilation, two key information are made available
- ABI – Application binary interface. This is a json file which details all the methods exposed in the smart contract along with meta data of the methods. More on this will be discussed in the subsequent blogs.
- Bytecode – EVM (Ethereum virtual machine) operation code, Smart contract logic gets converted into the bytecode on compilation.
8. In order to test the smart contract, the smart contract needs to be deployed. In order to deploy the smart contract click on the next icon in left menu, below compile icon. The following screen will appear. In order to test the smart contract, the smart contract needs to be deployed. In order to deploy the smart contract click on the next icon in the left menu, below compile icon. The following screen will appear.
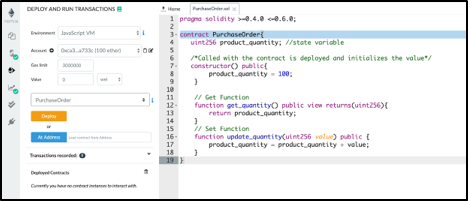
Deployment Option
The deployment screen, provides a couple of choices, let us look at them one by one.
- Environment: This can be thought of an option similar to choosing to buy a laptop from either Amazon, Flipkart, Newegg (all of these are online retailer) you make a choice where you want to buy from, based on your requirement. Similarly, in case of Remix, we have an option where to deploy the smart contract and test the smart contract. The dropdown next to environment label provides three selections
- JavaScript VM – a local Ethereum single node is spun up in the browser memory and provide 5 prefunded test accounts which can be used for the transaction (deployment, invoking functions)
- Injected Web3 Provide – This relies on MetaMask. Metamask is like a broker or middleman, which allows the web applications to interact with the smart contract. Metamask provides capability to manage the identities and also signing the transactions to be sent to the ethereum network.This middleman or 3rd party provide help you to determine the blockchain network the smart contract will be deployed to.
- Web3 Provider – if you are running a local Ethereum node and RPC endpoint is available, this option can be used. Smart contract will be deployed to the local Ethereum node.
- Accounts: This information is populated based on the environment selected. For example. JavaScript VM provides 5 prefunded test accounts. In case of Web3 provider and Injected Web3 do not provide prefunded test accounts.
- Gas limit: This defines the maximum amount of Gas the initiator is willing to spend for any transaction. This is the place to safeguard against infinite loop and depleting all funds of the account in case of infinite loop condition.
- Value: The value that may be required to send across while deploying the smart contract. This is an optional value.
In order to deploy the contract, select JavaScript VM option, select the first account from the accounts drop down, do note the balance of account (100 ether).
Ensure the smart contract name appearing is PurchaseOrder, click on deploy. Key actions that will happen
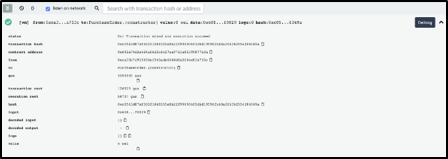
- Account balance changes from 100 ether to 99.999999 ether, the amount deducted is the transaction cost for deploying the smart contract.
- Under deployed contract a new tile for smart contract will appear, which will also provide the address of the new smart contract something like this (0x692a70d2e424a56d2c6c27aa97d1a86395877b3a)
- In the console window following information will appear
- Transaction hash – uniquely identifies the contract deployment
- Transaction cost
- Contract address
Interacting with the deployed contract
- Under the deployed contract, following two interaction methods are available update_quantity and get_quantity.
- Both of these interaction methods are the public methods defined in the “Purchase Order” contract.
- Update quantity “update_quantity” method requires an input parameter, hence the input box.
- Get quantity “get_quantity” method retrieves the value of the product_quantity.
- Let us check what happens when get_quantity is invoked, return value 100 is shown, which was initialized in the constructor. This does not cause a transaction to happen
- Let us invoke update_quantity and provide 30 as input. This causes a transaction to happen
In a nutshell, any operation that causes write operation to the state of the contract (i.e. changes the contract variables) will result in a transaction.

Any operation which just reads the state of the contract does not cause a transaction.
Smart Contract Development Conclusion
With this, we have just created our first smart contract, just scratching the surface of solidity. We have just seen what it takes to test the smart contract right from deploying the smart contract to initiating transactions.
In the next blog which is a continuation of the smart contract development series, we are going to dwell deeper into solidity fundamentals, taking a deeper dive into smart contract deployment.
With that, I conclude this Smart Contract development blog. I hope you enjoyed reading this blog and found it informative.
If you wish to learn Smart Contracts, build a career in the domain of Blockchain and gain expertise in Ethereum programming, get enrolled in live-online Blockchain Technology Courses here, that comes with 24*7 support to guide you throughout your learning period.
Got a question for us? Please mention it in the comments section of “Smart contract development” and we will get back to you at the earliest.