
PySpark Certification Training Course
- 12k Enrolled Learners
- Weekend/Weekday
- Live Class
(4000)


 Copy Link!
From our previous blog in Hadoop Tutorial Series, we learnt how to setup a Hadoop Single Node Cluster. Now, I will show how to set up a Hadoop Multi Node Cluster. A Multi Node Cluster in Hadoop contains two or more DataNodes in a distributed Hadoop environment. This is practically used in organizations to store and analyze their Petabytes and Exabytes of data. Learning to set up a multi node cluster gears you closer to your much needed Hadoop certification.
Here, we are taking two machines – master and slave. On both the machines, a Datanode will be running.
Let us start with the setup of Multi Node Cluster in Hadoop.
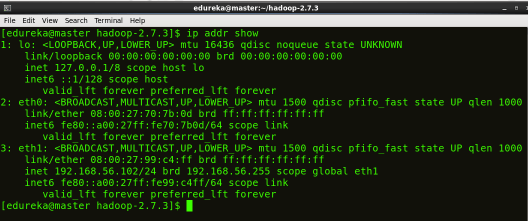
We have two machines (master and slave) with IP:
Master IP: 192.168.56.102
Slave IP: 192.168.56.103
STEP 1: Check the IP address of all machines.
Command: ip addr show (you can use the ifconfig command as well)

STEP 2: Disable the firewall restrictions.
Command: service iptables stop
Command: sudo chkconfig iptables off

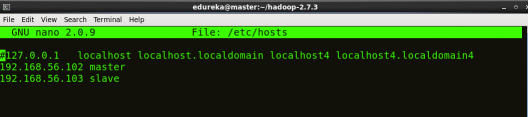
STEP 3: Open hosts file to add master and data node with their respective IP addresses.
Command: sudo nano /etc/hosts
Same properties will be displayed in the master and slave hosts files.

STEP 4: Restart the sshd service.
Command: service sshd restart

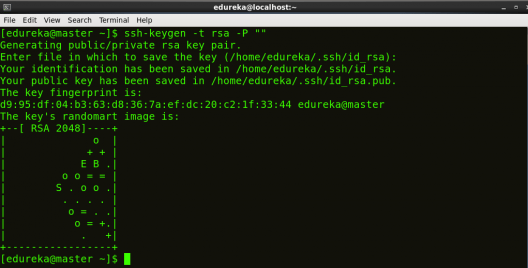
STEP 5: Create the SSH Key in the master node. (Press enter button when it asks you to enter a filename to save the key).
Command: ssh-keygen -t rsa -P “”
STEP 6: Copy the generated ssh key to master node’s authorized keys.
Command: cat $HOME/.ssh/id_rsa.pub >> $HOME/.ssh/authorized_keys

STEP 7: Copy the master node’s ssh key to slave’s authorized keys.
Command: ssh-copy-id -i $HOME/.ssh/id_rsa.pub edureka@slave

STEP 8: Click here to download the Java 8 Package. Save this file in your home directory.
STEP 9: Extract the Java Tar File on all nodes.
Command: tar -xvf jdk-8u101-linux-i586.tar.gz

STEP 10: Download the Hadoop 2.7.3 Package on all nodes.
Command: wget https://archive.apache.org/dist/hadoop/core/hadoop-2.7.3/hadoop-2.7.3.tar.gz

STEP 11: Extract the Hadoop tar File on all nodes.
Command: tar -xvf hadoop-2.7.3.tar.gz

STEP 12: Add the Hadoop and Java paths in the bash file (.bashrc) on all nodes.
Open. bashrc file. Now, add Hadoop and Java Path as shown below:
Command: sudo gedit .bashrc

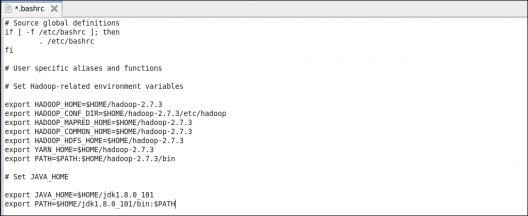
Then, save the bash file and close it.
For applying all these changes to the current Terminal, execute the source command.
Command: source .bashrc

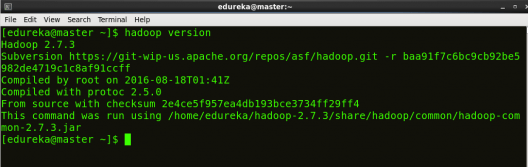
To make sure that Java and Hadoop have been properly installed on your system and can be accessed through the Terminal, execute the java -version and hadoop version commands.
Command: java -version

Command: hadoop version
Now edit the configuration files in hadoop-2.7.3/etc/hadoop directory.
STEP 13: Create masters file and edit as follows in both master and slave machines as below:
Command: sudo gedit masters

STEP 14: Edit slaves file in master machine as follows:
Command: sudo gedit /home/edureka/hadoop-2.7.3/etc/hadoop/slaves

STEP 15: Edit slaves file in slave machine as follows:
Command: sudo gedit /home/edureka/hadoop-2.7.3/etc/hadoop/slaves

STEP 16: Edit core-site.xml on both master and slave machines as follows:
Command: sudo gedit /home/edureka/hadoop-2.7.3/etc/hadoop/core-site.xml

STEP 7: Edit hdfs-site.xml on master as follows:
Command: sudo gedit /home/edureka/hadoop-2.7.3/etc/hadoop/hdfs-site.xml

STEP 18: Edit hdfs-site.xml on slave machine as follows:
Command: sudo gedit /home/edureka/hadoop-2.7.3/etc/hadoop/hdfs-site.xml
STEP 19: Copy mapred-site from the template in configuration folder and the edit mapred-site.xml on both master and slave machines as follows:
Command: cp mapred-site.xml.template mapred-site.xml
Command: sudo gedit /home/edureka/hadoop-2.7.3/etc/hadoop/mapred-site.xml


STEP 21: Format the namenode (Only on master machine).
Command: hadoop namenode -format

STEP 22: Start all daemons (Only on master machine).
Command: ./sbin/start-all.sh

STEP 23: Check all the daemons running on both master and slave machines.
Command: jps
On master

On slave

At last, open the browser and go to master:50070/dfshealth.html on your master machine, this will give you the NameNode interface. Scroll down and see for the number of live nodes, if its 2, you have successfully setup a multi node Hadoop cluster. In case, it’s not 2, you might have missed out any of the steps which I have mentioned above. But no need to worry, you can go back and verify all the configurations again to find the issues and then correct them.
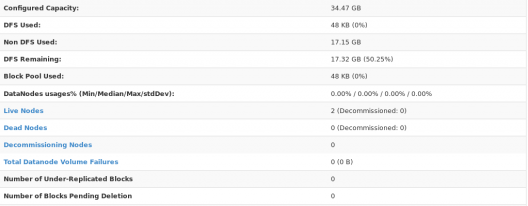
Here, we have only 2 DataNodes. If you want, you can add more DataNodes according to your needs, refer our blog on Commissioning and Decommissioning Nodes in a Hadoop Cluster.
I hope you would have successfully installed a Hadoop Multi Node Cluster. If you are facing any problem, you can comment below, we will be replying shortly. In our next blog of Hadoop Tutorial Series, you will learn some important HDFS commands and you can start playing with Hadoop.
Now that you have understood how to install Hadoop Multi Node Cluster, check out the Hadoop training by Edureka, a trusted online learning company with a network of more than 250,000 satisfied learners spread across the globe. The Edureka’s Big Data Engineering Course helps learners become expert in HDFS, Yarn, MapReduce, Pig, Hive, HBase, Oozie, Flume and Sqoop using real-time use cases on Retail, Social Media, Aviation, Tourism, Finance domain.


 Thank you for registering Join Edureka Meetup community for 100+ Free Webinars each month JOIN MEETUP GROUP


Dear Mr. Sinha:
I have 2 VMs (RHEL) where I have installled Java 1.8.0_144-b01 and Hadoop 3.0.0-alpha4.
The VMs can ping each other and from master node i can ssh the slave node without password and issue touch 1.txt to see r/w permissions.
Both VMs have hadoop as user and exact installation folder structure.
I have followed each and every instructions right from SSH to setting the XML files. But slave node – when i issue “jps” no service found. Also 192.168.1.151:50070 fails to connect.
Your help will be appreciated.
I’m not sure if my comment would serve or answer your question, but if you have set up your cluster on AWS, I would recommend you to check you security group configs and make sure that you open “ALL TCP” and “All ICMP” open for all.
Hope it helps
Hi
i followed the steps and set up a 3 node cluster. When i’m trying to start-all command, root@master’s password: master: Permission denied, please try again.
Please help…
Hi Shubham,
I have following your tutorial step by step. However when I check the the daemons running using jps, I notice that no Datanode deamon is running and also on the slave machine, there are no deamons running. Can you please help me?
Hi,
I followed the steps and set up a 3 node cluster. When i am trying to run a mapreduce programme, its stuck and not getting proceeded. Please help..
Hey Rajesh, thanks for checking out our blog.
You need to look into the logs for this job id to find out the issue.
You can find the logs in resource manager URI IP_Of_Machine:8088
Hope this helps. Cheers!
Hi Shubham,
I have a question, I need create, on each nodes, the same user? (e.i. hduser) or I can create different users without problem?
thanks a lot.
Hey Daniele, thanks for checking out our blog.
You can create different users as this is linux related concepts. But remember that the user from which you are installing Hadoop will be able to access Hadoop. So, if you are installing Hadoop from a user, you must give the permissions to that user for accessing all the folders related to DataNode and NameNode.
Also, keep in mind that if you are installing Hadoop using super user, you can access the HDFS and Hadoop daemons using that super user only.
It is preferred to keep a normal user instead of root user across all the DataNodes, which could be accessed remotely.
Hope this helps. Cheers!
Hi Shubham,
Nice detailed documentation on setting up 2 node hadoop cluster. Just one question:- Shouldn’t you have added about setting JAVA_HOME in the hadoop-env.sh file as well?
Hey Dennis, thanks for checking the blog. Yes, you are right that JAVA_HOME needs to be declared in hadoop-env.sh. But as we are setting Java path in Bash file and by default it is mentioned in hadoop-env.sh file to exports JAVA_HOME from the Bash file and use $JAVA_HOME variable from Bash file while executing. So, I didn’t mentioned explicitly to set JAVA_HOME variable path in hadoop-env.sh file.
But for the best practice, we should add the same in hadoop-env.sh file.
I have successfully setup master and slave nodes. When i check jps before start-all.sh in master, nothing is running in both machine. after that command, there is 5 process running in master and 2 processes in slave which are datanode and nodemanager. however, when i go to master:8088 in browser it shows only the master node as live node. I cant connect to slave1:8088. why is there only 1 live node?
Initially you check your NameNode web UI i.e. master:50070, which should show you 2 live nodes as two datanodes are running, one on master node and one on slave node.
The 8088 port is for resource manager which should show you only 1 live node, as there is only one resource manager running.
Let me know if I answered your query.
Very nice explanation. Thank Edureka.
In my case, i have only one live node on master:50070 (i have recheck all configuration many time)
There are my JPS:
on master
3458 ResourceManager
3155 DataNode
3559 NodeManager
3032 NameNode
5406 Jps
3311 SecondaryNameNode
on slave
2672 DataNode
4666 Jps
Please help me. Thank
Hey Truong Pham, thanks for checking out the blog. We can see on your slave, NodeManager is not working. And check on your 50070 dfs health, there is a datanode section, over there you can figure out which DataNode is not running. As in most of the cases, if the problem is on your slave, then this can be a firewall issue.
Check with these commands (if you are installing on CentOS):
sudo service iptables save
sudo service iptables stop
sudo chkconfig iptables off
sudo service ip6tables save
sudo service ip6tables stop
sudo chkconfig ip6tables off
Check these three commands also:
sudo systemctl disable firewalld
sudo systemctl stop firewalld
sudo systemctl status firewalld
To verify your firewall status:
service iptables status
Now stop/kill all the services and then try starting all the services again. Check the status of live nodes.
If the problem persists, you might have to save your ssh key again after this again on master’s authorized key and slave’s authorized key as mentioned in the blog. Then delete your datanode directory and format namenode and start all services again.
If the problem persists, please write to us again. Hope this helps. Cheers!
I am getting 0 nodes while i tried with one master and one node
Hey Balaji, thanks for checking out the blog. When you give the JPS command, are your data nodes running? The reason you are getting 0 nodes might be because the data note is not running. Hope this helps. Please feel free to get in touch with us if you have any further queries. Cheers!
why at the we see only 2 nodes while you prepare one master and two slaves?
Hey KanatAbish, thanks for checking out the blog. Master node and slave nodes run on different machines. The number of Live Nodes shown in the screenshot towards the end of the blog corresponds only to the data nodes and not name nodes. In our case, there are two data nodes with IPs 192.168.56.102 and 192.168.56.103 respectively. That is why you see only 2 nodes. The master i.e the name node is running on 192.168.56.101. Hope this helps. Please feel free to write to us if you have further difficulties. Cheers!