


Advanced Power BI Certification Course with G ...
- 12k Enrolled Learners
- Weekend
- Live Class
(4230)


 Copy Link!
Wouldn’t it be great if you could compare and ask questions about your data? Tableau Sets let your audience interact directly with visualization or dashboard to control aspects of their analysis. When you select marks in the view, set actions can change the values in a set.
It, hence, makes an integral part of Tableau, and more importantly, of the Tableau Training curriculum.
This article is written with the intention to impart enough information for you, the reader, to be able to start using Tableau sets in no time. Here’s an outline;
Now, let’s begin by knowing what Tableau Sets exactly are. Shall we?
Tableau Sets are custom fields used to hold the subset of data based on a given condition. In real-time, you can create a set by selecting members from the list or a visualization. You can also do the same by writing custom Conditions or Selecting Top/Bottom few records in a Measure.
The members of a dynamic set change when the underlying data changes. Dynamic sets can only be based on a single dimension.
To create a dynamic set
Navigate to the Data pane, under Dimensions, right-click a field and select Create > Set.
In the Create Set dialogue box, configure your set. You can configure your set using the following tabs;
Use the General tab to select one or more values that will be considered when computing the set.
Alternatively, you could even select the Use all option to always consider all members even when new members are added or removed.

Use the Condition tab to define rules that determine what members to include in the set. For example, you might specify a condition that is based on total sales that only includes products with sales of over $100,000.

Note: Set conditions work the same as filter conditions.
Make use of the Top tab to define limits on what members to include in the set. For example, you might specify a limit that is based on total sales that only includes the top 5 products based on their sales.
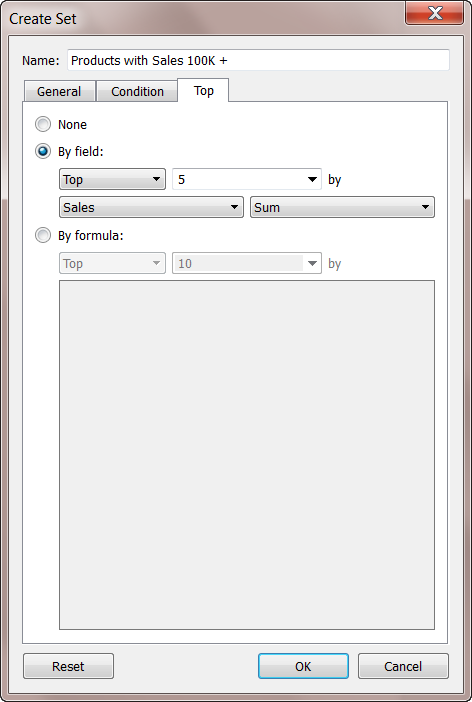
Note Set limits work the same as Filter limits.
When finished, click OK.
The new set is added to the bottom of the Data pane, under the Sets section. A set icon (the two intersecting bubbles) indicates the field is a set.

The members of a fixed set do not change. A fixed set can be based on a single dimension or multiple dimensions.
To create a fixed set;
In the visualisation, select one or more marks (or headers) in the view.
Right-click the marks and select Create Set.

In the Create Set dialogue box, type a name for the set.
Optionally complete any of the following:
By default, the set includes the members listed in the dialogue box. You can select the option to Exclude these members instead. When you exclude, the set will include all of the members you didn’t select.
Remove any dimensions that you don’t want to be considered by clicking the red x icon that appears when you hover over a column heading.
Remove any specific rows that you don’t want to include in the set by clicking the red x icon that appears when you hover over the row.
If the marks you selected represent multiple dimensions, each member of the set will be a combination of those dimensions. You can specify the character that separates the dimension values. To do so, for Separate members by, enter a character of your choice.
Select Add to Filters shelf to automatically move the set to the Filters shelf once it is created.

5. When finished, click OK.
Note: If you created a set using specific data points, you can add more data to or subtract data from the set using the tooltip that appears. All you have to do is click the Sets drop-down icon and select the Add/Remove option.
After you create a set, you could see it at the bottom of the Data pane in the Sets section. You can drag it into any visualization like you would with any other field.
When you drag a set to the visualization into Tableau Desktop, you can choose to show the members of the set or aggregate the members into In/Out categories.
In Tableau Server, one can only aggregate the members of the set into In/Out categories.
You can use set actions to give your audience more control over their analysis of your visualization.
Simplify and streamline your data preparation process. Learn how to clean, shape, and merge your data effortlessly with Tableau Prep Builder, and get your insights faster.
Set actions take an existing set and update the values contained in that set based on a user’s action in the visualization. As the author, you can use a set or sets that you have already created to define the scope of the set action.
You could use set actions to let your audience interact directly with your visualization, even your dashboard. It gives them more control over aspects of their analysis.
Now, you can define the set action to include the following:
the source sheet or sheets it applies to.
the user behaviour that runs the action (hover, select, or menu).
the target set (the data source and set to be used).
what happens when the selection is cleared.
This Edureka tutorial on “Tableau Sets” will help you in utilizing Tableau to query your data, not only f…
Go to a worksheet, select Worksheet >Actions. In a dashboard, select Dashboard >Actions.
In the Actions dialogue box, click Add Action and then select Change Set Values.

Specify a meaningful name for the action in the Add/Edit Set Action dialogue box.
Select a source sheet or data source. The current sheet is selected by default. If you select a data source or dashboard you can select individual sheets within it.

Select how users will run the action.
Hover runs when a user hovers the mouse cursor over a mark in the view.
Select runs when a user clicks a mark in the view. This option works well for set actions.
Menu runs when a user right-clicks a selected mark in the view, then selects an option on the context menu.
Specify the target set. First, select the data source, and then select the set.
The sets available in the Target Set lists are determined by the data source that you select and the sets that you have created in the workbook that are associated with that data source.

In this example, the target set is using World Cup Squads and Groups Extract as the data source and Team Set as the set.
Specify what happens when the selection is cleared in the view:
Keep set values makes current values in the set remain in the set.
Add all values to set adds all possible values to the set.
Remove all values from the set removes previously selected values from the set.
Click OK to save your changes and return to the view.
Test the set action by interacting with the visualisation. Tweak some of the settings for the action to adjust the selection behaviour as needed.
The following examples show just a few of the ways you can use set actions.
Proportional Brushing
Asymmetric Drill Downs
Colour Scaling
Relative Dates
Combining sets allows you to answer complex questions and compare data cohorts. You can combine two sets to compare the members. When you combine sets you create a new set containing either the combination of all members, just the members that exist in both, or members that exist in one set but not the other.
Note: To combine two sets, they must be based on the same dimensions (this means, you can combine a set containing the top customers with another set containing the customers from last year but you cannot combine the top customers set with the top products set).
In the Data pane, under Sets, select the two sets you want to combine.
Right-click the sets and select Create Combined Set.
In the Create Set dialogue box, type a name for the new combined set.
Verify that the two sets you want to combine are selected in the two drop-down menus.
Select one of the following options for how to combine the sets:
All Members in Both Sets enables the combined set will contain all of the members from both sets.
Shared Members in Both Sets enables the combined set to only contain members that exist in both sets.
Except Shared Members enables the combined set to contain all members from the specified set that don’t exist in the second set.
These options are equivalent to subtracting one set from another. For example, if the first set contains Red, Orange, and Green Marbles and the second set contains Green and Yellow Marbles, combining the first set except the shared members would contain just Red and Orange. The Green Marbles are removed because they exist in the second set.
Optionally specify a character that will separate the members if the sets represent multiple dimensions.
When finished, click OK.
There are many ways you can use sets to answer complex questions and compare cohorts of data.
You may have all kinds of questions surrounding how the members in a set contribute to the overall total.
For example, what per cent of total sales come from repeat customers? You can answer these types of questions using the IN/OUT mode for a set.
Another common use of sets is to compare subsets of data or cohorts.
For example, you may wonder how many customers that purchased last year also purchased this year. Or if a customer purchased a specific product, what other products did they buy? You can answer these types of questions by creating multiple sets and combining them.
A hierarchical set filters data to the selected members and all of their descendants. They are unique to multidimensional (cube) data sources and are defined within the data source prior to connecting to Tableau Desktop.
When you create sets in Tableau from a cube data source, descendants and any hierarchical structures are automatically included with the selected members.
Sets are dynamic and useful elements for you to add interactivity and flexibility to a report. It is a versatile weapon in your arsenal and can be used in calculations and visualizations, equally well!
Want to know more about Sets in Tableau? Or maybe other concepts? Edureka’s Tableau Certification training is the one for you. It aligned with the Tableau Qualified Associate Level Examination and was specially curated to help analytics and data professionals create insightful visuals, dashboards, perform scripting, and create Network Diagrams on Tableau to present the data in a much better and insightful manner.


 Thank you for registering Join Edureka Meetup community for 100+ Free Webinars each month JOIN MEETUP GROUP