


Software Testing and Automation Internship Pr ...
- 1k Enrolled Learners
- Weekend/Weekday
- Live Class
(50)
In the previous blog, I taught you how to run your first Selenium WebDriver test. In this blog, I will be covering advanced Selenium WebDriver concepts. I have mentioned quite a few times already that Selenium WebDriver has limitations with respect to test case management and test report generation. So, what is the alternative? A tool as popular as Selenium must definitely have a workaround right? Of course it does! We can use a combination of Selenium and TestNG to beat this limitation and that will be the topic of this blog’s discussion.
In case, you are new to Selenium and want an introduction to the basic concepts, you can start your journey from here: What Is Selenium? However, the others can get started with TestNG for Selenium from this blog. You should also know that organizations are actively hunting for professionals with Selenium Online Course, making it an important skill for software testers to master.
Software developers from around the world will unanimously agree that writing code in test cases saves a good part of their debugging time. Why? That is because test cases help in creating robust and error-free code. How does it do that? By breaking the entire code into smaller test cases, and then by evaluating each of these test cases to pass/ fail conditions, we can create error-free code. Since Selenium does not support the execution of code in test cases, we have to use TestNG for the same. This is where TestNG fits in the Selenium framework.
TestNG stands for Test Next Generation and it is an open-source test automation framework inspired by JUnit and NUnit. Well, not just inspired, but an upgrade to those two frameworks. So you may ask what is the upgrade here? The upgrade with TestNG is that it provides additional functionality like test annotations, grouping, prioritization, parameterization, and sequencing techniques in the code which was not possible earlier.
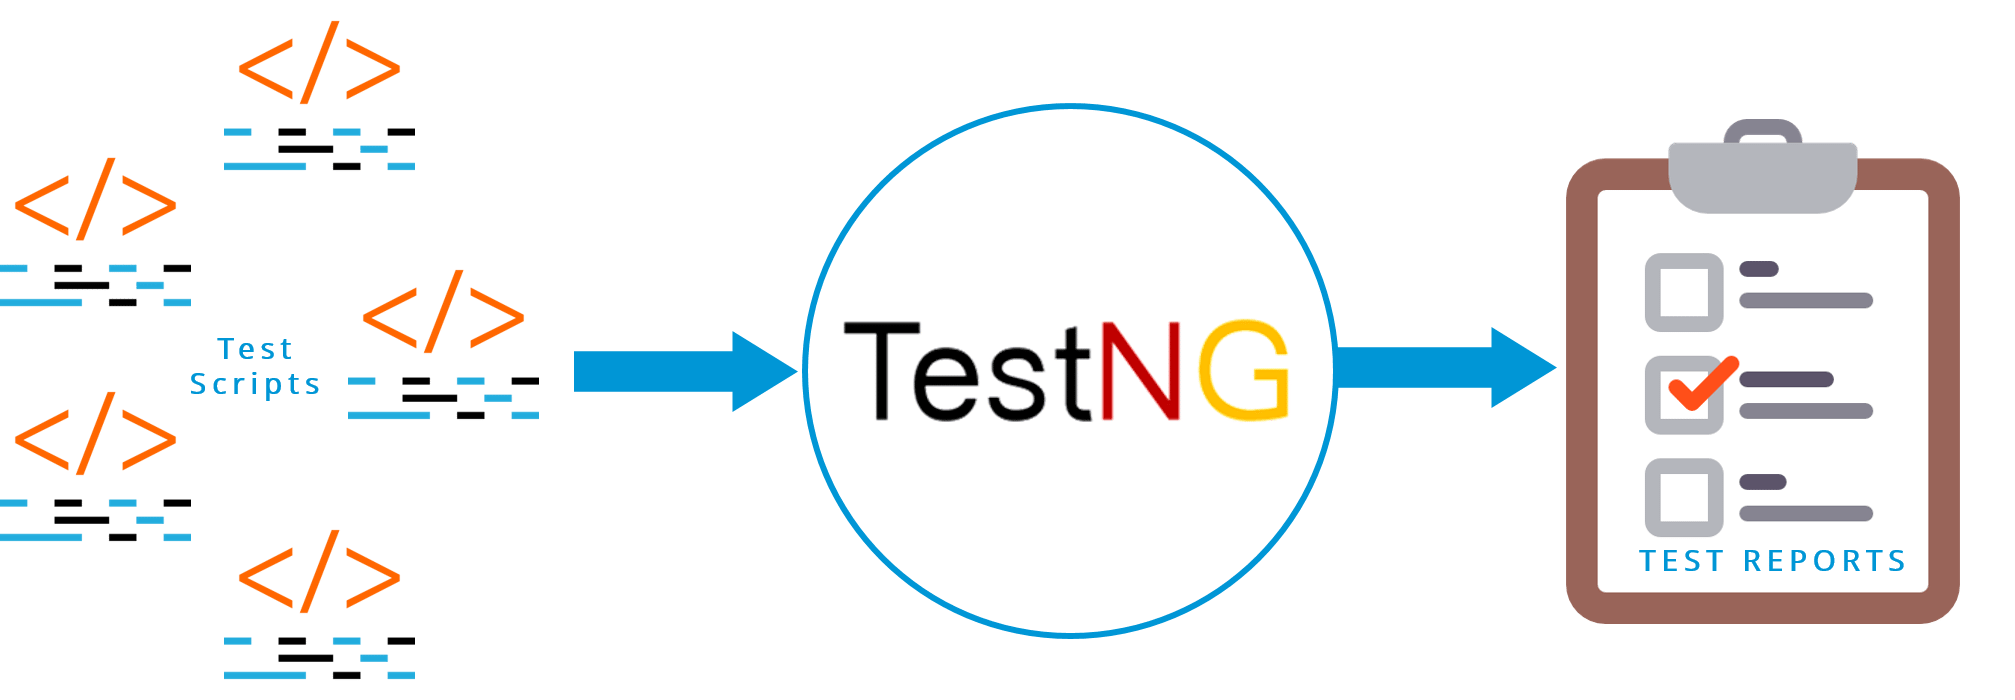
Besides managing test cases, even detailed reports of tests can be obtained by using TestNG. There will be a summary displaying the test case that has failed, along with the group which it was a part of, and the class it falls under. When bugs can be accurately located like this, they can be fixed immediately to the relief of developers. The below image depicts the working of TestNG.
So, how does TestNG get the job done? This question will be answered in the next section of this Selenium WebDriver tutorial blog, where I will be discussing how to manage various test cases by using TestNG.
Test cases can be defined and managed by one of the following ways:
Let me start explaining each of these functionalities.
First of all, let’s ask ourselves this question: Why do we need to use annotations? When can we use them? Annotations in Selenium are used to control the next method to be executed. Test annotations are defined before every method in the test code. In case any method is not prefixed with annotations, then that method will be ignored and not be executed as part of the test code. To define them, methods need to be simply annotated with ‘@Test‘. Look at the below code snippet for example.
package testng;

import org.openqa.selenium.WebDriver;
import org.openqa.selenium.firefox.FirefoxDriver;
import org.testng.annotations.AfterClass;
import org.testng.annotations.AfterMethod;
import org.testng.annotations.BeforeClass;
import org.testng.annotations.BeforeMethod;
import org.testng.annotations.Test;

public class TestAnnotations {
 @Test
 public void myTestMethod() {
 System.out.println("Inside method:- myTestMethod");
 WebDriver driver = new FirefoxDriver();
 driver.get("http://www.seleniumframework.com/Practiceform/");
 String title = driver.getTitle();
 System.out.println(title);
 driver.quit();
 }

 @BeforeMethod
 public void beforeMethod() {
 System.out.println("This piece of code is executed before method:- myTestMethod");
 System.setProperty("webdriver.gecko.driver", "C:UsersVardhanworkspaceSeleniumProjectfilesgeckodriver.exe");
 }

 @AfterMethod
 public void afterMethod() {
 System.out.println("This piece of code is executed after method:- myTestMethod");
 }

 @BeforeClass
 public void beforeClass() {
 System.out.println("This piece of code is executed before the class is executed");
 }

 @AfterClass
 public void afterClass() {
 System.out.println("This piece of code is executed after the class is executed");
 }
}
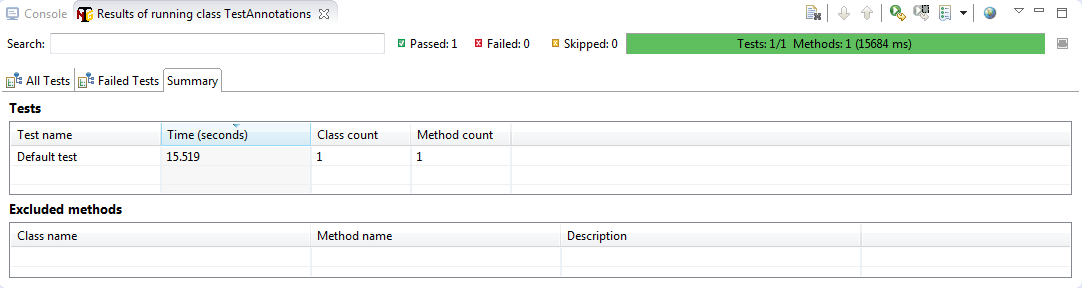
In the above code, you would have noticed that I have not defined a ‘main’ method. However, I have 5 other methods defined. They are ‘myTestMethod’, ‘beforeMethod’, ‘afterMethod’, ‘beforeClass’ and ‘afterClass’. Also, note the order of definition of methods in the code because they will not be executed in this same order.
The method ‘myTestMethod’ is annotated with @Test, and it is the main method or piece of code which has to be executed. Other annotated methods will be executed before and after this method is executed. Since ‘beforeMethod’ is annotated with @BeforeMethod, it will be executed before ‘myTestMethod’ is executed. Similarly, ‘afterMethod’ is annotated with @AfterMethod, and thus it will be executed after ‘myTestMethod’.
However, ‘beforeClass’ is annotated with @BeforeClass, which means it will be executed even before the class itself is executed. Our class name here is TestAnnotations, and thus before the class starts getting executed, the piece of code inside ‘beforeClass’ will be executed. Similarly, ‘afterClass’ is annotated with @AfterMethod, and thus will be executed after the class TestAnnotations is executed.
If you still have confusion regarding the order of execution, then the below snippet will definitely help you.
1. BeforeSuite
2. BeforeTest
3. BeforeClass
4. BeforeMethod
5. Test
6. AfterMethod
7. AfterClass
8. AfterTest
9. AfterSuite
The output of the above code will be:
This piece of code is executed before the class is executed
This piece of code is executed before method:- myTestMethod
Inside method:- myTestMethod
1493192682118 geckodriver INFO Listening on 127.0.0.1:13676
1493192682713 mozprofile::profile INFO Using profile path C:UsersVardhanAppDataLocalTemp
ust_mozprofile.wGkcwvwXkl2y
1493192682729 geckodriver::marionette INFO Starting browser C:Program Files (x86)Mozilla Firefoxirefox.exe
1493192682729 geckodriver::marionette INFO Connecting to Marionette on localhost:59792
[GPU 6152] WARNING: pipe error: 109: file c:/builds/moz2_slave/m-rel-w32-00000000000000000000/build/src/ipc/chromium/src/chrome/common/ipc_channel_win.cc, line 346
1493192688316 Marionette INFO Listening on port 59792
Apr 26, 2017 1:14:49 PM org.openqa.selenium.remote.ProtocolHandshake createSession
INFO: Detected dialect: W3C
JavaScript error: http://t.dtscout.com/i/?l=http%3A%2F%2Fwww.seleniumframework.com%2FPracticeform%2F&j=, line 1: TypeError: document.getElementsByTagName(...)[0] is undefined
Selenium Framework | Practiceform
1493192695134 Marionette INFO New connections will no longer be accepted
Apr 26, 2017 1:14:57 PM org.openqa.selenium.os.UnixProcess destroy
SEVERE: Unable to kill process with PID 6724
This piece of code is executed after method:- myTestMethod
This piece of code is executed after the class is executed
PASSED: myTestMethod

===============================================
 Default test
 Tests run: 1, Failures: 0, Skips: 0
===============================================


===============================================
Default suite
Total tests run: 1, Failures: 0, Skips: 0
===============================================
As you can see from the above output, the number of tests run is 1 and failed is 0. This means that the code is successful. Even the order of execution of methods will be in the order I mentioned earlier.
When you execute this code in your machine, Selenium WebDriver will instantiate your Firefox browser, navigate to Selenium Framework’s practice form, close the browser instance and display the same output as shown above in your Eclipse IDE.
I have only used 5 different annotations in my code. But there are many more annotations which can be used to control the next method to be executed. The entire list of annotations are explained in the table below:
@BeforeSuite – The method annotated with @BeforeSuite will run before all the tests in the suite have run.
@AfterSuite – The method annotated with @AfterSuite will run after all the tests in the suite have run.
@BeforeTest – The method annotated with @BeforeTest will run before any test method belonging to a class is run.
@AfterTest – The method annotated with @AfterTest will run after all the test methods belonging to a class have run.
@BeforeGroup – The method annotated with @BeforeGroup will run before each group is run.
@AfterGroup – The method annotated with @AfterGroup will run after every group is run.
@BeforeClass – The method annotated with @BeforeClass will run once before the first test method in the current class is invoked.
@AfterClass – The method annotated with @AfterClass will run once after all the test methods in the current class have run.
@BeforeMethod – The method annotated with @BeforeMethod will run before any test method inside a class is run.
@AfterMethod – The method annotated with @AfterMethod will run after every test method inside a class is run.
@Test – The method annotated with @Test is the main test method in the entire program. Other annotated methods will be executed around this method.
The screenshot of the TestNG report is present below:-
We spoke about how different methods that can be defined such that they are executed around the @Test method. But, what if you have more than one @Test method and you want to define the execution order between them?
In that case, we can Prioritize them by assigning a number to the annotated test cases. Smaller the number, higher the priority. Priority can be assigned as parameters while defining the test cases. But, if no priority is assigned, then the annotated test methods will be executed as per the alphabetical order of the tests. Look at the parameters of the test annotations in the below piece of code.
@Test(Priority=2)
public static void FirstTest()
{
system.out.println("This is the Test Case number Two because of Priority #2");
}

@Test(Priority=1)
public static void SecondTest()
{
system.out.println("This is the Test Case number One because of Priority #1");
}

@Test
public static void FinalTest()
{
system.out.println("This is the Final Test Case because there is no Priority");
}
Let me show you something more interesting. What if you have a code spanning a million lines, consisting of hundreds of test cases, and you want to only disable one test method? You don’t need to delete any part of the code, instead, we can simply disable that test method.
The act of disabling a test case is also done via parameters. We can set the enabled attribute to ‘false’. By default, all test cases will be enabled, hence we do not need to define them every time we write a test. Look at the parameters of the third and fourth methods in the below piece of code.
@Test(Priority=2, enabled = True)
public static void FirstTest()
{
system.out.println("This is the Test Case number Two because of Priority #2");
}

@Test(Priority=1, enabled = True)
public static void SecondTest()
{
system.out.println("This is the Test Case number One because of Priority #1");
}

@Test(enabled = false)
public static void SkippedTest()
{
system.out.println("This is the Skipped Test Case because this has been disabled");
}

@Test(enabled = True)
public static void FinalTest()
{
system.out.println("This is the Final Test Case, which is enabled and has no Priority");
}
Now in case you have a situation wherein, you want a piece of code to be executed only if it satisfies a condition or only if a particular method executes successfully, then we can do that by using dependsOnMethod(). This is basically a condition of method dependency where a method will be executed depending on another method. If we additionally set alwaysRun attribute to true, then the method will be executed irrespective of the fail/ pass condition of the depending method. Look at the code in the below code snippet.
@Test
public static void FirstTest()
{
system.out.println("This is the first Test Case to be executed");
}

@Test(dependsOnMethods = { "FirstTest" })
public static void SecondTest()
{
system.out.println("This is the second Test Case to be executed; This is a Dependent method");
}

@Test(dependsOnMethods = { "SecondTest" })
public static void FinalTest()
{
system.out.println("This is the Final Test Case; It will be executed anyway.");
}
Now, this takes us to another important aspect in test annotations which is Grouping.
By now you must know that there will be a number of methods as part of our test case in the code. Let’s say there are 100 test cases but, we want to execute only 20 test cases in our next test. Do you think we can do that? Sure we can.
We can use groups attribute for this purpose. We can assign a group name to a number of test cases and later choose to execute the group instead of the entire code. Look at the below code snippet to understand how to create groups.
@Test(groups = { "MyGroup" })
public static void FirstTest()
{
system.out.println("This is a part of the Group: MyGroup");
}

@Test(groups = { "MyGroup" })
public static void SecondTest()
{
system.out.println("This is also a part of the Group: MyGroup");
}

@Test
public static void ThirdTest()
{
system.out.println("But, this is not a part of the Group: MyGroup");
}
This now takes us to the next topic in TestNG which is assertions. As the name suggests, assertions can be used in test methods to determine the pass/ fail condition a test. Based on the true/ false condition of a statement, the tests will pass/ fail.
In the code below I have included 3 test methods, wherein the first and third methods have a pass condition and the second method will have a fail condition. See the code for yourself.
package testng;

import org.testng.annotations.Test;
import org.testng.annotations.BeforeMethod;
import org.openqa.selenium.WebDriver;
import org.openqa.selenium.firefox.FirefoxDriver;
import org.testng.Assert;
import org.testng.annotations.AfterMethod;

public class Assertions {
 @BeforeMethod
 public void beforeMethod() {
 System.setProperty("webdriver.gecko.driver",
 "C:UsersVardhanworkspaceSeleniumProjectfilesgeckodriver.exe");
 }

 public boolean isEqual(int a, int b) {
 if (a == b) {
 return true;
 } else {
 return false;
 }
 }

 @Test
 public void testEquality1() {
 Assert.assertEquals(true, isEqual(10, 10));
 System.out.println("This is a pass condition");
 }

 @Test
 public void testEquality2() {
 Assert.assertEquals(true, isEqual(10, 11));
 System.out.println("This is a fail condition");
 }

 @Test
 public void getTitle() {
 WebDriver driver = new FirefoxDriver();
 driver.get("https://www.gmail.com");
 String title = driver.getTitle();
 Assert.assertEquals(title, "Gmail");
 System.out.println("This is again a pass condition");
 }
}
When you look at the report that gets generated after this execution, then you will notice that out of the three tests, one failed and two passed. Another important point to note is that when an assertion fails, other commands/ lines of code in that test will be skipped. Only when the assertion is a success, the next line of code will be executed in that test. Check out the output below where system.out.println has executed only for the first and third methods.
1493277977348 geckodriver INFO Listening on 127.0.0.1:47035
1493277977993 mozprofile::profile INFO Using profile path C:UsersVardhanAppDataLocalTemp
ust_mozprofile.Z7X9uFdKODvi
1493277977994 geckodriver::marionette INFO Starting browser C:Program Files (x86)Mozilla Firefoxirefox.exe
1493277977998 geckodriver::marionette INFO Connecting to Marionette on localhost:50758
[GPU 6920] WARNING: pipe error: 109: file c:/builds/moz2_slave/m-rel-w32-00000000000000000000/build/src/ipc/chromium/src/chrome/common/ipc_channel_win.cc, line 346
1493277981742 Marionette INFO Listening on port 50758
Apr 27, 2017 12:56:22 PM org.openqa.selenium.remote.ProtocolHandshake createSession
INFO: Detected dialect: W3C
This is again a pass condition
This is a pass condition
PASSED: getTitle
PASSED: testEquality1
FAILED: testEquality2
java.lang.AssertionError: expected [false] but found [true]
 at org.testng.Assert.fail(Assert.java:93)
 at org.testng.Assert.failNotEquals(Assert.java:512)
 at org.testng.Assert.assertEqualsImpl(Assert.java:134)
 at org.testng.Assert.assertEquals(Assert.java:115)
 at org.testng.Assert.assertEquals(Assert.java:304)
 at org.testng.Assert.assertEquals(Assert.java:314)
 at testng.Assertions.testEquality2(Assertions.java:38)
 at sun.reflect.NativeMethodAccessorImpl.invoke0(Native Method)
 at sun.reflect.NativeMethodAccessorImpl.invoke(Unknown Source)
 at sun.reflect.DelegatingMethodAccessorImpl.invoke(Unknown Source)
 at java.lang.reflect.Method.invoke(Unknown Source)
 at org.testng.internal.MethodInvocationHelper.invokeMethod(MethodInvocationHelper.java:108)
 at org.testng.internal.Invoker.invokeMethod(Invoker.java:661)
 at org.testng.internal.Invoker.invokeTestMethod(Invoker.java:869)
 at org.testng.internal.Invoker.invokeTestMethods(Invoker.java:1193)
 at org.testng.internal.TestMethodWorker.invokeTestMethods(TestMethodWorker.java:126)
 at org.testng.internal.TestMethodWorker.run(TestMethodWorker.java:109)
 at org.testng.TestRunner.privateRun(TestRunner.java:744)
 at org.testng.TestRunner.run(TestRunner.java:602)
 at org.testng.SuiteRunner.runTest(SuiteRunner.java:380)
 at org.testng.SuiteRunner.runSequentially(SuiteRunner.java:375)
 at org.testng.SuiteRunner.privateRun(SuiteRunner.java:340)
 at org.testng.SuiteRunner.run(SuiteRunner.java:289)
 at org.testng.SuiteRunnerWorker.runSuite(SuiteRunnerWorker.java:52)
 at org.testng.SuiteRunnerWorker.run(SuiteRunnerWorker.java:86)
 at org.testng.TestNG.runSuitesSequentially(TestNG.java:1301)
 at org.testng.TestNG.runSuitesLocally(TestNG.java:1226)
 at org.testng.TestNG.runSuites(TestNG.java:1144)
 at org.testng.TestNG.run(TestNG.java:1115)
 at org.testng.remote.AbstractRemoteTestNG.run(AbstractRemoteTestNG.java:132)
 at org.testng.remote.RemoteTestNG.initAndRun(RemoteTestNG.java:230)
 at org.testng.remote.RemoteTestNG.main(RemoteTestNG.java:76)


===============================================
 Default test
 Tests run: 3, Failures: 1, Skips: 0
===============================================


===============================================
Default suite
Total tests run: 3, Failures: 1, Skips: 0
===============================================
So, that is the end of the concepts related to test case management. We are left with one more topic, and that is report generation. Report generation is the last topic in this Selenium WebDriver tutorial because reports can be generated only after all the tests are executed.
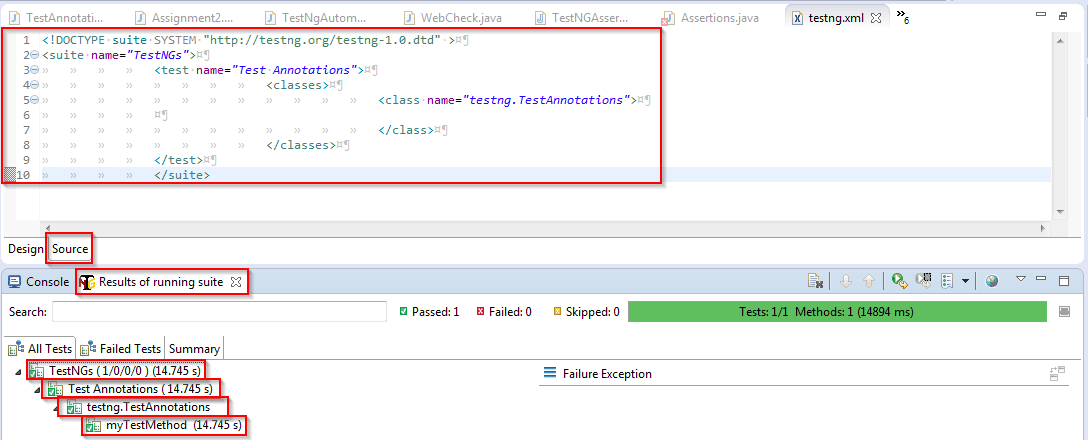
The most important thing you need to note is that the report will only be generated via a .xml file. This means, be it a method, or be it a class, or be it a group which you want to test, they all have to be specified in the .xml file.
So first you can create a new folder under your project, and create a new file inside that folder and give a name to the file and save it with .xml extension. You can create the new folder and file by right-clicking on the package explorer. Once you have created the file, go to the source tab from the bottom of the window and enter the configurations as specified in the below snippet.
<!DOCTYPE suite SYSTEM "http://testng.org/testng-1.0.dtd" >
<suite name="TestNGs">
 <test name="Test Annotations">
  <classes>
   <class name="testng.TestAnnotations">
   </class>
  </classes>
 </test>
</suite>
The first line is the XML document type definition. This is standard and compulsory for all test reports. But, the other lines are pretty self explanatory. I have used the open tags for suite, test, classes and class. Classes tag can have one or more class inside it. Thus, it can be used if we want to generate a report where we are testing multiple classes. This is handy especially for developers who want to test a long piece of code.
Anyway getting back to our report, you can name each suite or test or class after opening those tags and remember to close every tag you open. I have given my suite name as TestNGs, test name as Test Annotations and class name as testng.TestAnnotations. Do note that the class name is in the format of ‘packagename.classname’.
When you run this file as TestNG suite, the execution will start and you will get the detailed test reports. You will get the test output in your console tab and the result of the test suite in the next tab. The report that I have generated for executing my code is in the below screenshot. You will notice that this time, there is a suite name, test name, class name along with the time taken for executing each of them.
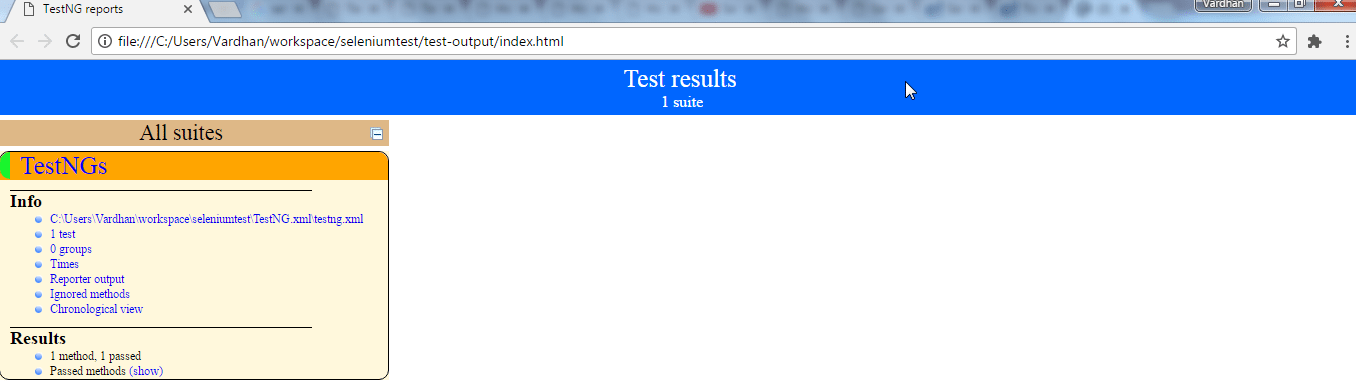
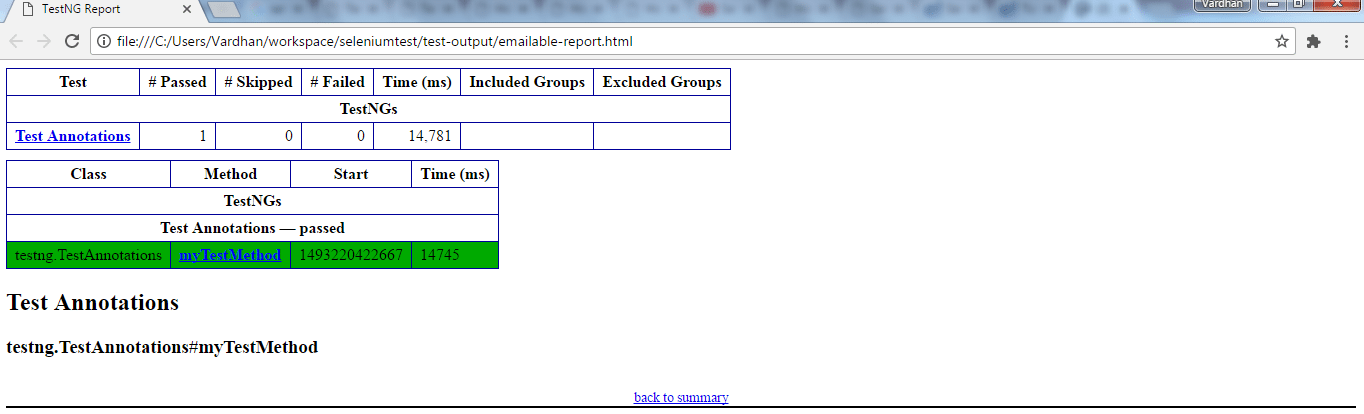
In case you want to view the HTML report (Index report or Emailable-report), you can go to the test-output folder inside the project directory in your workspace. By clicking on them, you can view the reports even at a later point of time. Below are their screenshots.
Index Report:-
Emailable Report:-
So that brings us to the end of this Selenium WebDriver tutorial blog. It is time for you to setup eclipse at your end, install the various Selenium packages, install TestNG and get started with writing your test cases.
You can check out the below Selenium WebDriver tutorial video to witness a demonstration of the various concepts explained in this blog.
This Edureka Selenium Training video will take you through the in-depth details of Selenium WebDriver. This Selenium tutorial video is ideal for both beginners and professionals who want to brush up the basics of WebDriver commands and learn how TestNG can be used with Selenium for managing various test cases.
If you wish to learn Selenium and build a career in the testing domain, then check out our interactive, live-online Selenium Certification Training here, which comes with 24*7 support to guide you throughout your learning period.
Got a question for us? Please mention it in the comments section and we will get back to you.
| Course Name | Date | Details |
|---|---|---|
| Selenium Certification Training Course | Class Starts on 20th April,2024 20th April SAT&SUN (Weekend Batch) | View Details |
| Selenium Certification Training Course | Class Starts on 22nd April,2024 22nd April MON-FRI (Weekday Batch) | View Details |
| Selenium Certification Training Course | Class Starts on 4th May,2024 4th May SAT&SUN (Weekend Batch) | View Details |


 REGISTER FOR FREE WEBINAR
  Thank you for registering Join Edureka Meetup community for 100+ Free Webinars each month JOIN MEETUP GROUP


