


Software Testing and Automation Internship Pr ...
- 1k Enrolled Learners
- Weekend/Weekday
- Live Class
(50)
In my previous blogs in this Selenium tutorial series, I have discussed the need for automation testing and the demand for Selenium certification training. In this blog, I’m going to tell you how to install and use Selenium IDE, which is another important tool in the Selenium suite. If you have missed out on reading any of the previous blogs, I urge you to start reading from here: What is Selenium.
Full form of Selenium IDE is Selenium Integrated Development Environment. While WebDriver and RC allow us to write test cases via programming logic, Selenium IDE works slightly different. You can simply record the interactions you have on the browser to create test cases. This sounds simple right? Yes!
Unlike WebDriver and RC, you don’t need programming logic. You can simply record the actions you perform on your browser, and use the playback option to re-run tests (i.e your actions). That is how simple it is. But, there is a catch here. Selenium IDE is a Mozilla Firefox plugin, which means tests can be recorded only on Firefox browser and not supported on any other browser.
If you’re wondering how to download Selenium IDE, then download it from this page. Do note that, you can only install Selenium IDE in Firefox. You can open Selenium IDE by clicking on the icon on the top right corner in Firefox.
The test cases which are recorded on Selenium IDE can be exported to other programming languages. They can be exported to either C#, Java, Ruby or Python. But, don’t mistake this tool’s simplicity for a full-fledged testing tool because it is not meant for complex test cases or test suites. This is just a prototyping tool and works well only with static web pages. Testing dynamic (real-time) web pages brings about numerous challenges.
Before I go any further, let me show you how IDE’s interface looks like.
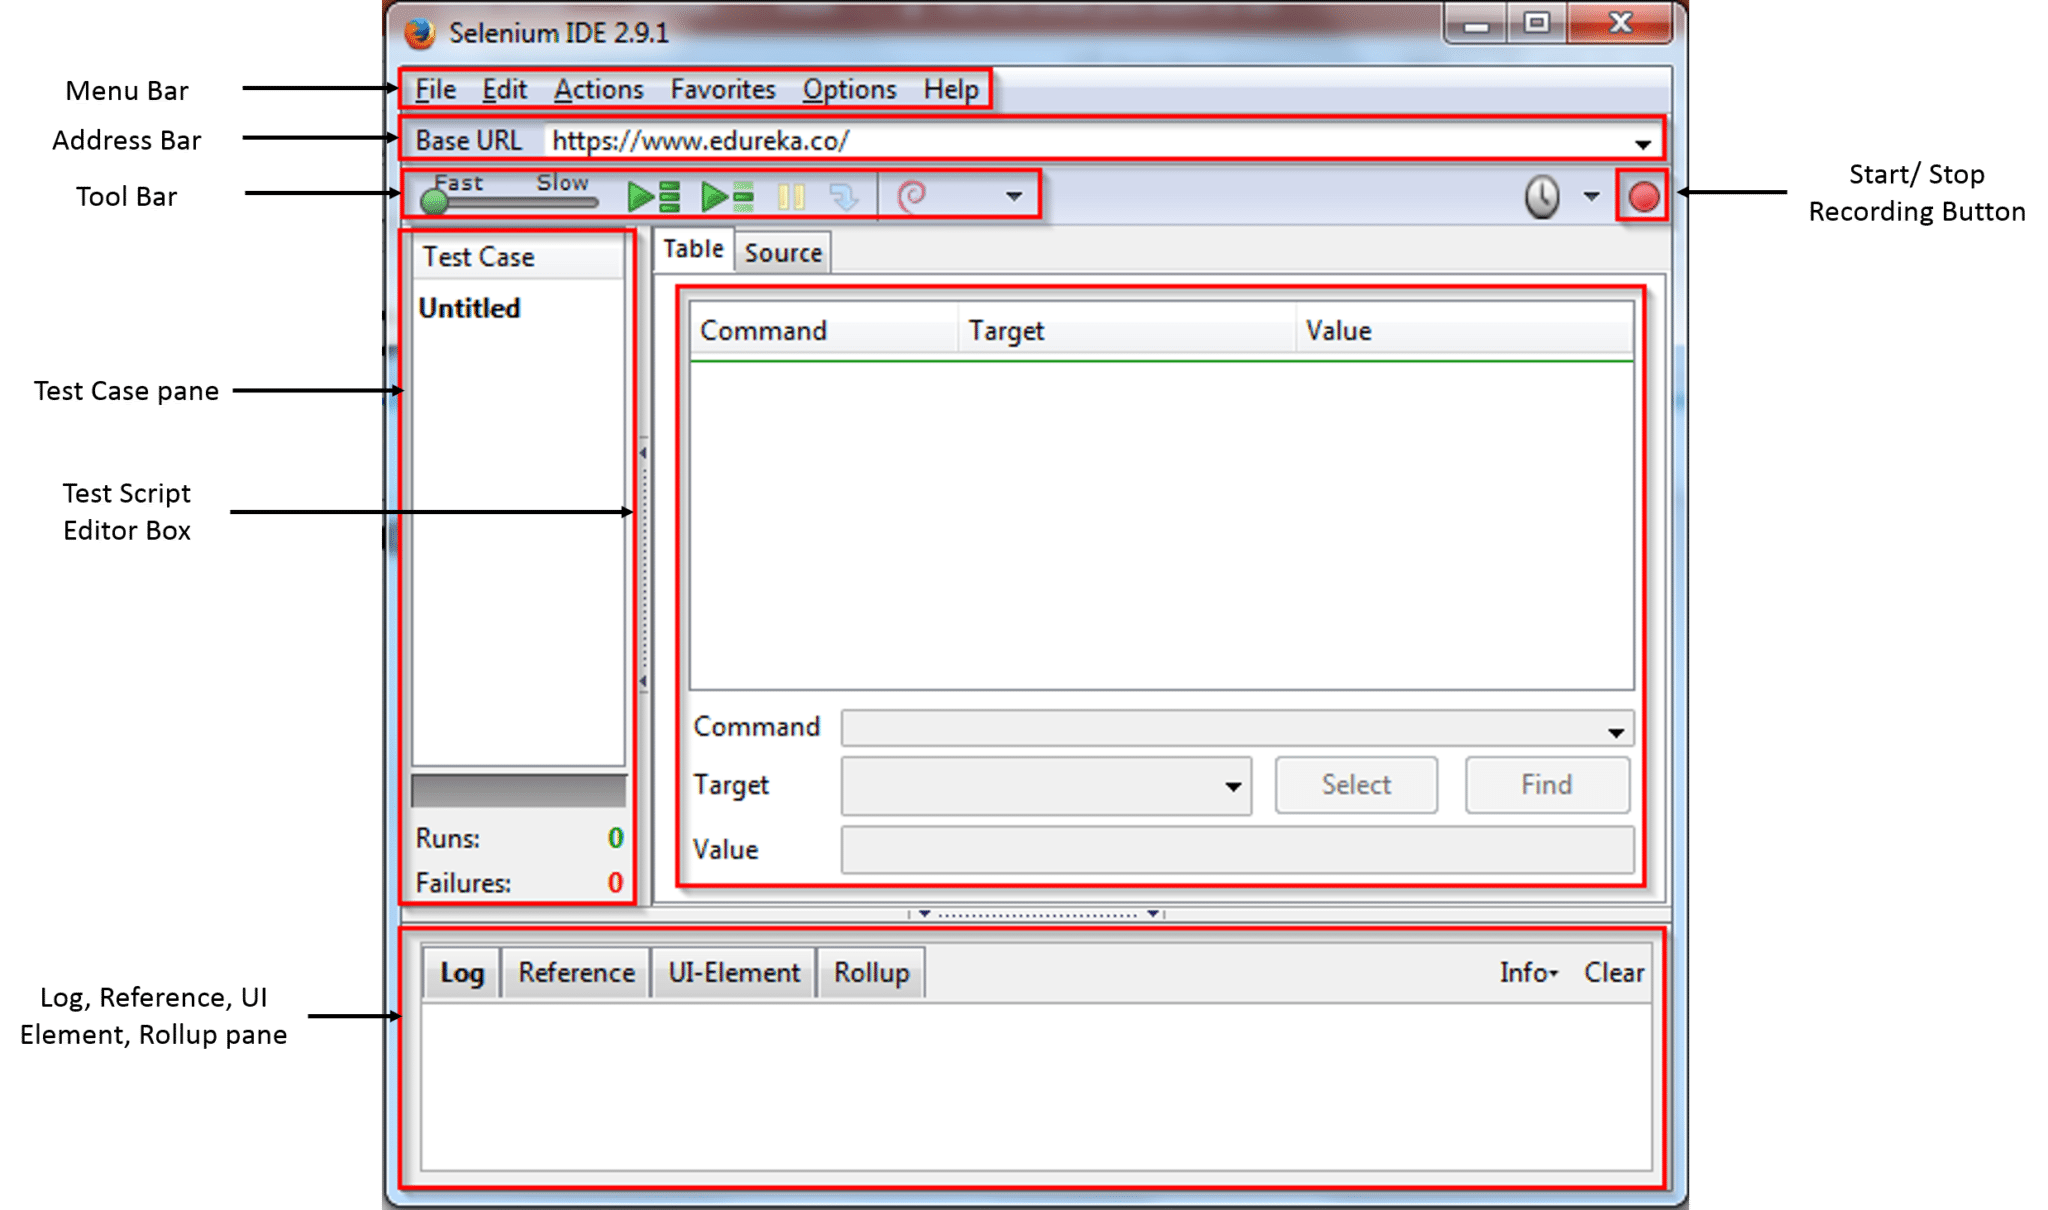
I have highlighted certain functionalities in the above screenshot. They are:
These functionalities provide various options while working with test cases. Let us deep dive into each of the functionalities.
The menu bar consists of the following tabs: File, Edit, Actions, Favorites, Options and Help.
File: This tab gives us options to open, save, export and create new test cases and test suites. Tests are saved in HTML format by default and they can be exported to either .cs(C#), .java(java), .py(python) or .rb(ruby) formats. Once exported, they can run on Selenium RC and Selenium WebDriver.
Edit: Under this tab, we have options to copy, paste, delete, undo and select all operations for editing test cases and test suites. Along with these, we also have options to insert new commands and new comments. These two options come in handy when we want to manually add a step in the test case.
Actions: Under the actions tab, you can find options to either execute single test cases or a group of test cases in the form of test suites. In fact, it also has an option to execute single commands inside a test case and set breakpoints inside a test case.
Options: This tab provides us further options to change IDE settings. There are two important categories under this tab, they are Options and Clipboard format.

Advanced IDE settings can be found under Options => Options. Though there are many settings here, we will concentrate only on a few important one’s.

Under the General tab, we can set the timeout value for locating elements on the page. If the said time is exceeded before locating elements, then an error will be thrown and the test case will fail. Default value is 30000ms.
Selenium IDE extensions can be used to extend the capabilities of the IDE.
If the Remember Base URL checkbox is checked, then the IDE will launch with the specified URL. Or else IDE will launch with blank URL.
If the Record assertTitle automatically is checked, then every time a new tab is fetched, the title of the page will be returned.
Start recording automatically on open makes IDE record browser interactions automatically upon startup.

Under the Locator Builders tab, you can set the order of preference for element attributes. The attribute with the greatest preference will be used to locate elements by default. If that attribute is not specified for an element, then the attribute with the next preference will be used.
Clipboard format will be found under Options => Clipboard format. Under Clipboard format options, you can choose the programming language into which you want to copy your Selenese command to. A single Selenese command which is a part of a test case can be copied to your preferred IDE.
By default, it will be extracted in HTML format. The other formats we can extract it to, are visible on the screenshot on the left side.
The address bar consists of Base URL, which is the URL that will be fetched when Selenium IDE is launched. Besides that, the address bar also has a drop-down list, where the previously visited websites will be listed down for easy access.
 The tool bar in Selenium IDE has the following options:
The test case pane will contain the list of test cases that you have recorded. You can open more than one test case at a time and when you open a test suite, all the test cases contained in that suite will be listed down in the test case pane. Each test case will contain multiple Selenium IDE commands. Below the test case pane, you can see the pass/ fail status of the various test cases.
Every user interaction recorded in a test case will be stored as a Selenium IDE command in the editor box. The editor box is divided into 3 columns: Command, Target and Value.
The HTML equivalent of these commands can be viewed in source tab. Similar to table, your script can be edited from the Table view.
The Log pane displays the runtime messages during execution. It provides real-time updates of the action which Selenium IDE is performing. Log messages can be categorized into four types: info, error, debug and warn. The log messages here will be displayed along with the category it belongs to.
The Reference pane shows a concise description of the currently selected Selenese command in the Editor. It also shows the description of the locator and value to be used on that command.
The UI-Element uses JavaScript Object Notation (JSON) to define element mappings. The documentation and resources are found in the “UI Element Documentation” option under the Help menu of Selenium IDE.
Rollup allows you to execute a group of commands in one step. Rollups are reusable; meaning, they can be used multiple times within the test case. Since rollups are groups of commands combined into one, they contribute a lot in shortening your test script.
Now that you have a fair idea of the various components in IDE and their functionalities, let’s get started with our first test.
Once you have added the IDE plugin to Firefox, you can launch the IDE by clicking on the IDE button on the toolbar of Firefox. You can then click on the record button and start running your test cases by performing actions on the browser. The actions that you perform will be stored as commands in the editor box. You can extract the entire test case or even a single command from the edit box into the programming language of your preference. For understanding the concepts, see the below screenshot.
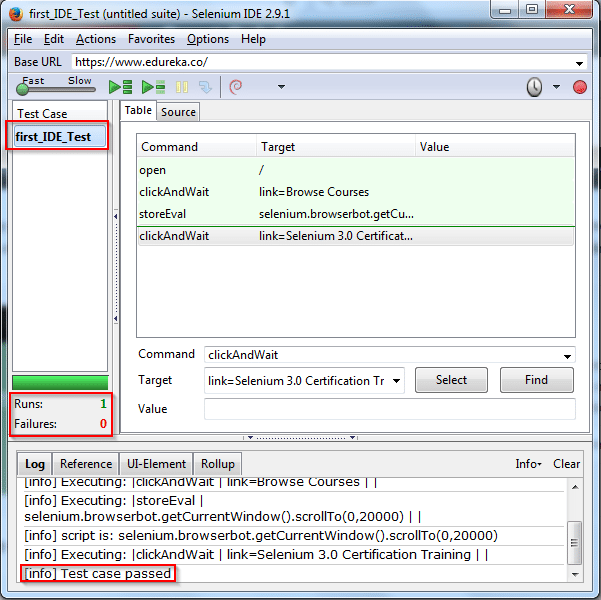
The above screenshot is that of the Selenium IDE plugin. The commands and logs you see in the image are a result of recording the following interactions on the browser:
I have named my test case as first_IDE_Test. If you look at the log pane, the final log displayed says that the Test case passed. Below the test case pane, you can see the results of the test case. I have run only one test and it has passed.
An important point to note is that, the browser actions which are recorded, will not always execute successfully when we run it later. That is because of the dynamics of the page. This is the same issue which I mentioned earlier that, only static web pages can be tested.
Scrolling down a page is an example of the action that will not be recorded in the IDE editor box. Hence, when we run the recorded test, IDE will not scroll down the page for locating the web element, resulting in the test case failing. Another example is that of page load timeout. It is a challenge to synchronize the Selenium IDE speed to the speed of the web page. This is the reason, IDE is not the preferred tool for testing.
If you try running the same test on Edureka’s home page, which I showed earlier in the blog, the test will most likely fail. The workaround is to manually add commands in the test script editor to synchronize the IDE speed and page speed. I have manually added one command and modified another command in the editor.
One of them is to scroll down the page. The command is:
command: storeEval
target: selenium.browserbot.getCurrentWindow().scrollTo(0,20000)
value: <blank>
The other command I modified is for clicking on the link.
command: clickAndWait
target: link=Selenium 3.0 Certification Training
value: <blank>
So, that brings us to the end of this blog. If you are looking for a video tutorial on Selenium IDE, then you can watch the video below which an industry expert delivers.
If you wish to learn Selenium and build a career in the testing domain, then check out our interactive, live-online automation testing courses here, that comes with 24*7 support to guide you throughout your learning period.
| Course Name | Date | Details |
|---|---|---|
| Selenium Certification Training Course | Class Starts on 20th April,2024 20th April SAT&SUN (Weekend Batch) | View Details |
| Selenium Certification Training Course | Class Starts on 22nd April,2024 22nd April MON-FRI (Weekday Batch) | View Details |
| Selenium Certification Training Course | Class Starts on 4th May,2024 4th May SAT&SUN (Weekend Batch) | View Details |


 REGISTER FOR FREE WEBINAR
  Thank you for registering Join Edureka Meetup community for 100+ Free Webinars each month JOIN MEETUP GROUP


