


Software Testing and Automation Internship Pr ...
- 1k Enrolled Learners
- Weekend/Weekday
- Live Class
(50)
The other blogs in this Selenium tutorial series speak about the creation of test cases and executing those test cases in sequence and in parallel. So, the final technique left for discussion is execution of test cases in remote machines. Selenium Grid can be used for executing these tests on remote machines/ hosts. Hence, that is the topic of discussion of today’s blog. Learn more with the Selenium Online Course.
There are so many web browsers which are in use today. Users may be using either Chrome or Firefox or Safari or Opera or even Internet Explorer for reading this very blog. They may be using different versions of the browsers. They may also be running these browsers on any OS, be it Windows or Mac or Ubuntu or any other distribution of Linux.
What if the users were seeing something important on the internet? Something important to your business. Wouldn’t you want to go that extra mile (testing the web app) just to ensure that your users and/ or customers get the best user experience? You would, right?
Well, you should!
But the question is, how feasible is it? Will you be able to spend time testing your web app on every possible OS and every available web browser? Hmm, that sounds like a bit of a challenge. This is where Selenium Grid fits the bill and helps save your time and energy.
In addition to this, one more question arises, Is it viable to set up Selenium grid infrastructure using local systems? Maintaining a grid with all required browsers and operating systems is a challenge. For this, there are multiple online platforms that provide an online Selenium Grid that you can access to run your selenium automation scripts. For example, you can use LambdaTest. It has more than 2000 browser environments over which you can run your tests and truly automatecross-browser testing.
Selenium Grid is another important tool in the Selenium suite of tools. Grid is capable of coordinating WebDriver tests/ RC tests which can run simultaneously on multiple web browsers or can be initiated on different operating systems or even hosted on different machines.
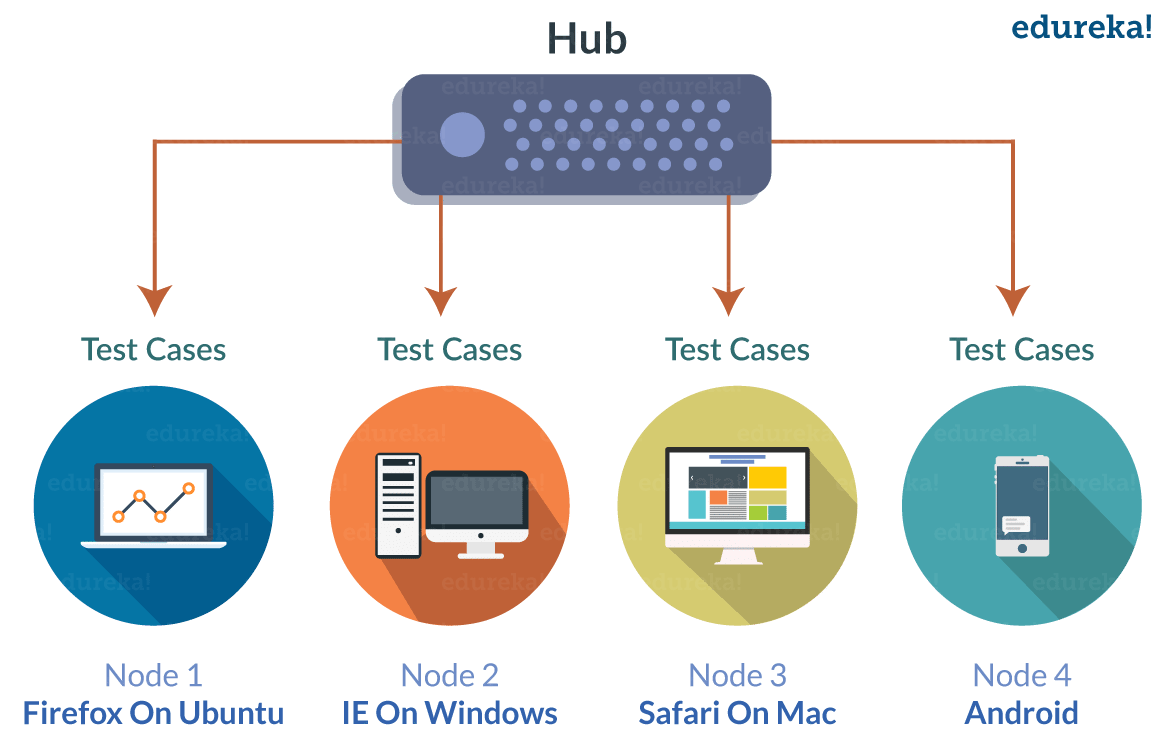 So, how does that work out? Grid employs a Hub-Node architecture where, there is one Hub, which acts as the master and one or more Nodes acting as slaves.
What this means is, if you have a total of 100 jobs/ tests that need to be executed, then the tests can be executed simultaneously in 5 machines, where each machine will be running 20 tests. In fact, you can execute these tests in different combinations of operating systems and browsers. Each machine here can be of a different OS and inside each OS, the tests can be performed on different browsers.
This act would easily save up on a lot of your time in test execution. If you consider the above example, then we can reduce the execution time to around 1/5th of the total time taken to execute tests on a single machine.
If you can recall from my previous blogs, I have mentioned a countless number of times that Grid was part of the Selenium project since its inception i.e. since Selenium v1. Selenium Grid was also a part of Selenium v2 and currently it is a part of Selenium v3. There is not much difference in the v2 and v3 of the Selenium Grid. However, v1 has a lot of differences comparatively. So, let’s understand the differences between v1 and v2.
The fundamental difference between Grid v1.0 and v2.0 is that, RC was used in Grid 1, and WebDriver was used in Grid 2. The table below explains the differences in detail.
| Grid 1 | Grid 2 |
| Requires Apache Ant to be installed | Apache Ant installation is not required |
| Has its own remote control (This is different from RC server) | Bundled with Selenium Server jar file |
| Supports only Selenium RC commands | Supports both Selenium RC and WebDriver scripts |
| You can automate only one browser per remote control | You can automate up to 5 browsers per remote control |
Now that we have learnt the fundamental differences between the two versions, let us deep dive into Selenium Grid.
As I mentioned earlier, Grid functions on the basis of one Hub and multiple Nodes. But, what are Hub and Nodes and what do they do?
In any Grid setup, there can be only one Hub and that will be the central point in that Grid setup. All the tests that need to be executed should be loaded here. In spite of the tests being loaded here, they will be executed only at the Nodes. We can configure any host machine to be our Hub, and it will co-ordinate the activities of test execution in other hosts.
For this to happen, we need to first configure the Hub, and then make other Nodes to register to the Hub. Before I go into too many details, let me show you the command to configure the Hub.
You need to first of all download the Selenium server JAR file from Seleniumhq’s website. The link is here. You also need to make sure that Java is installed in your system and the environment variables are set.
Once you have downloaded the jar file, you need to place it in an appropriate directory. For my convenience, I have downloaded it and placed it in the Selenium folder in C Drive. It is recommended that you also download the jar file and place it in a similar directory in all the other nodes.
To configure the Hub, you need to run the command in the windows command prompt. The command is present in the below snippet.
C:UsersVardhan> cd ..
C:Users> cd ..
C:> cd Selenium
C:Selenium> java -jar selenium-server-standalone-3.4.0.jar -role hub
The selenium-server-standalone-3.4.0.jar is the name of the jar file I downloaded.
The -role flag is used to set that particular host machine as the Hub. When you hit enter, you will get the below output on your screen.

In case you failed to notice the above screenshot, then see it again. It says ‘-Nodes should register to http://192.168.0.11:4444/grid/register‘. Now that the Hub is configured, we need to set up the Nodes and connect them to this Hub.
192.168.0.11 is the IP address of the Hub, and every Node should connect to this IP address. 4444 is the default port number on which Selenium Grid gets hosted and listens for requests. If some other service is running on port 4444 and you want Selenium Grid to be hosted on another port, then you can do that by specifying the -port flag followed by the port number.
The Nodes are the host machines on which the tests are run. These tests will be launched by the Hub. The Hub can launch one or more Nodes either on remote machines or the same machine where the Hub itself is located. On each of the Nodes, different operating systems can be booted, and on different operating systems, different versions of the same browser or different browsers can be initiated.
Similar to the Hub, you need to first download the Jar file in the Node machines and place it on the C Drive or any other common directory for your convenience. You can then run the below command in the Windows command prompt. If you are launching even the Node on the same machine as your Hub, then you need to run the command by starting another command prompt.
java -Dwebdriver.chrome.driver=E:chromedriver.exe -jar selenium-server-standalone-3.4.0.jar -role node -hub http://192.168.0.11:4444/grid/register
There are just a few differences in this command compared to the command needed to start the Hub.
-Dwebdriver.chrome.driver=E:chromedriver.exe is used to set the path of the browser driver. Similar to setting the path of the browser driver in your WebDriver code, you specify it here so as to enable the Node to carry out tests. From Selenium v3 onwards, you need to download the driver browser for Firefox. The browser driver for Firefox is Gecko driver. However, in versions 1 and 2, you need to set the browser driver for all browsers other than Firefox.
-role node flag is used to set that particular host machine as the Node.
-hub http://192.168.0.11:4444/grid/register informs the Node to connect to Hub by using the Hub’s IP address. An important point to note is that if you are launching any Node on the same machine as your Hub, then you can specify ‘-hub http://localhost:4444/grid/register‘ in the command instead of the Hub’s IP address.
When you hit enter, you will get the below output on the command prompt.
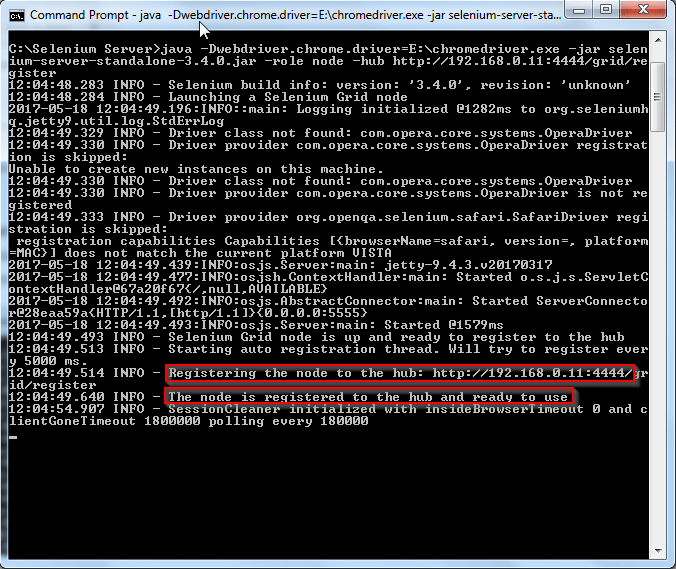
By now, the Node would have been connected to the Hub. You can verify that by going back to the command prompt used for starting the Hub and you will notice the following message: ‘Registered a node http://192.168.0.11:5555‘.
The IP address and port number is that of your Node. Since I have my Node on the same machine as my Hub, the port used for the Node is 5555. When you initiate it on some other machine, the default port will be used.
When you launch the following URL in your Hub’s machine, you will get the status of the Nodes connected to your Hub. See the highlighted portion in the screenshot below.

Now that your Selenium Grid is configured, you can proceed to the execution of test scripts on Nodes. Let me re-emphasize that we need to run scripts in our Hub and they will be executed in our Nodes. The script used to execute the tests are similar to WebDriver tests.
I have run my script in Eclipse IDE. The execution of this script relies on two important library packages. They are DesiredCapabilities object and RemoteWebDriver object.
DesiredCapabilities is used to set the browser type and the OS of our Node. To import DesiredCapabilities object, use the below code.
import org.openqa.selenium.remote.DesiredCapabilities;
RemoteWebDriver is used to select the Node on which we want to execute the test. To import RemoteWebDriver object, use the below lines of code.
import java.net.MalformedURLException;
import java.net.URL;
import org.openqa.selenium.remote.RemoteWebDriver;
I have imported these two packages along with TestNG annotations package for my script as shown in the below code snippet. I have imported TestNG annotations because I have executed this as a TestNG test for which a detailed report will be generated. I would recommend you to import the same set of packages for your code.
When you maneuver over the logos of any browser present in the Selenium Hub console, you will get the details like the browserName and the platform of the Node you want to automate. The image also indicates how many instances of the browsers I can open in my Node. I can configure a maximum of 5 chrome, 5 Firefox and 1 Internet Explorer instances. These details are present in the below screenshot.
 You can use the code in the below snippet to setup your first Grid.
package GridTest;

import org.testng.annotations.AfterTest;
import org.testng.annotations.BeforeTest;
import org.testng.annotations.Test;

import java.net.MalformedURLException;
import java.net.URL;

import org.junit.Assert;
import org.openqa.selenium.Platform;
import org.openqa.selenium.WebDriver;
import org.openqa.selenium.remote.DesiredCapabilities;
import org.openqa.selenium.remote.RemoteWebDriver;

public class TestGrid {
 static WebDriver driver;
 static String nodeUrl;

 @BeforeTest
 public void setup() throws MalformedURLException {
 nodeUrl = "http://192.168.0.11:5555/wd/hub";
 DesiredCapabilities capabilities = DesiredCapabilities.chrome();
 capabilities.setBrowserName("chrome");
 capabilities.setPlatform(Platform.WINDOWS);
 driver = new RemoteWebDriver(new URL(nodeUrl), capabilities);
 }

 @Test
 public void simpleTest() {
 driver.get("https://www.edureka.co/");
 Assert.assertEquals("Instructor Led Online Courses with 24x7 On-Demand Support | Edureka", driver.getTitle());
 }

 @AfterTest
 public void afterTest() {
 driver.quit();
 }
}
I have divided the entire test script into three test annotations. @BeforeTest, @Test and @AfterTest. In @BeforeTest, I have used the DesiredCapablities and RemoteWebDriver objects to configure my Node. In @Test, I have asked the Node to navigate to Edureka’s home page and assert the title of the page. In @AfterTest, I have asked the Node to quit the browser instance.
When your test passes execution, you will get the below output.
May 18, 2017 3:09:07 PM org.openqa.selenium.remote.ProtocolHandshake createSession
INFO: Detected dialect: OSS
PASSED: simpleTest

===============================================
 Default test
 Tests run: 1, Failures: 0, Skips: 0
===============================================


===============================================
Default suite
Total tests run: 1, Failures: 0, Skips: 0
===============================================
Since this is executed as a TestNG test, you will get a detailed test report similar to the below screen shot.

If you don’t know what is TestNG and what how to use test annotations, then read my blog on how to use Selenium WebDriver with TestNG from this Selenium tutorial series.
You can see the video below to witness a demonstration of how to build a Selenium Grid. The instructor delivering the video explains the same concepts explained in this blog.
So, that brings us to the end of this Selenium Grid blog. If you have any doubt or issues with any code/ content of this blog series, please leave them in the comments section below and I will solve your problem at the earliest.
If you wish to learn Selenium and build a career in the testing domain, then check out our interactive, live-online Selenium Certification Training here, which comes with 24*7 support to guide you throughout your learning period.
Got a question for us? Please mention it in the comments section and we will get back to you.
| Course Name | Date | Details |
|---|---|---|
| Selenium Certification Training Course | Class Starts on 27th April,2024 27th April SAT&SUN (Weekend Batch) | View Details |
| Selenium Certification Training Course | Class Starts on 11th May,2024 11th May SAT&SUN (Weekend Batch) | View Details |
| Selenium Certification Training Course | Class Starts on 20th May,2024 20th May MON-FRI (Weekday Batch) | View Details |


 REGISTER FOR FREE WEBINAR
  Thank you for registering Join Edureka Meetup community for 100+ Free Webinars each month JOIN MEETUP GROUP


Hi There ,
Its really a great post and your videos are amazing and very handy to understand .
I am basically wfh person , how do i get this Grid working from my home pc to my office pc which is on two different networks and connected via vpn ? When I tried on my own local PC as a node and hub all works fine .
Please help .Appreciate your answer .Thanks