


In the previous blogs, you learnt what is Salesforce and different Salesforce certifications. In this Salesforce tutorial blog, I will show you how to create App in Salesforce. I will be creating an app called StudentForce which can be used to maintain student records.
This app will contain three different objects (tables) to store data. The first object, Students Data, will contain the names of students and their personal details like email ID, phone number, and native city. The second object, College, will store the college students belong to. The third object, Marks, will contain the marks obtained by the students in various subjects.
Salesforce Tutorial
I have covered the following topics in this Salesforce tutorial blog with step-by-step instructions and screenshots:
- How to create the app environment?
- What are tabs and how to create tabs in your app?
- What are profiles and how to customize user profiles?
- How to create objects in the app?
- How to create fields in objects and define their data type?
- How to add entries (fields) into these objects?
- How to link (create a relationship between) two different objects?
Before I get started with creating an app, let me introduce you to the cloud environment where Salesforce apps are built.
Salesforce Org
The cloud computing space offered to you or your organization by Force.com is called Salesforce org. It is also called Salesforce environment. Developers can create custom Salesforce Apps, objects, workflows, data sharing rules, Visualforce pages and Apex coding on top of Salesforce Org. Get your Salesforce Architect Certification today to become certified.
Learn about Salesforce Cloud Computing here. Now, let us dive deep into Salesforce Apps and understand how they function.
Salesforce Apps
The primary function of a Salesforce app is to manage customer data. Salesforce apps provide a simple UI to access customer records stored in objects (tables). Apps also help in establishing relationship between objects by linking fields.
Apps contain a set of related tabs and objects which are visible to the end user. The below screenshot shows, how the StudentForce app looks like.

The highlighted portion in the top right corner of the screenshot displays the app name: StudentForce. The text highlighted next to the profile pic is my username: Vardhan NS.
Related Learning: What is OWD in Salesforce?
Before you create an object and enter records, you need to set up the skeleton of the app. You can follow the below instructions to set up the app.
Steps To Setup The App
- Click on Setup button next to app name in top right corner.
- In the bar which is on the left side, go to Build → select Create → select Apps from the drop down menu.

- Click on New as shown in the below screenshot.
- Choose Custom App.
- Enter the App Label. StudentForce is the label of my app. Click on Next.
- Choose a profile picture for your app. Click Next.
- Choose the tabs you deem necessary. Click Next.
- Select the different profiles you want the app to be assigned to. Click Save.


In steps 7 and 8, you were asked to choose the relevant tabs and profiles. Tabs and profiles are an integral part of Salesforce Apps because they help you to manage objects and records in Salesforce.
In this salesforce tutorial, I will give you a detailed explanation of Tabs, Profiles and then show you how to create objects and add records to it.
Salesforce Tabs
Tabs are used to access objects (tables) in the Salesforce App. They appear on top of the screen and are similar to a toolbar. It contains shortcut links to multiple objects. On clicking the object name in a tab, records in that object will be displayed. Tabs also contain links to external web content, custom pages and other URLs. The highlighted portion in the below screenshot is that of Salesforce tabs.

All applications will have a Home tab by default. Standard tabs can be chosen by clicking on ‘+’ in the Tab menu. Accounts, Contacts, Groups, Leads, Profile are the standard tabs offered by Salesforce. For example, Accounts tab will show you the list of accounts in the SFDC org and Contacts tab will show you the list of contacts in the SFDC org.
Steps To Add Tabs
- Click on ‘+’ in the tab menu.
- Click on Customize tabs, which is present on the right side.
- Choose the tabs of your choice and click on Save.

Besides standard tabs, you can also create custom tabs. Students tab that you see in the above screenshot is a custom tab that I have created. This is a shortcut to reach the custom object: Students.
Steps To Create Custom Tabs
- Navigate to Setup → Build → Create → Tabs.
- Click on New.
- Select the object name for which you are creating a tab. In my case, it is Students Data. This is a custom object which I have created (the instructions to create this object is covered later in this blog).
- Choose a tab style of your preference and enter a description.
- Click on Next → Save. The new Students Data tab will appear as shown below.

Salesforce Profiles
Every user who needs to access the data or SFDC org will be linked to a profile. A profile is a collection of settings and permissions which controls what a user can view, access and modify in Salesforce.
A profile controls user permissions, object permissions, field permissions, app settings, tab settings, apex class access, Visualforce page access, page layouts, record types, login hour and login IP addresses.
You can define profiles based on the background of the user. For example, different levels of access can be set for different users like system administrator, developer and sales representative.
Similar to tabs, we can use any standard profile or create a custom profile. By default, the available standard profiles are: read only, standard user, marketing user, contract manager, solution manager and system administrator. If you want to create custom profiles, you have to first clone standard profiles and then edit that profile. Do note that one profile can be assigned to many users, but one user cannot be assigned many profiles.
Related Article: Salesforce Interview Questions
Salesforce Tutorial for Beginners
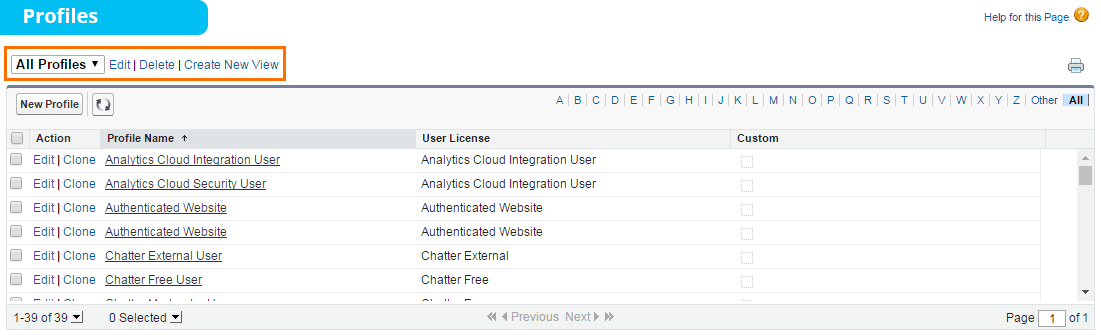
Steps To Create A Profile
- Click on Setup → Administer → Manage users → Profiles
- You can then clone any of the existing profiles by clicking on Edit.
Once the tabs and profiles are set up for your App, you can load data into it. The next section of this Salesforce tutorial will thus cover how data is added to objects in the form of records and fields.
Objects, Fields And Records In Salesforce
Objects, Fields, and Records are Salesforce’s building blocks. It is important to know what they are and what role they play in building Apps.
Objects are the database tables in Salesforce where data is stored. There are two types of objects in Salesforce:
- Standard objects: Salesforce provides standard objects, such as Accounts, Contacts, Leads, Opportunities, Campaigns, Products, Reports, and Dashboards.
- Custom objects: The objects created by users are called custom objects.
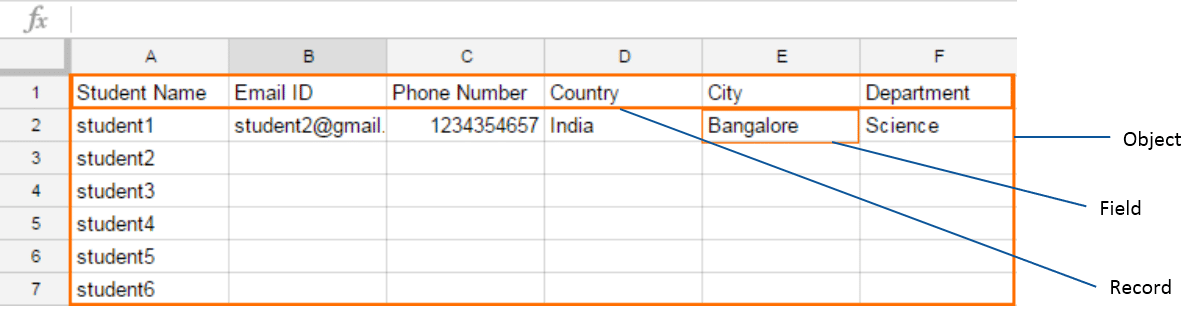
Objects are collections of records, and records are collections of fields.
Related Learning: Record Types in Salesforce
Every row in an object consists of many fields. Thus a record in an object is a combination of related fields. Look at the below excel for illustration.
I will create an object called Students Data which will contain personal details of students.
Steps to create a custom object:
- Navigate to Setup → Build → Create → Object
- Click on New Custom Object.
- Fill in the Object Name and Description. As you can see from the below image, the object name is Students Data.
- Click on Save.

If you want to add this custom object to the tab menu, then you can follow the instructions mentioned earlier in this Salesforce tutorial blog.
After creating the object, you need to define various fields in it. For example, the fields in a student’s record will be his name, phone number, email ID, department, and native city.
Related Learning: Types of Flows in Salesforce
You can add records to objects only after defining the fields.
Steps To Add Custom Fields
- Navigate to Setup → Build → Create → Objects
- Select the object to which you want to add fields. In my case, it is Students Data.
- Scroll down to Custom Fields & Relationships for that object and click on New as shown in the below screenshot.
- You need to choose the data type of that particular field and then click Next. I have chosen text format because I will be storing letters in this field.
The different data types of fields have been explained in detail in the next section of this blog. - You will then be prompted to enter the name of the field, maximum length of that field and description.
- You can also make it an optional/ mandatory field and allow/ disallow duplicate values for different records by checking on the check boxes. See the below screenshot to get a better understanding.
- Click on Next.
- Select the various profiles who can edit that text field at a later point of time. Click Next.
- Select the page layouts that should include this field.
- Click Save.


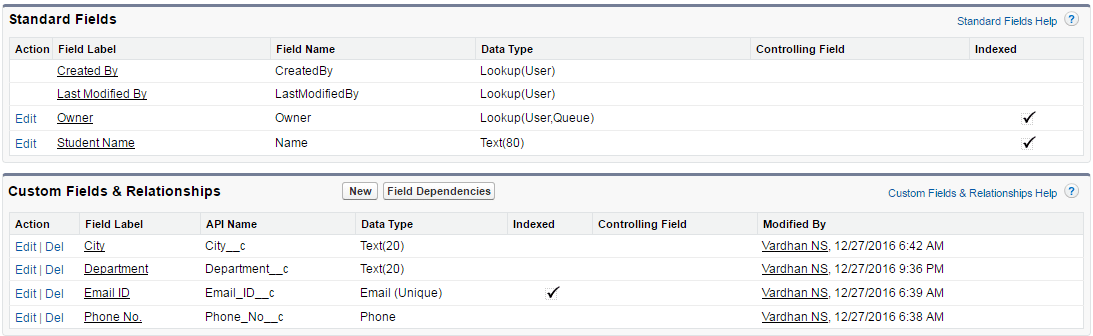
As you can see from the below screenshot, there are two types of fields. Standard fields created for every object by default and Custom fields created by myself. The four fields which I have created for Students Data are City, Department, Email ID and Phone No. You will notice that all custom fields are suffixed with ‘__C’ which indicates that you have the power to edit and delete those fields. Whereas some standard fields can be edited, but not deleted.
You can now add student records (complete row) to your object.
Steps To Add A Record
- Go to the object table from the tab menu. Students Data is the object to which I will add records.
- As you can see from the below image, there are no existing records. Click on New to add new student records.
- Add student details into different fields as shown in the below screenshot. Click on Save.
- You can create any number of student records. I have created 4 student records as shown in the below screenshot.
- In case you want to edit the student details, you can click on Edit as shown in the below screenshot.


Data Types Of Fields
Data type controls which type of data can be stored in a field. Fields within a record can have different data types. For example:
- If it is a phone number field, you can choose Phone.
- If it is a name or a text field, you can choose Text.
- If it is a date/ time field, you can choose Date/Time.
- By choosing Picklist as data type for a field, you can write predefined values in that field and create a drop-down.
You can choose any one of the data types for custom fields. Below is a screenshot listing the different data types.
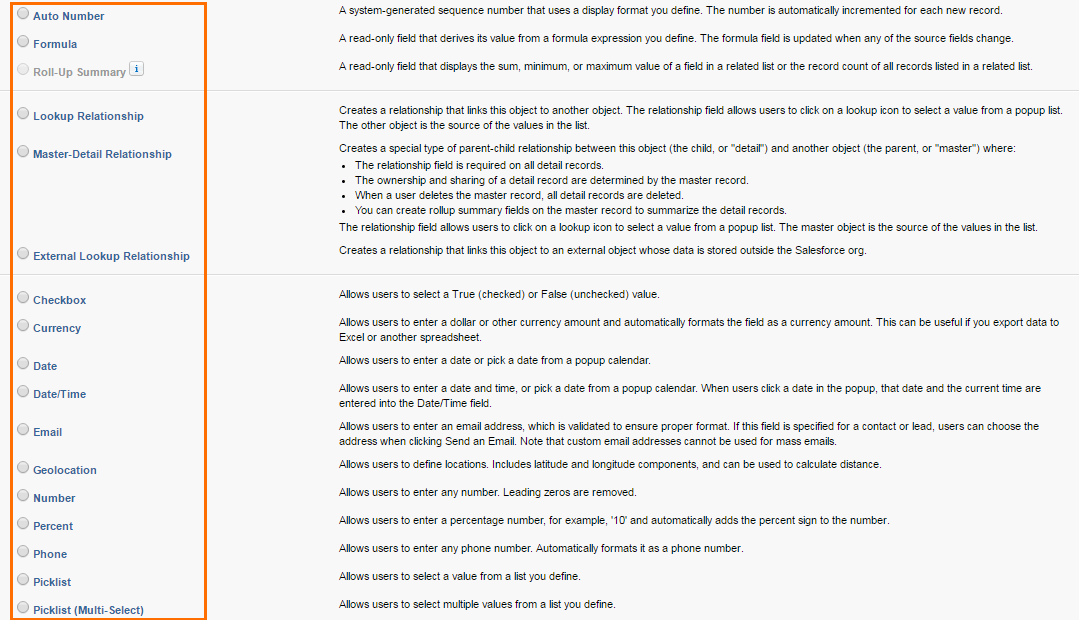
Data types like Lookup Relationship, Master-Detail Relationship and External Lookup Relationship are used to create links/ relationships between one or more objects. Relationships between objects is the next topic of discussion in this Salesforce tutorial blog.
Object Relationship In Salesforce
As the name suggests, object relationship is used in Salesforce to create a link between two objects. The question on your mind would be, why is it needed? Let me talk about the need with an example.
In my StudentForce app, there is a Students Data object, which contains personal information of students. Details regarding student’s marks and their previous college are present in different objects. We can use relationships to link these objects using related fields. The marks of the students and colleges can be linked with the Student Name field of Student Data object.
Relationships can be defined while choosing the data type. They are always defined in the child object and are referenced to the common field in master object. Creating such links will help you to search and query data easily when the required data is present in different objects. There are three different types of relationships that can exist between objects. They are:
- Master-Detail
- Lookup
- Junction
Let us look into each of them:
Master-Detail Relationship (1:n)
Master-Detail relationship is a parent-child relationship in which the master object controls the behaviour of the dependent object. It is a 1:n relationship, in which there can be only one parent, but many children. In my example, Students Data is the master object and Marks is the child object.
Let me give you an example of a Master-Detail relationship. The Students Data object contains student records. Each record contains personal information about a student. However, the marks obtained by students are present in another record called Marks. Look at the screenshot of Marks object below.
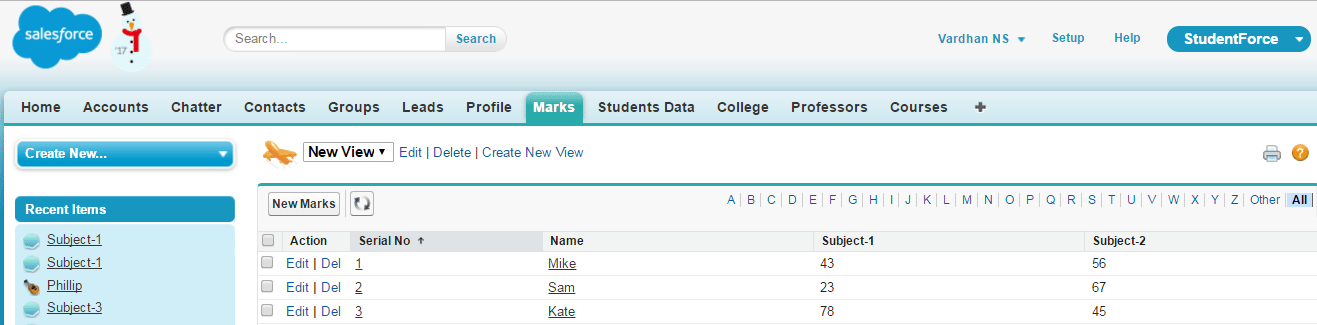
I have created a link between these two objects by using the student’s name. Below are the points you have to keep in mind when setting up a Master-Detail relationship.
- Being the controlling object, the master field cannot be empty.
- If a record/ field in master object is deleted, the corresponding fields in the dependent object are also deleted. This is called a cascade delete.
- Dependent fields will inherit the owner, sharing and security settings from its master.
You can define master-detail relationships between two custom objects, or between a custom object and standard object as long as the standard object is the master in the relationship.
Lookup Relationship (1:n)
Lookup relationships are used when you want to create a link between two objects, but without the dependency on the parent object. You can think of this as a form of parent-child relationship where there is only one parent, but many children i.e. 1:n relationship. Below are the points you have to keep in mind when setting up a Lookup relationship.
- The lookup field on the child object is not necessarily required.
- Deleting a record in the parent object does not affect the fields/ records in a child object.
- The child fields will not inherit the owner, sharing and security settings of its parent.
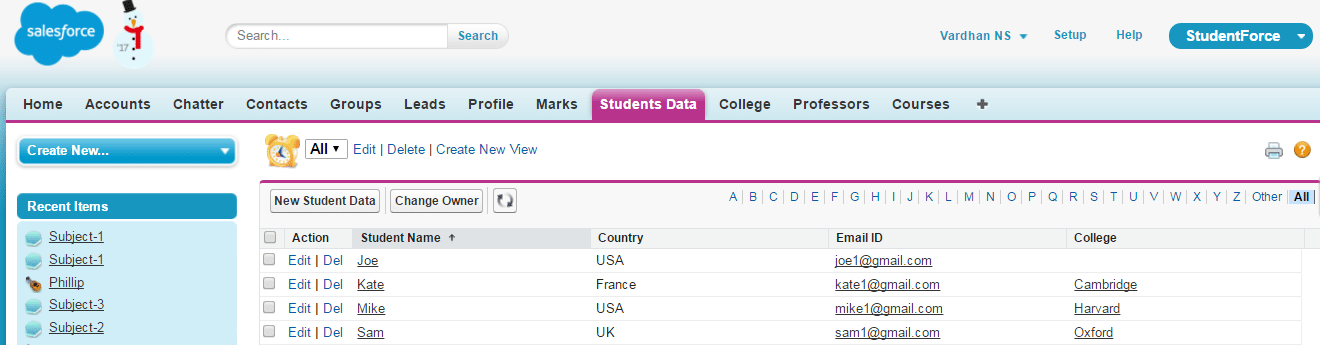
An example of a lookup relationship in my case would be that of a College object. You can see the child object: Students Data in the below screenshot. You will notice that there is an empty College field for the first record. This indicates that the dependency is not a necessity.
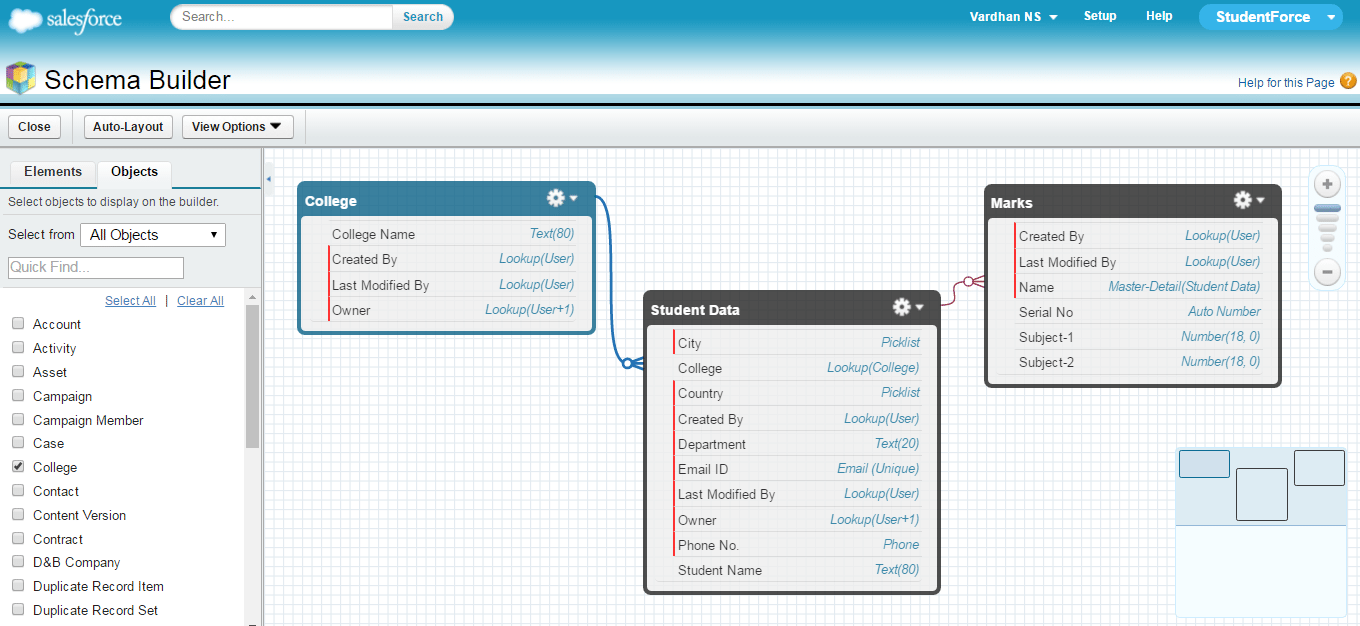
Below is a screenshot of the schema diagram of both the relationships. College – Student Data forms the Lookup relationship and Student Data – Marks forms the Master-Detail relationship.
Self-Relationship
This is a form of lookup relationship where instead of two tables/ objects, the relationship is within the same table/ object. Hence the name self-relationship. Here, the lookup is referenced to the same table. This relationship is also called Hierarchical relationship.
Salesforce is a cloud-based CRM platform that helps businesses manage customer relationships efficiently. Our Salesforce online training course covers its core features, automation tools, and integration capabilities for career growth.
Junction Relationship (Many-To-Many)
This kind of a relationship can exist when there is a need to create two master-detail relationships. Two master-detail relationships can be created by linking 3 custom objects. Here, two objects will be master objects and the third object will be dependent on both the objects. In simpler words, it will be a child object for both the master objects.
To give you an example of this relationship, I have created two new objects.
- A master object called Professor. It contains the list of professors.
- A child object called Courses. It contains the list of courses available.
- I will use the Students Data object as another master object.
I have created a many-to-many relationship such that every record in the Courses object must have at least one student and at least one professor. This is because every course is a combination of students and professors. In fact, a course, can have one or more number of students and professors associated with them.
Related Learning: Junction Object in Salesforce
The dependency on Student and Professor objects makes Courses as the child object. Student and Professor are thus the master objects. Below is a screenshot of Courses object.
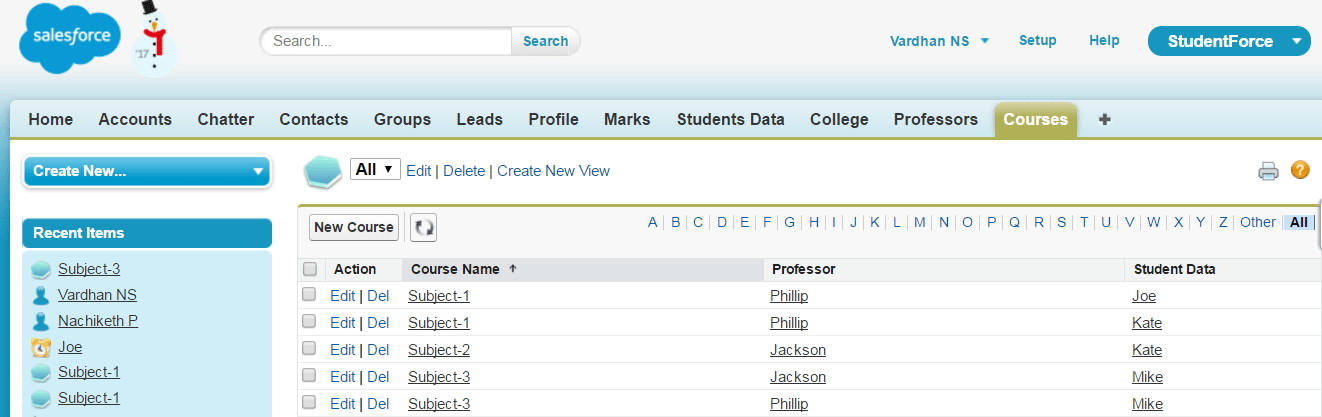
You will notice that there are different combinations of professors and students for these subjects. For example, Kate is associated with two courses and has two different professors for each of those two courses. Mike is associated with only one course, but, has two different professors for that course. Both Joe and Kate are associated with the same course and same professor. In the below screenshot, you will find the schematic diagram of this relationship.
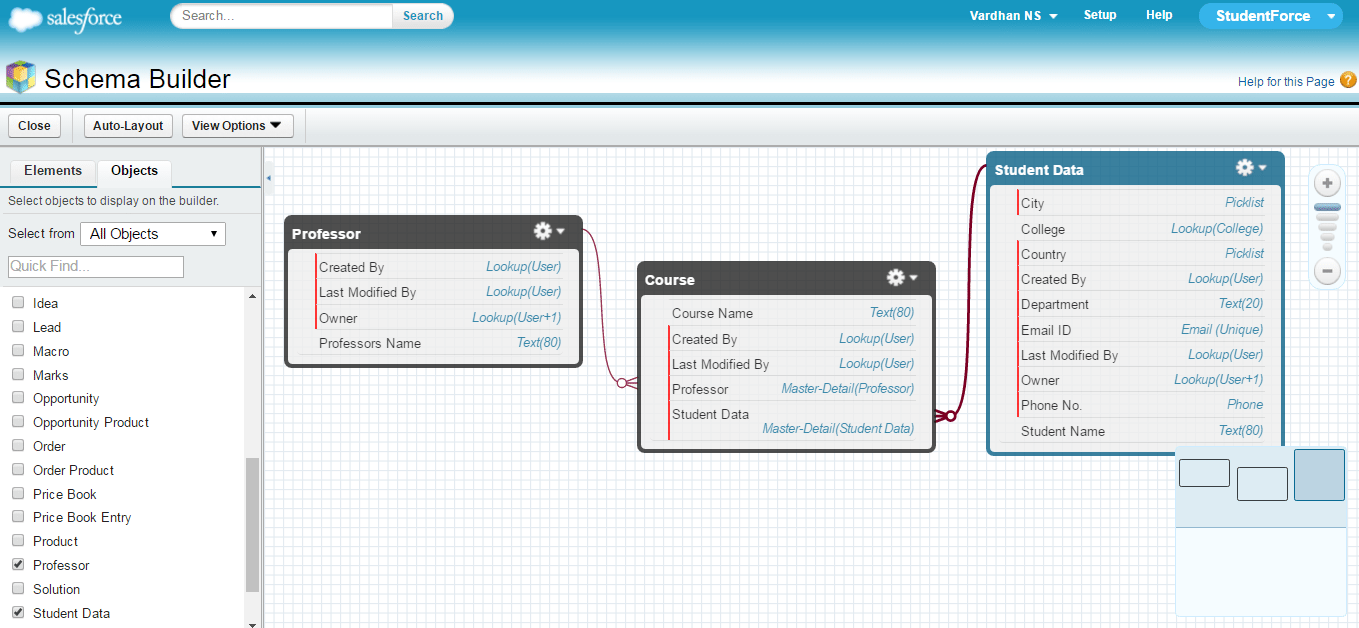
Congrats! The StudentForce App is successfully built. The two schema diagrams present above show how the different objects are linked inside my Salesforce App.
This brings us to the end of this Salesforce tutorial. I hope you understood the various concepts like apps, tabs, profiles, fields, objects and relationships which were explained in this Salesforce tutorial blog. In case you have any doubts or queries, feel free to leave them in the comment section below and I will get back to you at the earliest.
I urge you to see this Salesforce tutorial video that explains the creation of Salesforce student app. Go ahead, enjoy the video and tell me what you think.
Stay tuned to read the next blog in our Salesforce tutorial series. In the meantime, I would suggest you to create a Salesforce account and play around with the Salesforce app. You can try building your own app by following the instructions mentioned above.
If you want to become a professional skilled in Salesforce then, check out our Salesforce Platform Developer1 Certification Course which comes with instructor-led live training and real life project experience.


Thank’s for sharing this information. This salesforce tutorial are very easy to understand for a beginner like me. congratulations for this amazing and very helpful website. It really really helpful for me.