Python Scripting Certification Training
- 15k Enrolled Learners
- Weekend
- Self Paced
(5900)


 Copy Link!
Millions of businesses use the Internet as a cost-effective communications channel. It lets them exchange information with their target market and make fast, secure transactions. Frameworks are libraries that help you develop your application faster and smarter. Ruby on Rails is one of the most extremely productive web application framework. This Ruby on Rails Tutorial will provide you an in-depth knowledge about the web application framework.
What is Ruby on Rails?
 Ruby on Rails, also known as Rails, is a server-side web application framework written in Ruby programming language. It is a model-view-controller framework that provides a structure for a database and web pages.One can develop an application at least ten times faster with Rails than a typical Java framework.
Let’s move ahead with the Ruby on Rails Tutorial and find out more reasons to use this framework.
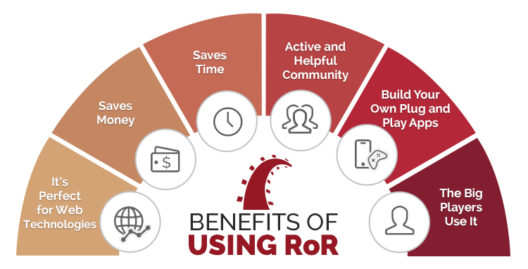
The full-stack web framework comes with features to facilitate both client-side and server-side web development. It provides the basic structure required by developers to create web pages, web services, and databases. Also, it enables developers to build user interfaces by combining HTML, CSS, JavaScript, and XML. Let’s have a look at some of the reasons why we should choose Ruby on Rails over other frameworks :
Now that we know why we should prefer Ruby on Rails more than other frameworks, let’s move on with our Ruby on Rails Tutorial and know about the programming language it is written in.
Ruby is a dynamic, open source programming language with a focus on simplicity and productivity. It has an elegant syntax that is natural to read and easy to write. In Ruby, absolutely everything is an object, meaning everything operates in the same paradigm of sending and receiving messages.

Let’s move ahead with our Ruby on Rails Tutorial and have a look at some of the advantages of Ruby programming language.
Ruby is often recommended to beginners because it’s easy to use and master. Another reason is that it comes with a long list of benefits when compared to other languages. It is one of the most popular programming languages and powers a lot of booming applications. Let’s have a look at some of the advantages of the programming language:

Simplicity – The syntax of Ruby is very simple and readable. It enables Ruby developers to do more with less code. The readability also makes Ruby almost self-documenting and reduces the burden of writing out separate comments or help text for the developers.

Faster Development – Web development with Ruby on Rails is faster due to the object-orientation of Ruby programming language. a line of code in Ruby may be worth six lines of Java code sometimes. It offers a powerful infrastructure from the onset and spares a considerable time and effort for the developers to build one from scratch.

Easy Code maintenance and updates – Ruby is known for its stability and predictability. It is pretty easy to modify the existing code and add new features to a site. This is particularly valuable for long-term projects and startups.

Cost-effectiveness – It can run on the free open-source Linux and works well with many free web servers and databases. The whole development process and code updates are performed faster. thus, the business owners tend to spend less money on the development of their website and its upgrade.
Now that you know about some of the advantages of Ruby programming language, let’s move ahead with our Ruby on Rails Tutorial and check out some of the popular frameworks of Ruby.
Dive into the world of full stack development and unleash your creativity with our Full Stack Developer Course.
The expressive syntax rules of Ruby enable programmers to build web applications by writing easy-to-read code. Many developers even opt for Ruby to create prototypes without putting extra time and effort. But the developers cannot write large and complex web applications in Ruby without leveraging web frameworks. The tools, libraries, and utilities provided by Ruby web frameworks enable programmers to write web applications according to varied business requirements.
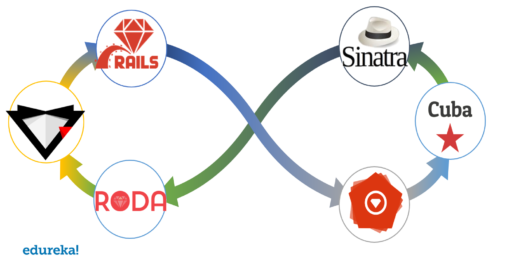
Some of the famous Ruby Frameworks include:
So let’s move ahead and focus on one of the most popular frameworks of Ruby and know more about Rails Framework in this Ruby on Rails Tutorial.
Elevate your web development skills with our industry-relevant Node JS Course and stay ahead in the ever-evolving tech world.

Ruby on Rails is the most popular web framework for Ruby programming language. The full-stack web framework comes with features to facilitate both client-side and server-side web development. It provides the basic structure required by developers to create web pages, web services, and databases.
Now let’s move ahead with our Ruby on Rails Tutorial and list out some of the reasons why Rails is chosen out of hundreds of other programming languages.
Now let’s move ahead with our Ruby on Rails Tutorial and find out some of the primary tasks performed by Rails while building an application.
A framework is a program, set of programs and code library that writes most of your application for you. When you use a framework, your job is to write the parts of the application that make it do the specific things you want. While setting out to write a Rails application, it is important to perform three primary tasks such as:
Based on the above three tasks, Ruby on Rails deals with a Model View Controller framework. So let’s move ahead with our Ruby on Rails Tutorial and find out more about the MVC Framework.
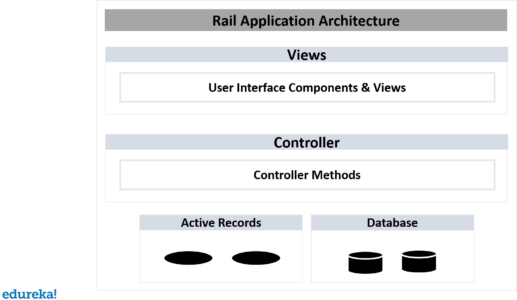
The Model View Controller principle divides the work of an application into three separate but closely cooperative subsystems.
Now that you know what is Ruby on Rails and why we should use this framework, Let’s move ahead and have a look at the installation process of Ruby and Rails.
To develop a web application using Ruby on Rails Framework, we need to install the following software first:
Rails works with many database systems, including MySQL, PostgreSQL, SQLite, Oracle, DB2 and SQL Server. Please refer to a corresponding Database System Setup manual to set up your database.
Step 1 : Install Ruby
download an installation package from rubyinstaller.org. Follow the download link, and run the resulting installer. You can install the latest available version of Ruby in a single click. It’s a very small package, and you’ll get RubyGems as well along with this package. After installation, you can also check the version by typing ruby -v in the command prompt.

Step 2 : Install Rails
With Rubygems loaded, you can install all of Rails and its dependencies using the following command through the command line −
C:> gem install rails
Use the following command to check the rails version.
C:> rails -v
Output
Rails 5.2.2
Once you are done with the above steps, you have successfully installed Ruby on Rails over windows.
Now that you have an idea of Ruby on Rails Framework and how to install it, let’s move ahead with our Ruby on Rails Tutorial and understand a simple implementation of building a web page using the framework.
Here we are going to use PostgreSQL as our database. It is a popular choice among Ruby On Rails community. First you have to navigate to the directory where you want to save your project and open the command prompt.

To generate a new app run the following code:
rails new collabfield --database=postgresql
With this, we have successfully generated our new application and we can navigate to the new directory using the following command:
cd collabfield
Once we are inside the directory, we can run the app by using the following command:
rails s
With this, we have started our app and now you have to open the browser and go to http://localhost:3000 where you will find the Rails welcome page.
 Now we will change the Rails welcome page to our home page and for that we need to generate a new controller called pages using the following command:
rails g controller pages
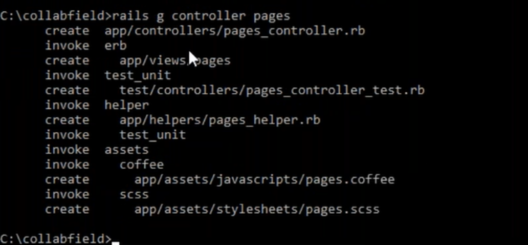
We are going to use this PagesController to manage our special and static pages. We can use Notepad++ or Sublime text to open the file pages_controller.rb.
app/controllers/pages_controller.rb
When we open pages_controller.rb, we see this:
class PagesController < ApplicationController
end
All the controllers that we create are going to inherit from ApplicationController class. Thus, all methods defined inside this class are going to be available across all our controllers.
We’ll define a public method named index, so it can be callable as an action:
class PagesController < ApplicationController

def index
end

end
Now let’s define a route so that Rails knows which controller and its action to call when we open our root page. Open a routes.rb file in app/config/routes.rb and insert the following line:
root to: 'pages#index'
Rails.application.routes.draw do
root to: 'pages#index'
end
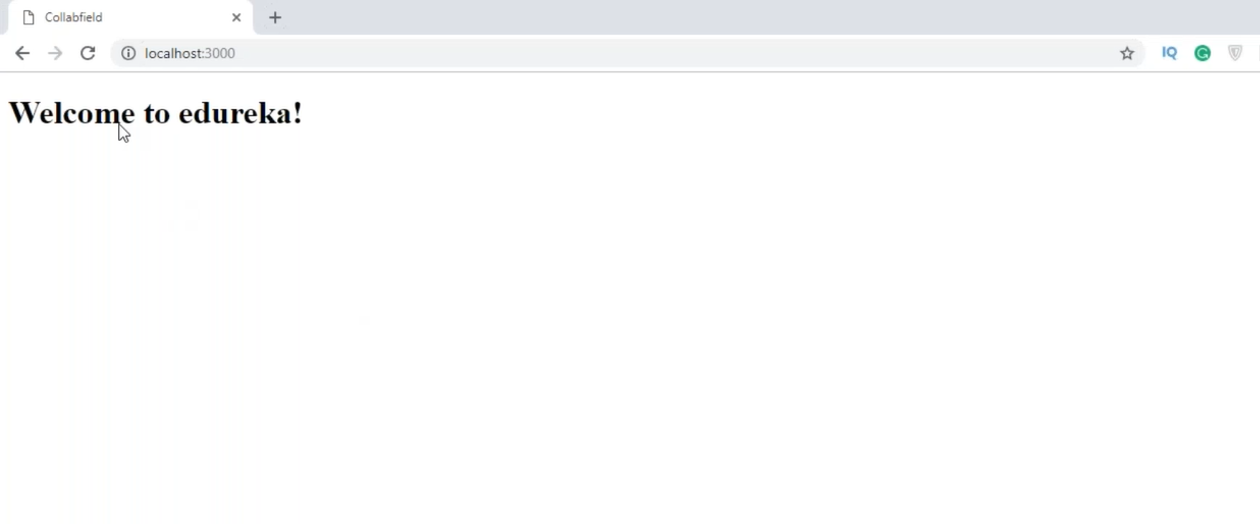
Now let’s create a new template for our index action. Go to app/views/pages and create an index.html.erb file inside this directory. Inside this file we can write our regular HTML+ Embedded Ruby code.
<h1>Welcome to edureka!</h1>
Now when we go to our home page, we see something like this:
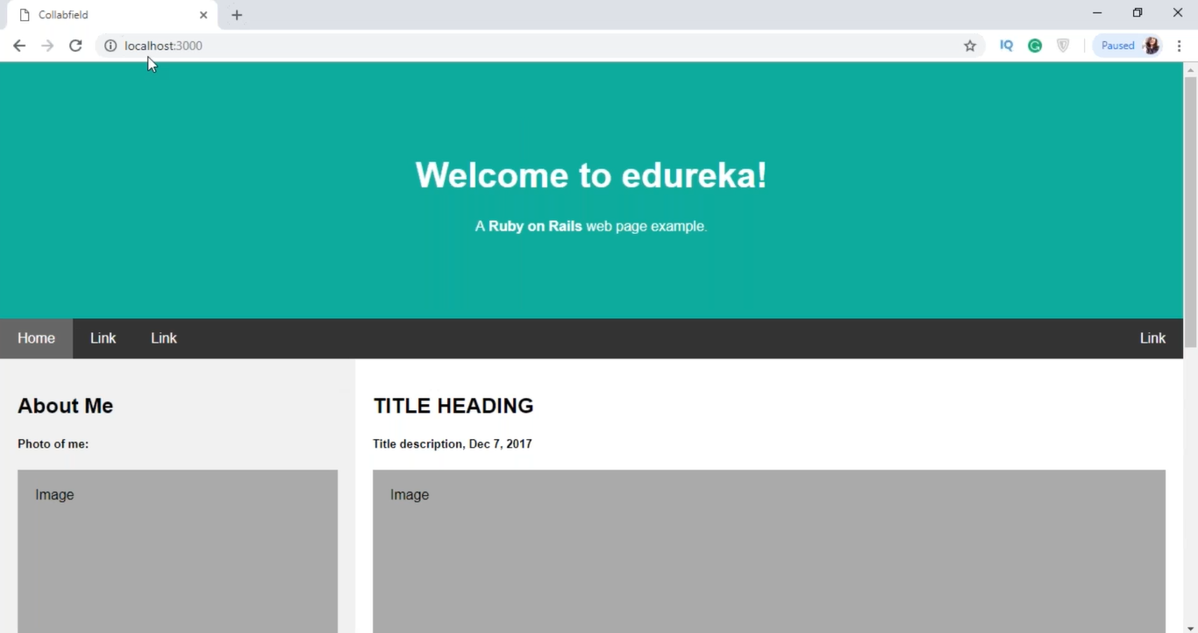
 It’s finally time to design our web page:
<!DOCTYPE html> <html lang="en"> <head> <title>Page Title</title> <meta charset="UTF-8"> <meta name="viewport" content="width=device-width, initial-scale=1"> <img src="data:image/gif;base64,R0lGODlhAQABAIAAAAAAAP///yH5BAEAAAAALAAAAAABAAEAAAIBRAA7" data-wp-preserve="%3Cstyle%3E%0A*%20%7B%0Abox-sizing%3A%20border-box%3B%0A%7D%0A%0A%2F*%20Style%20the%20body%20*%2F%0Abody%20%7B%0Afont-family%3A%20Arial%2C%20Helvetica%2C%20sans-serif%3B%0Amargin%3A%200%3B%0A%7D%0A%0A%2F*%20Header%2Flogo%20Title%20*%2F%0A.header%20%7B%0Apadding%3A%2080px%3B%0Atext-align%3A%20center%3B%0Abackground%3A%20%231abc9c%3B%0Acolor%3A%20white%3B%0A%7D%0A%0A%2F*%20Increase%20the%20font%20size%20of%20the%20heading%20*%2F%0A.header%20h1%20%7B%0Afont-size%3A%2040px%3B%0A%7D%0A%0A%2F*%20Sticky%20navbar%20-%20toggles%20between%20relative%20and%20fixed%2C%20depending%20on%20the%20scroll%20position.%20It%20is%20positioned%20relative%20until%20a%20given%20offset%20position%20is%20met%20in%20the%20viewport%20-%20then%20it%20%22sticks%22%20in%20place%20(like%20position%3Afixed).%20The%20sticky%20value%20is%20not%20supported%20in%20IE%20or%20Edge%2015%20and%20earlier%20versions.%20However%2C%20for%20these%20versions%20the%20navbar%20will%20inherit%20default%20position%20*%2F%0A.navbar%20%7B%0Aoverflow%3A%20hidden%3B%0Abackground-color%3A%20%23333%3B%0Aposition%3A%20sticky%3B%0Aposition%3A%20-webkit-sticky%3B%0Atop%3A%200%3B%0A%7D%0A%0A%2F*%20Style%20the%20navigation%20bar%20links%20*%2F%0A.navbar%20a%20%7B%0Afloat%3A%20left%3B%0Adisplay%3A%20block%3B%0Acolor%3A%20white%3B%0Atext-align%3A%20center%3B%0Apadding%3A%2014px%2020px%3B%0Atext-decoration%3A%20none%3B%0A%7D%0A%0A%2F*%20Right-aligned%20link%20*%2F%0A.navbar%20a.right%20%7B%0Afloat%3A%20right%3B%0A%7D%0A%0A%2F*%20Change%20color%20on%20hover%20*%2F%0A.navbar%20a%3Ahover%20%7B%0Abackground-color%3A%20%23ddd%3B%0Acolor%3A%20black%3B%0A%7D%0A%0A%2F*%20Active%2Fcurrent%20link%20*%2F%0A.navbar%20a.active%20%7B%0Abackground-color%3A%20%23666%3B%0Acolor%3A%20white%3B%0A%7D%0A%0A%2F*%20Column%20container%20*%2F%0A.row%20%7B%0Adisplay%3A%20-ms-flexbox%3B%20%2F*%20IE10%20*%2F%0Adisplay%3A%20flex%3B%0A-ms-flex-wrap%3A%20wrap%3B%20%2F*%20IE10%20*%2F%0Aflex-wrap%3A%20wrap%3B%0A%7D%0A%0A%2F*%20Create%20two%20unequal%20columns%20that%20sits%20next%20to%20each%20other%20*%2F%0A%2F*%20Sidebar%2Fleft%20column%20*%2F%0A.side%20%7B%0A-ms-flex%3A%2030%25%3B%20%2F*%20IE10%20*%2F%0Aflex%3A%2030%25%3B%0Abackground-color%3A%20%23f1f1f1%3B%0Apadding%3A%2020px%3B%0A%7D%0A%0A%2F*%20Main%20column%20*%2F%0A.main%20%7B%0A-ms-flex%3A%2070%25%3B%20%2F*%20IE10%20*%2F%0Aflex%3A%2070%25%3B%0Abackground-color%3A%20white%3B%0Apadding%3A%2020px%3B%0A%7D%0A%0A%2F*%20Fake%20image%2C%20just%20for%20this%20example%20*%2F%0A.fakeimg%20%7B%0Abackground-color%3A%20%23aaa%3B%0Awidth%3A%20100%25%3B%0Apadding%3A%2020px%3B%0A%7D%0A%0A%2F*%20Footer%20*%2F%0A.footer%20%7B%0Apadding%3A%2020px%3B%0Atext-align%3A%20center%3B%0Abackground%3A%20%23ddd%3B%0A%7D%0A%0A%2F*%20Responsive%20layout%20-%20when%20the%20screen%20is%20less%20than%20700px%20wide%2C%20make%20the%20two%20columns%20stack%20on%20top%20of%20each%20other%20instead%20of%20next%20to%20each%20other%20*%2F%0A%40media%20screen%20and%20(max-width%3A%20700px)%20%7B%0A.row%20%7B%0Aflex-direction%3A%20column%3B%0A%7D%0A%7D%0A%0A%2F*%20Responsive%20layout%20-%20when%20the%20screen%20is%20less%20than%20400px%20wide%2C%20make%20the%20navigation%20links%20stack%20on%20top%20of%20each%20other%20instead%20of%20next%20to%20each%20other%20*%2F%0A%40media%20screen%20and%20(max-width%3A%20400px)%20%7B%0A.navbar%20a%20%7B%0Afloat%3A%20none%3B%0Awidth%3A%20100%25%3B%0A%7D%0A%7D%0A%3C%2Fstyle%3E" data-mce-resize="false" data-mce-placeholder="1" class="mce-object" width="20" height="20" alt="<style>" title="<style>" /> </head> <body> <div class="header"> <h1>Welcome to edureka!</h1> <p>A <b>Ruby on Rails</b> web page example.</p> </div> <div class="navbar"> <a href="#" class="active">Home</a> <a href="#">Link</a> <a href="#">Link</a> <a href="#" class="right">Link</a> </div> <div class="row"> <div class="side"> <h2>About Me</h2> <h5>Photo of me:</h5> <div class="fakeimg" style="height:200px;">Image</div> <p>Some text about me in culpa qui officia deserunt mollit anim..</p> <h3>More Text</h3> <p>Lorem ipsum dolor sit ame.</p> <div class="fakeimg" style="height:60px;">Image</div><br> <div class="fakeimg" style="height:60px;">Image</div><br> <div class="fakeimg" style="height:60px;">Image</div> </div> <div class="main"> <h2>TITLE HEADING</h2> <h5>Title description, Dec 7, 2017</h5> <div class="fakeimg" style="height:200px;">Image</div> <p>Some text..</p> <p>Sunt in culpa qui officia deserunt mollit anim id est laborum consectetur adipiscing elit, sed do eiusmod tempor incididunt ut labore et dolore magna aliqua. Ut enim ad minim veniam, quis nostrud exercitation ullamco.</p> <br> <h2>TITLE HEADING</h2> <h5>Title description, Sep 2, 2017</h5> <div class="fakeimg" style="height:200px;">Image</div> <p>Some text..</p> <p>Sunt in culpa qui officia deserunt mollit anim id est laborum consectetur adipiscing elit, sed do eiusmod tempor incididunt ut labore et dolore magna aliqua. Ut enim ad minim veniam, quis nostrud exercitation ullamco.</p> </div> </div> <div class="footer"> <h2>Footer</h2> </div> </body> </html>
To learn more about HTML : ***Click Here***
Now when we go back to our homepage, it will look like this:
Related Post Automating brute force login with Ruby
Now with this, we come to an end to this Ruby on Rails Tutorial. I Hope you guys enjoyed this article and understood how to use Ruby on Rails framework for web applications. So, if you have read this, you are no longer a newbie to Ruby on Rails. Try out these examples and let me know if there are any challenges you are facing while deploying the code.
Now that you have learnt about Ruby on Rails Framework, check out the Ruby on Rails Certification Training by Edureka, a trusted online learning company with a network of more than 250,000 satisfied learners spread across the globe. This Certification Training is curated by industry professionals as per the industry requirements & demands. Explore about full-stack web development practices with ‘Ruby on Rails’ to build highly scalable applications in shorter time span compared to its counterparts using concepts like MVC, Gems, Action View, Action Controller, Active Record & Deployment and Web Application Projects.Got a question for us? Please mention it in the comments section of “Ruby on Rails Tutorial” and we will get back to you.


 Thank you for registering Join Edureka Meetup community for 100+ Free Webinars each month JOIN MEETUP GROUP