Automation has been into existence since the early 1950s but has only started gaining recognition recently. With Robotic Process Automation being the key leader to it, there is no doubt in the fact that all kinds of organizations are automating their daily mundane tasks with the help of RPA skilled professionals. So, in this article on RPA projects, I will talk about the top RPA projects which you can practice to get yourself skilled in this field.
The following topics will be covered in this article on RPA Projects:
Before I discuss the top RPA Projects, let me tell you what is RPA.
What is RPA?
The Process of automating the workflows with the help of robots/software to reduce the involvement of humans is said to be Robotic Process Automation.
Over here there are mainly three terms that you need to understand: Robotic, Process and Automation. Let me explain you each of these terms one by one.
- Robotic: Entities which mimic human actions are called Robots.
- Process: Sequence of steps which lead to a meaningful activity. For example, the process of making tea or your favorite dish, etc.
- Automation: Any process which is done by a robot without human intervention.
If we summarize all the terms together then, mimicking human actions to perform a sequence of steps that lead to meaningful activity, without any human intervention is known as Robotic Process Automation.
Now, since in the industry of RPA, physical robots do not work, we need tools available in the market, to let us configure automation workflows to automate your business operations. So, next in this article on RPA Projects, let us discuss RPA Tools.
RPA Tools
RPA Tools/Vendors are the software through which you can configure tasks to get automated. In today’s market, there are RPA Vendors such as Blue Prism, Automation Anywhere, UiPath, WorkFusion, Pega Systems and many more. But, the leaders in the market are the trio (UiPath, Blue Prism & Automation Anywhere).
So, let us compare the tools.
Criteria | UiPath | Blue Prism | Automation Anywhere |
Is trial version available? | Community edition/ Free edition is available | No trial version available | |
Is it user-friendly? | Provides the user-friendly visual designer | Provides a user-friendly visual designer, easier than Automation Anywhere | Developers friendly but requires high programming skills. |
Popularity | Most Popular Tool | More popular than Automation Anywhere | The least popular tool in the trio |
Table 1: Comparison Between RPA Tools – RPA Projects
Now, that you have an idea about RPA and its tools, let us now look into the Top RPA Projects. If you want a video lecture on the same, refer to the following video:
Top RPA Projects in UiPath and Automation Anywhere | Real-Life RPA Projects
Top Projects of RPA
RPA is used in many industries to automate simple to complex based on the requirement of the organization. Most commonly RPA is used in the industries such as Customer Service, Accounting, Financial Service, Healthcare, Human Resources, and, Supply Chain Management.
So, now let us look into the top 5 projects in RPA one by one. Well, I will be showing the step by step process of automating the tasks either in UiPath or in Automation Anywhere.
RPA Projects: Web Scraping
Web scraping is an application of Robotic Process Automation which is used in almost all the industries. Either it be a stock trading websites, e-commerce websites, commodities trading websites, etc, you can scrape the data from any of them based on your interest.
Now, the problem with performing web scraping manually is that, it is quite prone to errors and takes lot of time. Also, the data present on the websites is never static. It gets updated very frequently. So, the data that is stored at a point of instance might not be accurate always.
So, industries can simply automate this task. Below in this article I am going to show you, how to automate this task using UiPath.
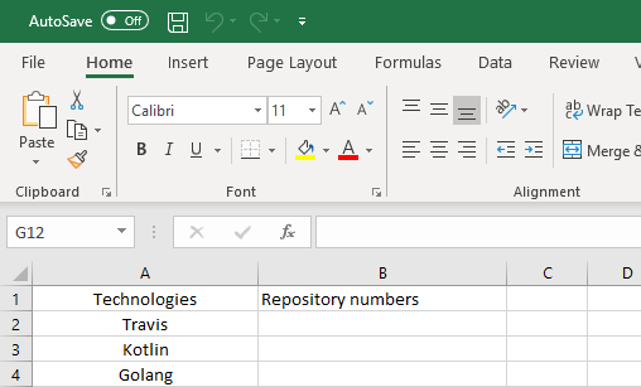
Problem Statement: Task is to scrape the number of GitHub repositories for the top technologies in today’s market.
Solution:
Step 1: Store the technologies list in an excel sheet with the column name Technologies and Repository Count as you can see below.
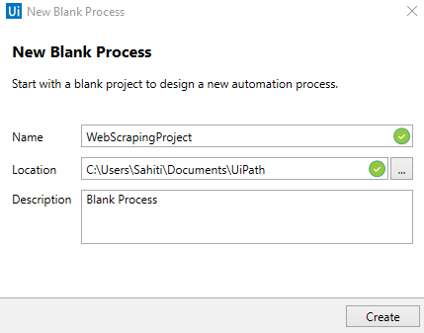
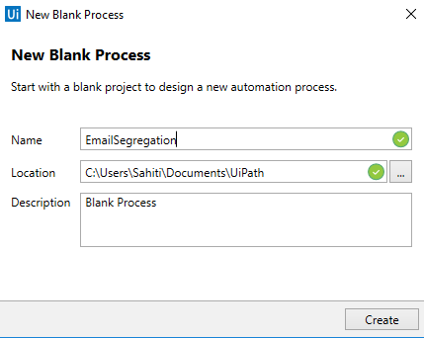
 Step 2: Open UiPath Studio and create a Blank Project. Mention the Project Name, Location and Description. Then click on Create. Refer below.
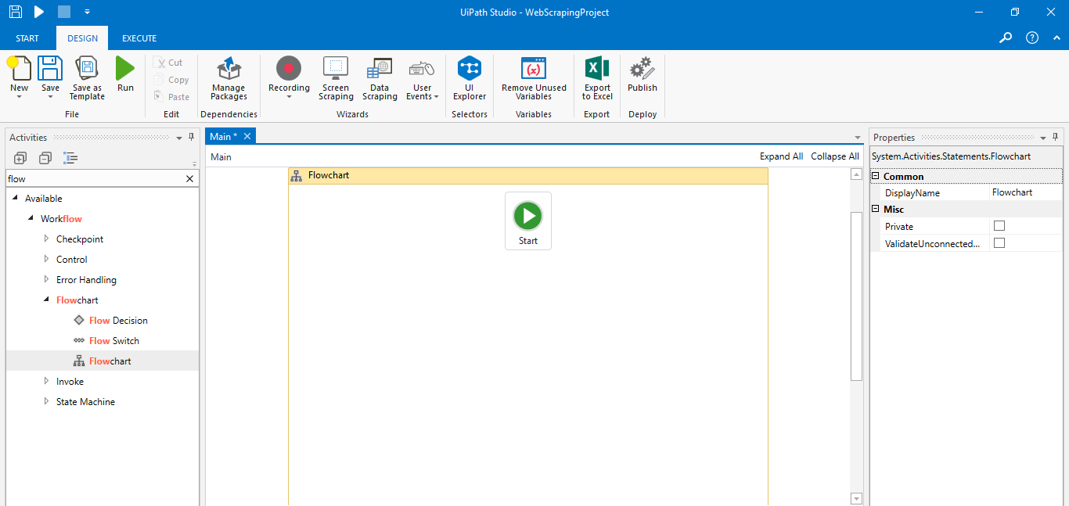
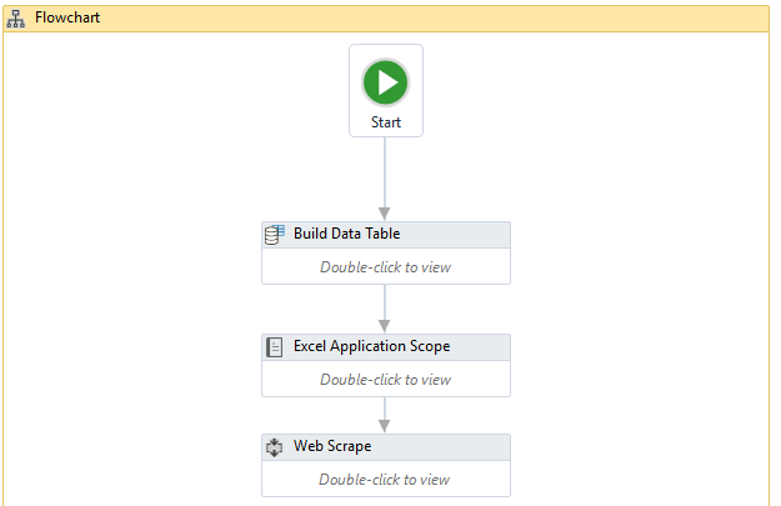
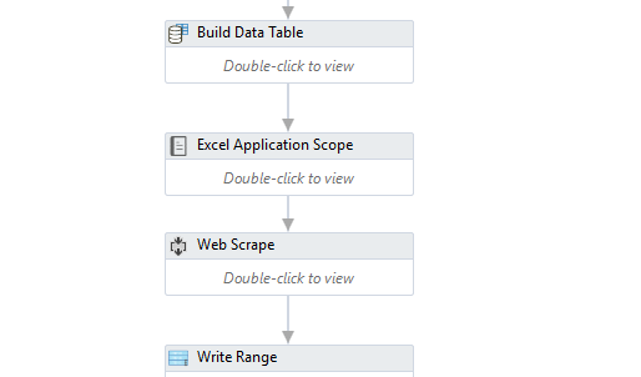
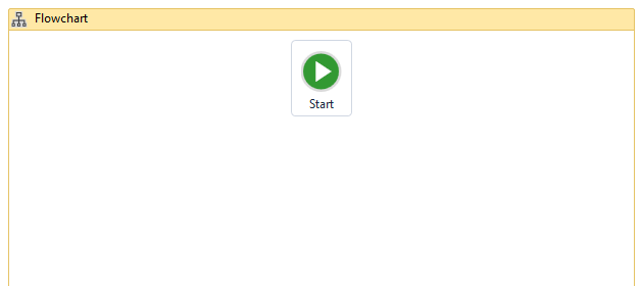
 Step 3: Once your dashboard opens, search for the Flowchart activity in the Activity Pane and drag it to the work space. We are dragging the flowchart to ensure a proper workflow of the complete automation. Refer below.
 Step 4: Now, drag a Build Data Table activity from the Activity Pane. Connect it with the start point of the flowchart.
Step 4.1: Double click on the activity and click on the Data Table option. Then you have to mention the column names. Since we had only two columns in the excel sheet, we will mention the same column names in the Data Table. To do that click on the edit column option and mention the details. Refer below.
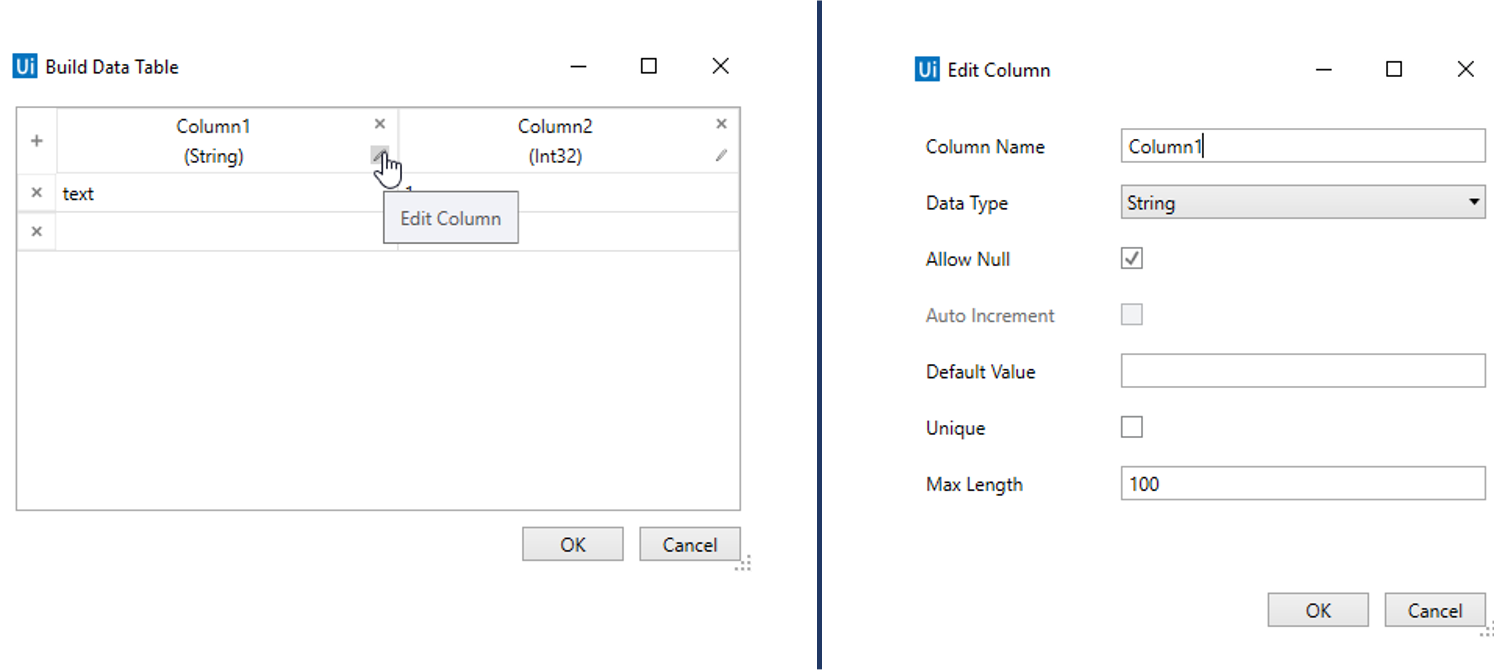 Step 4.2: After filling the details click on OK. This will create a Data Table. A Data Table is a table which will be used by UiPath to read the data present in the excel file and store the retrieved data in an excel file.Refer below.
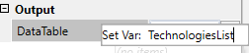
 Step 4.3: Next, in the output section of the Data Table activity mention a variable to store the output of the Data Table. Here I have mentioned it as TechnologiesList. Refer below.
 Step 5: Now go back to the Flowchart and add the Excel Application Scope activity from the Activity Pane to perform actions related to the Excel file. Then connect the Build Data Table activity to this activity in the flowchart.
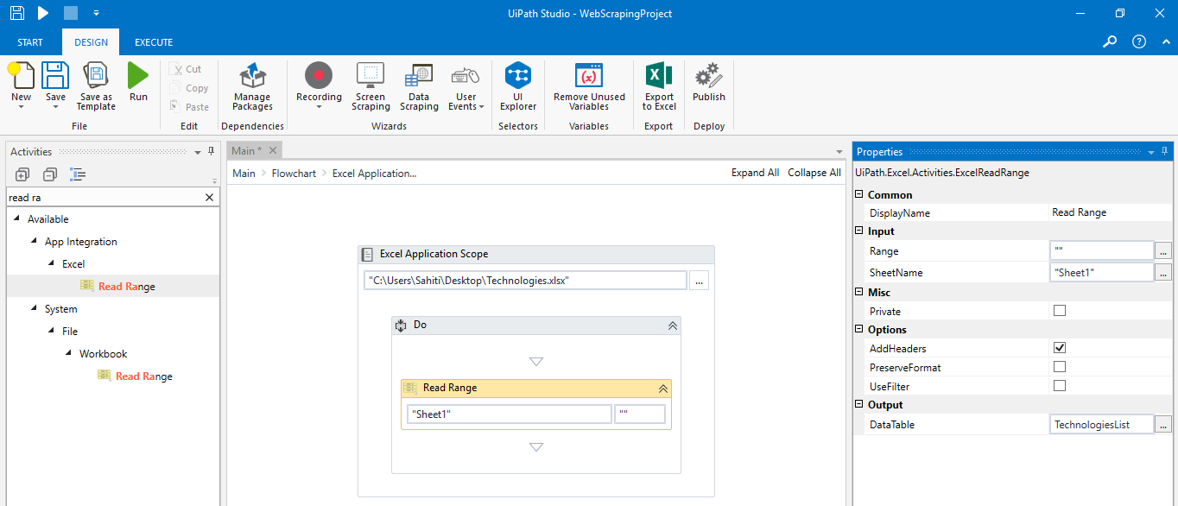
Step 5.1: Double click the Excel Application scope activity and mention the path of the excel sheet. Then, in the Do section of this activity drag the Read Range activity from the Activity pane and mention the Sheet name and the Range. Also, in the output section of the Read Range activity mention the name of the Data Table variable you created before i.e. TechnologiesList. Refer below.
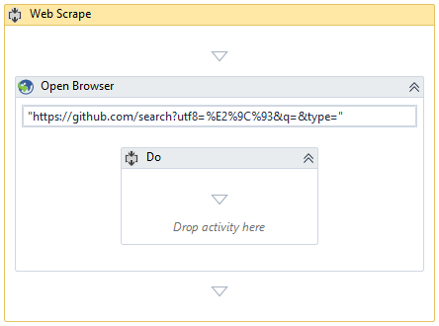
 Step 6: Now our next step is to extract the elements from the Web pages. To do that, go back to the flowchart and drag a Sequence from the Activity Pane. Then, connect the Excel Application Scope activity to this Sequence in the flowchart and rename the sequence as Web Scrape for better understanding as below.
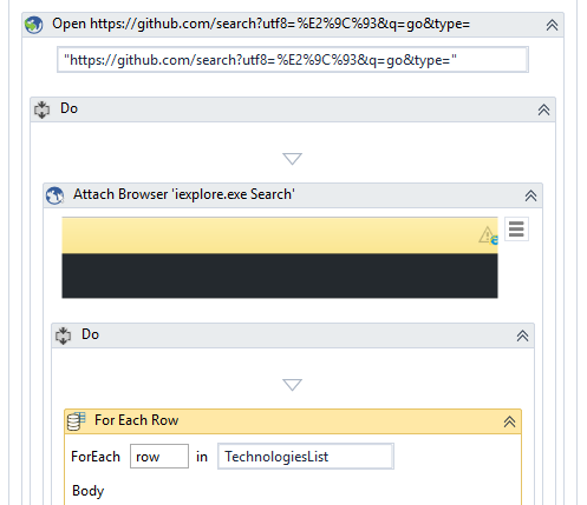
 Step 6.1: Now, double click the Web Scrape sequence and drag the Open Browser Activity. In this activity mention the URL on which you wish to scrape the data. I will mention the GitHub search URL in double quotes as below.
 Step 6.2: In the Do section of this activity drag the Attach Browser activity from the activity pane. Then just indicate on the browser or the screen. This is to make sure that all the activities have to occur on this specific web page.
Step 6.3: Now, the Do section of the Attach Browser activity drag the For Each Row activity. In this activity mention the Data Table variable i.e. the TechnologiesList to start a loop for each row value in the Data Table. Refer below.
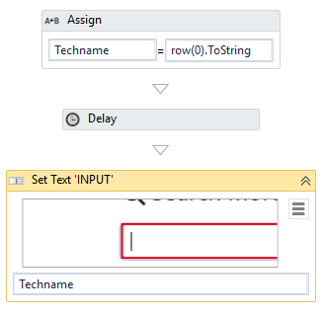
 Step 6.4: In the Body section of the above activity, drag the Assign activity and mention the Techname variable in the To section and row(0).ToString in the Value section as below. This is to take the each and every technology name from the excel sheet and store it in the variable Techname.
Step 6.5: Then drag a Delay activity and mention a Delay of around 10-30 seconds.
Step 6.6: Now, our next task is to type the technology name automatically. To do that you have to Set Text activity from the activity pane. Then you have to indicate on the screen, where the text should be automatically typed in. Here I will indicate it on the search bar. In the Text section off this activity, I will mention the Techname variable. Refer below.
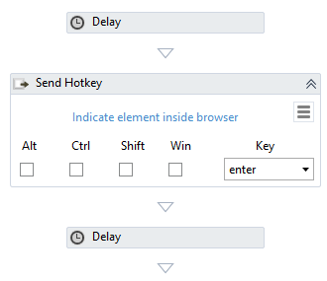
 Step 6.7: Then drag a Delay activity and mention a delay of around 5-10 seconds.
Step 6.8: Next, drag the Send Hotkey activity and mention the key to be enter. This will help you automatically click on Enter on the web page.
Step 6.9: Now, again add delay to avoid any errors of around 10-30 seconds with the help of Delay activity. Refer below.
 Step 6.10: Once you are done with the above steps, you have to next drag the Get Text activity from the activity pane and indicate on the browser, from where you wish to extract data. Here I will indicate on the screen where repositories are shown. Also, you have to mention an output variable in the output section of the properties pane this activity. Here I will mention the variable RepName. Refer below.
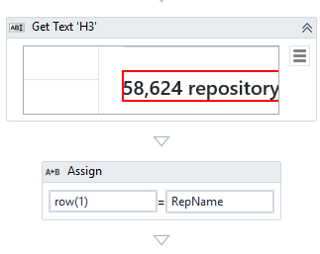 Step 6.11: Finally, you have to drag an Assign activity and mention row(1) in the To section and a variable to store Repository count. i.e. RepName. Refer above image.
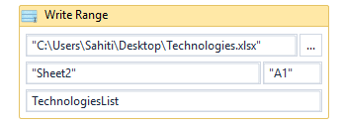
Step 7: Now, you have to store the values back into the excel file. To do that, go back to the flowchart and add the Write Range activity from the activity pane. Connect the Web Scrape sequence to this activity as below.
 Step 7.1: Then, mention the path of the excel sheet in quotes. Also mention the name of the Data Table, Sheet Number and the cell value from which it has to start writing data. Here the Data Table name is TechnologiesList, sheet number is Sheet 2 and cell value is AI. Refer below.
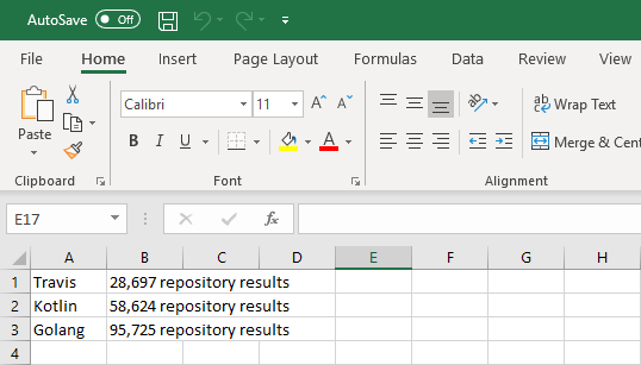
Step 8: Save and Execute the designed automation.
You will see the below output.
 Now, that you know how you can automate tasks for web scraping, next in this article on RPA Projects, let us look into Data Migration & Entry.
RPA Projects: Data Migration & Entry
In all kinds of organizations, legacy systems perform important functions on a day to day basis. Now, these systems can have dependency issues to pull the required data from API’s. Also, you cannot migrate and enter the data each and every day manually, as the humongous amount of data gets generated on a daily basis.
It is not just tedious but is error prone and time taking.
Well, you can automate this task of migrating the data from an excel to another based on some conditions. Below in this article, I am going to show you, how to automate this task using Automation Anywhere.
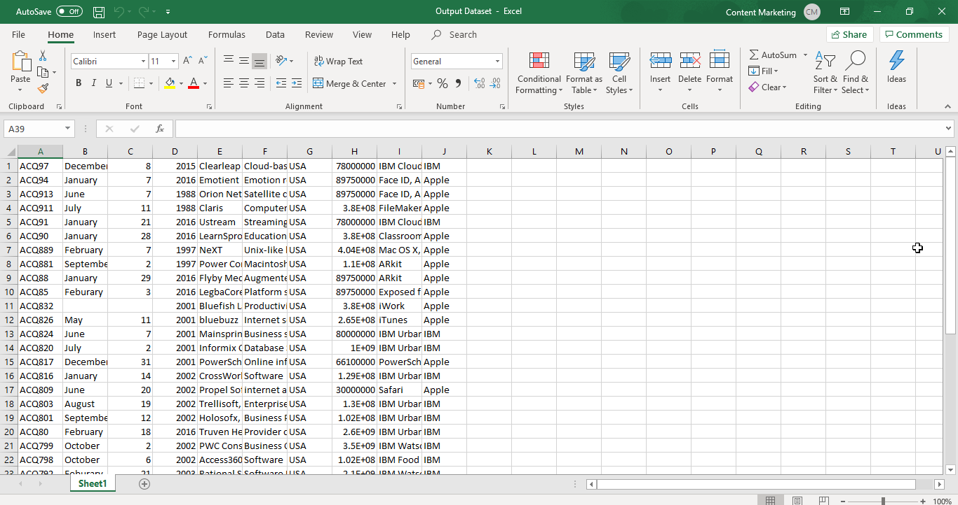
Problem Statement: Task is to extract data from an excel file, according to a specific condition and store it in another excel file.
Solution:
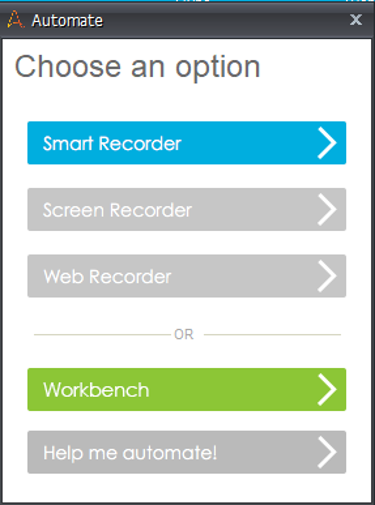
Step 1: Open the Automation Anywhere Workbench.
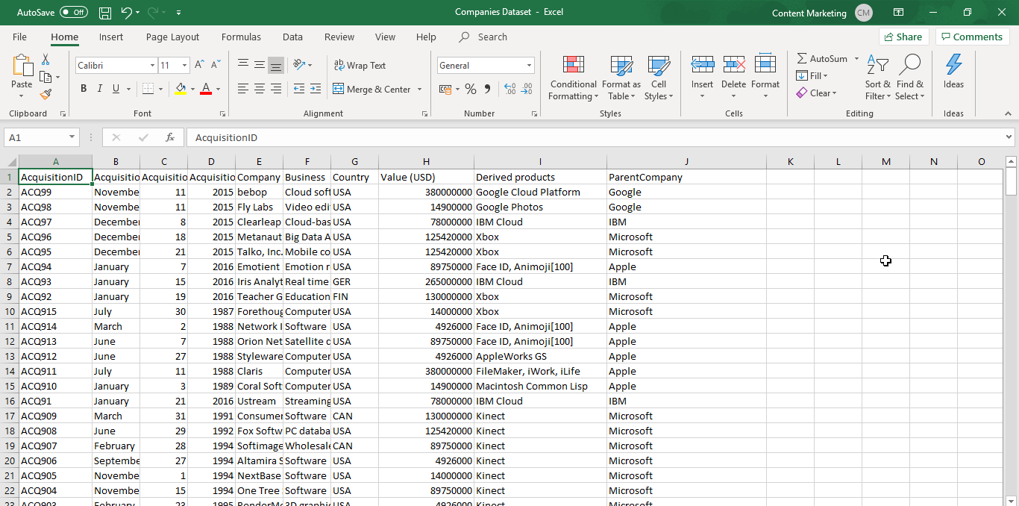
Before I move forward with the steps, let me show the file from which we are going to extract data.
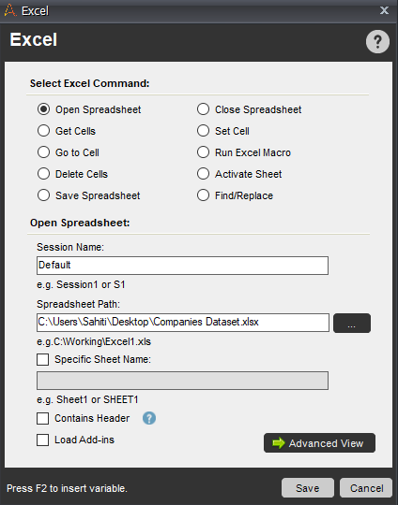
 Step 2: Now, your next step is to open both the spreadsheets. To do that, drag the Open Spreadsheets command from the Excel section. Refer below.
Step 3: Mention the path of the first spreadsheet( from where you have to extract data), and click on Save. Refer below.
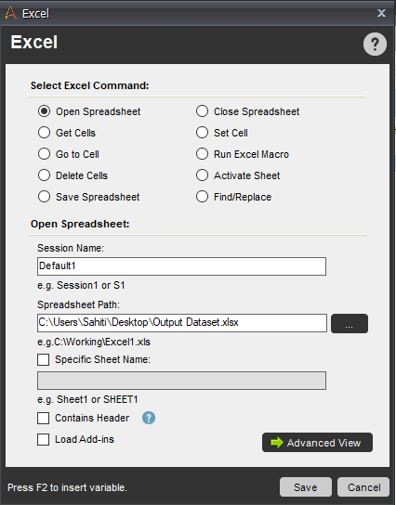
Step 4: Repeat the above two steps for the second spreadsheet and change the session name to Default1 so that it doesn’t clash with the session name of the first spreadsheet. Refer below.
 Step 5: Now, drag the Get Cell command and choose the Get All Cells option. Then, mention the session name to be Default(which is the session name for the first spreadsheet). Then click on Save. Refer below.
 Step 6: Drag the Get All Cells action in between the actions of opening both the spreadsheets. This step will help you get the data from all the cells in the first spreadsheet.
Your task pane should look like the below image:
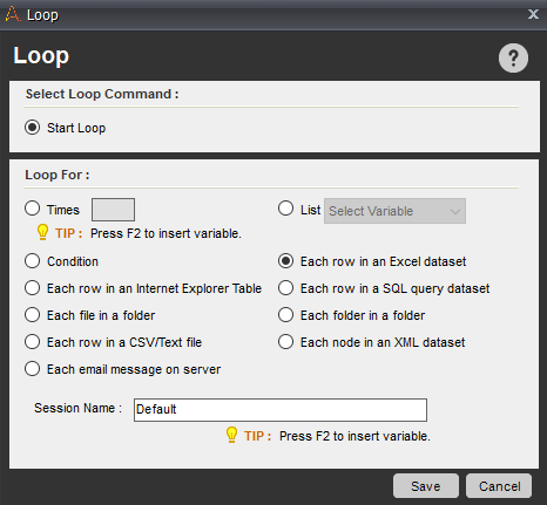
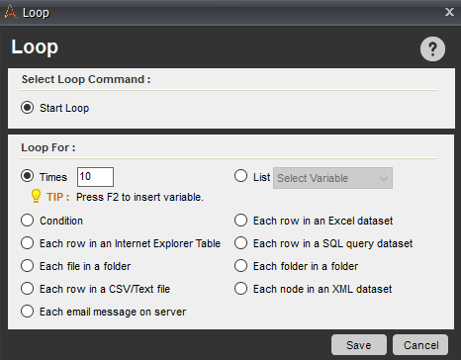
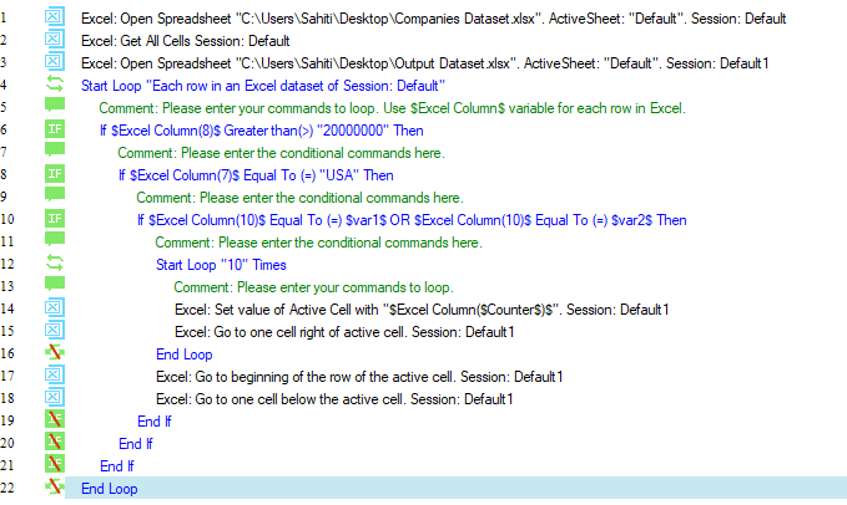
![]() Step 7: Now, you have to start a loop. To do that, drag the Each Row in an Excel Dataset command from the loop section. Mention the session name as Default. Then, click on Save. Refer below.
Step 7: Now, you have to start a loop. To do that, drag the Each Row in an Excel Dataset command from the loop section. Mention the session name as Default. Then, click on Save. Refer below.
 Step 8: Now, you have to mention the condition based on which you wish to extract data.
The condition is to extract data of all those rows whose Value > 20000000, belong to USA and their parent company is either Apple or IBM.
To do that follow the below steps.
Step 8.1: Drag and drop the variable command from the If section.
Step 8.2: Now click on the Edit option and set the condition using the following steps:
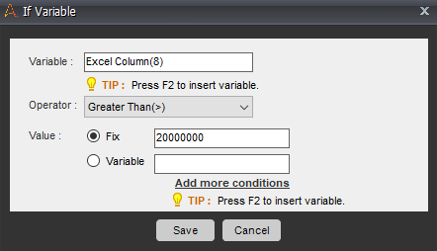
Step 8.2.1: Mention the variable as Excel Column by pressing on CTRL + F2 and then click on Insert. After that mention the value 8 since we want to set a condition on the 8th column of the dataset. Press on OK.
NOTE: Here the 8th column in the dataset is the Value column.
Step 8.2.2: Now, select the operator. Here I will select the GreaterThan(>) operator.
Step 8.2.3: In the value section mention the value 20000000, and click on Save. Refer below.
 Step 9: Now, drag and drop variable command from the If section.
Step 9.1: Now click on the Edit option and set the condition using the following steps:
Step 9.1.1: Mention the variable as Excel Column by pressing on CTRL + F2 and then click on Insert. After that mention the value 7 since we want to set a condition on the 7th column of the dataset. Press on OK.
NOTE: Here the 7th column in the dataset is the Country column.
Step 9.1.2: Now, select the operator. Here I will select the Equals operator.
Step 9.1.3: In the value section mention the value USA, and click on Save. Refer below.
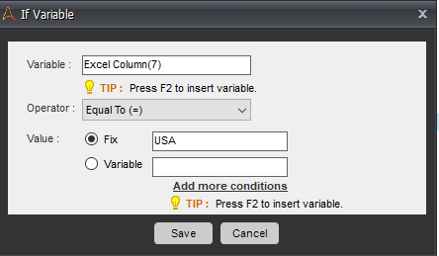 Step 10: Now, again, drag and drop variable command from the If section.
Step 10.1: Now click on the Edit option and set the condition using the following steps:
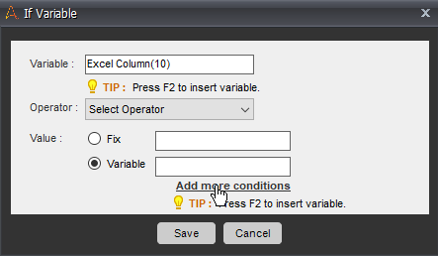
Step 10.1.1: Mention the variable as Excel Column by pressing on CTRL + F2 and then click on Insert. After that mention the value 10 since we want to set a condition on the 10th column of the dataset. Press on OK.
NOTE: Here the 10th column in the dataset is the Parent Country column.
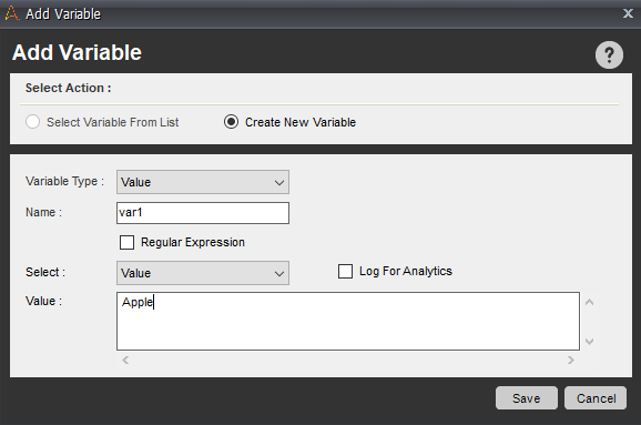
Step 10.1.2: Now, before you move forward, create two variables which will have the values Apple and IBM stored in it. To do that, go to the Variable Manager on the right-hand side of your Workbench and add the variables.
Step 10.1.2.1: Click on the Add option. In the dialog box that opens up, mention the name of the variable in the Name field and click on Save.
Step 10.1.3: In the value section, choose Variable and click on Add more conditions. Refer below.
Here, I have created two variables( var1 & var2), var1 = Apple and var2 = IBM.
Step 10.1.4: Now, in the value section, choose the option of Variable, and click on the Add more conditions. Refer below.
 Step 10.1.5: Next, choose the Match Any option and mention the variables and Equals To operator. Then click on Save. Refer below.
Step 11: Next, you have to iterate the loop of filling data for the number of columns present in the dataset. Since 10 columns are present in the dataset, you have to iterate the loop for 16 times. To do that, drag the Times command from the Loop section and mention 10 in the Times section. Then click on Save. Refer below.
 Step 12: Now, you have to fill the data into specific cells. To do that you have to set the cell as follows:
Step 12.1: Drag the Set Cell command from the Excel command and in the Cell Value section mention the variable ExcelColumn and click on Insert. Then mention the Counter variable by pressing on CTRL + F2. Finally, click on Save.
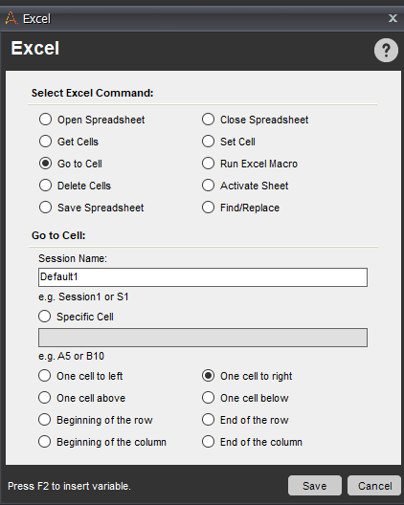
Step 13: Next, you have to go to one cell towards the right of the active cell, to store the next extracted data. So, to do that, drag the Go To Cell command from the Excel section and choose One Cell Right. Refer below.
 Step 14: Once the data is stored for a specific row, you have to go to the next row to store the next set of data. To do that, you have to
go the beginning of a row and one cell below from the active cell.
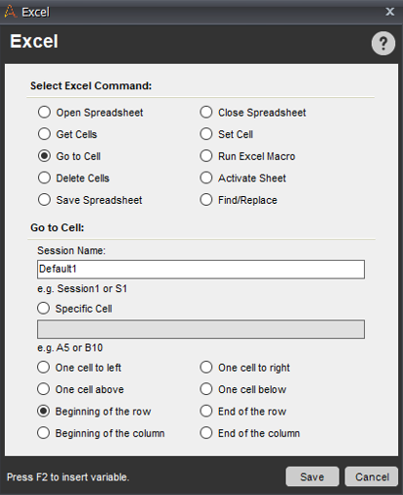
Step 14.1: So, to do that, drag the Go To Cell command from the Excel section and choose Beginning of the row. Refer below.
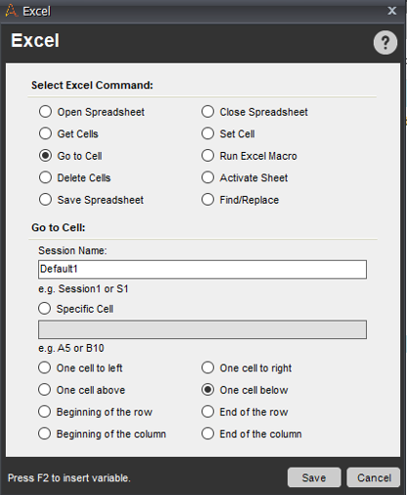
Step 14.2: Again drag the Go To Cell command from the Excel section and choose One Cell Below. Refer below.
Your final task list should look like below:
 Step 15: Now, click on the Save button, to save your task and execute the task by clicking on the Run button.
You would see the below output.
Now, that you know how you can automate the task of data migration and entry, next in this article on RPA Projects, let us look into: Email Query Processing.
RPA Projects: Email Query Processing
Thousands of emails get generated every day which need to be segregated, so as to ensure that proper replies are sent to all the senders in an organization.
Now, the problem is that a manual workforce team cannot sit and segregate each and every mail as the humongous amount of emails get generated on a daily basis. Apart from that it is a quite tiresome job and cannot be done by a single employee or a team.
So, industries can simply automate this task by segregating common issues or emails into specific folders. Below in this article, I am going to show you, how to automate this task using UiPath.
Problem Statement: Task is to segregate emails based on the email ID in respective folders present in the Outlook folder.
Solution:
Step 1: Open UiPath Studio and create a Blank Project. Mention the Project Name, Location and Description. Then click on Create. Refer below.
 Step 2: Once your dashboard opens, search for the Flowchart activity in the Activity Pane and drag it to the work space. We are dragging the flowchart to ensure a proper workflow of the complete automation. Refer below.
 Step 3: Now, drag a Sequence activity from the Activity Pane and rename it to Segregate Emails. Connect it with the starting point of the flowchart.
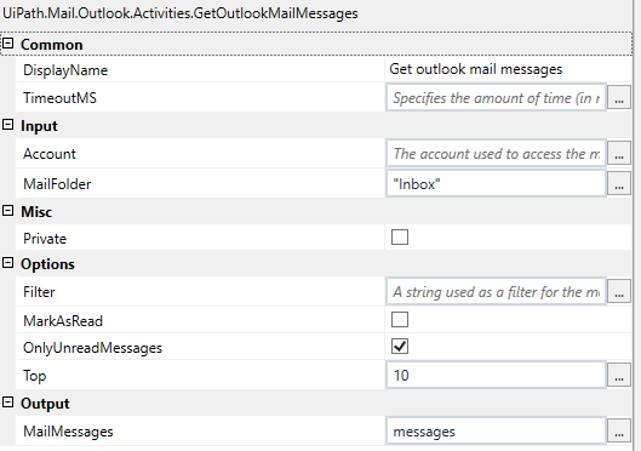
Step 3.1: Now double click on the Sequence, drag the Get Outlook Mail Messages activity. In this activity go to the Properties Pane and mention the number of emails you wish to read. Here I want to read 30. So, I will mention 30 in the Top section. Also, you have to mention an output variable in the Output section of this activity. The variable should have a data type of List<Mail Message>. Refer below.
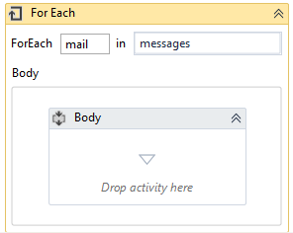
 Step 4: Your next step is to identify the email address and segregate them accordingly. To do that drag the For Each activity from the activity pane. Then, in the proprieties pane of this activity, change the Type Argument to System.Net.Mail.MailMessage.
Step 4.1: Then you have to mention mail in the item section and the messages variable in the value section as below.
 Step 4.2: Now, since you wish to identify each and every email, you have to split the address.
For example, if the sender’s email address are as follows:
- abc@edureka.co
- example@sample.com
- sample@demo.com
Now, our task is to put all the emails having the address the text “edureka.co” in the email address in the Edureka folder.
Similarly, the same action has to be repeated for sample.com and demo.com
Step 4.3: To do that, you have to first Split the email address into the following two parts:
- 1 ——— abc or the sender name or whatever is mentioned
- 2———-edureka.co [basically the domain name from where the email is coming]
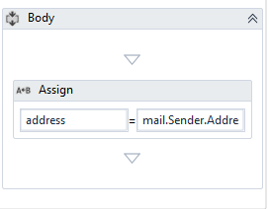
So, drag the Assign activity in the Body section of the For Each activity and initially assign the sender address to mail.Sender.Address.ToLower as below.
 Step 4.4: Similarly, drag another Assign activity and assign Split(address, “@”) to Splitaddress variable. Here address is the variable which stores the sender address ans Splitaddress should be an array of String.
Step 5: Next, you have to drag and drop If-Else conditions based on how many addresses you wish to segregate. Here I want to segregate 3 emails address, so I will drag and drop then If activity from the activity pane thrice.
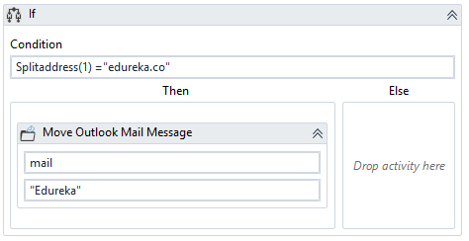
Step 5.1: Initially I will drag the If activity once and mention the following condition in the Condition tab:
Splitaddress1(1) =”edureka.co”
So, if any of our sender’s email address has edureka.co at last, then all those emails will be automatically be moved to Edureka folder.
Step 5.2: Now, in the Then section of this If activity, drag the Move Outlook Mail Message activity. Mention the ”mail” variable in MailMessage section and folder name in the MailFolder section. (Mention Folder name in quotes). Refer below.
 Step 5.3: Similarly repeat the above steps for, other email address such as sample.com and demo.com. Refer below.
 Step 6: Save and Execute the designed automation.
Once you execute the automation, you will see that automatically all the emails will be segregated into specific folders.
Now, that you know how you can segregate emails, let us look into the next hands-on: Invoice Processing.
RPA Projects: Invoice Processing
From multi-national companies to small startups, all of them have to deal with thousands of invoices every day. These invoices could be generated for various purposes such as car rental agreement, order, receipt and many more.
Now, it is almost next to impossible to extract data from these invoices and store them in a database without errors in less time.
So, you can just automate this task. Below in this article on RPA Projects, I am going to show you, how to automate this task using Automation Anywhere.
Problem Statement: Task is to extract data from various invoices and store it in an excel file. After that, an email should be sent automatically to the mentioned email address.
How will you automate this task?
Solution:
Step 1: Login to the Control Room, and open the Automation Anywhere Enterprise Client.
Step 2: Now, click on the New option and choose Workbench. This will redirect you to the workbench of this client. Refer below.
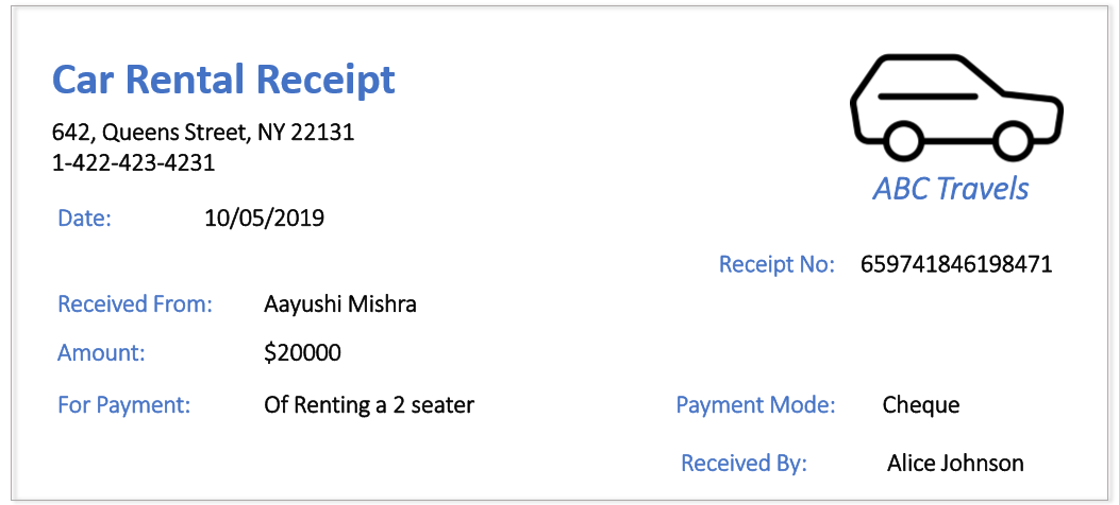
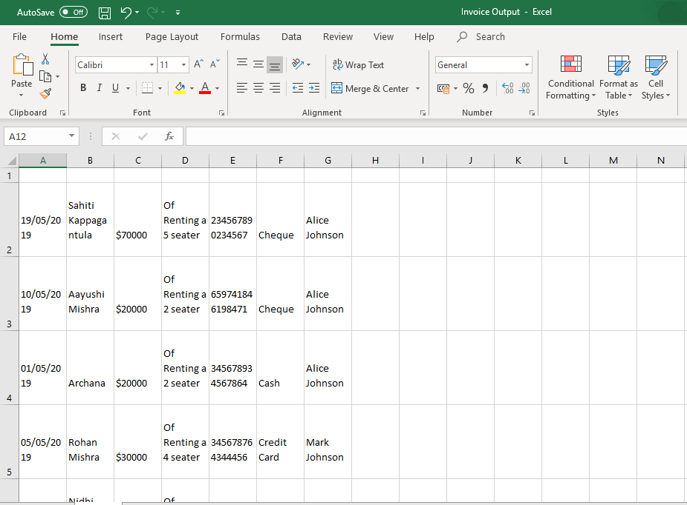
 Step 3: Now choose the PDF from which you want to extract data and also take note of all the fields that you want to extract data. The below snapshot shows the document from which I want to extract data. Here I want to extract Date, Received From, ReceiptNo, Amount, For Payment, Payment Mode, and Received By.
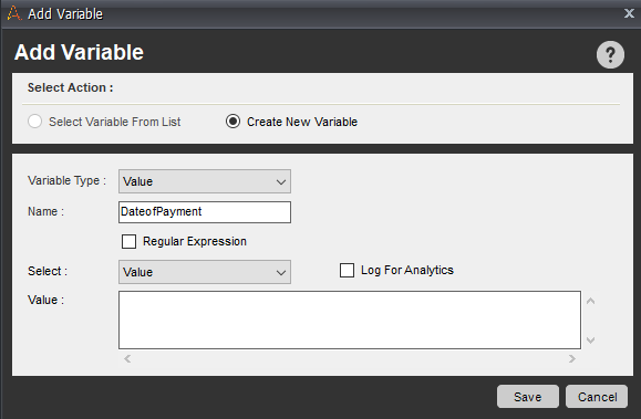
 Step 4: Now, go to the Variable Manager on the right-hand side of your Workbench and add the variables for all the fields from which you want to extract data. Here you have to create 7 variables. Let me show you how to create a single variable.
Step 4.1: Click on the Add option. In the dialog box that opens up, mention the name of the variable in the Name field and click on Save. Refer below.
Step 4.2: Repeat the above steps to create the other 6 variables.
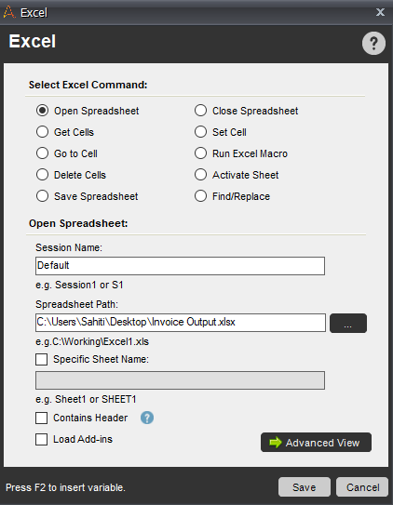
Step 5: Now click the Excel command from the left panel and double click on the Open-Spreadsheet sub-command. This opens a dialog box.
Step 5.1: Now go to the ellipses button and mention the path of the Excel file where the extracted data should be mentioned. Then, click on Save. This step will design the task to open an Excel file. Refer below.
 Step 6: Now, you have to make sure that your data is getting filled automatically from the A2 Cell. To create an action for this Double-click on the Go-to-cell sub-command and enter A2 in the specific cell section. After that click on Save. Refer below.
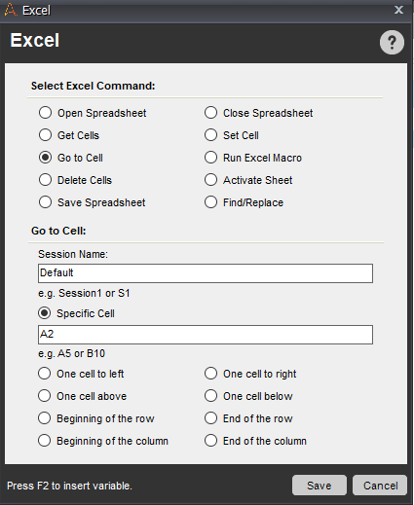
This step will design a task to open your spreadsheet and place your cursor at the A2 cell.
Step 7: Now, you have to start extracting data from the PDF File. To do so follow the below steps.
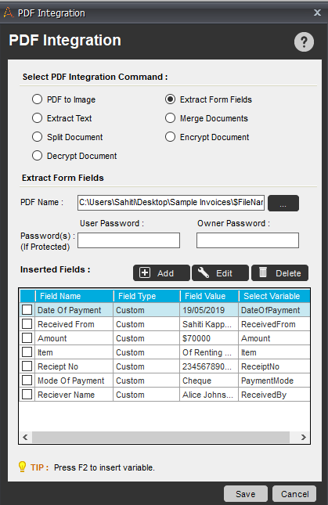
Step 7.1: Click on the PDF-Integration command and Double-click on the Extract Form Fields sub-command.
Step 7.2: Now click on the ellipses button and choose the PDF file from which you want to extract data.
Step 7.3: After this, from the Inserted Fields section, choose the Add option and drag the mouse over the required field.
Step 7.4: Now, right-click the selected field, and choose the Add Field as below.
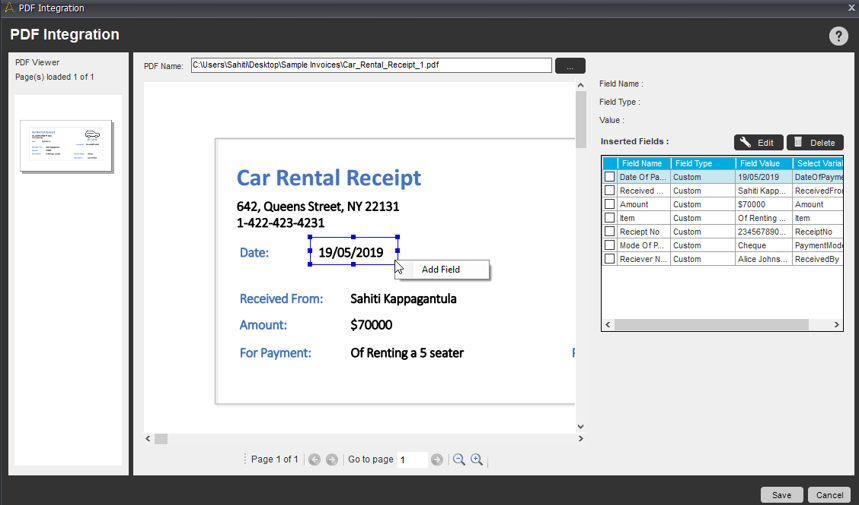 Step 7.5: In the extracted text window, choose the suitable variable name and enter the field name. Then click Ok.
This will store the extracted data for the specified variable and the field name.
Step 7.6: Similarly repeat the steps for the other 6 fields/variables.
Step 7.7: Finally click on Save.
Step 8: Now, you have to store the extracted data in the respective cells in the Excel File. To do this follow the below steps.
Step 8.1: Click on the Excel command and Double-click on the Set Cell sub-command.
Step 8.2: In the dialog box that opens up, go to the Cell value section, press on F2 and choose the variable name that you would like to choose. Then click on Insert. Here I will choose the DateOfPayment.
This action will make you store the data in A2 cell. Now, the next extracted data should be stored in the next cell that is B2. To do that, double-click on the Go to cell sub-command and choose the option of One cell to right. After that click on Save.
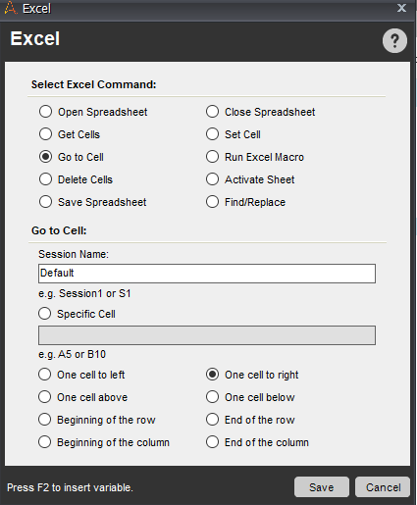
Step 8.3: Now, to insert the value to the B2 cell, again double click on the Set Cell subcommand and press on F2. Choose the variable name and click on Insert.
Step 8.4: Now, insert the next value to C2 cell. To do that repeat the above steps.
Now, you have extracted the data for a single PDF, if you wish to extract data from various other PDFs. You have to store the data in the next row right?
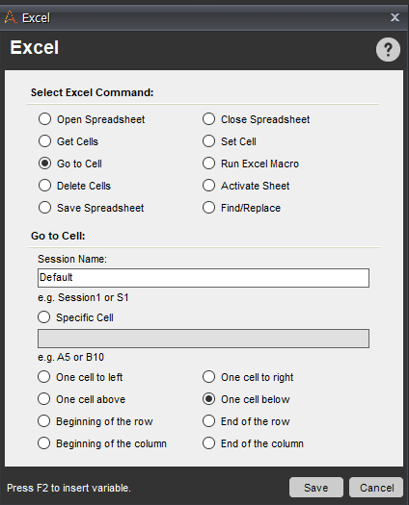
Step 9: To do so, Double click on the Go to Cell sub-command and choose One cell below. Refer below.
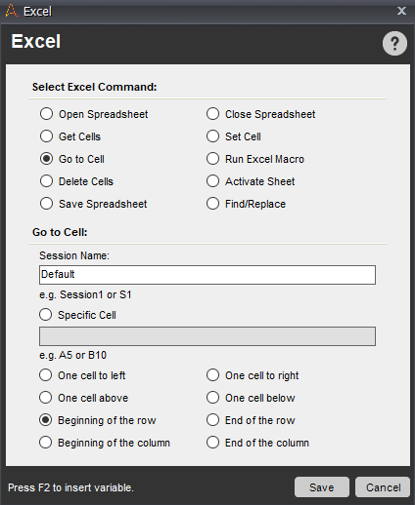
 Step 10: To go to the beginning cell i.e the first cell in the row, choose the Go to cell sub-command and choose Beginning of the row. Refer below.
 Step 11: Now, all the above actions were to extract data from a single PDF File. To extract data from multiple PDF Files, follow the below steps.
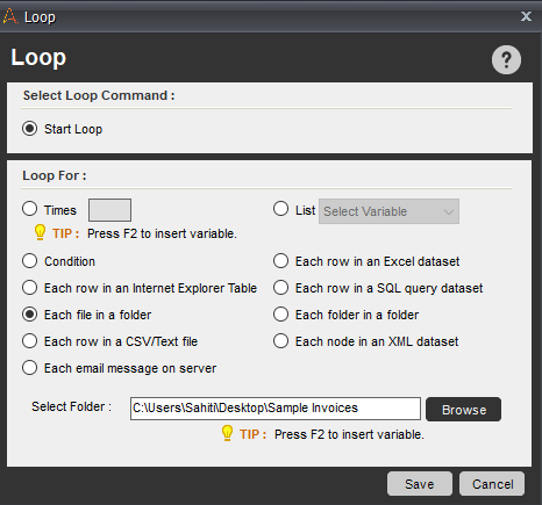
Step 11.1: Click on the section action in the task pane and then Double click the Loop command from the left panel.
Step 11.2: Over here choose Double click on the Each File in a Folder command and from the Browse option mention the path of the folder which contains all the PDF Files. Then click on Save. Refer below.
 Step 11.3: Move the End Loop command below the last line of the action list.
Step 11.4: Double click the PDF Integration command and insert the required variable ($FileName$) in the PDF Name section.
Step 12: Now, you have to save the spreadsheet. To do that, drag the Save Spreadsheet sub-command from the Excel command. Refer below.
This command will save the data in the spreadsheet.
Step 13: Next, you have to close the spreadsheet. To do that, drag the Close Spreadsheet sub-command from the Excel command. Refer below.
Step 14: Now, to send an email, by attaching this file, you have to drag the Send Email command. In this, you have to mention the To and From address and mention the Subject. After that mention the path of the attachments. Refer below.
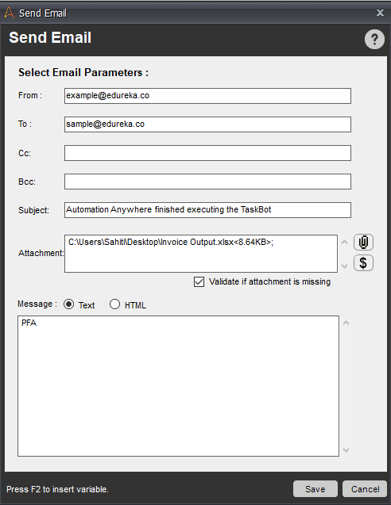
This is how your final task list should look like.
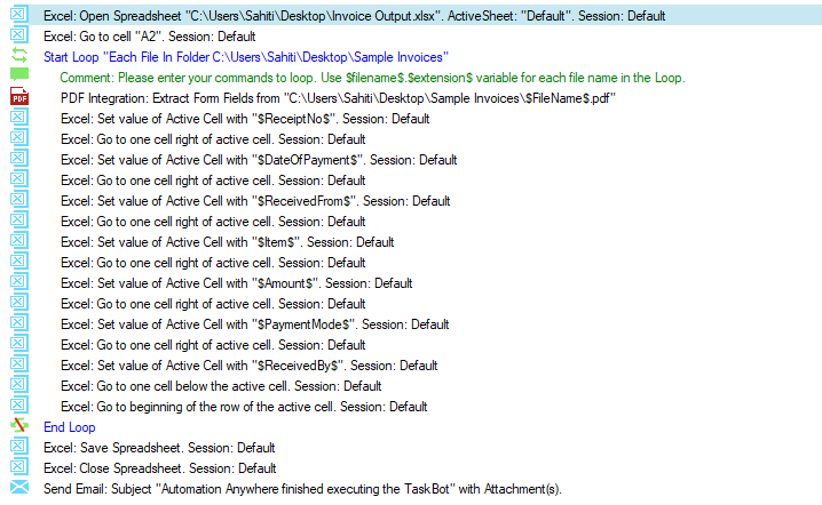 Step 15: Save and Execute the designed automation.
Once you execute the automation, you will see that all the data is extracted from the PDF files and is getting stored in the Excel file. Refer below.
 Now, that you know how you can automate the task of processing large amount of invoices, next in this article on RPA Projects, let us look into the next hands-on: Customer Support Emails
RPA Projects: Customer Support Emails
In any organization, a support team has to deal with humongous amount of tickets generated on a daily basis. These tickets could be raised on various issues. Now, each of these tickets have to be replied back immediately to maintain good client relationship.
Obviously, a manual employee cannot reply to all those emails single handily on a day to day basis. This would be quite tiresome and will enough cost a good amount of money.
Instead, you can just automate this task. Below in this article, I am going to show you, how to automate this task using UiPath.
Problem Statement: Task is to send an automated reply to the emails which have specific text mentioned in the subject line.
How will you automate this task?
Solution:
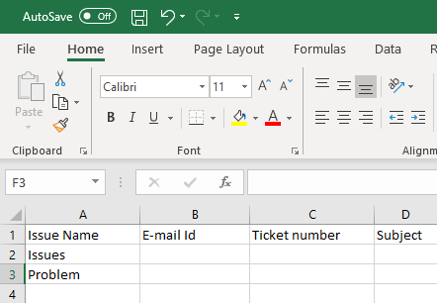
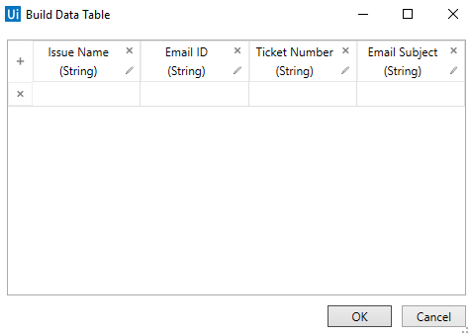
Step 1: Store the issue name in a column in the excel sheet. Also mention the column names, email id, ticket number, subject as you can see below.
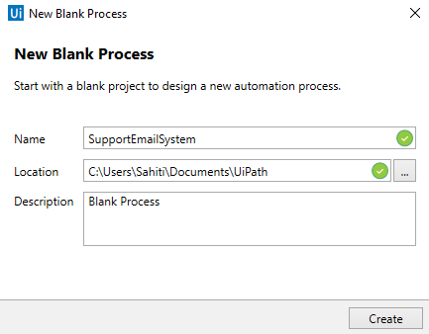
 Step 2: Open UiPath Studio and create a Blank Project. Mention the Project Name, Location and Description. Then click on Create. Refer below.
 Step 3: Once your dashboard opens, search for the Flowchart activity in the Activity Pane and drag it to the work space. We are dragging the flowchart to ensure proper workflow of the complete automation.
Step 4: Now, drag a Build Data Table activity from the Activity Pane. Connect it with the start point of the flowchart.
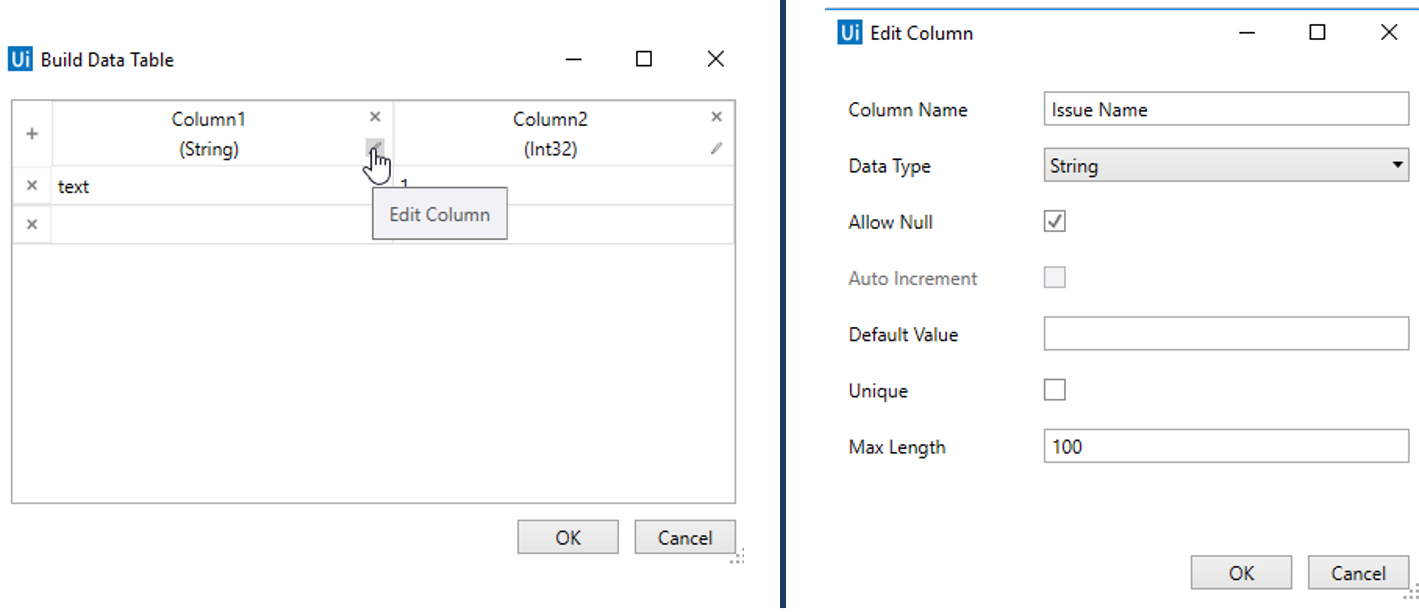
Step 4.1: Double click on the activity and click on the Data Table option. Then you have to mention the column names. Since we had four columns in the excel sheet, we will mention the same column names in the Data Table. To do that click on the edit column option and mention the details. Refer below.
 Step 4.2: After filling the details click on OK. This will create a Data Table. A Data Table is a table which will be used by UiPath to read the data present in the excel file and store the retrieved data in an excel file. Refer below.
 Step 4.3: Next, in the output section of the Data Table activity mention a variable to store the output of the Data Table. Here I have mentioned it as SupportTable. Refer below.
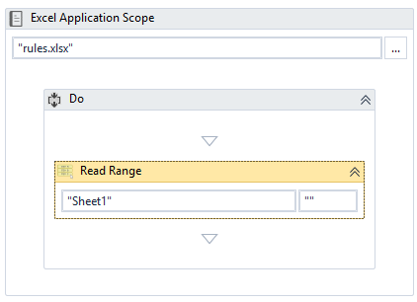
 Step 5: Now go back to the Flowchart and add the Excel Application Scope activity from the Activity Pane to perform actions related to the Excel file. Then connect the Build Data Table activity to this activity in the flowchart.
Step 5.1: Double click the Excel Application scope activity and mention the path of the excel sheet. Then, in the Do section of this activity drag the Read Range activity from the Activity pane and mention the Sheet name and the range. Also, in the output section of the Read Range activity mention the name of the Data Table variable you created before i.e. SupportTable. Refer below.
 Step 6: Now our next step is to automate the task of reading and sending emails. To do that, go back to the flowchart and drag a Sequence from the Activity Pane. Then, connect the Excel Application Scope activity to this Sequence in the flowchart and rename the sequence as Read and Send Emails.
Step 6.1: Now, double click the sequence, and drag the Get Outlook Mail Message activity. Then go to the properties pane, and choose the top number of mails to be read. In the output section of this activity, mention the output variable which will store all the mails. So, the data type of this variable should be List<Mail Message>. Here that variable is messages.
Step 6.2: Now, for every mail in the mails you have to read, you have to iterate a few actions. To do that, drag the For Each activity and mention mail in the item section and messages in the value section. Also, in the Properties Pane, go to the Type Argument, and mention System.Net.Mail.MailMessage.
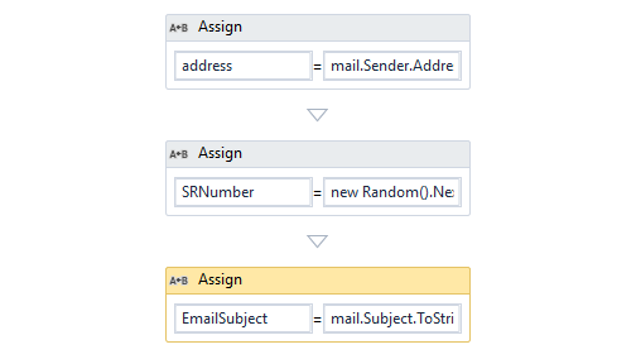
Step 6.3: In the Body section of this activity, drag the assign activity from the activity pane. Then you have to assign the sender address to a variable. To do that, mention the variable name to store the address (here it is address) and in the value section mention mail.Sender.Address.ToLower.
Step 6.4: Now, drag an Assign activity again and assign the Ticket number to a random value. To do that, mention, the variable name of the variable created to store the ticket number. Here it is TicketNumber of Generic type. Then, in the value section mention New Random().Next(1,10000) to generate a random number for every email.
Step 6.5: Next, you have to again drag an Assign activity and assign the subject of every email to a variable. To do that, mention the EmailSubject variable name in the To section and mail.Subject.ToString in the value section. Refer below.
 Step 7: After this, you next step is to compare the Subject line in the emails to the issue name column. If they match, only then a reply should be sent. To do that, you have to drag a For Each Row activity from the activity pane.
Step 7.1: Now, mention the name of the above-created data table name i.e. SupportTable.
Step 7.2: Next, in the Body section of this activity, you have to drag an If activity, and mention the condition: mail.subject.Contains(row(“IssueName”).ToString). Refer below.
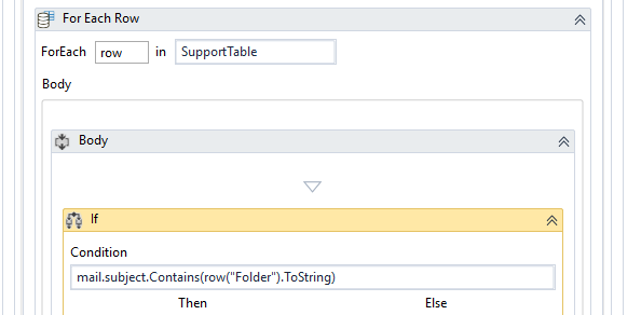
This condition will compare the subject line of each and every email on the loop to the issue in the excel sheet.
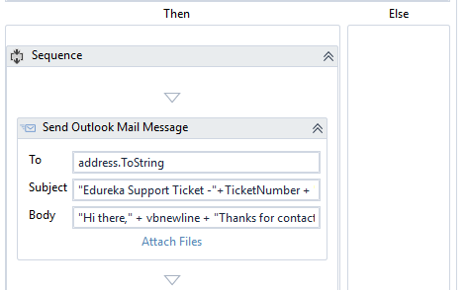
Step 7.3: Now, in the Then condition the activity, you have to drag the Send Outlook Mail Message activity, as we want to reply to the email automatically if the condition satisfies.
Step 7.4:
- In the To section of the activity mention, address.ToString. This will send the email to the respective sender.
- In the Subject section mention the text: “Edureka Support Ticket -“+TicketNumber + ” – “+ mail.subject. This text will send the email with the Subject line as: (Edureka Support Ticket- RandomTicketNumberGenerated – Subject of email sent by the sender).
- In the Body section of the activity, mention the message you wish to send. Here I have sent the following message: “Hi there,” + vbnewline + “Thanks for contacting Edureka Support labs” + vbnewline +vbnewline +”A Support engineer will soon be in touch with you, to look into the issue you are facing and resolve it at the earliest.” + vbnewline +”Your Support ticket is : EDUSR”+ TicketNumber +vbnewline +”We value your relation with us and would like to help you out 24/7″ + vbnewline +vbnewline +”In the meantime, please read the news handle to get to know about the latest Edureka updates at http://www.edureka.co”
Refer below.
 Step 7.5: Now, you have to store the data back to the excel file. To do that, drag three assign activities in the THEN section itself and mention the following details:
- To section: row(1) Value section: address
- To section: row(2) Value section: TicketNumber
- To section: row(1) Value section: EmailSubject
Refer below.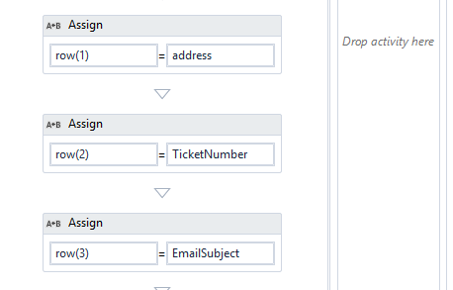
Step 8: Now, since we want to just store the email address, subject line, and the ticket number, we have to remove a column. To do that drag the Remove Data Column activity into the flowchart and connect the previously created sequence with it. Refer below.
 Step 8.1: In the Properties Pane of this activity, mention the Column Index->0, since we want the issues column to be deleted. Also mention the data table name, i.e. SupportTable here. Refer to the above image.
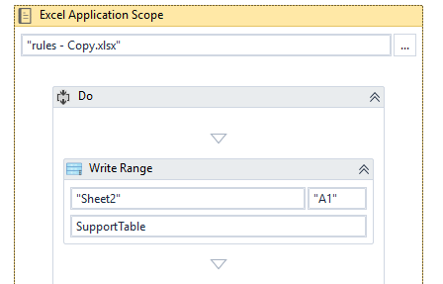
Step 9: Drag the Excel Application Scope activity and connect the Remove Data Column flowchart to this activity.
Step 9.1: Now, double click the Excel Application Scope activity and mention the path of the workbook where you wish to store the data.
Step 9.2: In the Do section of the activity, drag the Write Range activity and mention the Sheet name, range and the Data Table name. Refer below.
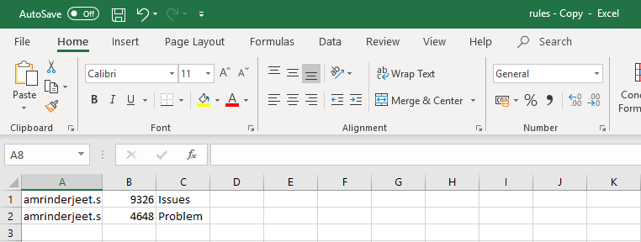
 Step 10: Save and Execute the designed automation.
Once, you execute the automation, you will observe that automated replies are sent to all those emails which have words matching the words we have in the sheet. Also, a new sheet will be created, which will store the details such as EmailID, Ticket Number and Subject. Refer below.
 So, guys, with this we come to an end of this article on RPA Projects.The RPA projects discussed in this article should help you kick start your learning about RPA and it will indulge you and push you to learn more about RPA practically. This will be very handy when you are trying to consider a problem and providing a solution for that using RPA.
Now that you have understood the RPA Projects, check out the RPA Certification & RPA Training using Automation Anywhere by Edureka, a trusted online learning company with a network of more than 250,000 satisfied learners spread across the globe. Both, these certifications will help you get an in-depth knowledge in UiPath and Automation Anywhere respectively.
Got a question for us? Please mention it in the comments section of “RPA Projects” and we will get back to you.