


Advanced Power BI Certification Course with G ...
- 13k Enrolled Learners
- Weekend/Weekday
- Live Class
(4230)


 Copy Link!
Restricting access to any data to a user is one of the key techniques used when it comes to the security aspect of any Data. In this article, we will understand how to implement Row Level Security in Power BI.
Row-level security in Power BI can be used to restrict data access for given users. Filters restrict data access at the row level, and you can define filters within roles. Be aware that in the Power BI service, members of a workspace have access to datasets in the workspace. RLS in Power BI doesn’t restrict this data access.
 You can configure RLS in Power BI for data models imported into Power BI with Power BI Desktop. You can also configure RLS on datasets that are using DirectQuery, such as SQL Server. Previously, you were only able to implement RLS in Power BI within on-premises Analysis Services models outside of Power BI. For Analysis Services live connections, you configure Row-level security on the on-premises model. The security option will not show up for live connection datasets.
You can define roles and rules within the Power BI Desktop. When you publish to Power BI, it also publishes the role definitions. It is an important aspect of the Row Level Security in Power BI. To define security roles, follow these steps.
Import data into your Power BI Desktop report, or configure a DirectQuery connection.
Note: You can’t define roles within Power BI Desktop for Analysis Services live connections. You need to do that within the Analysis Services model.
Select the Modeling tab.
Select Manage Roles.
 Select Create.
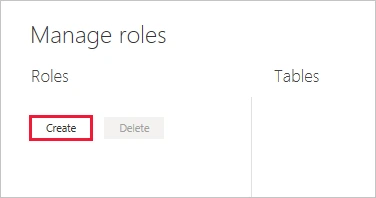
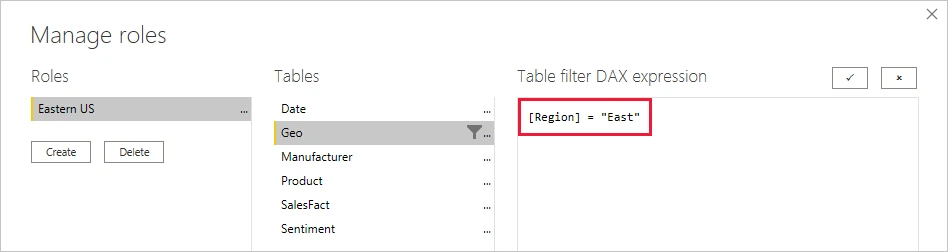
Provide a name for the role.
Select the table that you want to apply a DAX rule.
Enter the DAX expressions. This expression should return a true or false. For example: [Entity ID] = “Value”.
Note: You can use the username() within this expression. Be aware that the username() has the format of DOMAINusername within the Power BI Desktop. Within the Power BI service and Power BI Report Server, it’s in the format of the user’s User Principal Name (UPN). Alternatively, you can use userprincipalname(), which always returns the user in the format of their user principal name, username@contoso.com.
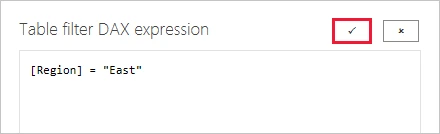
After you have created the DAX expression, you can select the check above the expression box to validate the expression.
Note: In this expression box, you use commas to separate DAX function arguments even if you’re using a locale that normally uses semicolon separators (e.g. French or German).
You can’t assign users to a role within Power BI Desktop. You assign them in the Power BI service. You can enable dynamic security within Power BI Desktop by making use of the username() or userprincipalname() DAX functions and having the proper relationships configured.
By default, row-level security filtering uses single-directional filters, regardless of whether the relationships are set to single direction or bi-directional. You can manually enable bi-directional cross-filter with row-level security by selecting the relationship and checking the Apply security filter in both directions checkbox. You should check this box when you’ve also implemented dynamic row-level security at the server level, where row-level security is based on the user name or login ID.

Validate the roles within Power BI Desktop
After you’ve created your roles, test the results of the roles within Power BI Desktop.
 In View as roles, you see the roles you’ve created.
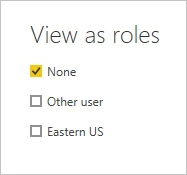 Select a role you created > OK to apply that role. The report renders the data relevant for that role.
You can also select Other user and supply a given user. It’s best to supply the User Principal Name (UPN) as that’s what the Power BI service and Power BI Report Server use.
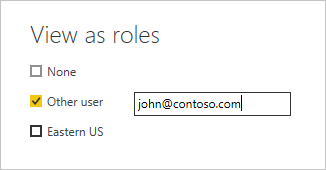
Within Power BI Desktop, Other users only displays different results if you’re using dynamic security based on your DAX expressions.
Unleash the full potential of Power BI with our comprehensive guide on mastering DAX Studio.
You may go through this Microsoft Power BI recording where our expert has explained the topics in a detailed manner with examples that will help you to understand the concepts better.
To manage security on your data model, you will want to do the following.
Select the ellipse (…) for a dataset.
Select Security.

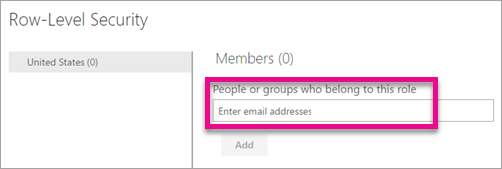
This will take you to the RLS page for you to add members to a role you created in Power BI Desktop. Only the owners of the dataset will see Security available. If the dataset is in a Group, only Administrators of the group will see the security option.
You can only create or modify roles within Power BI Desktop.
Elevate your data analysis skills to expert levels with our in-depth Mastering Power BI Program. Gain the advanced expertise to analyze, visualize, and report data like a pro.
You can add a member to the role by typing in the email address, or name, of the user, security group or distribution list you want to add. You cannot add Groups created within Power BI. You can add members external to your organization.
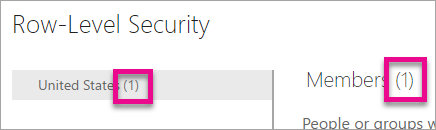
You can also see how many members are part of the role by the number in parenthesis next to the role name, or next to Members.
You can remove members by selecting the X next to their name.

Validating the Role Within the Power BI service
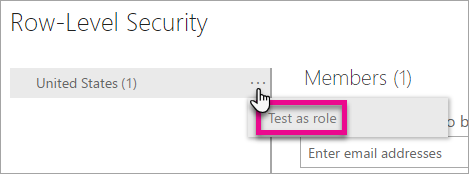
You can validate that the role you defined is working correctly by testing the role.
Select the ellipsis (…) next to the role.
Select Test data as role
You will then see reports that are available for this role. Dashboards are not presented in this view. In the blue bar above, you will see what is being applied.
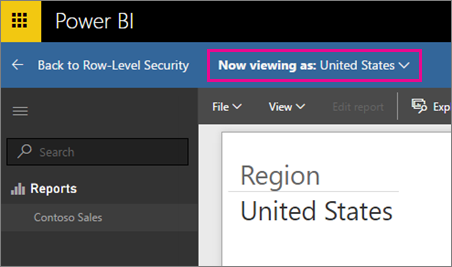
You can test other roles, or combination of roles, by selecting Now viewing as.

You can choose to view data as a specific person, or you can select a combination of available roles to validate they are working.
To return to normal viewing, select Back to Row-Level Security.
Using the username() or userprincipalname() DAX function
You can take advantage of the DAX functions username() or userprincipalname() within your dataset. You can use them within expressions in Power BI Desktop. When you publish your model, it will be used within the Power BI service.
Within Power BI Desktop, username() will return a user in the format of DOMAINUser and userprincipalname() will return a user in the format of user@contoso.com.
Within the Power BI service, username() and userprincipalname() will both return the user’s User Principal Name (UPN). This looks similar to an email address.
Using RLS with app workspaces in Power BI
If you publish your Power BI Desktop report to an app workspace within the Power BI service, the roles will be applied to read-only members. You will need to indicate that members can only view Power BI content within the app workspace settings.
Warning: If you have configured the app workspace so that members have edit permissions, the RLS in Power BI roles will not be applied to them. Users will be able to see all of the data.
Following is a list of the current limitations for row-level security on cloud models.
If you previously defined roles and rules in the Power BI service, you must re-create them in Power BI Desktop.
You can define RLS only on the datasets created with Power BI Desktop. If you want to enable RLS for datasets created with Excel, you must convert your files into Power BI Desktop (PBIX) files first. Learn more
Only ETL and DirectQuery connections are supported. Live connections to Analysis Services are handled in the on-premises model.
Cortana is not supported by RLS at this time.
With this, we come to an end of this Row Level Security in Power BI. I hope you got an understanding of row-level security. Enhance your data security strategy and learn how to implement row-level security in tableau effectively with our in-depth guide.
If you wish to learn Power BI and build a career in data visualization or BI, then check out our Power BI Certification Course, which comes with instructor-led live training and real-life project experience. This training will help you understand Power BI in-depth and help you achieve mastery over the subject.
Also, If you wish to build a career in business intelligence, our Business Intelligence Certification Course will help you mine that data and enhance the decision-making processes throughout your organization.
Got a question for us? Please mention it in the comments section of “Row Level Security in Power BI” and we will get back to you.


 Thank you for registering Join Edureka Meetup community for 100+ Free Webinars each month JOIN MEETUP GROUP