


In this article, we will learn about the scheduling algorithm called round-robin scheduling algorithm, what is round-robin? How to write a program? Etc. Let us start.
What is Round Robin Scheduling?
Round Robin Scheduling is a scheduling algorithm used by the system to schedule CPU utilization. This is a preemptive algorithm. There exist a fixed time slice associated with each request called the quantum. The job scheduler saves the progress of the job that is being executed currently and moves to the next job present in the queue when a particular process is executed for a given time quantum.


No process will hold the CPU for a long time. The switching is called a context switch. It is probably one of the best scheduling algorithms. The efficiency of this algorithm depends on the quantum value.
ROUND ROBIN SCHEDULING ALGORITHM
- We first have a queue where the processes are arranged in first come first serve order.
- A quantum value is allocated to execute each process.
- The first process is executed until the end of the quantum value. After this, an interrupt is generated and the state is saved.
- The CPU then moves to the next process and the same method is followed.
- Same steps are repeated till all the processes are over.
Consider the Example Code
#include<stdio.h>

int main()
{
      int i, limit, total = 0, x, counter = 0, time_quantum;
      int wait_time = 0, turnaround_time = 0, arrival_time[10], burst_time[10], temp[10];
      float average_wait_time, average_turnaround_time;
      printf("nEnter Total Number of Processes:t");
      scanf("%d", &limit);
      x = limit;
      for(i = 0; i < limit; i++)
      {
            printf("nEnter Details of Process[%d]n", i + 1);

            printf("Arrival Time:t");

            scanf("%d", &arrival_time[i]);

            printf("Burst Time:t");

            scanf("%d", &burst_time[i]);

            temp[i] = burst_time[i];
      }

      printf("nEnter Time Quantum:t");
      scanf("%d", &time_quantum);
      printf("nProcess IDttBurst Timet Turnaround Timet Waiting Timen");
      for(total = 0, i = 0; x != 0;)
      {
            if(temp[i] <= time_quantum && temp[i] > 0)
            {
                  total = total + temp[i];
                  temp[i] = 0;
                  counter = 1;
            }
            else if(temp[i] > 0)
            {
                  temp[i] = temp[i] - time_quantum;
                  total = total + time_quantum;
            }
            if(temp[i] == 0 && counter == 1)
            {
                  x--;
                  printf("nProcess[%d]tt%dtt %dttt %d", i + 1, burst_time[i], total - arrival_time[i], total - arrival_time[i] - burst_time[i]);
                  wait_time = wait_time + total - arrival_time[i] - burst_time[i];
                  turnaround_time = turnaround_time + total - arrival_time[i];
                  counter = 0;
            }
            if(i == limit - 1)
            {
                  i = 0;
            }
            else if(arrival_time[i + 1] <= total)
            {
                  i++;
            }
            else
            {
                  i = 0;
            }
      }

      average_wait_time = wait_time * 1.0 / limit;
      average_turnaround_time = turnaround_time * 1.0 / limit;
      printf("nnAverage Waiting Time:t%f", average_wait_time);
      printf("nAvg Turnaround Time:t%fn", average_turnaround_time);
      return 0;
}
OUTPUT:

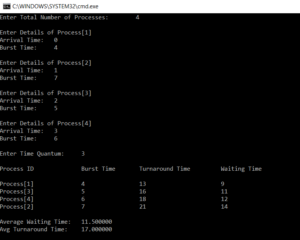
EXPLANATION:
In the above code, we ask the user to enter the number of processes and arrival time and burst time for each process. We then calculate the waiting time and the turn around time using the round-robin algorithm.
The main part here is calculating the turn around time and the waiting time. Turn around time is calculated by adding the total time taken and subtracting the arrival time.
The waiting time is calculated by subtracting the arrival time and burst time from the total and adding it t0 the waiting time. This is how the round-robin scheduling takes place.
ADVANTAGES:
- Low overhead for decision making.
- Unlike other algorithms, it gives equal priority to all processes.
- Starvation rarely occurs in this process.
DISADVANTAGES:
- The efficiency of the system is decreased if the quantum value is low as frequent switching takes place.
- The system may become unresponsive if the quantum value is high.
With this, we come to an end of this article.
I hope you found this informative and helpful, stay tuned for more tutorials on similar topics. You may also check out our training program to get in-depth knowledge on jQuery along with its various applications, you can enroll here for live online training with 24/7 support and lifetime access. Implement the above code with different strings and modifications. Now, we have a good understanding of all key concepts related to the pointer.
Got a question for us? Mention them in the comments section of this blog and we will get back to you.