


React.js Training Course With Certification
- 18k Enrolled Learners
- Weekend
- Live Class
(6950)


Before I start this blog, I hope that you have gone through the building blocks of React in my React tutorial blog. If you haven’t, please go through it first to get a better understanding of React. While learning the basics of React, I’m sure you must be wondering how to add navigation to your application. If so, you have landed at the right place. In this React Router blog, I will be walking you through the routing concepts in React.
We will look at the following topics:
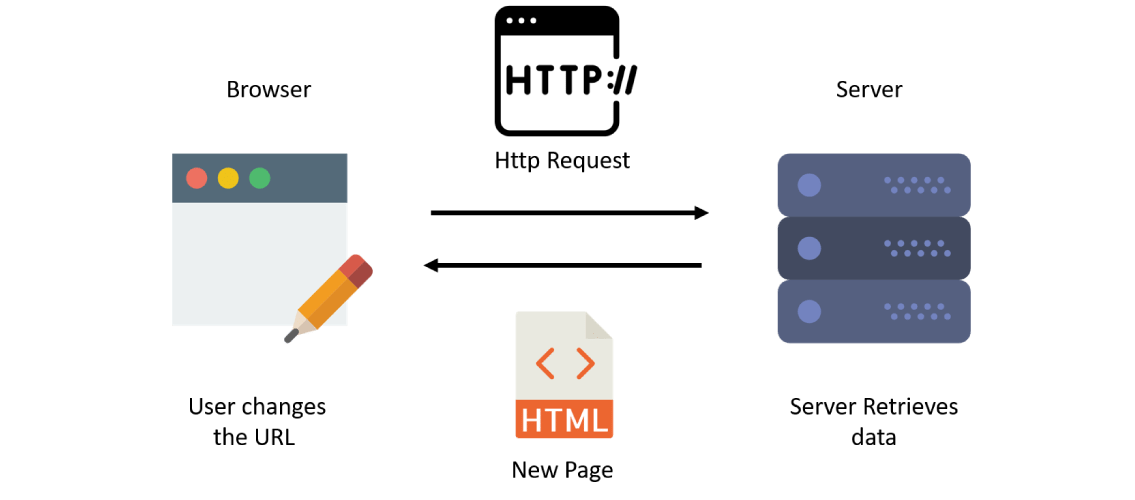
In general, when the user types an URL in the browser, an HTTP request is sent to the server, which then retrieves the HTML page. For each new URL, the user is redirected to a new HTML page. You can refer to the below diagram to get a better understanding of how Routing works.
Those of you who are planning to make a flourishing career in web development, React Certification Training is the right move for you.
Having a single page application limited to single view does not do justice to many popular social media websites like Facebook, Instagram which render multiple views using React today. We need to move ahead and learn how to display multiple views in our single page application.
For example, we are used to seeing a home page which displays welcome message and related content. The site’s background details can be found on the ‘About Us’ page, a list of users and their details are listed on a different page and there might be various other pages to include several different views. To learn more about React, check this Web developer course online.
So how do you think this is achieved? Adding a router library into our application solves this requirement.
This brings us to the topic of today’s blog: React Router v4. On 13th March 2017, Micheal Jackson & Ryan Florence released React Router v4 along with a solid documentation.
They believed in the ideology “Learn Once, Route Anywhere”.
In their speech at React Conf 2017, they explained this by showing how they projected their routing concepts seamlessly from Web to Native platforms, as well as integrating React Router into VR and creating animations in React Native. Though the drawing point from their talk revolved around how their Router API Is ‘All About Components’.
In React, there is only a single ‘Html’ file involved. Whenever a user types in a new URL request, instead of fetching data from the server, the Router swaps in a different Component for each new URL request. The user is tricked into switching among multiple pages but in reality, each separate Component re-renders achieving multiple views as per our needs.
How does React achieve this?
This is where the concept of ‘History’ comes into the picture. In React, the Router looks at the History of each Component and when there is any change in the History, that Component re-renders. Until Router version 4 we had to manually set the History value. However, from Router v4 the base path is bypassed by the <BrowserRouter> saving us a lot of work. If you still need to access History, HTML5 offers a built-in API which allows us to modify the History object through pushState and replaceState methods.
In fact, React Router 4 is a complete rewrite of the previous release. Creating your own routes is just a natural extension of the React Components code that you are already well versed with. Although it will need some time to sink in, Router v4 will start to make a lot of sense once you move ahead.
Alright, let’s now take an in-depth look at what version 4 has to offer.
Find out our React Course in Top Cities
| India | Other Popular Cities |
| React JS Course in Chennai | React JS Course in Australia |
| React JS Course in Bangalore | React JS Course in Canada |
| React JS Course in Hyderabad | React JS Course in Singapore |
We essentially want to call the Router Component inside React’s render method. This is because the entire Router API is all about Components. Of course, each Component’s role is to render UI just as any React application.
1. No Need to Manually set History
All we do is wrap our Router App Component inside the <BrowserRouter>.
ReactDOM.render((
<BrowserRouter>
<App/>
</BrowserRouter>
), document.getElementById(“root”));
Now, let’s understand routing with the help of an example:
We will create three pages. Here is the list of pages along with its address.
| Page | Address |
| Home | ‘/’ |
| About | ‘/about’ |
| Topic | ‘/topic’ |
2. Packages Split:
The ‘react-router’ library is now split into three separate packages.
We need to install the dependency:
$ npm install --save react-router-dom
(Use the ‘save’ command if you don’t have the latest npm (5.x) version installed.)
We import the ‘BrowserRouter’ Component from the ‘react-router-dom’ library along with ‘Link’ and ‘Route’.
We can visualize the BrowserRouter as the root Component which renders the children routes.
import {
BrowserRouter,
Route,
Link
} from 'react-router-dom'
Let’s understand the Link and Route Components before moving ahead with the benefits in Router v4.
Link is used to navigate amongst the internal routes in our router application. It is the equivalent of anchor tags: <a> </a>.
Link is passed a string argument ‘to’ where the URL’s path is specified.
<ul>
<li><Link to="/">Home</Link></li>
<li><Link to="/about">About</Link></li>
<li><Link to="/topics">Topics</Link></li>
</ul>
We will now look at <Route>, which can be considered as the individual child Components responsible for rendering the UI, based on user’s input location. If the user specified location matches the defined path in <Route>, then the <Route> can define the view in two ways:
The <Route> will return null in case the specified URL doesn’t match the defined path. The basic <Route> takes two arguments, one for path and one for rendering UI.
Let me illustrate this below:
<BrowserRouter>
<div>
<Route exact path="/" render={ ( ) => (<h2> HomePage </h2>) } />
<Route path="/about" component={About}/>
<Route path="/topics" component={Topics}/>
</div>
</BrowserRouter>
3. IndexRoute is replaced by ‘exact‘:
No need to use IndexRoute to render the HomePage, you would have noticed the ‘exact’ prop in the previous code snippet. This is a good example of React Router v4’s declarative nature.
Routes in v4 being inclusive means that more than one route may be rendered simultaneously. We employ the ‘exact’ prop to settle a contention among multiple matches.
Without using ‘exact’ in our previous example, the URL ‘/’ would match the routes with path ‘/’, ‘/about ‘ and ‘/topics’. However, we want ‘/’ to match only our render function, hence using ‘exact’ explicitly achieves this.
4. The Router can have only a Single Child element:
This is why we need to wrap our routes within a <div>.
If we fail to do so you will get the following exception.
* Uncaught Error: A <Router> may have only one child element *
5. Switch:
While we can encapsulate several routes within a single <div> tag. If we wish to render only a single route Component at once, we use a <switch> tag instead. It checks each route for a match sequentially and stops once the first match is found.
<switch>
<route exact path=’/’   component={Home}/>
<route path=’/users/:id’ component={User }/>
<route path=’/users’   component={Roster}/>
<switch>
In our example, we have placed the route with path ‘users/:id’ tactically above ‘users’. This is because ‘users/:id’ will match for both ‘users’ and ‘users/:id’.
Now that you have a basic understanding of React Router, here is the entire code to define our Router App Component.
const App= () => (
<BrowserRouter>
<div>
<ul>
<li><Link to="/">Home</Link></li>
<li><Link to="/about">About</Link></li>
<li><Link to="/topics">Topics</Link></li>
</ul>
<Route exact path="/" render={ ( ) => (<h2> HomePage </h2>) } />
<Route path="/about" component={About}/>
<Route path="/topics" component={Topics}/>
</div>
</BrowserRouter>
)
This brings us to the end of this blog. Hope this helped you get a better idea of how React Router works. To learn more on React Router you can check out its documentation as well. Happy learning!
Discover how to create mobile apps that look and feel great on any platform with a comprehensive Flutter training.
If you found this blog on “React Router” relevant, check out the React.js Training Course or Web development certification Training by Edureka, a trusted online learning company with a network of more than 250,000 satisfied learners spread across the globe. This Edureka course helps learners gain expertise in both fundamental and advanced topics in React enabling you to develop full-fledged, dynamic web applications on the go.
Got a question for us? Please mention it in the comments section and we will get back to you.
| Course Name | Date | Details |
|---|---|---|
| React.js Training Course With Certification | Class Starts on 27th April,2024 27th April SAT&SUN (Weekend Batch) | View Details |
| React.js Training Course With Certification | Class Starts on 8th June,2024 8th June SAT&SUN (Weekend Batch) | View Details |


 REGISTER FOR FREE WEBINAR
  Thank you for registering Join Edureka Meetup community for 100+ Free Webinars each month JOIN MEETUP GROUP


