


React Redux Tutorial
React is one of the most popular JavaScript libraries which is used for front-end development. It has made our application development easier and faster by providing a component-based approach.
As you might know, it’s not the complete framework but just the view part of the MVC (Model-View-Controller) framework. So, how do you keep track of the data and handle the events in the applications developed using React? Well, this is where Redux comes as a savior and handles the data flow of the application from the backend.
Through this blog on React Redux tutorial, I will explain everything you need to know on how to integrate Redux with React applications.
Why Redux With React? – React Redux Tutorial


As I have already mentioned that React follows the component-based approach, where the data flows through the components. In fact, the data in React always flows from parent to child components which makes it unidirectional. This surely keeps our data organized and helps us in controlling the application better. Because of this, the application’s state is contained in specific stores and as a result, the rest of the components remain loosely coupled. This makes our application more flexible leading to increased efficiency. That’s why communication from a parent component to a child component is convenient.
But what happens when we try to communicate from a non-parent component?
A child component can never pass data back up to the parent component. React does not provide any way for direct component-to-component communication. Even though React has features to support this approach, it is considered to be a poor practice. It is prone to errors and leads to spaghetti code. So, how can two non-parent components pass data to each other?
This is where React fails to provide a solution and Redux comes into the picture. More about this is explained in our React JS certification Training in depth.
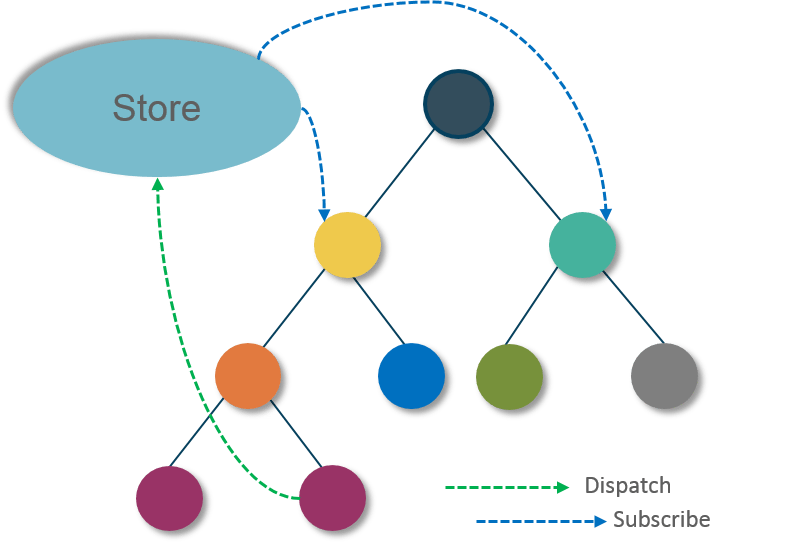

Thus, with Redux, it becomes clear where the components get their state from as well as where should they send their states to. Now the component initiating the change does not have to worry about the list of components needing the state change and can simply dispatch the change to the store. This is how Redux makes the data flow easier.
Unlock the power of UI/UX design with our UI UX design certification course.
Related Post : Props in React
What Is Redux? – React Redux Tutorial
Just like React, Redux is also a library which is used widely for front-end development. It is basically a tool for managing both data-state and UI-state in JavaScript applications. Redux separates the application data and business logic into its own container in order to let React manage just the view. Rather than a traditional library or a framework, it’s an application data-flow architecture. It is most compatible with Single Page Applications (SPAs) where the management of the states over time can get complex. Check out this Full Stack developer course today to learn about React redux.
Redux was created by Dan Abramov and Andrew Clark around June 2015. It was inspired by Facebook’s Flux and influenced by functional programming language Elm. Redux got popular very quickly because of its simplicity, small size (only 2 KB) and great documentation.
Principles Of Redux
Redux follows three fundamental principles:
Single source of truth: The state of the entire application is stored in an object/ state tree within a single store. The single state tree makes it easier to keep track of the changes over time and debug or inspect the application. For a faster development cycle, it helps to persist the application’s state in development.
State is read-only: The only way to change the state is to trigger an action. An action is a plain JS object describing the change. Just like the state is the minimal representation of data, the action is the minimal representation of the change to that data. An action must have a type property (conventionally a String constant). All the changes are centralized and occur one by one in a strict order.
Changes are made with pure functions: In order to specify how the state tree is transformed by actions, you need pure functions. Pure functions are those whose return values depend solely on the values of their arguments. Reducers are just pure functions that take the previous state and an action and return the next state. You can have a single reducer in your application and as it grows, you can split it off into smaller reducers. These smaller reducers will then manage specific parts of the state tree.
ReactJS Redux Tutorial3

Advantages Of Redux – React Redux Tutorial
Following are some of the major advantages of Redux:
- Predictability of outcome – Since there is always one source of truth, i.e. the store, there is no confusion about how to sync the current state with actions and other parts of the application.
- Maintainability – The code becomes easier to maintain with a predictable outcome and strict structure.
- Server side rendering – You just need to pass the store that is created on the server, to the client side. This is very useful for initial render and provides a better user experience as it optimizes the application performance.
- Developer tools – From actions to state changes, developers can track everything going on in the application in real time.
- Community and ecosystem – Redux has a huge community behind it which makes it even more captivating to use. A large community of talented individuals contribute to the betterment of the library and develop various applications with it.
- Ease of testing – Redux code are mostly functions which are small, pure and isolated. This makes the code testable and independent.
- Organization – Redux is very precise about how the code should be organized, this makes the code more consistent and easier when a team works with it.
Unleash your creativity and build stunning websites with our Web developer course.
Components Of Redux – React Redux Tutorial
Redux has four components.
- Action
- Reducer
- Store
- View
Let us discuss them in detail:
Action – The only way to change state content is by emitting an action. Actions are the plain JavaScript objects which are the main source of information used to send data (user interactions, internal events such as API calls, and form submissions) from the application to the store. The store receives information only from the actions. You have to send the actions to the store using store.dispatch().
Internal actions are simple JavaScript objects that have a type property (usually String constant), describing the type of action and the entire information being sent to the store.{ type: ADD_TODO, text }Actions are created using action creators which are the normal functions that return actions.
function addTodo(text) {
    return {
        type: ADD_TODO,
        text
    }
}
To call actions anywhere in the app, use dispatch()method:
dispatch(addTodo(text));
Reducer – Actions describe the fact that something happened, but don’t specify how the application’s state changes in response. This is the job of reducers. It is based on the array reduce method, where it accepts a callback (reducer) and lets you get a single value out of multiple values, sums of integers, or an accumulation of streams of values. In Redux, reducers are functions (pure) that take the current state of the application and an action and then return a new state. Understanding how reducers work is important because they perform most of the work.
function reducer(state = initialState, action) { switch (action.type) { case ADD_TODO: return Object.assign({}, state, { todos: [ ...state.todos, { text: action.text, completed: false } ] }) default: return state } }- Store – A store is a JavaScript object which can hold the application’s state and provide a few helper methods to access the state, dispatch actions and register listeners. The entire state/ object tree of an application is saved in a single store. As a result of this, Redux is very simple and predictable. We can pass middleware to the store to handle the processing of data as well as to keep a log of various actions that change the state of stores. All the actions return a new state via reducers.
import { createStore } from 'redux' import todoApp from './reducers' let store = createStore(reducer); - View – Smart and dumb components together build up the view. The only purpose of the view is to display the date passed down by the store. The smart components are in charge of the actions. The dumb components underneath the smart components notify them in case they need to trigger the action. The smart components, in turn, pass down the props which the dumb components treat as callback actions.
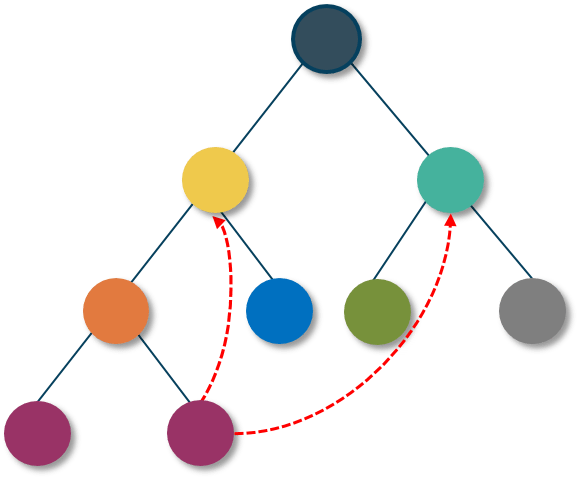
Following is a diagram which shows how the data actually flows through all the above-described components in Redux.


Find out our React Course in Top Cities
| India | Other Popular Cities |
| React JS Course in Chennai | React JS Course in Australia |
| React JS Course in Bangalore | React JS Course in Canada |
| React JS Course in Hyderabad | React JS Course in Singapore |
React With Redux – React Redux Tutorial
Now that you are familiar with Redux and its components, let’s now see how you can integrate it with a React application.
STEP 1: You need to setup the basic react, webpack, babel setup. Following are the dependencies we are using in this application.
"dependencies": {
  "babel-core": "^6.10.4",
  "babel-loader": "^6.2.4",
  "babel-polyfill": "^6.9.1",
  "babel-preset-es2015": "^6.9.0",
  "babel-preset-react": "^6.11.1",
  "babel-register": "^6.9.0",
  "cross-env": "^1.0.8",
  "css-loader": "^0.23.1",
  "expect": "^1.20.1",
  "node-libs-browser": "^1.0.0",
  "node-sass": "^3.8.0",
  "react": "^15.1.0",
  "react-addons-test-utils": "^15.1.0",
  "react-dom": "^15.1.0",
  "react-redux": "^4.4.5",
  "redux": "^3.5.2",
  "redux-logger": "^2.6.1",
  "redux-promise": "^0.5.3",
  "redux-thunk": "^2.1.0",
  "sass-loader": "^4.0.0",
  "style-loader": "^0.13.1",
  "webpack": "^1.13.1",
  "webpack-dev-middleware": "^1.6.1",
  "webpack-dev-server": "^1.14.1",
  "webpack-hot-middleware": "^2.11.0"
},
STEP 2: Once you are done with installing the dependencies, then create a components folder in src folder. Within that create App.js file.
import React from 'react';
import UserList from '../containers/user-list';
import UserDetails from '../containers/user-detail';
require('../../scss/style.scss');

const App = () => (
    <div>
        <h2>User List</h2>
        <UserList />
        <hr />
        <h2>User Details</h2>
        <UserDetails />
    </div>
);

export default App;
STEP 3: Next create a new actions folder and create index.js in it.
export const selectUser = (user) => {
    console.log("You clicked on user: ", user.first);
    return {
        type: 'USER_SELECTED',
        payload: user
    }
};
STEP 4: Now create user-details.js in a new folder called containers.
import React, {Component} from 'react';
import {connect} from 'react-redux';

class UserDetail extends Component {
    render() {
        if (!this.props.user) {
            return (<div>Select a user...</div>);
        }
        return (
            <div>
                <img height="150" width="150" src={this.props.user.thumbnail} />
                <h2>{this.props.user.first} {this.props.user.last}</h2>
                <h3>Age: {this.props.user.age}</h3>
                <h3>Description: {this.props.user.description}</h3>
            </div>
        );
    }
}

function mapStateToProps(state) {
    return {
        user: state.activeUser
    };
}

export default connect(mapStateToProps)(UserDetail);
STEP 5: Inside the same folder create user-list.js file.
import React, {Component} from 'react';
import {bindActionCreators} from 'redux';
import {connect} from 'react-redux';
import {selectUser} from '../actions/index'
class UserList extends Component {
    renderList() {
        return this.props.users.map((user) => {
            return (
                <li key={user.id}
                    onClick={() => this.props.selectUser(user)}
                >
                    {user.first} {user.last}
                </li>
            );
        });
    }
    render() {
        return (
            <ul>
                {this.renderList()}
            </ul>
        );
    }
}
function mapStateToProps(state) {
    return {
        users: state.users
    };
}
function matchDispatchToProps(dispatch){
    return bindActionCreators({selectUser: selectUser}, dispatch);
}
export default connect(mapStateToProps, matchDispatchToProps)(UserList);
STEP 6: Now create reducers folder and create index.js within it.
import {combineReducers} from 'redux';
import UserReducer from './reducer-users';
import ActiveUserReducer from './reducer-active-user';

const allReducers = combineReducers({
    users: UserReducer,
    activeUser: ActiveUserReducer
});
export default allReducers
STEP 7: Within the same reducers folder, create reducer-users.js file.
export default function () {
    return [
        {
            id: 1,
            first: "Maxx",
            last: "Flinn",
            age: 17,
            description: "Loves basketball",
            thumbnail: "https://goo.gl/1KNpiy"
        },
        {
            id: 2,
            first: "Allen",
            last: "Matt",
            age: 25,
            description: "Food Junky.",
            thumbnail: "https://goo.gl/rNLgwv"
        },
        {
            id: 3,
            first: "Kris",
            last: "Chen",
            age: 23,
            description: "Music Lover.",
            thumbnail: "https://goo.gl/EVbPHb"
        }
    ]
}
STEP 8: Now within reducers folder create a reducer-active-user.js file.
export default function (state = null, action) {
    switch (action.type) {
        case 'USER_SELECTED':
            return action.payload;
            break;
    }
    return state;
}
STEP 9: Now you need to create index.js in the root folder.
import 'babel-polyfill';
import React from 'react';
import ReactDOM from "react-dom";
import {Provider} from 'react-redux';
import {createStore, applyMiddleware} from 'redux';
import thunk from 'redux-thunk';
import promise from 'redux-promise';
import createLogger from 'redux-logger';
import allReducers from './reducers';
import App from './components/App';

const logger = createLogger();
const store = createStore(
    allReducers,
    applyMiddleware(thunk, promise, logger)
);

ReactDOM.render(
    <Provider store={store}>
        <App />
    </Provider>,
    document.getElementById('root')
);
STEP 10: Now that you are done writing the codes, launch your application at localhost:3000.
This brings us to the end of the blog on React Redux tutorial. I hope through this React Redux tutorial blog I was able to clearly explain what is Redux, its components, and why we use it with React. You can refer to this blog on ReactJS Tutorial, in case you want to learn more about React.
If you want to get trained in React and wish to develop interesting UI’s on your own, then check out the Web development certification Training by Edureka, a trusted online learning company with a network of more than 250,000 satisfied learners spread across the globe.
Learn how to use Flutter to create performant and dynamic mobile apps with a comprehensive Flutter certification training.
Got a question for us? Please mention it in the comments section and we will get back to you.