React JS Training Course
- 24k Enrolled Learners
- Weekend/Weekday
- Live Class
If you are familiar with React, then you must have heard or read this phrase many times. But do you know what it means exactly and how it is used? If you don’t, then read this blog to learn all about React components and the different phases in the lifecycle. I am sure by the time you finish reading this blog you will have a complete understanding about React components and the concepts surrounding it. But before proceeding, take a quick look at the topics I will be discussing:
Previously, developers had to write 1000 lines of code to develop a simple single-page application. Most of these applications followed the traditional DOM structure and making changes to them was very challenging and a tedious task for the developers. They had to search for the element which needed the change and update it accordingly. Even a small mistake would lead to application failure. Moreover, updating DOM was very expensive. Thus, the component-based approach was introduced. In this approach, the entire application is divided into logical chunks which are called the Components. React was one of the frameworks who opted for this approach. If you are planning to build your career in web development, early start would open lots of opportunities for you.
Let’s now understand what these components are.
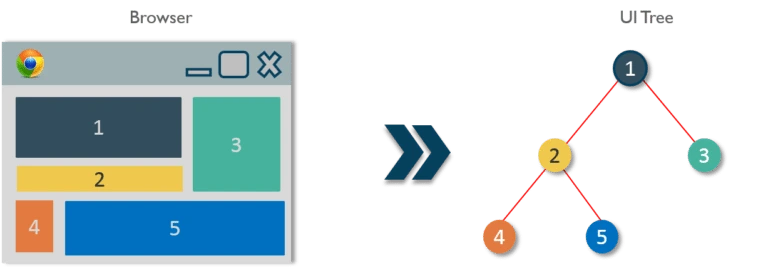
React components are considered as the building blocks of the User Interface. Each of these components exists within the same space but execute independently from one another. React components have their own structure, methods as well as APIs. They are reusable and can be injected into interfaces as per need. To have a better understanding, consider the entire UI as a tree. Here the starting component becomes the root and each of the independent pieces becomes branches, which are further divided into sub-branches.

We use React.createClass() method to create a component. This method must be passed an object argument which will define the React component. Each component must contain exactly one render() method. It is the most important property of a component which is responsible for parsing the HTML in JavaScript, JSX. This render() will return the HTML representation of the component as a DOM node. Therefore, all the HTML tags must be enclosed in an enclosing tag inside the render().
Following is a sample code for creating a component.
import React from 'react';
import ReactDOM from 'react-dom';

class MyComponent extends React.Component{
    render(){
        return(
              <div>
                <h1>Hello</h1>
                <h1>This is a Component</h1>
              </div>
        );
    }
}
ReactDOM.render(
    <MyComponent/>, document.getElementById('content')
);
Advantages of React Components
Now that you have understood what is a component and what are its advantages, let’s now find out how to feed data to these components.
React Components Lifecycle
Ready to launch your UI/UX career? Enroll in our UI design course today!
There are two ways the components receive data:
Props stand for Properties. They are the read-only components which work similar to the HTML attributes. Prop is a way of passing data from parent to child component. Let’s understand this with an example.
As we already know, the react components arrange the UI in the form of a tree where the parent component becomes the root and child components become branches and sub-branches. Now suppose parent component wants to send data to one of its deeply nested components. Let us say from component 1 you need to send a property to component 6. How will you do that?
You cannot pass down a property directly to the target component. This is because React follows the rule where properties have to flow down from a parent component to an immediate child component. This means you can’t skip a layer of child components when sending a property and the child components can’t send property back up to a parent as well. You can have default props in case a parent component doesn’t pass down props so that they are still set. This is why React has one-way data binding.

So, in this case, we need to send data, layer by layer until it reaches target child component. Every component in this path has to receive the property from its parent and then resend that property to its child as received. This process repeats until your property reaches its target component.

Here is an example of passing the props.
import React from 'react';
import ReactDOM from 'react-dom';

class MyComponent extends React.Component{
        render(){
        return(
              <div>
               <h1>Hello</h1>
               <Header name="maxx" id="101"/>
           </div>
        );
    }
}

function Header(props) {
    return (
           <div>
            <Footer name = {props.name} id = {props.id}/>
           </div>
    );
}
function Footer(props) {
    return (
           <div>
            <h1> Welcome : {props.name}</h1>
            <h1> Id is : {props.id}</h1>
           </div>
  );
}
ReactDOM.render(
   <MyComponent/>, document.getElementById('content')
);
Since the props can only be passed from parent components, they cannot be changed. This makes them immutable and dumb. This poses a great challenge as the modern apps do not have all of its states ready on page load. Ajax or Events can happen when data returns, so someone needs to take responsibility for handling the updates. This is where React states come into the picture.
Generally, components take in props and render them. These are called stateless components. But they can also provide state which are used to store data or information about the component which can change over time. Such components are called stateful components. The change in state can happen as a response to user event or system event. In other words, state is the heart of every react component which determines how the component will behave and render. They are also responsible for making a component dynamic and interactive. Thus they must be kept as simple as possible.
The state can be accessed with this reference, e.g., this.state. You can access and print variables in JSX using curly braces {}. Similarly, you can render this.state inside render(). You must set a default state for the component else it will set to null.
Now let’s see how a state is assigned to a component.
import React from 'react';
import ReactDOM from 'react-dom';

class MyComponent extends React.Component {
    constructor() {
        super();
        this.state = {
            name: 'Maxx',
            id: '101'
        }
    }
    render()
        {
            setTimeout(()=>;{this.setState({name:'Jaeha', id:'222'})},2000)
            return (
                   <div>
                     <h1>Hello {this.state.name}</h1>
                     <h2>Your Id is {this.state.id}</h2>
                   </div>
             );
        }
    }
ReactDOM.render(
    <MyComponent/>, document.getElementById('content')
);
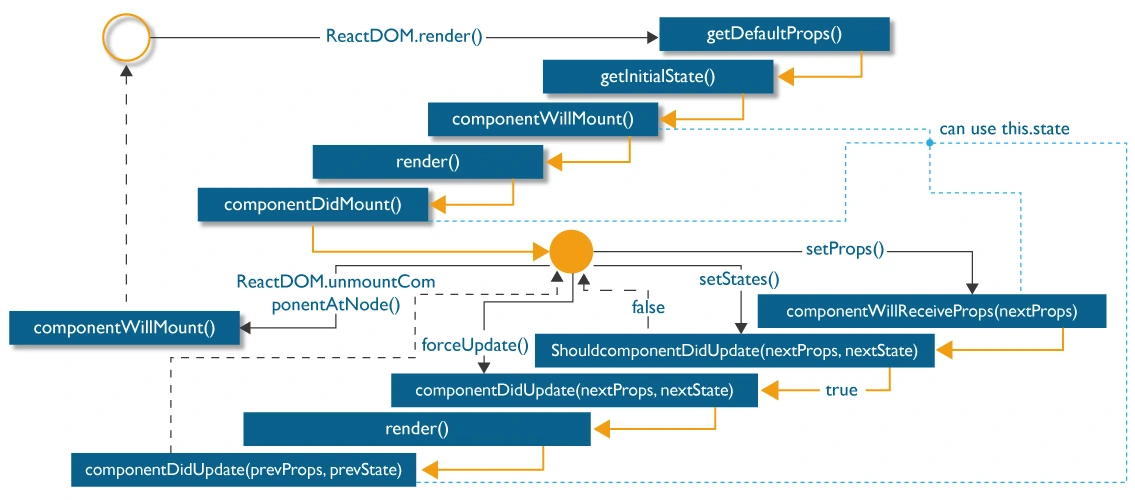
React provides various methods which notify when a certain stage in the lifecycle of a component occurs. These methods are called the lifecycle methods. These lifecycle methods are not very complicated. You can think of these methods as specialized event handlers that are called at various points during a components life. You can even add your own code to these methods to perform various tasks. Talking about the lifecycle of the component, the lifecycle is divided into 4 phases. They are:
Each of these phases contains some lifecycle methods which are specific only to them. So let’s now find out what happens during each of these phases.
a. Initial Phase – The first phase of the lifecycle of a React component is the initial phase or initial rendering phase. In this phase, the component is about to start its journey and make its way to the DOM. This phase consists of the following methods which are invoked in a predefined order.
b. Updating Phase – Once the component is added to the DOM, they can update and re-render only when a state change occurs. Each time the state changes, the component calls its render() again. Any component, that relies on the output of this component will also call its render() again. This is done, to ensure that our component is displaying the latest version of itself. Thus to successfully update the components state the following methods are invoked in the given order:
c. Props Change Phase – After the component has been rendered into the DOM, the only other time the component will update, apart from the state change is when its prop value changes. Practically this phase works similar to the previous phase, but instead of the state, it deals with the props. Thus, this phase has only one additional method from the Updating Phase.
d. The Unmounting Phase – This is the last phase of components life cycle in which the component is destroyed and removed from the DOM completely. It contains only one method:
Following is the entire life cycle diagram:

Related Post: React Hooks – Know Everything About It
If you want to get trained in React and wish to develop interesting UI’s on your own, then check out the React JS certification Training or Web development certification Training by Edureka, a trusted online learning company with a network of more than 250,000 satisfied learners spread across the globe.
Got a question for us? Please mention it in the comments section and we will get back to you.
 Thank you for registering Join Edureka Meetup community for 100+ Free Webinars each month JOIN MEETUP GROUP
edureka.co