
Data Science with Python Certification Course
- 131k Enrolled Learners
- Weekend
- Live Class
(49300)


 Copy Link!
On this PyGame tutorial blog, let us learn in detail about PyGame and see how we can proceed building simple games with this.
We will be covering the following topics in the blog:
For making a game of your choice there are 3 main questions that need answering. They are as follows:
Most of the time you can answer each of these questions and find a perfect framework that fits your requirements. Other times, it might not be possible. Consider for example, there aren’t many HTML5 frameworks that allow you to write a high-performance 3D game that you can build.
For PyGame, let’s assume you gave the following answers to the previous 3 questions:
So, next up on this PyGame Tutorial blog let us look at how we can set up PyGame.
Installing PyGame is pretty straightforward and easy. But the first prerequisite is to install Python 2.7. Installing Python on both Windows and Linux is very easy and simple.
Next up would be download the official PyGame installer and run the corresponding files and follow the on-screen instructions.
Installation is simple. Just follow through and the defaults are considered fine.
I personally use PyCharm and install all of these addons there and work using that for my Python requirements. Just use whichever IDE you are comfortable with and start along with that.
The following is a very simple app that is built using PyGame pipeline. Check it out:
import pygame

pygame.init()
screen = pygame.display.set_mode((400, 300))
done = False

while not done:
        for event in pygame.event.get():
                if event.type == pygame.QUIT:
                        done = True

        pygame.display.flip()
Here is where you can make more sense out of the syntax:
import pygame – This is of course needed to access the PyGame framework.
pygame.init() – This initializes all the modules required for PyGame.
pygame.display.set_mode((width, height)) – This will launch a window of the desired size. The return value is a Surface object which is the object you will perform graphical operations on.
pygame.event.get() – This empties the event queue. If you do not call this, the windows messages will start to pile up and your game will become unresponsive in the opinion of the operating system.
pygame.QUIT – This is the event type that is fired when you click on the close button in the corner of the window.
pygame.display.flip() – PyGame is double-buffered so this swaps the buffers. All you need to know is that this call is required in order for any updates that you make to the game screen to become visible.
So what is the output like, when we execute the above code? It looks something like this:

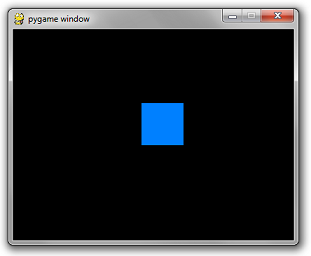
Looks rather plain, right? Let us start adding some content to our screen. We can begin by drawing a rectangle. It is simple and we use pygame.draw.rect for this purpose.
As you can imagine, this will draw a rectangle. It takes in a few arguments, including the surface to draw on , the color and the coordinates/dimensions of the rectangle.
# Add this somewhere after the event pumping and before the display.flip()
pygame.draw.rect(screen, (0, 128, 255), pygame.Rect(30, 30, 60, 60))
As you can see there are 3 arguments:
So what is it that we can see after adding that tiny piece of code?
Well, here is the output:

Seems to be nothing fancy just yet. But we can always start somewhere, right?
So next up on this PyGame Tutorial blog, let us look at how we can make the game more interactive.
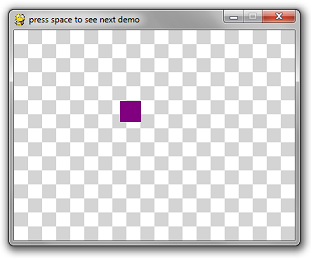
The point of a game is to be interactive. Right now, the only thing you can interact with is the close button. Which isn’t a very fun game, right? All user input events come through the event queue. Simply add more if statements to that for loop to add more interactivity.
Add the following code before the loop:
is_blue = True
Modify your rectangle code to pick a color conditionally:
if is_blue: color = (0, 128, 255)
else: color = (255, 100, 0)
pygame.draw.rect(screen, color, pygame.Rect(30, 30, 60, 60))
Finally, the important bit. Add the following if statement to your for loop in the same sequence as the other if statement in there.
if event.type == pygame.KEYDOWN and event.key == pygame.K_SPACE:
    is_blue = not is_blue
So pressing the space key will change the color of the box. Check out the following output:

Pretty easy, right? Next up on this PyGame tutorial blog, we need to check out how we can add some functionality to the game.
So, our entire code looks something like this for now. Check it out below:
import pygame

pygame.init()
screen = pygame.display.set_mode((400, 300))
done = False
is_blue = True
x = 30
y = 30

while not done:
        for event in pygame.event.get():
                if event.type == pygame.QUIT:
                        done = True
                if event.type == pygame.KEYDOWN and event.key == pygame.K_SPACE:
                        is_blue = not is_blue

        pressed = pygame.key.get_pressed()
        if pressed[pygame.K_UP]: y -= 3
        if pressed[pygame.K_DOWN]: y += 3
        if pressed[pygame.K_LEFT]: x -= 3
        if pressed[pygame.K_RIGHT]: x += 3

        if is_blue: color = (0, 128, 255)
        else: color = (255, 100, 0)
        pygame.draw.rect(screen, color, pygame.Rect(x, y, 60, 60))

        pygame.display.flip()
Let us check the output when we try to move the rectangle to the right:

So that is not what we were expecting, right?
Two things are wrong.
For the first, you simply need to reset the screen to black before you draw the rectangle. There is a simple method on Surface called fill that does this. It takes in an RGB tuple.
screen.fill((0, 0, 0))
Secondly, the duration of each frame is as short as your super fancy computer can make it. The framerate needs to be throttled at a sane number such as 60 frames per second. Luckily, there is a simple class in pygame.time called Clock that does this for us. It has a method called tick which takes in a desired fps rate.
clock = pygame.time.Clock()

...
while not done:

    ...

    # will block execution until 1/60 seconds have passed
    # since the previous time clock.tick was called.
    clock.tick(60)
Put it all together and you get:
import pygame

pygame.init()
screen = pygame.display.set_mode((400, 300))
done = False
is_blue = True
x = 30
y = 30

clock = pygame.time.Clock()

while not done:
        for event in pygame.event.get():
                if event.type == pygame.QUIT:
                        done = True
                if event.type == pygame.KEYDOWN and event.key == pygame.K_SPACE:
                        is_blue = not is_blue

        pressed = pygame.key.get_pressed()
        if pressed[pygame.K_UP]: y -= 3
        if pressed[pygame.K_DOWN]: y += 3
        if pressed[pygame.K_LEFT]: x -= 3
        if pressed[pygame.K_RIGHT]: x += 3

        screen.fill((0, 0, 0))
        if is_blue: color = (0, 128, 255)
        else: color = (255, 100, 0)
        pygame.draw.rect(screen, color, pygame.Rect(x, y, 60, 60))

        pygame.display.flip()
        clock.tick(60)
So what does the output look like now? Check it out:
Next up on this PyGame tutorial blog we will see how we can work with images and how we can integrate them into our game.
You can instantiate a blank surface by simply calling the Surface constructor with a width and height tuple.
surface = pygame.Surface((100, 100))
This will create a blank 24-bit RGB image that’s 100 x 100 pixels. The default color will be black. Blitting such an image on a white background will result in this:
However, if you want a 32-bit RGBA image, you can also include an optional argument in the Surface constructor. Just add the following line in the code:
surface = pygame.Surface((100, 100), pygame.SRCALPHA)
This will create a 100 x 100 image that’s initialized to transparent. Rendering such an image on a white background will result in this:

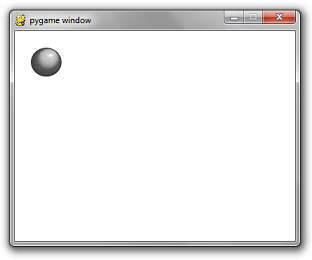
Solid color images and rectangles aren’t very interesting. Let’s use an image file:
Consider a PNG image of a ball. The fine name is ‘ball.png’. This is the image, check it out:

To load an image from file, there is a simple call to pygame.image.load()
Check out the following syntax:
image = pygame.image.load('ball.png')
Replacing the pygame.Surface((100, 100)) code with the code above will result in an output such as this. Check it out:
Do not use pygame.image.load repeatedly on the same image within your game loop. That is not an efficeint way to code. The best way to do it is to initialize it just once and use it any number of times later.
The best thing you could do is to create a string-to-surface dictionary in one centralized location. And then write a function called get_image that takes in a file path. If the image has been loaded already, then it returns the initialized image.
If not, it does the initialization. The beauty of this is that it is fast and it removes the clutter of initializing images at the beginning of key areas of the game logic. You can also use it to centralize the abstraction of directory separators for different operating systems. But a code snippet is worth a thousand words.
Here is the code snippet:
import pygame
import os

_image_library = {}
def get_image(path):
        global _image_library
        image = _image_library.get(path)
        if image == None:
                canonicalized_path = path.replace('/', os.sep).replace('', os.sep)
                image = pygame.image.load(canonicalized_path)
                _image_library[path] = image
        return image

pygame.init()
screen = pygame.display.set_mode((400, 300))
done = False
clock = pygame.time.Clock()

while not done:
        for event in pygame.event.get():
                if event.type == pygame.QUIT:
                        done = True

        screen.fill((255, 255, 255))

        screen.blit(get_image('ball.png'), (20, 20))

        pygame.display.flip()
        clock.tick(60)
Note: Windows is not case sensitive when it comes to file names. All other major operating systems are. If your file is called ball.png and you use pygame.image.load(‘BALL.PNG’) it will work if you are on windows. However, when you give your game to someone running on a mac or Linux, it will not work and might end up with an erroneous output.
Next up on this PyGame tutorial blog, let us check out how we can implement music and sound effects into our game.
pygame.mixer.music.load('foo.mp3')
pygame.mixer.music.play(0)
pygame.mixer.music.load('foo.mp3')
pygame.mixer.music.play(-1)
The number being passed in is the number of times to repeat the song. 0 will play it once.
Calling play without a number is like calling it with 0.
pygame.mixer.music.play() # play once
Queuing a song:
pygame.mixer.music.queue('next_song.mp3')
Stopping a song:
pygame.mixer.music.stop()
The stop function will also nullify any entries in the queue.
Shuffle and repeat:
If, for example, you wanted to play randomly from a list of 5 songs, one could create a list of the songs as a global:
_songs = ['song_1.mp3', 'song_2.mp3', 'song_3.mp3', 'song_4.mp3', 'song_5.mp3']
Add a flag indicating which song is currently playing:
_currently_playing_song = None
And write a function that chooses a different song randomly that gets called each time the SONG_END event is fired:
import random

def play_a_different_song():
    global _currently_playing_song, _songs
    next_song = random.choice(_songs)
    while next_song == _currently_playing_song:
        next_song = random.choice(_songs)
    _currently_playing_song = next_song
    pygame.mixer.music.load(next_song)
    pygame.mixer.music.play()
Or if you want them to play in the same sequence each time:
def play_next_song():
    global _songs
    _songs = _songs[1:] + [_songs[0]] # move current song to the back of the list
    pygame.mixer.music.load(_songs[0])
    pygame.mixer.music.play()
The music API is very centralized. However sounds require the creation of sound objects that you have to hold on to. Much like images. Sounds have a simple .play() method that will start playing the sound.
effect = pygame.mixer.Sound('beep.wav')
effect.play()
Because you can make the mistake of storing sound instances redundantly, I suggest creating a sound library much like the image library:
_sound_library = {}
def play_sound(path):
  global _sound_library
  sound = _sound_library.get(path)
  if sound == None:
    canonicalized_path = path.replace('/', os.sep).replace('', os.sep)
    sound = pygame.mixer.Sound(canonicalized_path)
    _sound_library[path] = sound
  sound.play()
There are many more features but this is really all you need to do 95% of what most games will require of you.
Next up on this PyGame Tutorial blog, let us look at how we can implement geometric shapes into the game.
Just like the mixer module, the drawing API is fairly straightforward with a few examples.
Drawing a rectangle:
pygame.draw.rect(surface, color, pygame.Rect(left, top, width, height))
Drawing a Circle:
pygame.draw.circle(surface, color, (x, y), radius)

Built-in outlines are bad, really bad!
This is the first caveat you should be aware of. PyGame’s method for creating “thicker” outlines for circles is to draw multiple 1-pixel outlines. In theory, it sounds okay, until you see the result:

The circle has noticeable pixel gaps in it. Even more embarrassing is the rectangle, which uses 4 line-draw calls at the desired thickness. This creates weird corners.
The way to do this for most drawing API calls is to pass in an optional last parameter which is the thickness.
# draw a rectangle
pygame.draw.rect(surface, color, pygame.Rect(10, 10, 100, 100), 10)
# draw a circle
pygame.draw.circle(surface, color, (300, 60), 50, 10)
Note: When you draw a polygon, rectangle, circle, etc, draw it filled in or with 1-pixel thickness. Everything else is not very well implemented.
Acceptable Outlines:
If you must draw a rectangle that has 10-pixel-thick borders, then it’s best that you re-implement the logic yourself with either 10 1-pixel-thick rectangle calls, or 4 10-pixel-thick rectangle calls for each side.

Drawing a Polygon:
This API is pretty straightforward. The point list is a list of tuples of x-y coordinates for the polygon.
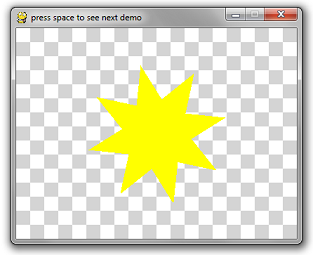
pygame.draw.polygon(surface, color, point_list)
Drawing a line:
pygame.draw.line(surface, color, (startX, startY), (endX, endY), width)
Check out this amazing 3D spinning wireframe cube created using the line method and a lot of math:

import pygame
import math
import time

# Ignore these 3 functions. Scroll down for the relevant code.

def create_background(width, height):
        colors = [(255, 255, 255), (212, 212, 212)]
        background = pygame.Surface((width, height))
        tile_width = 20
        y = 0
        while y < height:
                x = 0
                while x < width:
                        row = y // tile_width
                        col = x // tile_width
                        pygame.draw.rect(
                                background,
                                colors[(row + col) % 2],
                                pygame.Rect(x, y, tile_width, tile_width))
                        x += tile_width
                y += tile_width
        return background

def is_trying_to_quit(event):
        pressed_keys = pygame.key.get_pressed()
        alt_pressed = pressed_keys[pygame.K_LALT] or pressed_keys[pygame.K_RALT]
        x_button = event.type == pygame.QUIT
        altF4 = alt_pressed and event.type == pygame.KEYDOWN and event.key == pygame.K_F4
        escape = event.type == pygame.KEYDOWN and event.key == pygame.K_ESCAPE
        return x_button or altF4 or escape

def run_demos(width, height, fps):
        pygame.init()
        screen = pygame.display.set_mode((width, height))
        pygame.display.set_caption('press space to see next demo')
        background = create_background(width, height)
        clock = pygame.time.Clock()
        demos = [
                do_rectangle_demo,
                do_circle_demo,
                do_horrible_outlines,
                do_nice_outlines,
                do_polygon_demo,
                do_line_demo
                ]
        the_world_is_a_happy_place = 0
        while True:
                the_world_is_a_happy_place += 1
                for event in pygame.event.get():
                        if is_trying_to_quit(event):
                                return
                        if event.type == pygame.KEYDOWN and event.key == pygame.K_SPACE:
                                demos = demos[1:]
                screen.blit(background, (0, 0))
                if len(demos) == 0:
                        return
                demos[0](screen, the_world_is_a_happy_place)
                pygame.display.flip()
                clock.tick(fps)

# Everything above this line is irrelevant to this tutorial.

def do_rectangle_demo(surface, counter):
        left = (counter // 2) % surface.get_width()
        top = (counter // 3) % surface.get_height()
        width = 30
        height = 30
        color = (128, 0, 128) # purple

        # Draw a rectangle
        pygame.draw.rect(surface, color, pygame.Rect(left, top, width, height))

def do_circle_demo(surface, counter):
        x = surface.get_width() // 2
        y = surface.get_height() // 2
        max_radius = min(x, y) * 4 // 5
        radius = abs(int(math.sin(counter * 3.14159 * 2 / 200) * max_radius)) + 1
        color = (0, 140, 255) # aquamarine

        # Draw a circle
        pygame.draw.circle(surface, color, (x, y), radius)

def do_horrible_outlines(surface, counter):
        color = (255, 0, 0) # red

        # draw a rectangle
        pygame.draw.rect(surface, color, pygame.Rect(10, 10, 100, 100), 10)

        # draw a circle
        pygame.draw.circle(surface, color, (300, 60), 50, 10)

def do_nice_outlines(surface, counter):
        color = (0, 128, 0) # green

        # draw a rectangle
        pygame.draw.rect(surface, color, pygame.Rect(10, 10, 100, 10))
        pygame.draw.rect(surface, color, pygame.Rect(10, 10, 10, 100))
        pygame.draw.rect(surface, color, pygame.Rect(100, 10, 10, 100))
        pygame.draw.rect(surface, color, pygame.Rect(10, 100, 100, 10))

        # draw a circle
        center_x = 300
        center_y = 60
        radius = 45
        iterations = 150
        for i in range(iterations):
                ang = i * 3.14159 * 2 / iterations
                dx = int(math.cos(ang) * radius)
                dy = int(math.sin(ang) * radius)
                x = center_x + dx
                y = center_y + dy
                pygame.draw.circle(surface, color, (x, y), 5)


def do_polygon_demo(surface, counter):
        color = (255, 255, 0) # yellow

        num_points = 8
        point_list = []
        center_x = surface.get_width() // 2
        center_y = surface.get_height() // 2
        for i in range(num_points * 2):
                radius = 100
                if i % 2 == 0:
                        radius = radius // 2
                ang = i * 3.14159 / num_points + counter * 3.14159 / 60
                x = center_x + int(math.cos(ang) * radius)
                y = center_y + int(math.sin(ang) * radius)
                point_list.append((x, y))
        pygame.draw.polygon(surface, color, point_list)

def rotate_3d_points(points, angle_x, angle_y, angle_z):
        new_points = []
        for point in points:
                x = point[0]
                y = point[1]
                z = point[2]
                new_y = y * math.cos(angle_x) - z * math.sin(angle_x)
                new_z = y * math.sin(angle_x) + z * math.cos(angle_x)
                y = new_y
                # isn't math fun, kids?
                z = new_z
                new_x = x * math.cos(angle_y) - z * math.sin(angle_y)
                new_z = x * math.sin(angle_y) + z * math.cos(angle_y)
                x = new_x
                z = new_z
                new_x = x * math.cos(angle_z) - y * math.sin(angle_z)
                new_y = x * math.sin(angle_z) + y * math.cos(angle_z)
                x = new_x
                y = new_y
                new_points.append([x, y, z])
        return new_points

def do_line_demo(surface, counter):
        color = (0, 0, 0) # black
        cube_points = [
                [-1, -1, 1],
                [-1, 1, 1],
                [1, 1, 1],
                [1, -1, 1],
                [-1, -1, -1],
                [-1, 1, -1],
                [1, 1, -1],
                [1, -1, -1]]

        connections = [
                (0, 1),
                (1, 2),
                (2, 3),
                (3, 0),
                (4, 5),
                (5, 6),
                (6, 7),
                (7, 4),
                (0, 4),
                (1, 5),
                (2, 6),
                (3, 7)
                ]

        t = counter * 2 * 3.14159 / 60 # this angle is 1 rotation per second

        # rotate about x axis every 2 seconds
        # rotate about y axis every 4 seconds
        # rotate about z axis every 6 seconds
        points = rotate_3d_points(cube_points, t / 2, t / 4, t / 6)
        flattened_points = []
        for point in points:
                flattened_points.append(
                        (point[0] * (1 + 1.0 / (point[2] + 3)),
                         point[1] * (1 + 1.0 / (point[2] + 3))))

        for con in connections:
                p1 = flattened_points[con[0]]
                p2 = flattened_points[con[1]]
                x1 = p1[0] * 60 + 200
                y1 = p1[1] * 60 + 150
                x2 = p2[0] * 60 + 200
                y2 = p2[1] * 60 + 150

                # This is the only line that really matters
                pygame.draw.line(surface, color, (x1, y1), (x2, y2), 4)


run_demos(400, 300, 60)
Next up on this PyGame Tutorial blog, let us look at how we can work with Fonts and Text.
If you’re looking for the quick answer on how to render text, here it is:
import pygame

pygame.init()
screen = pygame.display.set_mode((640, 480))
clock = pygame.time.Clock()
done = False

font = pygame.font.SysFont("comicsansms", 72)

text = font.render("Hello, World", True, (0, 128, 0))

while not done:
    for event in pygame.event.get():
        if event.type == pygame.QUIT:
            done = True
        if event.type == pygame.KEYDOWN and event.key == pygame.K_ESCAPE:
            done = True

    screen.fill((255, 255, 255))
    screen.blit(text,
        (320 - text.get_width() // 2, 240 - text.get_height() // 2))

    pygame.display.flip()
    clock.tick(60)

But of course, there’s a few things not ideal about this.
Rule #1: You should never assume a certain font is installed on the user’s computer. Even in CSS, there is a way to define a hierarchy of fonts to use. If the best choice for a font isn’t available, an alternate is used. You should follow the same pattern. Luckily, PyGame has a way to enumerate all the fonts available on the machine:
all_fonts = pygame.font.get_fonts()
Additionally, there’s a way to instantiate the default system font:
font = pygame.font.Font(None, size)
And alternatively, you can pass in the name of a font file you include along with your code instead of None to guarantee the existence of the perfect font:
font = pygame.font.Font("myresources/fonts/Papyrus.ttf", 26)
Using any combination of the above, you can write a better font creation function. For example, here’s a function that takes a list of font names, a font size and will create a font instance for the first available font in the list. If none are available, it’ll use the default system font.
def make_font(fonts, size):
    available = pygame.font.get_fonts()
    # get_fonts() returns a list of lowercase spaceless font names
    choices = map(lambda x:x.lower().replace(' ', ''), fonts)
    for choice in choices:
        if choice in available:
            return pygame.font.SysFont(choice, size)
    return pygame.font.Font(None, size)
You can even further improve it by caching the font instance by font name and size.
_cached_fonts = {}
def get_font(font_preferences, size):
    global _cached_fonts
    key = str(font_preferences) + '|' + str(size)
    font = _cached_fonts.get(key, None)
    if font == None:
        font = make_font(font_preferences, size)
        _cached_fonts[key] = font
    return font
You can take it a step further and actually cache the rendered text itself. Storing an image is cheaper than rendering a new one, especially if you plan on having the same text show up for more than one consecutive frame. Yes. That is your plan if you want it to be readable.
_cached_text = {}
def create_text(text, fonts, size, color):
    global _cached_text
    key = '|'.join(map(str, (fonts, size, color, text)))
    image = _cached_text.get(key, None)
    if image == None:
        font = get_font(fonts, size)
        image = font.render(text, True, color)
        _cached_text[key] = image
    return image
Putting all of these together, here is the “Hello, World” code but with improved code:
import pygame

def make_font(fonts, size):
    available = pygame.font.get_fonts()
    # get_fonts() returns a list of lowercase spaceless font names
    choices = map(lambda x:x.lower().replace(' ', ''), fonts)
    for choice in choices:
        if choice in available:
            return pygame.font.SysFont(choice, size)
    return pygame.font.Font(None, size)

_cached_fonts = {}
def get_font(font_preferences, size):
    global _cached_fonts
    key = str(font_preferences) + '|' + str(size)
    font = _cached_fonts.get(key, None)
    if font == None:
        font = make_font(font_preferences, size)
        _cached_fonts[key] = font
    return font

_cached_text = {}
def create_text(text, fonts, size, color):
    global _cached_text
    key = '|'.join(map(str, (fonts, size, color, text)))
    image = _cached_text.get(key, None)
    if image == None:
        font = get_font(fonts, size)
        image = font.render(text, True, color)
        _cached_text[key] = image
    return image

pygame.init()
screen = pygame.display.set_mode((640, 480))
clock = pygame.time.Clock()
done = False

font_preferences = [
        "Bizarre-Ass Font Sans Serif",
        "They definitely dont have this installed Gothic",
        "Papyrus",
        "Comic Sans MS"]

text = create_text("Hello, World", font_preferences, 72, (0, 128, 0))

while not done:
    for event in pygame.event.get():
        if event.type == pygame.QUIT:
            done = True
        if event.type == pygame.KEYDOWN and event.key == pygame.K_ESCAPE:
            done = True

    screen.fill((255, 255, 255))
    screen.blit(text,
        (320 - text.get_width() // 2, 240 - text.get_height() // 2))

    pygame.display.flip()
    clock.tick(60)
Next up on this Pygame tutorial blog, we need to look at how we can consider inputs.
There are two basic ways to get the state of any input device. Those are checking the event queue or polling. Every time a key or button is pressed or released, or the mouse is moved, an event is added to the event queue. You must empty this event queue out each frame by either calling pygame.event.get() or pygame.event.pump().
pygame.event.get() will return a list of all the events since the last time you emptied the queue. The way to handle those events depends on the type of event itself. The type of event can be checked by reading the event.type field. Examples of pretty much each type of common event can be seen in the extended code sample below. There are more types, but they are fairly uncommon.
The other way to check for events is to poll for the state of keys or buttons.
pygame.key.get_pressed() – This will get a list of booleans that describes the state of each keyboard key.
pygame.mouse.get_pos() – Returns the coordinates of the mouse cursor. Will return (0, 0) if the mouse hasn’t moved over the screen yet.
pygame.mouse.get_pressed() – Like pygame.key.get_pressed(), returns the state of each mouse button. The value returned is a tuple of size 3 that corresponds to the left, middle, and right buttons.
Here’s a little program that has a bit of everything:
import pygame

def main():
    pygame.init()
    screen = pygame.display.set_mode((640, 480))
    clock = pygame.time.Clock()

    radius = 15
    x = 0
    y = 0
    mode = 'blue'
    points = []

    while True:

        pressed = pygame.key.get_pressed()

        alt_held = pressed[pygame.K_LALT] or pressed[pygame.K_RALT]
        ctrl_held = pressed[pygame.K_LCTRL] or pressed[pygame.K_RCTRL]

        for event in pygame.event.get():

            # determin if X was clicked, or Ctrl+W or Alt+F4 was used
            if event.type == pygame.QUIT:
                return
            if event.type == pygame.KEYDOWN:
                if event.key == pygame.K_w and ctrl_held:
                    return
                if event.key == pygame.K_F4 and alt_held:
                    return
                if event.key == pygame.K_ESCAPE:
                    return

                # determine if a letter key was pressed
                if event.key == pygame.K_r:
                    mode = 'red'
                elif event.key == pygame.K_g:
                    mode = 'green'
                elif event.key == pygame.K_b:
                    mode = 'blue'

            if event.type == pygame.MOUSEBUTTONDOWN:
                if event.button == 1: # left click grows radius
                    radius = min(200, radius + 1)
                elif event.button == 3: # right click shrinks radius
                    radius = max(1, radius - 1)

            if event.type == pygame.MOUSEMOTION:
                # if mouse moved, add point to list
                position = event.pos
                points = points + [position]
                points = points[-256:]

        screen.fill((0, 0, 0))

        # draw all points
        i = 0
        while i < len(points) - 1:
            drawLineBetween(screen, i, points[i], points[i + 1], radius, mode)
            i += 1

        pygame.display.flip()

        clock.tick(60)

def drawLineBetween(screen, index, start, end, width, color_mode):
    c1 = max(0, min(255, 2 * index - 256))
    c2 = max(0, min(255, 2 * index))

    if color_mode == 'blue':
        color = (c1, c1, c2)
    elif color_mode == 'red':
        color = (c2, c1, c1)
    elif color_mode == 'green':
        color = (c1, c2, c1)

    dx = start[0] - end[0]
    dy = start[1] - end[1]
    iterations = max(abs(dx), abs(dy))

    for i in range(iterations):
        progress = 1.0 * i / iterations
        aprogress = 1 - progress
        x = int(aprogress * start[0] + progress * end[0])
        y = int(aprogress * start[1] + progress * end[1])
        pygame.draw.circle(screen, color, (x, y), width)

main()
Lastly on this PyGame tutorial blog, we need to check out something called as the centralized scene logic.
This isn’t a PyGame-specific tutorial per-se. It’s more of an application of good software design concepts. This model of doing things has served me well for many complicated games.
If you are not familiar with Object-Oriented programming in Python, familiarize yourself now.
Done? Excellent.
Here is a class definition for a SceneBase:
class SceneBase:
def __init__(self):
self.next = self

def ProcessInput(self, events):
print("uh-oh, you didn't override this in the child class")

def Update(self):
print("uh-oh, you didn't override this in the child class")

def Render(self, screen):
print("uh-oh, you didn't override this in the child class")

def SwitchToScene(self, next_scene):
self.next = next_scene
When you override this class, you have 3 method implementations to fill in.
Of course, this class needs the appropriate harness to work. Here is an example program that does something simple: It launches the PyGame pipeline with a scene that is a blank red background. When you press the ENTER key, it changes to blue.
This code may seem like overkill, but it does lots of other subtle things as well while at the same time keeps the complexity of your game logic contained into a snazzy OO model. Once you start adding more complexity to your game, this model will save you lots of time from debugging and changing code.
import pygame

def main():
    pygame.init()
    screen = pygame.display.set_mode((640, 480))
    clock = pygame.time.Clock()

    radius = 15
    x = 0
    y = 0
    mode = 'blue'
    points = []

    while True:

        pressed = pygame.key.get_pressed()

        alt_held = pressed[pygame.K_LALT] or pressed[pygame.K_RALT]
        ctrl_held = pressed[pygame.K_LCTRL] or pressed[pygame.K_RCTRL]

        for event in pygame.event.get():

            # determin if X was clicked, or Ctrl+W or Alt+F4 was used
            if event.type == pygame.QUIT:
                return
            if event.type == pygame.KEYDOWN:
                if event.key == pygame.K_w and ctrl_held:
                    return
                if event.key == pygame.K_F4 and alt_held:
                    return
                if event.key == pygame.K_ESCAPE:
                    return

                # determine if a letter key was pressed
                if event.key == pygame.K_r:
                    mode = 'red'
                elif event.key == pygame.K_g:
                    mode = 'green'
                elif event.key == pygame.K_b:
                    mode = 'blue'

            if event.type == pygame.MOUSEBUTTONDOWN:
                if event.button == 1: # left click grows radius
                    radius = min(200, radius + 1)
                elif event.button == 3: # right click shrinks radius
                    radius = max(1, radius - 1)

            if event.type == pygame.MOUSEMOTION:
                # if mouse moved, add point to list
                position = event.pos
                points = points + [position]
                points = points[-256:]

        screen.fill((0, 0, 0))

        # draw all points
        i = 0
        while i < len(points) - 1:
            drawLineBetween(screen, i, points[i], points[i + 1], radius, mode)
            i += 1

        pygame.display.flip()

        clock.tick(60)

def drawLineBetween(screen, index, start, end, width, color_mode):
    c1 = max(0, min(255, 2 * index - 256))
    c2 = max(0, min(255, 2 * index))

    if color_mode == 'blue':
        color = (c1, c1, c2)
    elif color_mode == 'red':
        color = (c2, c1, c1)
    elif color_mode == 'green':
        color = (c1, c2, c1)

    dx = start[0] - end[0]
    dy = start[1] - end[1]
    iterations = max(abs(dx), abs(dy))

    for i in range(iterations):
        progress = 1.0 * i / iterations
        aprogress = 1 - progress
        x = int(aprogress * start[0] + progress * end[0])
        y = int(aprogress * start[1] + progress * end[1])
        pygame.draw.circle(screen, color, (x, y), width)

main()
I hope this PyGame tutorial helps you to kickstart your learning on PyGame. After reading this blog on PyGame Tutorial using Python, I am pretty sure you want to know more about Python. To know more about Python you can refer the following blogs:
I think the following blogs on Python concepts will interest you as well. Check it out:
If you have any questions regarding this tutorial, please let me know in the comments.
Do develop some games using the tutorial and let me know in the comments section below, I’d be play some games!


 Thank you for registering Join Edureka Meetup community for 100+ Free Webinars each month JOIN MEETUP GROUP