Angular JS is a JavaScript framework that enables the developers to create dynamic web pages. The main advantage of using this framework is that it is extensible and flexible i.e, it works well with other libraries like Bootstrap, and its features can be easily modified to suit the development workflow and meet the future requirement needs. In this article, we will learn about Pagination in Angular JS in the following order:
Moving on with this article of Pagination in Angular JS
Introduction to Pagination
In simple words, Pagination is the process of dividing the single-page website content into multiple webpages. This feature is mainly used by search engines like Google and Bing, and by content-based websites to make them user-friendly. This increases the number of page views, and consequently the ad revenue.
Take a look at the pagination used by Google.

Such a pagination system can also be created using AngularJS, Bootstrap(CSS Framework helpful in developing device responsive websites), and AngularUI (a companion suite to AngularJS). Therefore, we will start by embedding all of these to our ‘index.html’ page.
<img src="data:image/gif;base64,R0lGODlhAQABAIAAAAAAAP///yH5BAEAAAAALAAAAAABAAEAAAIBRAA7" data-wp-preserve="%3Cscript%20data-require%3D%22angular.js%401.1.5%22%20data-semver%3D%221.1.5%22%20src%3D%22http%3A%2F%2Fcode.angularjs.org%2F1.1.5%2Fangular.min.js%22%3E%3C%2Fscript%3E" data-mce-resize="false" data-mce-placeholder="1" class="mce-object" width="20" height="20" alt="<script>" title="<script>" /> <link data-require="bootstrap-css@2.3.2" data-semver="2.3.2" rel="stylesheet" href="//netdna.bootstrapcdn.com/twitter-bootstrap/2.3.2/css/bootstrap-combined.min.css" /> <img src="data:image/gif;base64,R0lGODlhAQABAIAAAAAAAP///yH5BAEAAAAALAAAAAABAAEAAAIBRAA7" data-wp-preserve="%3Cscript%20data-require%3D%22angular-ui-bootstrap%400.3.0%22%20data-semver%3D%220.3.0%22%20src%3D%22http%3A%2F%2Fangular-ui.github.io%2Fbootstrap%2Fui-bootstrap-tpls-0.3.0.min.js%22%3E%3C%2Fscript%3E" data-mce-resize="false" data-mce-placeholder="1" class="mce-object" width="20" height="20" alt="<script>" title="<script>" /> <link rel="stylesheet" href="//netdna.bootstrapcdn.com/twitter-bootstrap/2.3.2/css/bootstrap-combined.min.css" data-require="bootstrap-css@2.3.2" data-semver="2.3.2" />
Copy and paste this code chunk inside the ‘head’ tag of the index page.
To make the things easy to understand, we will first have a glance at the index.html and the app.js file. Then we will proceed for the output and the explanation part.
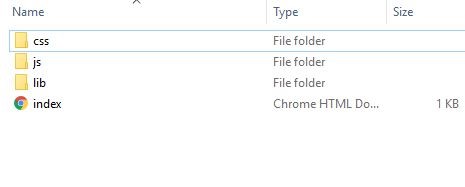
This is the folder distribution of the project. The css and js folders contain the stylesheets and the JavaScript files respectively; the lib folder contains the ‘angular.min.js’ file and the ‘ui-bootstrap-tpls-0.3.0.min.js’ file. Both of these files must be present in the project folder to make the application function properly. You can either download these files or just copy-paste the code chunk provided above.
Check out the Angular Course Online by Edureka, a trusted online learning company with a network of more than 250,000 satisfied learners spread across the globe. Angular is a JavaScript framework that is used to create scalable, enterprise, and performance client-side web applications. With Angular framework adoption being high, performance management of the application is community-driven indirectly driving better job opportunities.
Moving on with this article of Pagination in Angular JS
Pagination in Angular JS Example
Source Code
index.html
<!DOCTYPE html>
<html ng-app="myApp">
<head >
<img src="data:image/gif;base64,R0lGODlhAQABAIAAAAAAAP///yH5BAEAAAAALAAAAAABAAEAAAIBRAA7" data-wp-preserve="%3Cscript%20data-require%3D%22angular.js%401.1.5%22%20data-semver%3D%221.1.5%22%20src%3D%22http%3A%2F%2Fcode.angularjs.org%2F1.1.5%2Fangular.min.js%22%3E%3C%2Fscript%3E" data-mce-resize="false" data-mce-placeholder="1" class="mce-object" width="20" height="20" alt="<script>" title="<script>" />
<link data-require="bootstrap-css@2.3.2" data-semver="2.3.2" rel="stylesheet" href="//netdna.bootstrapcdn.com/twitter-bootstrap/2.3.2/css/bootstrap-combined.min.css" />
<img src="data:image/gif;base64,R0lGODlhAQABAIAAAAAAAP///yH5BAEAAAAALAAAAAABAAEAAAIBRAA7" data-wp-preserve="%3Cscript%20data-require%3D%22angular-ui-bootstrap%400.3.0%22%20data-semver%3D%220.3.0%22%20src%3D%22http%3A%2F%2Fangular-ui.github.io%2Fbootstrap%2Fui-bootstrap-tpls-0.3.0.min.js%22%3E%3C%2Fscript%3E" data-mce-resize="false" data-mce-placeholder="1" class="mce-object" width="20" height="20" alt="<script>" title="<script>" />
<link rel="stylesheet" href="style.css" />
<img src="data:image/gif;base64,R0lGODlhAQABAIAAAAAAAP///yH5BAEAAAAALAAAAAABAAEAAAIBRAA7" data-wp-preserve="%3Cscript%20src%3D%22script.js%22%3E%3C%2Fscript%3E" data-mce-resize="false" data-mce-placeholder="1" class="mce-object" width="20" height="20" alt="<script>" title="<script>" />
<img src="data:image/gif;base64,R0lGODlhAQABAIAAAAAAAP///yH5BAEAAAAALAAAAAABAAEAAAIBRAA7" data-wp-preserve="%3Cscript%20src%3D%22app.js%22%3E%3C%2Fscript%3E" data-mce-resize="false" data-mce-placeholder="1" class="mce-object" width="20" height="20" alt="<script>" title="<script>" />
</head>
<img src="data:image/gif;base64,R0lGODlhAQABAIAAAAAAAP///yH5BAEAAAAALAAAAAABAAEAAAIBRAA7" data-wp-preserve="%3Cstyle%3E%0Abody%7B%0Amargin%3A2%25%3B%0Afont-size%3A120%25%3B%0A%7D%0A%0Ath%2C%20td%7B%0Apadding%3A20px%3B%0A%7D%0A%3C%2Fstyle%3E" data-mce-resize="false" data-mce-placeholder="1" class="mce-object" width="20" height="20" alt="<style>" title="<style>" />
<body ng-controller="ListController as list">
<h1>Most centuries in International Cricket</h1>
<table border=1>
<thead>
<tr>
<th>S.No</th>
<th>Name</th>
<th>Role</th>
<th>Nationality</th>
<th>International Centuries</th>
<th>Active</th>
</tr>
</thead>
<tr ng-repeat="item in filteredItems">
<td> {{item.sno}} </td>
<td> {{item.name}} </td>
<td> {{item.role}} </td>
<td> {{item.nationality}} </td>
<td> {{item.centuries}} </td>
<td> {{item.active}} </td>
</tr>
</table>
<div data-pagination="" data-num-pages="numOfPages()" data-current-page="curPage" data-max-size="maxSize" data-boundary-links="true"></div>
</body>
</html>
app.js
var app = angular.module('myApp', ['ui.bootstrap']);

app.controller('ListController', function($scope){

$scope.curPage = 1,
$scope.itemsPerPage = 3,
$scope.maxSize = 5;

this.items = itemsDetails;

$scope.numOfPages = function () {
return Math.ceil(itemsDetails.length / $scope.itemsPerPage);

};

$scope.$watch('curPage + numPerPage', function() {
var begin = (($scope.curPage - 1) * $scope.itemsPerPage),
end = begin + $scope.itemsPerPage;

$scope.filteredItems = itemsDetails.slice(begin, end);
});
});

var itemsDetails = [
{ sno : 1,
name : 'Sachin Tendulkar',
role : 'Batsman',
nationality : 'Indian',
centuries : 100,
active : "No",
},
{ sno : 2,
name : 'Ricky Ponting',
role : 'Batsman',
nationality : 'Australian',
centuries : 71,
active : "No",
},
{ sno : 3,
name : 'Virat Kohli',
role : 'Batsman',
nationality : 'Indian',
centuries : 68,
active : "Yes",
},
{ sno : 4,
name : 'Kumar Sangakkara',
role : 'Wicketkeeper Batsman',
nationality : 'Sri Lankan',
centuries : 63,
active : "No",
},
{ sno : 5,
name : 'Jacques Kallis',
role : 'All Rounder',
nationality : 'South African',
centuries : 62,
active : "No",
},
{ sno : 6,
name : 'Hashim Amla',
role : 'Batsman',
nationality : 'South Indian',
centuries : 55,
active : "No",
},
{ sno : 7,
name : 'Mahela Jayawardene',
role : 'Batsman',
nationality : 'Sri Lankan',
centuries : 54,
active : "No",
},
{ sno : 8,
name : 'Brian Lara',
role : 'Batsman',
nationality : 'West Indies',
centuries : 53,
active : "No",
},
{ sno : 9,
name : 'Rahul Dravid',
role : 'Batsman',
nationality : 'Indian',
centuries : 48,
active : "No",
},
{ sno : 10,
name : 'AB de Villiers',
role : 'Wicketkeeper Batsman',
nationality : 'South African',
centuries : 47,
active : "No",
},

];
Moving on with this article of Pagination Angular JS
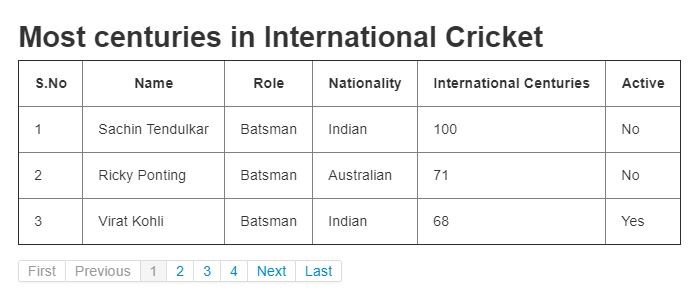
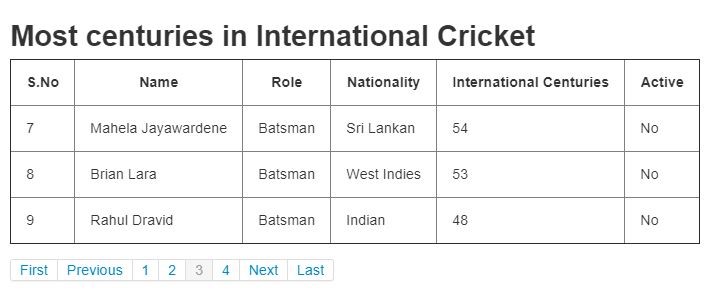
Output
First Page
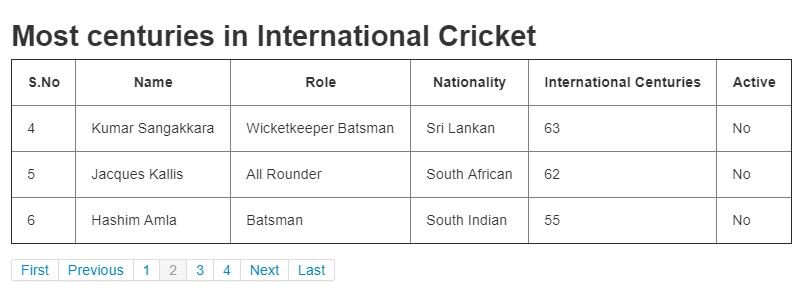
 Second Page
Third Page
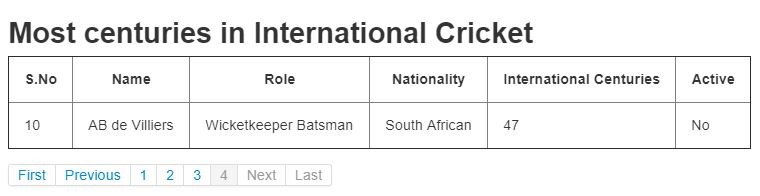
Fourth Page
You can have a live demonstration of the project by clicking this link here.
Moving on with this article of Pagination Angular JS
Learn the secrets of stunning UI/UX design with our UI UX Design Course.
Code Explanation
The webpage displays the highest century scorers in international cricket across all the formats. The pagination system allows only three names to be displayed in the tabular form, on a single webpage. To see the next three names, we must go to the second page. A total of four pages will be created, and the last page will display only one name in the table.
Starting with the app.js page.
We will start with adding ui.boostrap as a dependency to our AngularJS application. This is a necessary step as without this, our pagination bar will not get displayed and will not function properly.
$scope.curPage = 1, //starting page of pagination
$scope.itemsPerPage = 3, //number of names to be displayed per page
$scope.maxSize = 5; //maximum number of pages
The ‘curPage’ scope variable has been assigned the value of 1. This means that the first page will be default page to be displayed once the webpage loads.
The ‘itemsPerPage’ scope variable equals to the number of player names we want to display on one page. In this case, it is 3.
The ‘maxSize’ scope variable equals to the maximum number of pages, allowed in the pagination system.
this.items = itemsDetails;
In this line, we are initiating the ‘itemDetails’ variable. To know more about ‘this’ keyword in JavaScript, follow this MDN link.
$scope.numOfPages = function () {
return Math.ceil(itemsDetails.length / $scope.itemsPerPage);
};
In this line, we have created a function and stored in the ‘numOfPages’ scope variable. As the name already suggests, this function calculates the number of pages that will be in the pagination system.
In our example, we have 10 players in the ‘itemDetails’ array and the ‘itemsPerPage’ has been set to 3. Dividing 10 by 3 leaves us with 3.3333. The ‘Math.Ceil()’ function rounds up any number to the next largest integer. Therefore, 3.3333 gets rounded up to 4, and that is exactly the number of pages that are required to display 10 names with 3 names each page.
$scope.$watch('curPage + numPerPage', function() {
var begin = (($scope.curPage - 1) * $scope.itemsPerPage),
end = begin + $scope.itemsPerPage;

$scope.filteredItems = itemsDetails.slice(begin, end);
});
Here, we are defining a function that will determine the array values that will be displayed. We know that we have 10 items in the ‘itemsDetails’ array. This means that the array indexing will range from 0 to 9.
Each page displays three names, this means that the array items with index 0, 1 and 2 will be needed for the first page.
For the first page, the value of ‘curPage’ will be 0. This will make the value of begin as 0. It will help us in getting the first index value of the array. The value of the ‘end’ variable will be 0 + 3 = 3.
Now to get the first three elements, we will use the JavaScript ‘slice’ method. The slice() method selects the elements starting at the start argument but does not include the end argument. This means that it will select 0, 1 and 2 but not 3.
This will help in displaying the first three names from the itemDetails array.
Similarly, for the second page, the value of the ‘start’ and ‘end’ variable will be 3 and 6 respectively. The slice() method will select the items with index 3, 4 and 5. Thus, displaying the next three names from the array. This process will go on until the final page is reached.
Now coming to the index.html page. We will start by embedding the required frameworks and libraries. The items of the array will be displayed on the webpage in tabular form. We will use ‘ng-repeat’ service to iterate over the array and get the desired values.
The expressions are written inside the double braces. It helps in data binding to the HTML after the expressions are resolved. In simple words, this helps in displaying the names to the user.
This empty div is necessary to display the pagination bar. All the terms used here like ‘data-pagination’, ‘data-max-size’, etc are pre-defined and we just have to put the correct values for proper functioning.
This is how a proper pagination system is created using AngularJS.
NOTE 01: Do not forget to use the localhost while using the $http service, otherwise you may encounter CORS issues. A working server is required to send a get request and then to receive the data.
NOTE 02: Do not forget to embed the required frameworks and libraries.
With this, we come to an end of this article om Pagination in Angular JS.
Boost your mobile app development skills with a Flutter Certification Training and become a valuable asset to any team.
Now that you know about Pagination in Angular JS, check out the Web Development Certification Training by Edureka. Web Development Certification Training will help you learn how to create impressive websites using HTML5, CSS3, Twitter Bootstrap 3, jQuery and Google APIs and deploy it to Amazon Simple Storage Service(S3).
Got a question for us? Please mention it in the comments section of “Pagination in Angular JS” and we will get back to you.