Python Scripting Certification Training
- 15k Enrolled Learners
- Weekend
- Self Paced
(5900)


 Copy Link!
_(1)_(1)_(1)_1648290397.jpg)
MySQL is one of the most preferred databases by the developers as it is open-sourced as well as efficient. This is why most prominent programming languages like Java, Python, Node.js, etc, provide drivers to access and perform transactions with MySQL. In this Node.js MySQL tutorial, I will demonstrate how to establish a connection with MySQL and perform various CRUD operations in a few simple and easy steps.
Below is the detailed list of the topics that will be discussed in this Node.js MySQL Tutorial:
Let me start off this Node.js MySQL tutorial by addressing the most basic question i.e why do we use MySQL.
In very simple terms, MySQL is an open-source relational database management system which can operate on various platforms. It is an Oracle product that provides multi-user access to support a number of storage engines. Not only this, MySQL has a number of intriguing features as well which leverages the performance of an application by a notch. Below I have listed down a few of them:
I guess now you are pretty much familiar with the reason why MySQL is so heavily used in the market. If you wish to learn more about it, you can refer to this article on MySQL Tutorial. Moving ahead, let’s see how to install and get started with MySQL in your local system.
There are various ways in which you can install MySQL in your system. The easiest way to install MySQL is by using the MySQL Installer. You can download it from MySQL official site.
Now, why I am using this is because MySQL Installer is a standalone application that eases the complexity of installing and configuring MySQL products. To know more about it, you can refer to this article on MySQL Workbench.
Now that we are done with the installation, let us try to integrate MySQL with a Node.js application.
Here I will be creating a simple CRUD application using Node.js and link it with MySQL database to store the data of learners in it. Since my main aim is to demonstrate data transactions from the database, I will be mainly focussing on the controllers. Once you have enough knowledge on the controller, you can add the View to it.
For now, let’s concentrate on our project. This project will be having the below project structure:
So let’s begin the application development by creating a directory for the project. Once you are done, open the command prompt and navigate to your project directory. Now you need to set up the project configurations for that, type in the below command and provide the necessary details:
npm init
Now, you need to install the required packages. In this project, I am using the below packages:
In order to install these packages, type in the following command:
npm i --s express express-handlebars mongoose body-parser
Since I want to install nodemon such that it can access any file in the directory, I will be installing it with the global command:
npm i -g nodemon
Once you are done installing with the packages, your final JSON file should look like the below file:
package.json
{
"name": "samplenodemysql",
"version": "1.0.0",
"description": "Edureka Demo for creating a CRUD application using Node.js and MySQL",
"main": "script.js",
"scripts": {
"test": "echo "Error: no test specified" && exit 1"
},
"author": "Edureka",
"license": "ISC",
"dependencies": {
"body-parser": "^1.19.0",
"express": "^4.16.4",
"mysql": "^2.17.1"
}
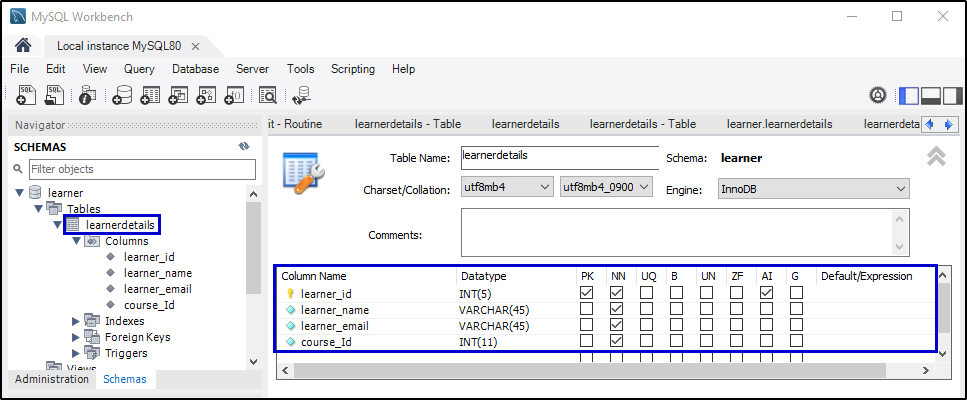
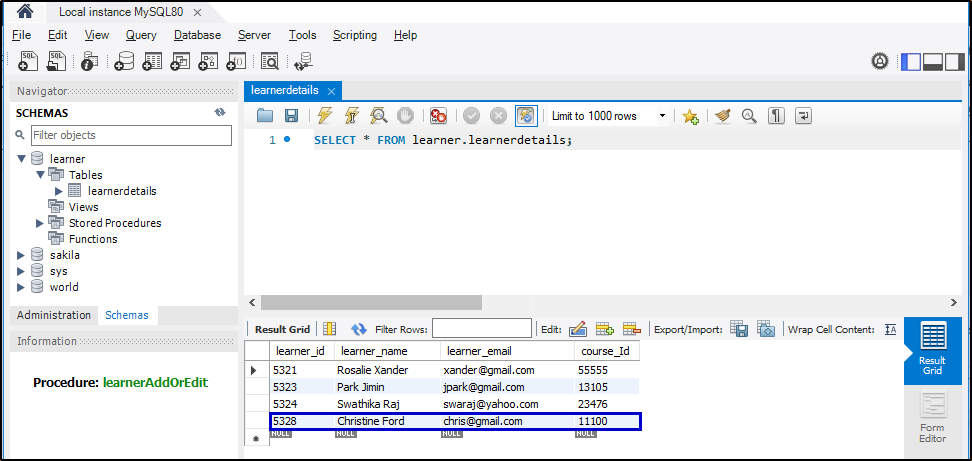
}As you can see, in the dependencies section all the installed packages have been successfully listed. So lets now create the database we will be using in this demo. For that launch a new connection in MySQL Workbench. Once inside, create a new database with the name ‘learners’. Now, within this database, create a new table with the name ‘learnerdetails’ and the following columns:
Add a few values in the table so that we can access and test them from our Node.js application.
Coming back to the application, the next step is to create the script.js file which will help in retrieving the data from the freshly created database. Script.js is the root file and also acts as the entry point of this application. It will contain all the routers and drivers in it. Along with this, it is also responsible for invoking the server and establish the connection.
To create this file, you can use any code editor or IDE. I am using Webstorm IDE to develop this application. First of all, you need to import the required packages in your application and for that, you need to type in the below code:
const mysql = require('mysql');
const express = require('express');
const bodyparser = require('body-parser');
var app = express();
//Configuring express server
app.use(bodyparser.json());
Next, you need to establish a connection with your MySQL database. For that, you have to use the createConnection() function and provide the required details such as host, user, password and database. Be very careful while entering the details else the MySQL won’t authorize the connection.
//MySQL details
var mysqlConnection = mysql.createConnection({
host: 'localhost',
user: 'root',
password: 'edu1234',
database: 'learner',
multipleStatements: true
});
After that, use the connect() function to connect establish the connection with the database using provided credentials. Here you need to specify what Node.js should do if the connection is successful and what should be done if the connection fails.
mysqlConnection.connect((err)=> {
if(!err)
console.log('Connection Established Successfully');
else
console.log('Connection Failed!'+ JSON.stringify(err,undefined,2));
});
Finally, you need to specify the port as well, since we will be sending our requests to the server over HTTP.
//Establish the server connection
//PORT ENVIRONMENT VARIABLE
const port = process.env.PORT || 8080;
app.listen(port, () => console.log(`Listening on port ${port}..`));
Now, in the terminal type in the below command:
nodemon script.js
Once you hit enter and your connection is successful, you will be able to see the successful message in the terminal as shown in the below snapshot: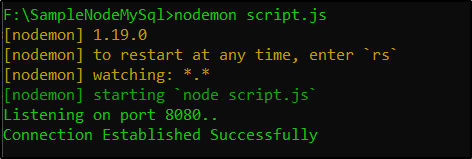
Now let’s move ahead and try to create our GET router to fetch the complete list of learners from the database along with their details. Refer the below code:
//Creating GET Router to fetch all the learner details from the MySQL Database
app.get('/learners' , (req, res) => {
mysqlConnection.query('SELECT * FROM learnerdetails', (err, rows, fields) => {
if (!err)
res.send(rows);
else
console.log(err);
})
} );
I will be using another application to make my requests called Postman. Postman can be easily added to your browser as a plugin. It helps in organizing the requests from the client and store the request history as well. So, once you have installed POSTMAN for Node.js in your system, you can go ahead and launch it. Now, select GET from the drop-down list and type in the below URL: http://localhost:8080/learners
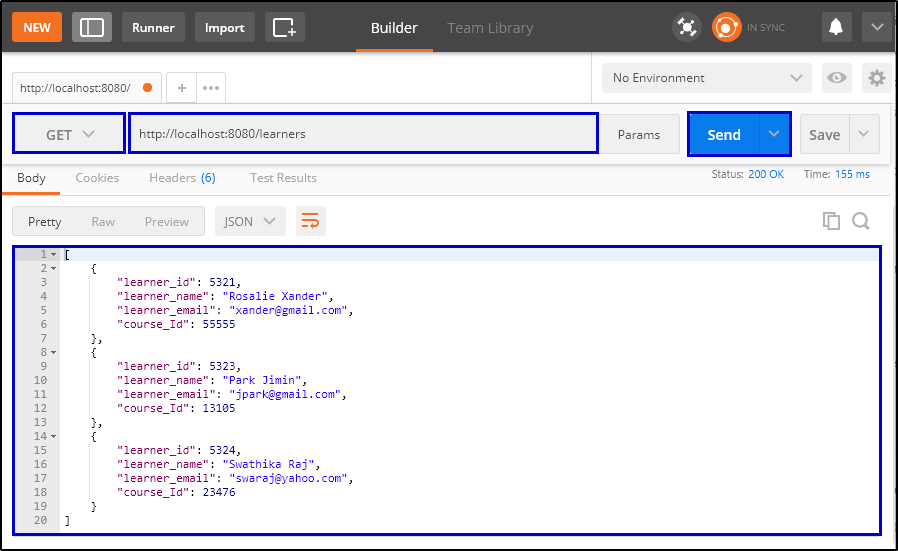 It will display you the complete list of learners from the database in the response section.
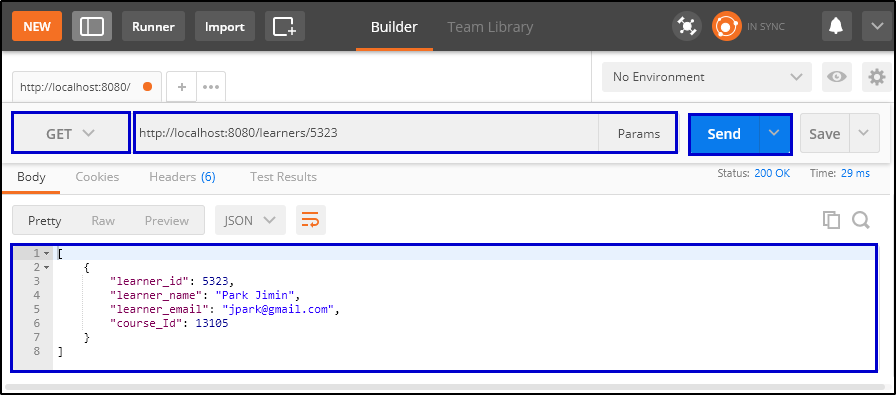
Next, let’s try to create a router to fetch the details of a specific learner by passing in the learner’s ID. Type in the below code to create this router.
//Router to GET specific learner detail from the MySQL database
app.get('/learners/:id' , (req, res) => {
mysqlConnection.query('SELECT * FROM learnerdetails WHERE learner_id = ?',[req.params.id], (err, rows, fields) => {
if (!err)
res.send(rows);
else
console.log(err);
})
} );
Let’s try sending a request with specific ID of a learner in the POSTMAN.
Moving ahead, let’s create a router to add the details of a new learner. But before that, you need to create a Stored Procedure in your database which can process your insert or update requests. For that open up MySQL workbench. Under your learner database, you will find a ‘Stored Procedure’. Right click on that to create a stored procedure and name it ‘learnerAddOrEdit’.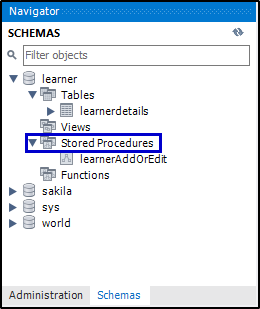
Type in the below codes to define all the required routines:
learnerAddOrEdit
CREATE DEFINER=`root`@`localhost` PROCEDURE `learnerAddOrEdit`(
IN _learner_id INT,
IN _learner_name VARCHAR(45),
IN _learner_email VARCHAR(45),
IN _course_Id INT
)
BEGIN
IF _learner_id = 0 THEN
INSERT INTO learnerdetails(learner_name,learner_email,course_Id)
VALUES (_learner_name,_learner_email,_course_Id);
SET _learner_id = last_insert_id();
ELSE
UPDATE learnerdetails
SET
learner_name = _learner_name,
learner_email = _learner_email,
course_Id = _course_Id
WHERE learner_id = _learner_id;
END IF;
SELECT _learner_id AS 'learner_id';
END
Once done, switch back to the script.js file, and type in the below code for the POST request.
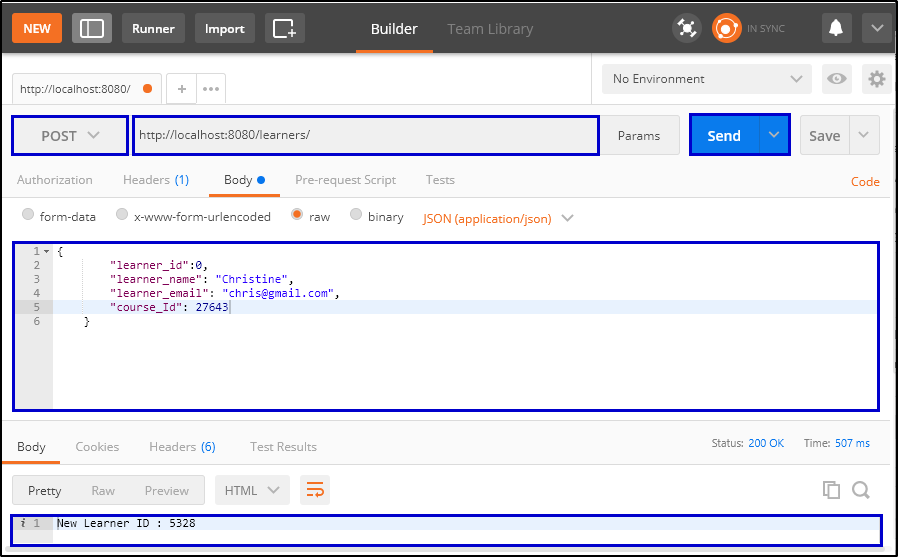
//Router to INSERT/POST a learner's detail
app.post('/learners', (req, res) => {
let learner = req.body;
var sql = "SET @learner_id = ?;SET @learner_name = ?;SET @learner_email = ?;SET @course_Id = ?;
CALL learnerAddOrEdit(@learner_id,@learner_name,@learner_email,@course_Id);";
mysqlConnection.query(sql, [learner.learner_id, learner.learner_name, learner.learner_email, learner.course_Id], (err, rows, fields) => {
if (!err)
rows.forEach(element => {
if(element.constructor == Array)
res.send('New Learner ID : '+ element[0].learner_id);
});
else
console.log(err);
})
});
According to our code, learner ID with value 0 indicates that the particular entry is new to the database. So, whenever you are making an Insert request make sure you pass the ID as 0. Now open POSTMAN, select POST from the dropdown list provide the URL and enter learners details in the body section.
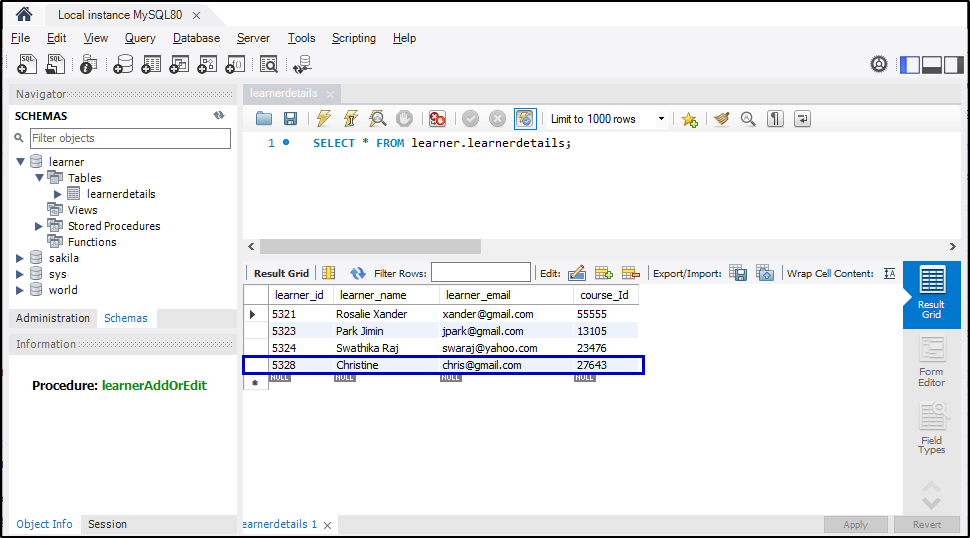
Now when you try to fetch the complete list of the learners, you will see the newly inserted record as well. Just to crosscheck, you can open your workbench and hit the refresh button to see the new record in the table.
Next, you need to create a router to update the learner details. In order to do that, type in the below code:
//Router to UPDATE a learner's detail
app.put('/learners', (req, res) => {
let learner = req.body;
var sql = "SET @learner_id = ?;SET @learner_name = ?;SET @learner_email = ?;SET @course_Id = ?;
CALL learnerAddOrEdit(@learner_id,@learner_name,@learner_email,@course_Id);";
mysqlConnection.query(sql, [learner.learner_id, learner.learner_name, learner.learner_email, learner.course_Id], (err, rows, fields) => {
if (!err)
res.send('Learner Details Updated Successfully');
else
console.log(err);
})
});
Let’s try implementing the UPDATE request. For that, go back to POSTMAN and select PUT from the drop-down list and provide the URL.
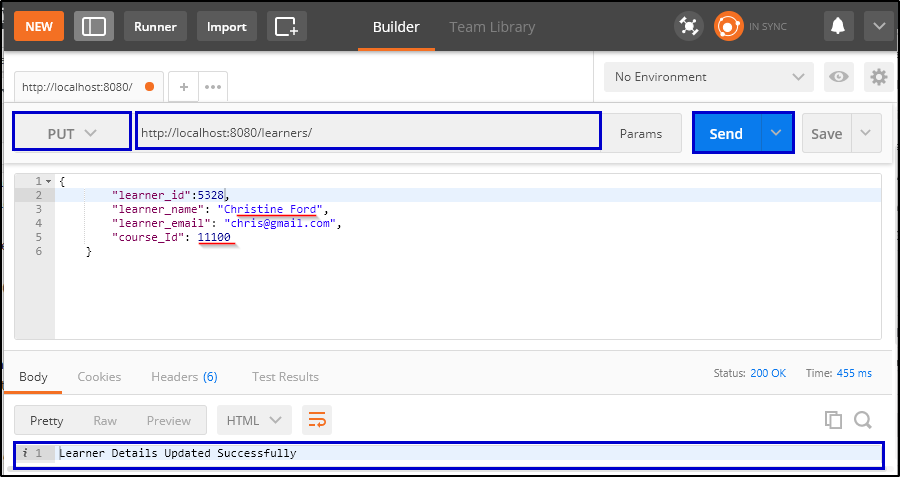
Now if you go back to your MySQL workbench and do a refresh, you will see the particular record has been updated.
Finally, let’s create the DELETE router. For this, type in the below given code.
//Router to DELETE a learner's detail
app.delete('/learners/:id', (req, res) => {
mysqlConnection.query('DELETE FROM learnerdetails WHERE learner_id = ?', [req.params.id], (err, rows, fields) => {
if (!err)
res.send('Learner Record deleted successfully.');
else
console.log(err);
})
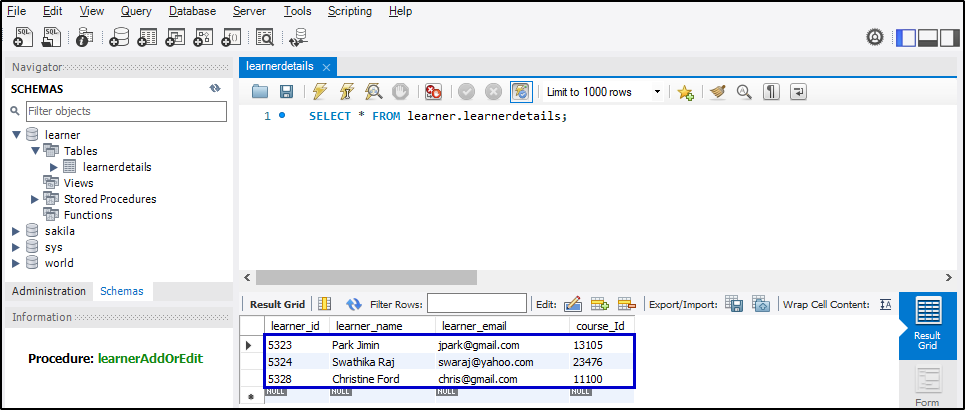
});Once done, go to the POSTMAN and select DELETE from the dropdown list. In the URL, provide the specific learner id whose details you want to remove. Once you hit send, you can see the Success message in the response body.
 In order to crosscheck, you can go back to your Workbench and hit refresh. You will see the record with the provided id has been removed from the table.
This brings us to the end of this article on Node.js MySQL Tutorial. Hope, it helped in adding value to your knowledge. If you want to gain more insights on Node.js you can refer to my other articles on Node.js as well.
If you found this “Node.js MySQL Tutorial” relevant, check out the Node.js Course by Edureka, a trusted online learning company with a network of more than 250,000 satisfied learners spread across the globe. Node JS is in high demand among all other Web Developer Certification Courses in India and the United States.
Got a question for us? Please mention it in the comments section of this Node.js MySQL Tutorial and we will get back to you.


 Thank you for registering Join Edureka Meetup community for 100+ Free Webinars each month JOIN MEETUP GROUP