Python Scripting Certification Training
- 15k Enrolled Learners
- Weekend
- Self Paced
(5900)


 Copy Link!
Node.js is the most popular JavaScript framework when it comes to high-speed application development. Node.js Professionals often opt for a NoSQL database which can keep up with Node.js speed all while maintaining the performance of the application. MongoDB is a perfect fit for this kind of requirement as it has a very fast development cycle and performs quite efficiently. Thus, I bring you this Node.js MongoDB tutorial where I will be demonstrating how effortlessly you can develop an application using Node.js with MongoDB from scratch.
Below are the topics I will be covering in this Node.js MongoDB tutorial:
So, let’s get started.
Not only SQL database or more popularly known as NoSQL database is a database design approach that provides a mechanism to store and access a wide variety of unstructured data. This unstructured data can contain a mixture of data models, including key-value, document, columnar and graph formats, etc. NoSQL database is especially useful for handling humongous sets of distributed data. These databases have a dynamic schema and no specific query language along with no or very fewer relationships. But it stores the data in the form of collections and documents which enable quick updates.
There is a list of NoSQL databases which are used quite heavily in the industry, some of which I have listed below:
To know more about NoSQL and it varies from SQL databases, you can check out this article on Differences between SQL & NoSQL Databases.
In this Node.js MongoDB tutorial, I will be focussing on only one of these databases, which by now you might have guessed, that is MongoDB. But before I show you how to work with it, let’s get familiar with its nitty-gritty.
MongoDB is an open source non-relational database that stores the data in the form of collections and documents. This kind of databases preserves most of the functionalities while offering horizontal scalability. This eases the work of a developer by providing persistence to the data and enhancing agility.
MongoDB stores the JSON documents in the form of collections having dynamic schemas. It stores all the related information together which enhances the speed of query processing. This way, it also helps in bringing down the gap between the key-value stores and relational databases.
Below I have listed down a few of the most intriguing features of MongoDB:
Now that you are familiar with MongoDB, let’s move ahead with this Node.js MongoDB tutorial and see how simple it is to install MongoDB in the system.
Step I: Download the latest version MongoDB server from its official site: https://www.mongodb.com/download-center/community
Step II: Next click on the ‘Server’ tab as shown in the below screenshot.
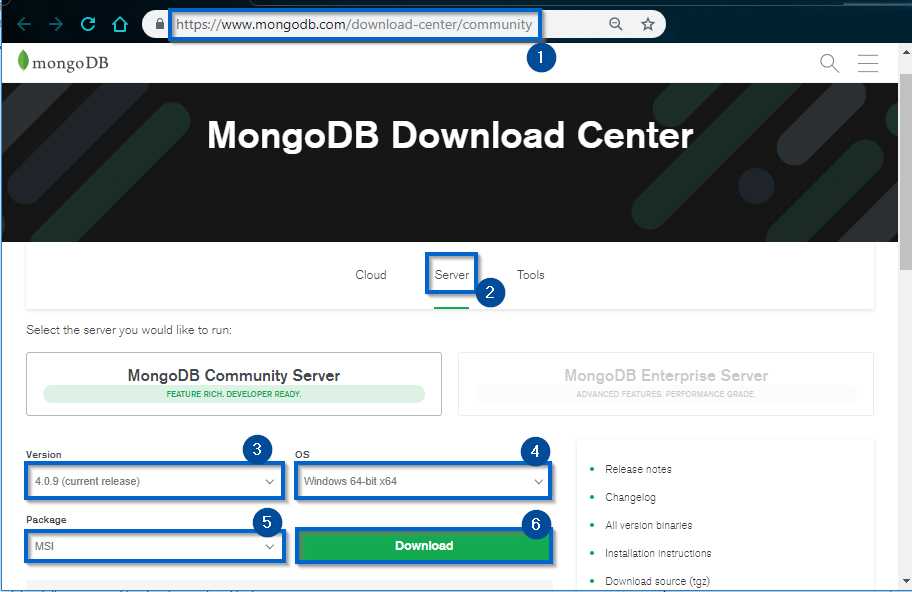
Step III: If you are looking for any specific version, you can select it from the drop-down list or you can just download the latest version.
Step IV: Select your OS from the drop down. Since I am working on Windows I will go for Windows 64 bit.
Step V: Now, select the package as MSI.
Step VI: Finally, click on ‘Download’ to begin the download process.
Step VII: Once downloaded, double click on the MSI file to open it and proceed with the installation wizard.
Step VIII: Now, in order to start the MongoDB server you have to run the .exe file and assign the database folder. To make the work easier, all you need to do is write down a few lines of code in a notepad file and save it with the .bat extension. In other words, you just need to create a batch file, which will start the MongoDB server for you without any hassle. To create the batch file type in the below code:
cd C:Program FilesMongoDBServer.0in (MongoDB path)
mongod.exe --dbpath F:MongoDBdata (database dump destination)
Now, whenever you want to launch the MongoDB server, all you need to do is double click this batch file and open the MongoDB Compass application.
Step IX: Next, you need to launch the ‘MongoDB Compass’ and agree to its terms of use.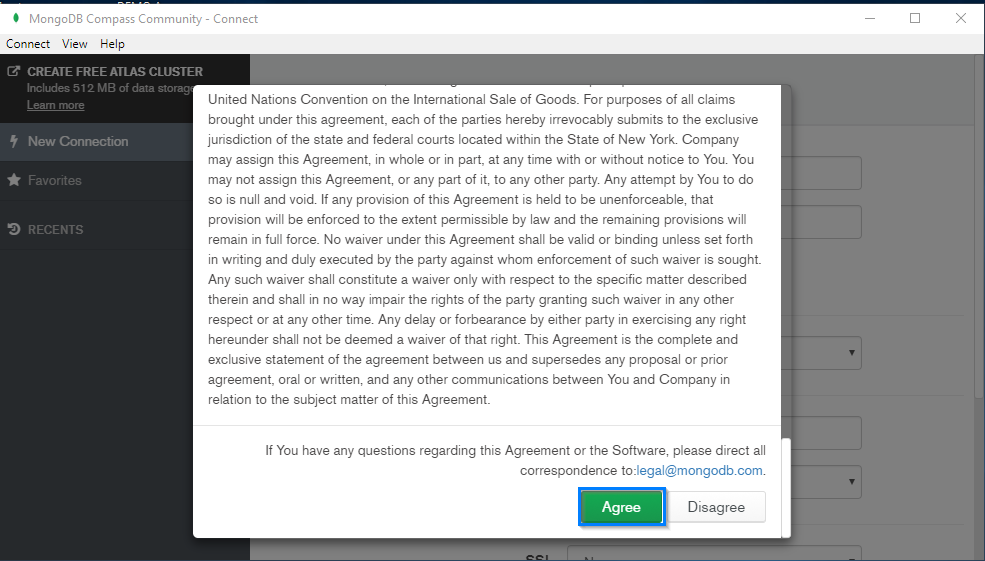
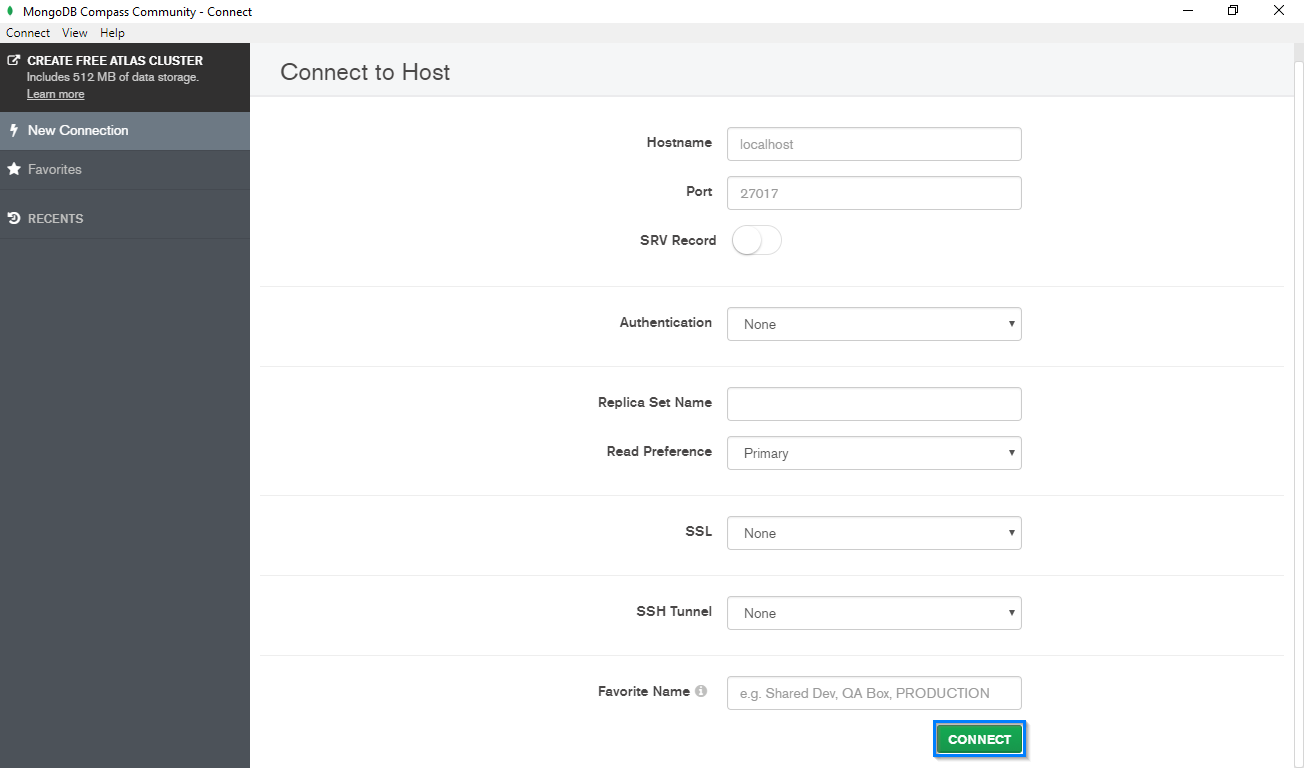
Step X: Now you need to provide the server configurations and hit ‘Connect’.
Step XI: Next, click on ‘Create Database’.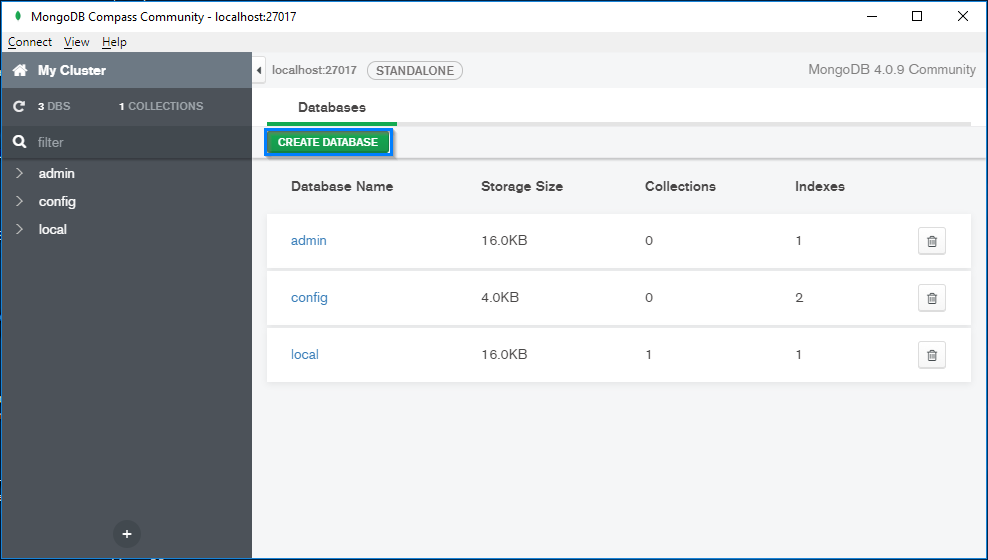
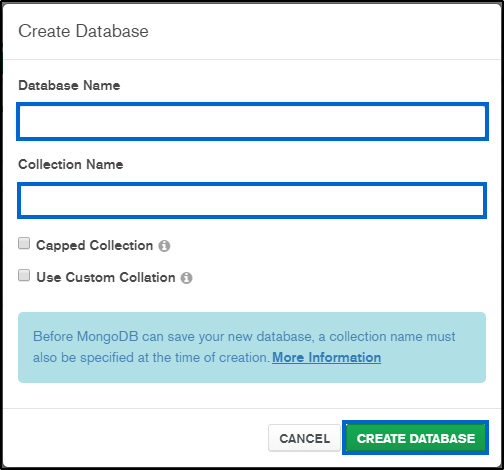
Step XII: Now, provide a relevant name for your database and collection and hit ‘Create Database’.
I guess, now you are all set to get started with the practical part, so without any more delay let’s dive into the code.
Here I will be creating a CRUD application for Course Management with the help of Node.js and Express.js and use MongoDB to store the data. In this application, I will be taking course details like name, id, duration, and fee as inputs. For that, I will be creating a few view files which will act as an interface. Then in order to handle the data, I will be needing a controller as well which will help in manipulating the data. Finally, I will be needing a few model files to store the data. So basically, I will be following an MVC pattern for this application development. So, lets now jump into development.
Our application will be having the following hierarchy:
So, let’s begin the application development by creating a directory for the project. Once you are done, open the command prompt and navigate to your project directory. Now you need to set up the project configurations for that, type in the below command and provide the necessary details:
npm init
Now, you need to install the required packages. So, in this project, I am using the below packages:
In order to install these packages, type in the following command:
npm i --s express express-handlebars mongoose body-parser
Since I want to install nodemon such that it can access any file in the directory, I will be installing it with the global command:
npm i -g nodemon
Once you are done installing with the packages, your final JSON file should look like the below file:
package.json
{
"name": "samplenodemongo",
"version": "1.0.0",
"description": "Edureka demo on how to build a Node.js application with MongoDB",
"main": "script.js",
"scripts": {
"test": "echo "Error: no test specified" && exit 1"
},
"author": "Edureka",
"license": "ISC",
"dependencies": {
"body-parser": "^1.19.0",
"express": "^4.16.4",
"express-handlebars": "^3.0.2",
"mongoose": "^5.5.6",
"nodemon": "^1.19.0"
}
}
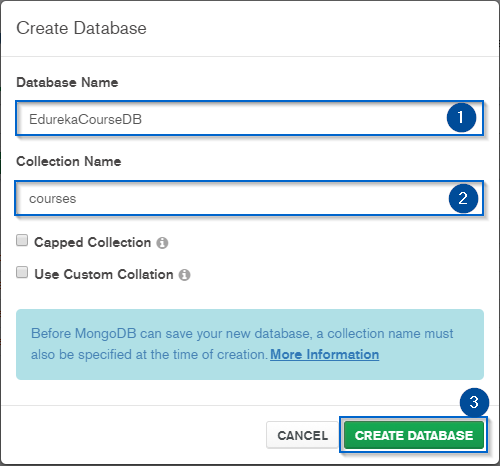
As you can see, in the dependencies section all the installed packages have been successfully listed. So, lets now create the database we will be using in this demo. For that start the batch file and open MongoDB application. Now, create a new database and provide a collection name. In my application, I will be using ‘EdurekaCoursesDB’ as the database name and ‘courses’ as the collection.
Now, switch back to your code editor where we will be creating the files to establish connectivity between Node.js and MongoDB. For that, first, you need to create a folder inside the project directory and name it ‘model’. Inside this folder, create a javascript file with the name ‘mongodb.js‘ and type in the below code:
mongodb.js
const mongoose = require('mongoose');

mongoose.connect('mongodb://localhost:27017/EdurekaCoursesDB', {useNewUrlParser: true}, (err) => {
if (!err) {
console.log('Successfully Established Connection with MongoDB')
}
else {
console.log('Failed to Establish Connection with MongoDB with Error: '+ err)
}
});

//Connecting Node and MongoDB
require('./course.model');
Now, you need to define the schema of your course database. For that, create a new JS file within the model folder and name it ‘course.model.js‘. So, I am using four fields in my course object I am using four fields which are name, id, duration, and fee. To create this file, type in the below-given code.
course.model.js
const mongoose = require('mongoose');

//Attributes of the Course object
var courseSchema = new mongoose.Schema({
courseName: {
type: String,
required: 'This field is required!'
},
courseId: {
type: String
},
courseDuration: {
type: String
},
courseFee: {
type: String
}
});

mongoose.model('Course', courseSchema);
Now, you need to create the root file called ‘script.js‘. This file is the entry point of this application and will contain all the connection paths in it. You need to be really careful while providing the paths in this file as it might result in an error or application failure. Along with this, it is also responsible for invoking the server and establish the connection. In order to create this file, type in the below code:
script.js
require('./models/mongodb');

//Import the necessary packages
const express = require('express');
var app = express();
const path = require('path');
const exphb = require('express-handlebars');
const bodyparser = require('body-parser');

const courseController = require('./controllers/courseController');

app.use(bodyparser.urlencoded({
extended: true
}));

//Create a welcome message and direct them to the main page
app.get('/', (req, res) => {
res.send('

<h2 style="font-family: Malgun Gothic; color: midnightblue ">Welcome to Edureka Node.js MongoDB Tutorial!!</h2>


 Click Here to go to <b> <a href="/course">Course Page</a> </b>');
});
app.use(bodyparser.json());

//Configuring Express middleware for the handlebars
app.set('views', path.join(__dirname, '/views/'));
app.engine('hbs', exphb({ extname: 'hbs', defaultLayout: 'mainLayout', layoutDir: __dirname + 'views/layouts/' }));
app.set('view engine', 'hbs');

//Establish the server connection
//PORT ENVIRONMENT VARIABLE
const port = process.env.PORT || 8080;
app.listen(port, () => console.log(`Listening on port ${port}..`));

//Set the Controller path which will be responding the user actions
app.use('/course', courseController);
Next, in order to handle the user requests, you need to create the router file. For that first, create a folder and name it ‘controller’ and within this folder create a file with the name ‘courseController.js‘. In this file, we will be dealing with the CRUD operations related to the employee. Below is the code for creating this file:
courseController.js
//Import the dependencies
const express = require('express');
const mongoose = require('mongoose');
//Creating a Router
var router = express.Router();
//Link
const Course = mongoose.model('Course');

//Router Controller for READ request
router.get('/',(req, res) => {
res.render("course/courseAddEdit", {
viewTitle: "Insert a New Course for Edureka"
});
});

//Router Controller for UPDATE request
router.post('/', (req,res) => {
if (req.body._id == '')
insertIntoMongoDB(req, res);
else
updateIntoMongoDB(req, res);
});

//Creating function to insert data into MongoDB
function insertIntoMongoDB(req,res) {
var course = new Course();
course.courseName = req.body.courseName;
course.courseId = req.body.courseId;
course.courseDuration = req.body.courseDuration;
course.courseFee = req.body.courseFee;
course.save((err, doc) => {
if (!err)
res.redirect('course/list');
else
console.log('Error during record insertion : ' + err);
});
}

//Creating a function to update data in MongoDB
function updateIntoMongoDB(req, res) {
Course.findOneAndUpdate({ _id: req.body._id }, req.body, { new: true }, (err, doc) => {
if (!err) { res.redirect('course/list'); }
else {
if (err.name == 'ValidationError') {
handleValidationError(err, req.body);
res.render("course/courseAddEdit", {
//Retaining value to be displayed in the child view
viewTitle: 'Update Course Details',
employee: req.body
});
}
else
console.log('Error during updating the record: ' + err);
}
});
}

//Router to retrieve the complete list of available courses
router.get('/list', (req,res) => {
Course.find((err, docs) => {
if(!err){
res.render("course/list", {
list: docs
});
}
else {
console.log('Failed to retrieve the Course List: '+ err);
}
});
});

//Creating a function to implement input validations
function handleValidationError(err, body) {
for (field in err.errors) {
switch (err.errors[field].path) {
case 'courseName':
body['courseNameError'] = err.errors[field].message;
break;
default:
break;
}
}
}

//Router to update a course using it's ID
router.get('/:id', (req, res) => {
Course.findById(req.params.id, (err, doc) => {
if (!err) {
res.render("course/courseAddEdit", {
viewTitle: "Update Course Details",
course: doc
});
}
});
});

//Router Controller for DELETE request
router.get('/delete/:id', (req, res) => {
Course.findByIdAndRemove(req.params.id, (err, doc) => {
if (!err) {
res.redirect('/course/list');
}
else { console.log('Failed to Delete Course Details: ' + err); }
});
});

module.exports = router;
Now, that we are done with backend files, the next step is to create the Views. For that first, you need to create a wrapper for the child views. But before that, create a folder with name ‘views‘. Inside this folder create two more folders with names ‘course‘ and ‘layouts‘ respectively with .hbs extension. Now, navigate inside the ‘layouts’ folder and create the wrapper with the name ‘mainLayout.hbs‘. This file will contain the basic skeleton of the application which will be reflected in the child views as well. In this file, I am inserting an image as well, so for that I will create a local folder with name img and save my image inside.
To create this file, type in the below codes:
mainLayout.hbs
<!DOCTYPE html>
<html>
<head>
<title>Edureka Node.js MongoDB Demo</title>
<link rel="stylesheet" href="https://maxcdn.bootstrapcdn.com/bootstrap/4.0.0/css/bootstrap.min.css" integrity="sha384-Gn5384xqQ1aoWXA+058RXPxPg6fy4IWvTNh0E263XmFcJlSAwiGgFAW/dAiS6JXm" crossorigin="anonymous">
<img src="data:image/gif;base64,R0lGODlhAQABAIAAAAAAAP///yH5BAEAAAAALAAAAAABAAEAAAIBRAA7" data-wp-preserve="%3Cscript%20src%3D%22https%3A%2F%2Fajax.googleapis.com%2Fajax%2Flibs%2Fjquery%2F3.2.1%2Fjquery.min.js%22%3E%3C%2Fscript%3E" data-mce-resize="false" data-mce-placeholder="1" class="mce-object" width="20" height="20" alt="<script>" title="<script>" />
<img src="data:image/gif;base64,R0lGODlhAQABAIAAAAAAAP///yH5BAEAAAAALAAAAAABAAEAAAIBRAA7" data-wp-preserve="%3Cscript%20src%3D%22https%3A%2F%2Fmaxcdn.bootstrapcdn.com%2Fbootstrap%2F3.3.7%2Fjs%2Fbootstrap.min.js%22%3E%3C%2Fscript%3E" data-mce-resize="false" data-mce-placeholder="1" class="mce-object" width="20" height="20" alt="<script>" title="<script>" />
</head>
<body class = "bg-info">
<div align="center">
<!-- Inserting the image -->
<img src="/static/edurekaLogo.png" alt="Edureka Logo">
</div>
<div class="row">
<div class="col-md-6 offset-md-3" style="background-color: #fff; margin-top: 40px; padding:20px;">
<!-- retrieving HTML String from the child Views -->
{{{body}}}
</div>
</div>
</body>
</html>
Finally, inside the course folder, we will be creating two child views, one of which will be used for course addition or update and the second view will display the complete list of the available courses. Let’s first focus on the first view i.e courseAddEdit.hbs which will look like the below screenshot.
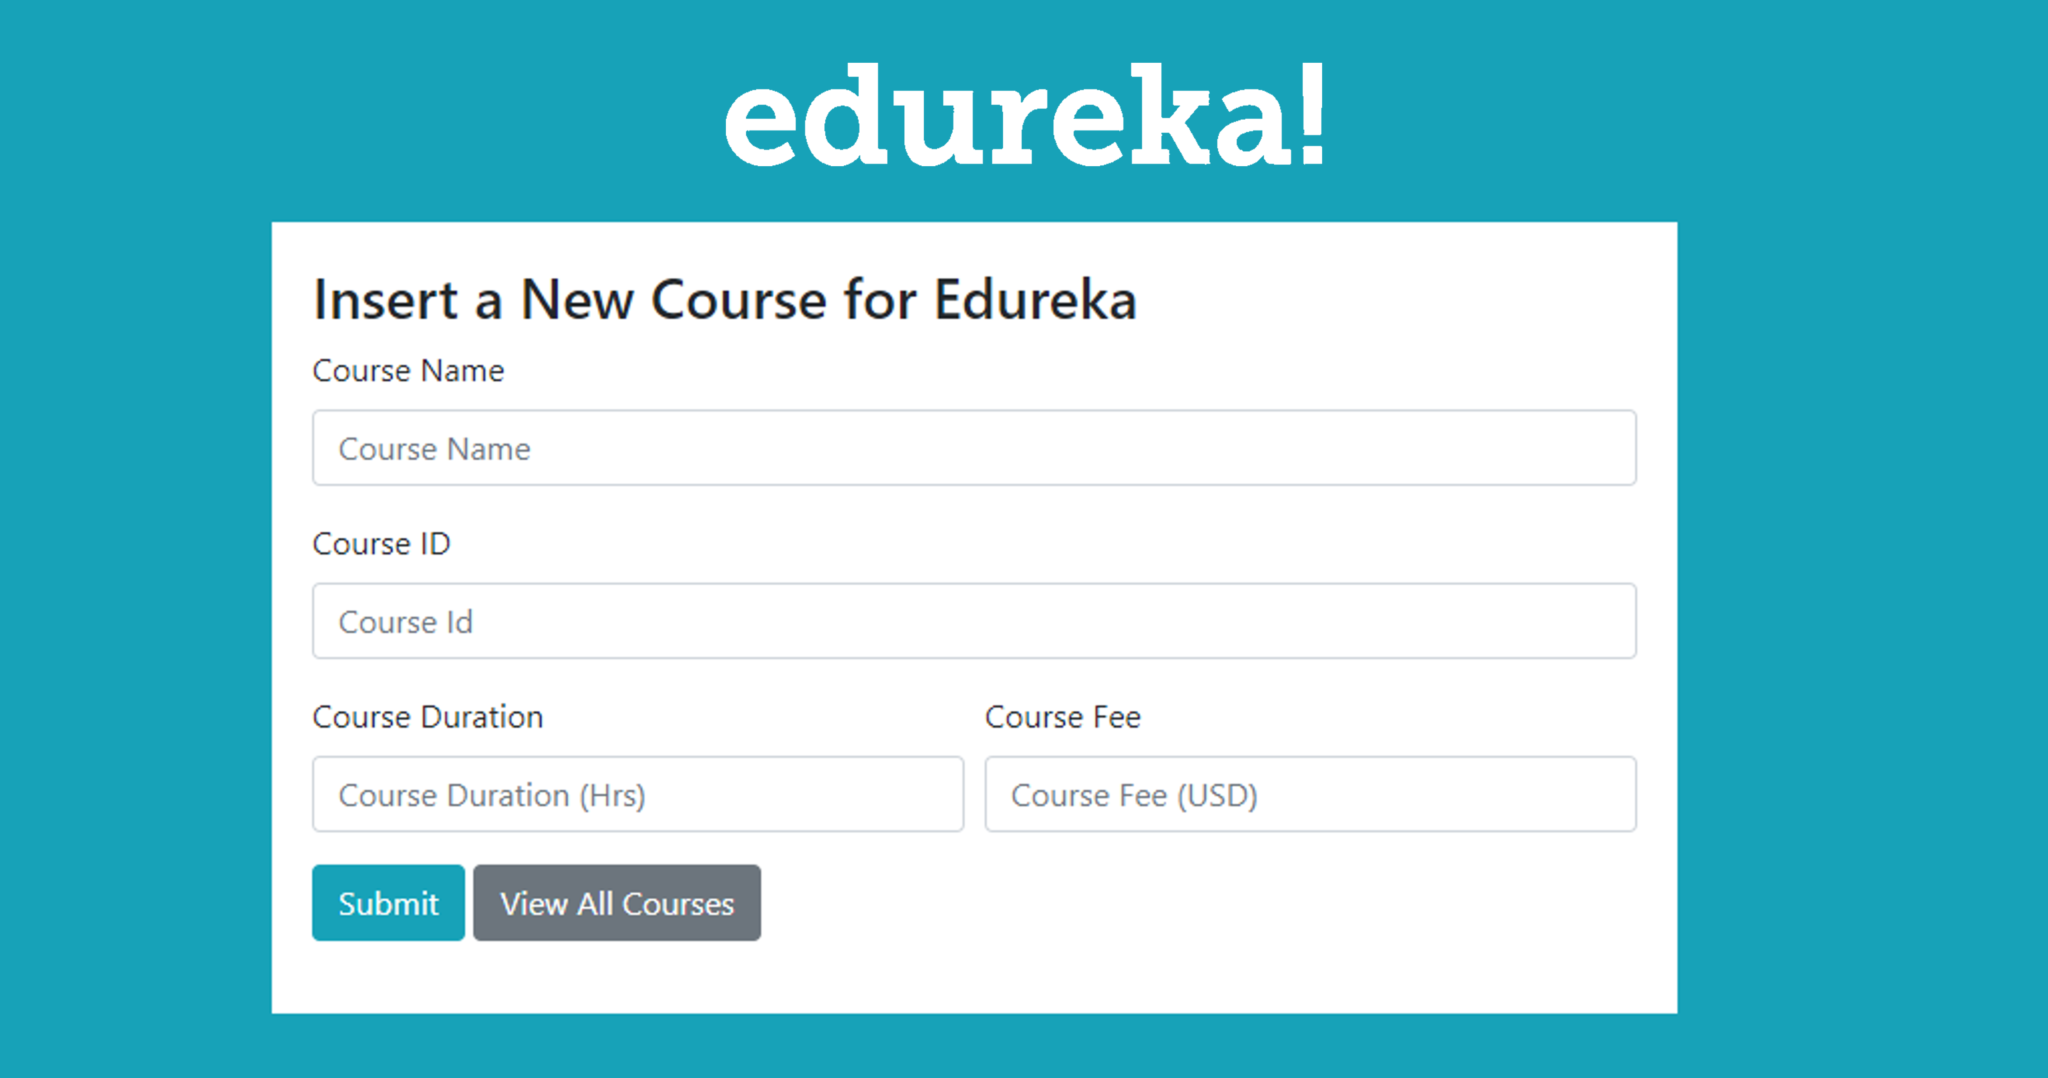
So, let me now show, how to build this view.
As you can see in the screenshot, the page will be containing four input fields and two buttons. One button will be submitting details filled in by the user into the database and the second button will display the complete list of courses available in the database. In order to make sure that the inputs are correct, you need to add some validations as well. Once done, you will be able to see this view using ‘/course’ URL. Below is the code, you will be needing to create courseAddEdit.hbs file:
courseAddEdit.hbs
<!-- Obtaining value from the course controller -->

<h3>{{viewTitle}}</h3>
<form action="/course" method="POST">
<input type="hidden" name="_id" value="{{course._id}}">

<div class = "form-group">
<label>Course Name</label>
<input type="text" maxlength="100" class="form-control" name="courseName" placeholder="Course Name" value="{{course.courseName}}">

<div class="text-danger">
{{course.courseNameError}}</div>
</div>
<div class = "form-group">
<label>Course ID</label>
<input type="number" min='10000' max='99999' class="form-control" name="courseId" placeholder="Course Id" value="{{course.courseId}} " required>
</div>
<div class = "form-row">
<div class = "form-group col-md-6">
<label>Course Duration</label>
<input type="number" min='10' max='99' class="form-control" name="courseDuration" placeholder="Course Duration (Hrs)" "{{course.courseDuration}} " required>
</div>
<div class = "form-group col-md-6">
<label>Course Fee</label>
<input type="number" min='100' max="100000" class="form-control" name="courseFee" placeholder="Course Fee (USD)" "{{course.courseFee}} " required>
</div>
</div>
<div class="form-group">
<button type="submit" class="btn btn-info"><i class="fa fa-database"></i> Submit</button>
<a class="btn btn-secondary" href="/course/list"><i class="fa fa-list-alt"></i> View All Courses</a>
</div>
</form>
Now, let me show you the next view i.e list.hbs, which will retrieve the complete list of available courses from the database and display them on your screen:

In this view, I am using a table to display the list of courses. This table will have five columns where the first four will display the course details while the last column will enable you to edit/delete a record directly from the application interface. The controllers of these functions have been already created in the script.js file. So, the only thing left is to add the view and in order to do so create a list.hbs file and type in the below-written code.
list.hbs
<div>
<a class="btn btn-secondary" href="/course"><i class="fa fa-plus"></i> Create New</a>

<h3 align="center">Edureka's Course List</h3>
</div>
<table class="table table-striped">
<thead>
<tr>
<th>Course Name</th>
<th>Course Id</th>
<th>Course Duration(Hrs)</th>
<th>Course Fee(USD)</th>
<th></th>
</tr>
</thead>
<tbody>
{{#each list}}
<tr align="center">
<td>{{this.courseName}}</td>
<td>{{this.courseId}}</td>
<td>{{this.courseDuration}}</td>
<td>{{this.courseFee}}</td>
<td>
<a href="/course/{{this._id}}"> Edit </a>
<a href="/course/delete/{{this._id}}" onclick="return confirm('Are you sure to delete this record ?');"> Delete </a>
</td>
</tr>
{{/each}}
</tbody>
</table>
This concludes are the coding part, now it’s time to test our application. For that, open the command prompt and navigate to the project folder or if you are using an IDE open the terminal and type in the below command to start the server.
nodemon script.js
Now you can launch your application in any browser at http://localhost:8080.
Once you have added your own data, you can go back in MongoDB and check whether the data has been added there or not. If you refer the below screenshot, you will see all my data has been successfully added. Which means my MongoDB is connected and working perfectly with my Node.js API.

With this, we come to an end of this Node.js MongoDB Tutorial. Hope I was able to keep the concepts clear and helped you in understanding how exactly MongoDB works with Node.js. If you want to know more about Node.js, you can check out my other articles on Node.js as well.
If you found this “Node.js MongoDB Tutorial” relevant, check out the Node.js certification Training by Edureka, a trusted online learning company with a network of more than 250,000 satisfied learners spread across the globe.
Got a question for us? Please mention it in the comments section of this Node.js MongoDB Tutorial and we will get back to you.


 Thank you for registering Join Edureka Meetup community for 100+ Free Webinars each month JOIN MEETUP GROUP