
Python Scripting Certification Training
- 15k Enrolled Learners
- Weekend
- Self Paced
(5900)


 Copy Link!
Node.js is one of the most powerful JavaScript frameworks that has been acting as a backbone of front end development since ages. This is why front end developers worldwide actively opt for Node.js Certification. You can check out my Node.js Tutorial to get some basic insights of it. But before you get started, you need to install Node.js in your system. Through the medium of this Node JS Installation article, I will give you step by step explanation of how it’s done.
In order to get started with Node.js, you need to install the following in your windows system:
To begin with the Node JS installation process, first you need to make sure you have sufficient space and your RAM is at least 4GB
STEP 1: You can download Node.js from its official site: https://nodejs.org/en/download/.
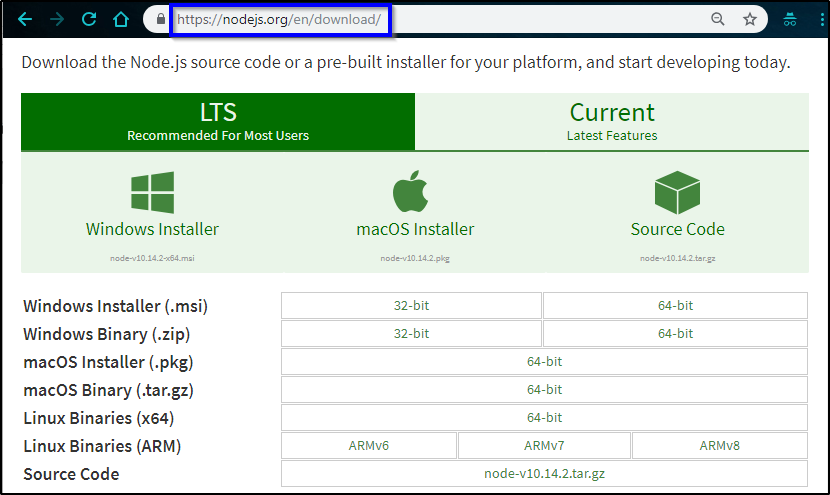 STEP 2: In the downloads page, you will see various versions of Node. All you need to do is, click on the box, suitable to your system configurations.
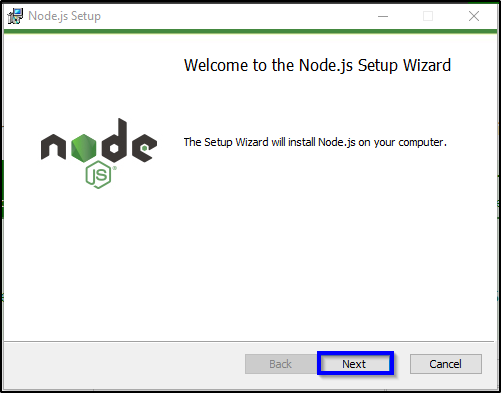
STEP 3: Once you have successfully downloaded the software, go to the downloaded file, and double-click on it.
STEP 4: As soon as you click on the file, an installation wizard will come up. Select ‘Next’ and move further with the installation.
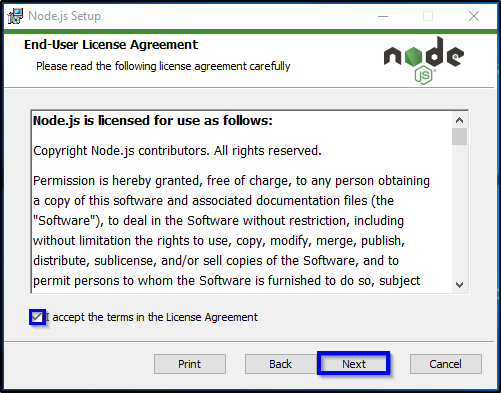
 STEP 5: Checkmark on the “I Agree” checkbox and click on the ‘Next’ button.
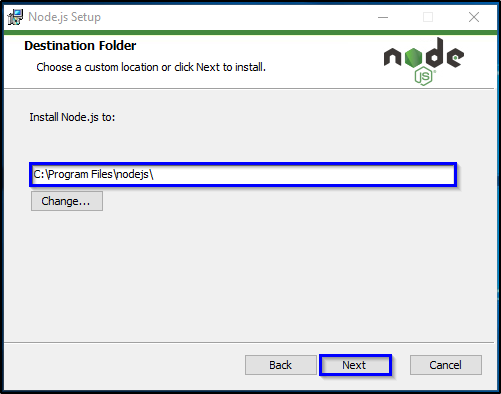
 STEP 6: By clicking on ‘Change’, set the path, where you want to install the NodeJs file and then click on next.
 STEP 7: Again, click on next.
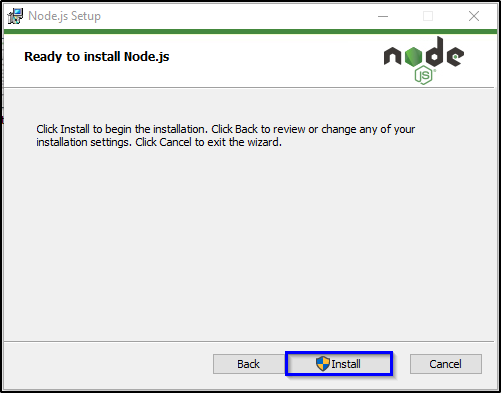
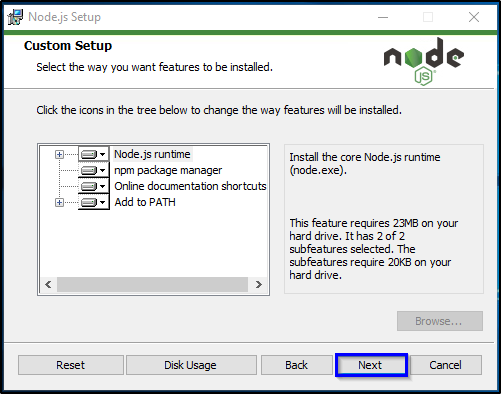 STEP 8: Now, click on the ‘Install’ button to finish up the installation process.
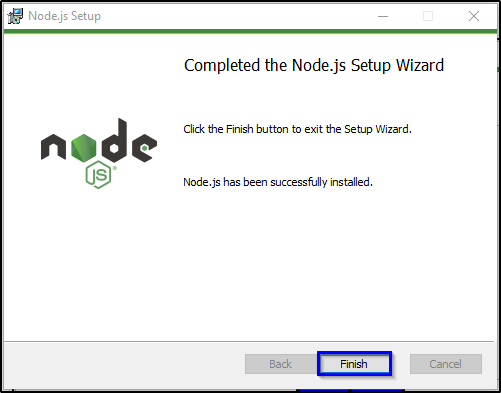
STEP 9: Once done with the installation, click on the ‘Finish’ button to exit the installation wizard.
With this, you are done with the most important part of the Node.js Installation. Now, let me now throw some light on another core module of Node.js without which Node.js won’t work.
NPM (Node Package Manager) Installation
NPM is the default package manager for Node.js that is completely written in Javascript. It helps in managing the packages and modules required for Node.js functioning and provides a command line client npm. Packages in Node.js are the entities which bundle up all the necessary files that are required for a module. Now, by modules, I mean the JavaScript libraries which can be incorporated in your project. Apart from this, using package.json file, Node.js can easily install all the required dependencies of the project. Also, you can update or install various packages using npm.
Node.js version 0.6.3 onwards, npm was included as a default package of Node.js. Thus, there is no need to install it explicitly. So, let me directly show you how you can install, updates and uninstall packages via npm.
npm install package_name
Now, since you are done with the Node.js installation part, you need to start writing the programs. You can write your programs either in some text editors or you can use various IDE’s available for free. Below I have listed down the most popular IDE’s and Text Editors preferred by the Node.js developers.
Top 5 IDE’s and Text Editors are listed below:
To verify whether your installation was successful or not, try executing a Node.js file.
Open your IDE/Text Editor and type in the below code.
console.log('Welcome To Edureka NodeJS Tutorial!');Save the file with a .js extension such as filename.js.
Now open your Node.js command prompt, navigate to the folder containing the js file. Now, type in the below command and hit enter to display the text in your console.
node filename.js
With this, we come to an end of this article on Node.js installation. I tried to keep the steps as detailed as possible for your better understanding. I hope it gave you a clear understanding of the entire Node.js installation process. So now your system is ready to execute any Node.js program. To get detailed insights into Node.js fundamental concepts, you can refer to my Node.js Tutorial.
If you found this “Node.js Installation” relevant, check out the Node JS Certification Training by Edureka, a trusted online learning company with a network of more than 250,000 satisfied learners spread across the globe.
Got a question for us? Please mention it in the comments section of this Node.js Tutorial and we will get back to you.


 Thank you for registering Join Edureka Meetup community for 100+ Free Webinars each month JOIN MEETUP GROUP