


With the advent of cloud computing & containerization, microservices has taken the world by storm. Organizations are hunting for professional with Microservices Training. In the previous blog, you must have learned how to setup and run Spring Boot using Eclipse IDE and CLI. Now in this Spring Boot Microservices blog, let me show how we can create Microservices Application for Top Sports Brands using Spring Boot and Netflix Eureka Server in detail.
Why there is a need for Spring Boot?
Spring Boot enables building production-ready applications quickly and provides non-functional features:
- Embedded servers which are easy to deploy with the containers
- It helps in monitoring the multiples components
- It helps in configuring the components externally
So, let us see what are the challenges with Microservices Architecture
Challenges With Microservice Architectures
While developing a number of smaller microservices might look easy, but there are number of inherent complexities that are associated with microservices architectures. Let’s look at some of the challenges:
- Automating the Components: It becomes difficult to automate everything because there are a number of smaller components instead of a monolith, i.e. Builds, Deployment, Monitoring, etc.
- Perceptibility: There are number of small components to deploy and maintain which sometimes becomes difficult to monitor and identify problems. It requires great perceptibility around all the components.
- Configuration Management: There is a great need to maintain the configurations for the components across the various environments.
- Debugging: It becomes difficult to probe each and every service for an error. Centralized Logging and Dashboards are essential to make it easy to debug problems.
- Consistency: You cannot have a wide range of tools solving the same problem. While it is important to foster innovation, it is also important to have some decentralized governance around the languages, platforms, technology and tools used for implementing/deploying/monitoring microservices.
Microservices Spring Boot | Edureka

This video will help you to implement Microservices with the help of Spring Boot.
Spring Boot Microservices: Building a Top Sports Brands Architecture with Spring Boot
In this spring boot microservices example, we will be creating Top Sports Brands application which will be having 3 services:-
- Eureka Service– This Service will register every microservice and then the client microservice will look up the Eureka server to get a dependent microservice to get the job done.This Eureka Server is owned by Netflix and in this, Spring Cloud offers a declarative way to register and invoke services by Java annotation.
- Item Catalog Service – This service will generate the list of Sports brands which are popular in the market.
- Edge Service – It is similar to the standalone Item service created in Bootiful Development with Spring Boot and Angular. However, it will have fallback capabilities which prevent the client from receiving an HTTP error when the service is not available


Tools Required
- Java 8
- Eclipse IDE Oxygen
- Spring Tool
If you facing any difficulty in installing and running the above tools, please refer to this blog.
Spring Boot Microservices: Creating a Eureka Service
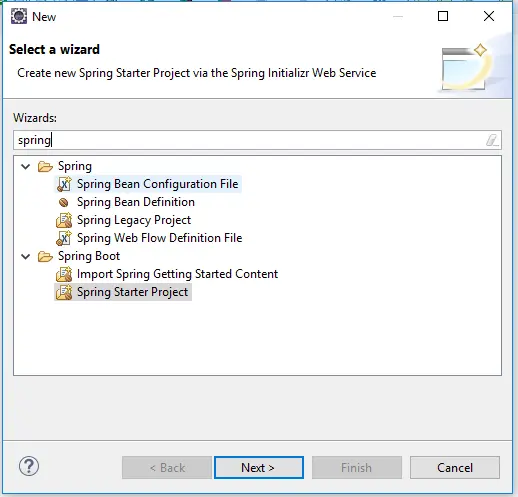
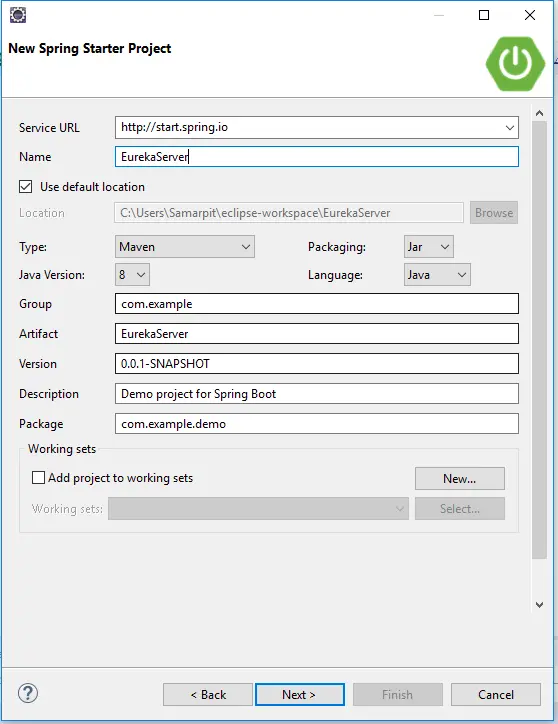
To begin with, create a EurekaServer Spring Starter Project in Eclipse IDE. Click on Spring Starter Project and click on Next.

Note:- Make sure your Internet is connected otherwise it will show an error.
Eureka Server as a dependency and click on Finish.


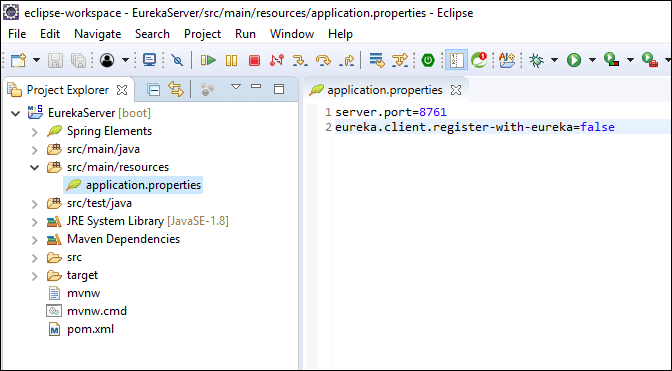
Now, modify EurekaServer/src/main/resources/application.properties file to add a port number and disable registration.
server.port=8761
 eureka.client.register-with-eureka=false

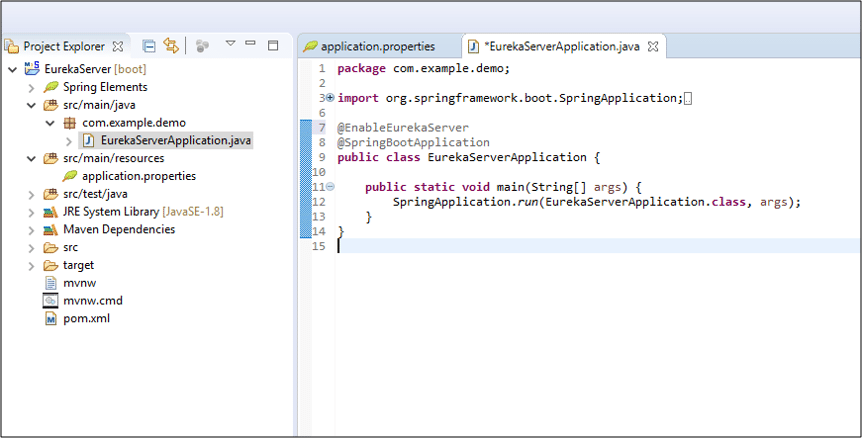
Open EurekaServer/src/main/java/com/example/EurekaServiceApplication.java and add @EnableEurekaServer above @SpringBootApplication.
import org.springframework.cloud.netflix.eureka.server.EnableEurekaServer;

@EnableEurekaServer
@SpringBootApplication
This annotation will configure a registry that will allow other applications to communicate.

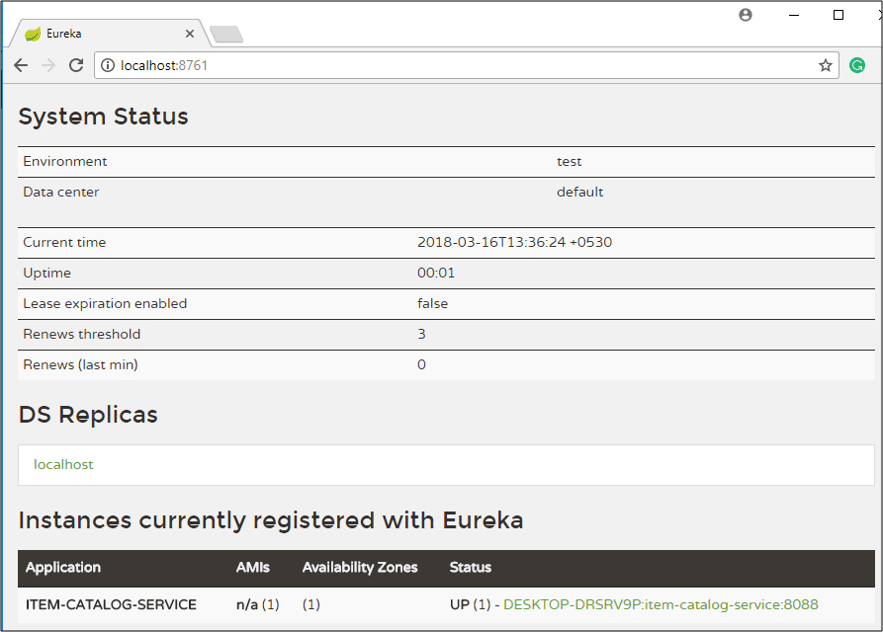
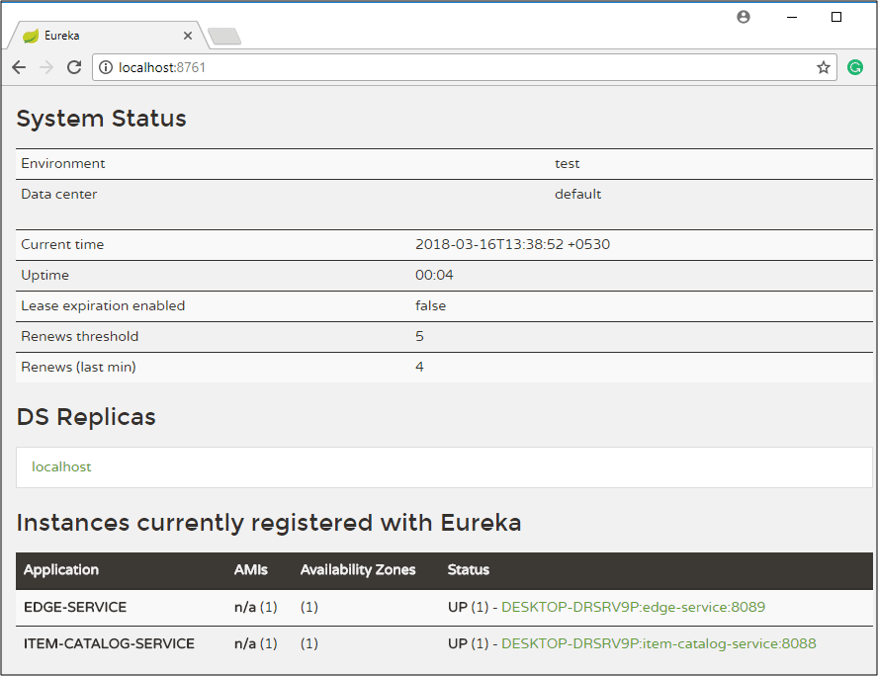
http://localhost:8761 and see there are no services available.
Now open http://localhost:8761. Here Spring Eureka Server will open and will show no service will be running.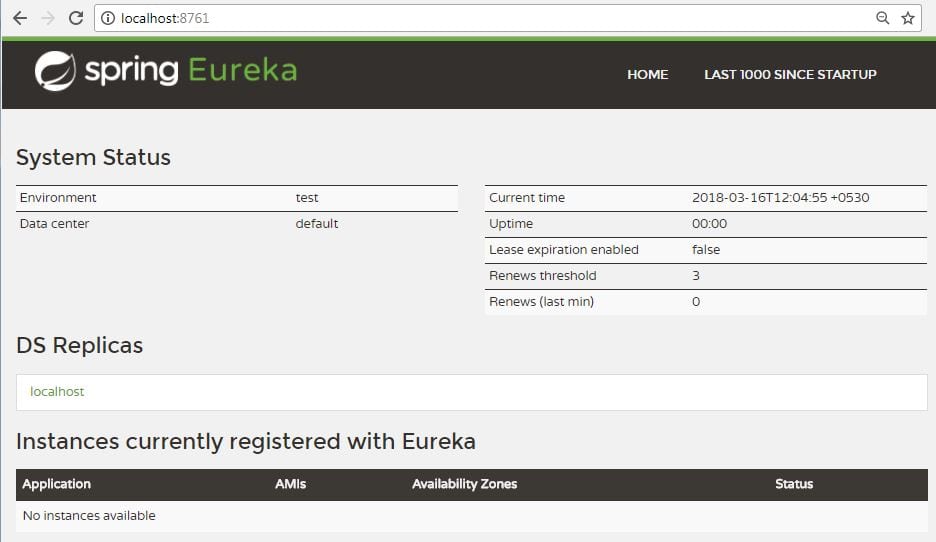

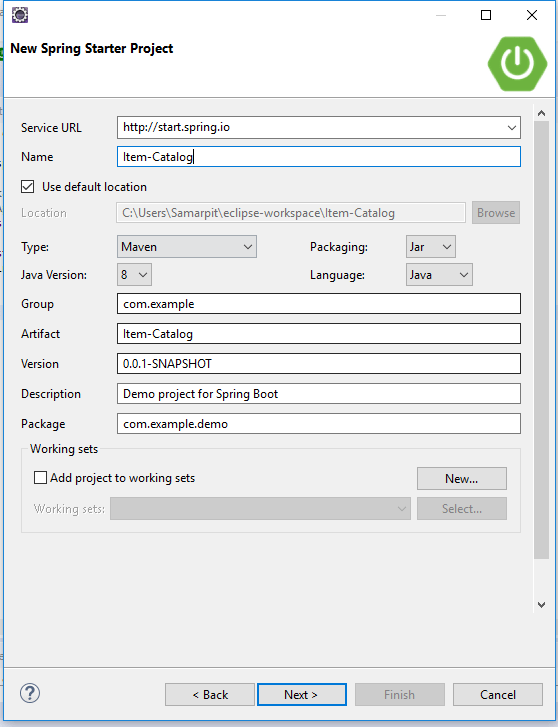
Spring Boot Microservices: Creating an Item Catalog Service
Again create a new project. Use Item-catalog-service for the artifact name and click on Next.

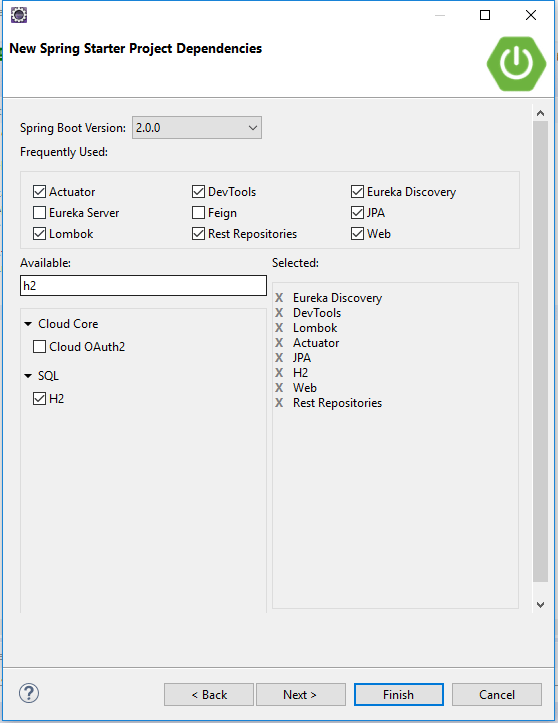
Add the following dependencies:
- Actuator: features to help you monitor and manage your application
- Eureka Discovery: for service registration
- JPA: to save/retrieve data
- H2: an in-memory database
- Rest Repositories: to expose JPA repositories as REST endpoints
- Web: Spring MVC and embedded Tomcat
- DevTools: to auto-reload the application when files change
- Lombok: to reduce boilerplate code
Click on Finish.

Now, create an Item entity, toItemCatalogServiceApplication.java . The code below assumes you’re putting all classes in the same file.
@Data
@AllArgsConstructor
@NoArgsConstructor
@ToString
@Entity
class Item {

    public Item(String name) {
        this.name = name;
    }

    @Id
    @GeneratedValue
    private Long id;

    private String name;
}

@RepositoryRestResource
interface ItemRepository extends JpaRepository<Item, Long> {}

@Component
class ItemInitializer implements CommandLineRunner {

    private final ItemRepository ItemRepository;

    ItemInitializer(ItemRepository itemRepository) {
        this.itemRepository = itemRepository;
    }

    @Override
    public void run(String... args) throws Exception {
        Stream.of(""Lining", "PUMA", "Bad Boy", "Air Jordan", "Nike", "Adidas", "Reebok")
                .forEach(item -> itemRepository.save(new Item(item)));

        itemRepository.findAll().forEach(System.out::println);
    }
}
If you’re using an editor that doesn’t auto-import classes, here’s the list of imports needed at the top of ItemCatalogServiceApplication.java.
import lombok.AllArgsConstructor;
import lombok.Data;
import lombok.NoArgsConstructor;
import lombok.ToString;
import org.springframework.boot.CommandLineRunner;
import org.springframework.boot.SpringApplication;
import org.springframework.boot.autoconfigure.SpringBootApplication;
import org.springframework.cloud.client.discovery.EnableDiscoveryClient;
import org.springframework.data.jpa.repository.JpaRepository;
import org.springframework.data.rest.core.annotation.RepositoryRestResource;
import org.springframework.stereotype.Component;

import javax.persistence.Entity;
import javax.persistence.GeneratedValue;
import javax.persistence.Id;
import java.util.stream.Stream;
Add an application name in item-catalog-service/src/main/resources/application.properties file to display in the Eureka service, and set the port to 8088.
server.port=8088
spring.application.name=item-catalog-service
Now, Create the Cloud Properties file
Click on File –> New –> Other –> File and add the below code in this file and save it.
eureka.instance.hostname=${vcap.application.uris[0]:localhost}
eureka.instance.nonSecurePort=80
eureka.instance.metadataMap.instanceId=${vcap.application.instance_id:${spring.application.name}:${spring.application.instance_id:${server.port}}}
eureka.instance.leaseRenewalIntervalInSeconds = 5

eureka.client.region = default
eureka.client.registryFetchIntervalSeconds = 5
eureka.client.serviceUrl.defaultZone=${vcap.services.pwa-eureka-service.credentials.uri}/eureka/
Now, to start the Application:
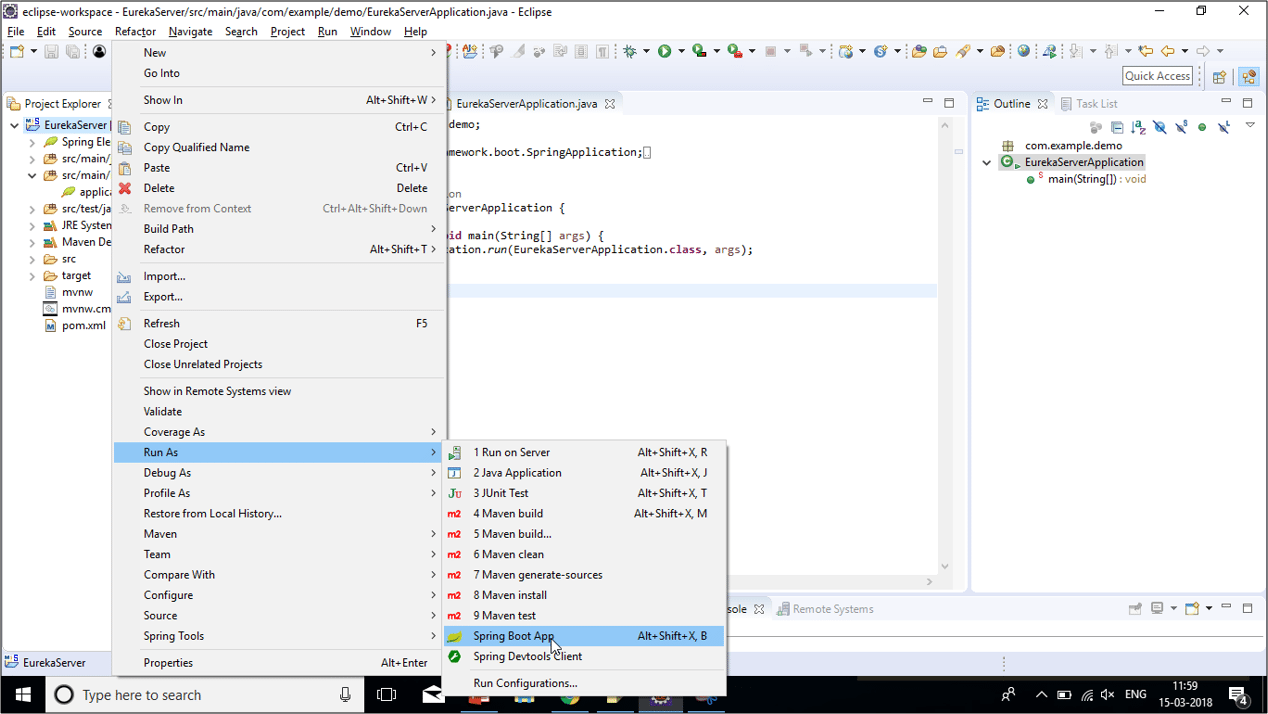
Right Click on Project –> Run As –> Click on “Spring Boot App“
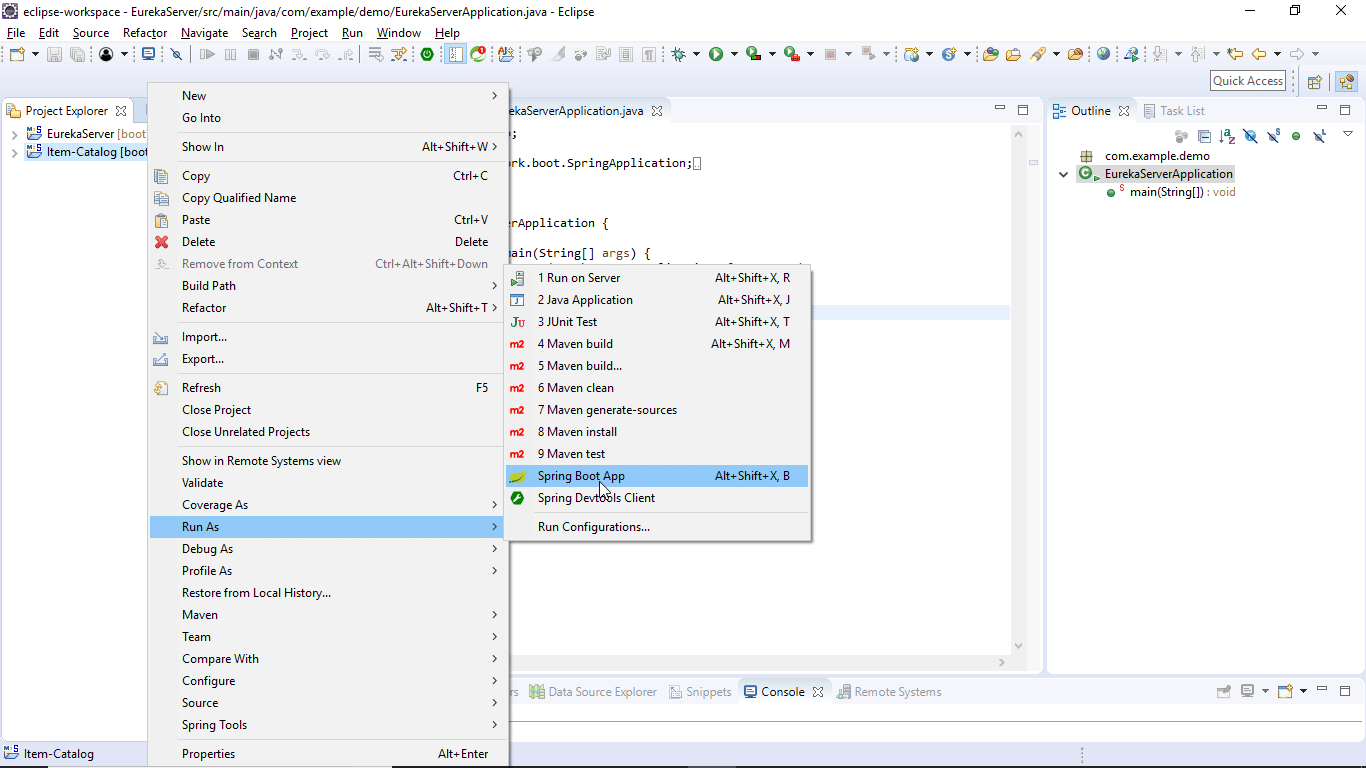

Note: In case of error try this step: Right Click on the Project –> Run As –> Click on “Maven Build“
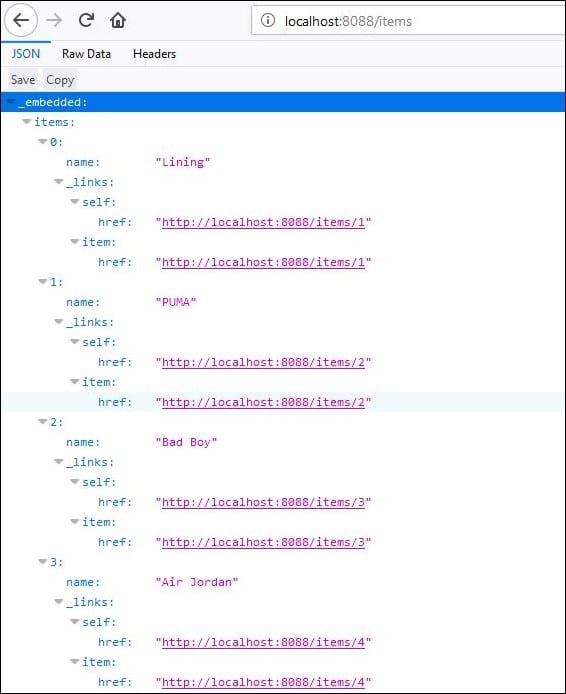
Now open http://localhost:8761. Here you will see Item Catalog service will be running.

You will see the list of items from the catalog service.
Open http://localhost:8088/items

Now let us move forward and create the Edge Service.
Spring Boot Microservices: Creating an Edge Service
It is similar to the standalone Item service created in Bootiful Development with Spring Boot and Angular. However, it will have fallback capabilities which prevent the client from receiving an HTTP error when the service is not available.
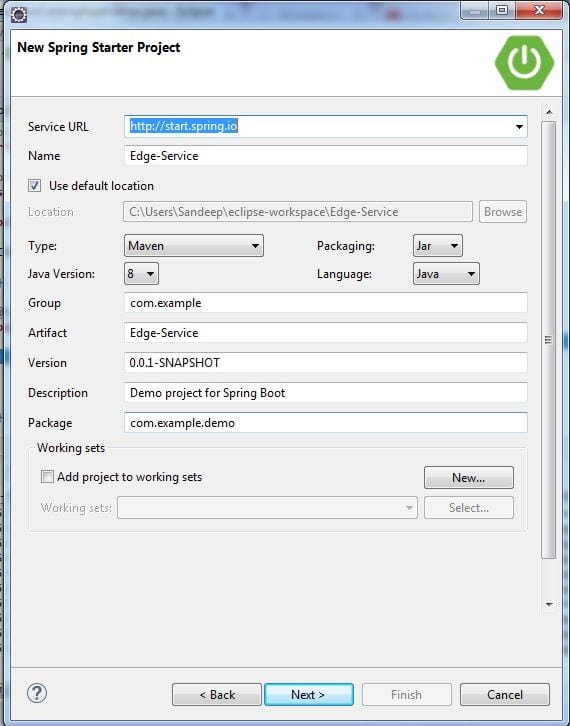
Again create a new project. Use edge-service for the artifact name

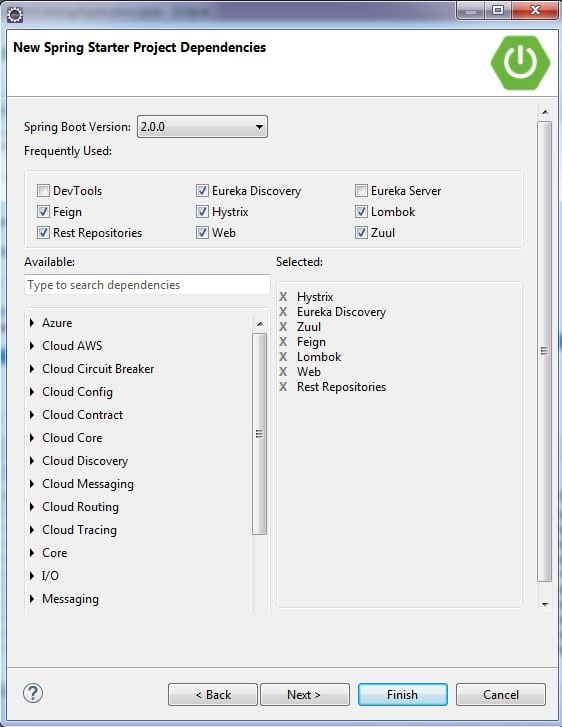
- Eureka Discovery: for service registration
- Feign: a declarative web service client
- Zuul: provides intelligent routing
- Rest Repositories: to expose JPA repositories as REST endpoints
- Web: Spring MVC and embedded Tomcat
- Hystrix: a circuit breaker to stop cascading failure and enable resilience
- Lombok: to reduce boilerplate code
Click on Finish.

Since the item-catalog-service is running on port 8088, you’ll need to configure this application to run on a different port. Modify edge-service/src/main/resources/application.properties to set the port to 8089 and set an application name.
server.port=8089
spring.application.name=edge-service
Now, Create the Cloud Properties file
Click on File –> New –> Other –> File and add below code in this file and save it.
eureka.instance.hostname=${vcap.application.uris[0]:localhost}
eureka.instance.nonSecurePort=80
eureka.instance.metadataMap.instanceId=${vcap.application.instance_id:${spring.application.name}:${spring.application.instance_id:${server.port}}}
eureka.instance.leaseRenewalIntervalInSeconds = 5

eureka.client.region = default
eureka.client.registryFetchIntervalSeconds = 5
eureka.client.serviceUrl.defaultZone=${vcap.services.pwa-eureka-service.credentials.uri}/eureka/


To enable Feign, Hystrix, and registration with the Eureka server, add the appropriate annotations toEdgeServiceApplication.java:
package com.example.edgeservice;
import com.netflix.hystrix.contrib.javanica.annotation.HystrixCommand;
import lombok.Data;
import org.springframework.boot.SpringApplication;
import org.springframework.boot.autoconfigure.SpringBootApplication;
import org.springframework.cloud.client.circuitbreaker.EnableCircuitBreaker;
import org.springframework.cloud.client.discovery.EnableDiscoveryClient;
import org.springframework.cloud.netflix.feign.EnableFeignClients;
import org.springframework.cloud.netflix.feign.FeignClient;
import org.springframework.cloud.netflix.zuul.EnableZuulProxy;
import org.springframework.hateoas.Resources;
import org.springframework.web.bind.annotation.*;
import java.util.ArrayList;
import java.util.Collection;
import java.util.stream.Collectors;
@EnableFeignClients
@EnableCircuitBreaker
@EnableDiscoveryClient
@EnableZuulProxy
@SpringBootApplication
public class EdgeServiceApplication {
public static void main(String[] args) {
SpringApplication.run(EdgeServiceApplication.class, args);
}
}
Create a Item DTO (Data Transfer Object) in this same file. Lombok’s @Data will generate a toString() methods, getters, setters, and appropriate constructors.
@Data
class Item {
    private String name;
}
Create a ItemClient interface that uses Feign to communicate to the Item-catalog-service.
public class EdgeServiceApplication {

    public static void main(String[] args) {
        SpringApplication.run(EdgeServiceApplication.class, args);
    }
}

@Data
class Item {
    private String name;
}

       public String getName() {
             return name;
}

public void setName(String name) {
                      this.name = name;
          }
@FeignClient("item-catalog-service")
interface ItemClient {

    @GetMapping("/items")
    Resources<Item> readItems();
}
Create a RestController below the ItemClient that will filter out less-than-top brands and shows a /top-brandsendpoint.
@RestController
class GoodItemApiAdapterRestController {

    private final ItemClient itemClient;

    public GoodItemApiAdapterRestController(ItemClient ItemClient) {
        this.itemClient = itemClient;
    }

    @GetMapping("/top-brands")
    public Collection<Item> goodItems() {
        return itemClient.readItems()
                .getContent()
                .stream()
                .filter(this::isGreat)
                .collect(Collectors.toList());
    }

    private boolean isGreat(Item item) {
        return !item.getName().equals("Nike") &&
                !item.getName().equals("Adidas") &&
                !item.getName().equals("Reebok");
    }
}
Start the edge-service application with Maven or your IDE and verify it registers successfully with the Eureka server.

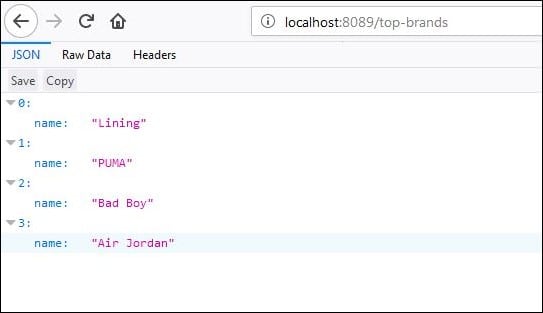
Now invoke localhost:8089/top-brands, you will see the list of top brands from the catalog service.

Note: If you shut down the item-catalog-service application, you’ll get a 500 internal server error.
$ http localhost:8089/top-brands
HTTP/1.1 500
Connection: close
Content-Type: application/json;charset=UTF-8
Date: Fri, 16 Mar 2018 12:51:22 GMT
Transfer-Encoding: chunked
X-Application-Context: edge-service:8089
{
    "error": "Internal Server Error",
    "exception": "feign.RetryableException",
    "message": "connect timed out executing GET http://item-catalog-service/items",
    "path": "/top-brands",
    "status": 500,
    "timestamp": 1328088897672
}
To fix this, you can use Hystrix to create a fallback method and tell the goodItems() method to use it.
public Collection<Item> fallback() {
    return new ArrayList<>();
}

@HystrixCommand(fallbackMethod = "fallback")
@GetMapping("/top-brands")
public Collection<Item> goodItems() {
    return …
}
Restart the edge-service and you should see an empty list returned.
$ http localhost:8089/top-brands
HTTP/1.1 200
Content-Type: application/json;charset=UTF-8
Date: Fri, 16 Mar 2018 12:59:02 GMT
Transfer-Encoding: chunked
X-Application-Context: edge-service:8089
[]
Start the item-catalog-service again and this list should eventually return the full list of top brands names.
If you want the Source Code for this Application, please leave your comment in comment section.
Subscribe to our youtube channel to get new updates..!
So, this was all about the Spring Boot Microservices blog. If yoy are preparing for your Spring Boot interview? Check out these 50 essential Spring Boot interview questions to ace your upcoming interview!
If you wish to learn spring framework and build your own applications, then check out this Spring Certification course online to learn more about Spring Frameworks.
Got a question for us? Please mention it in the comments section of ” Spring Microservices” and I will get back to you.