
Advanced Certification in Agentic AI Engineer ...
- 68k Enrolled Learners
- Weekend
- Live Class
(45931)


 Copy Link!
Machine Learning is the buzzword right now. Some incredible stuff is being done with the help of machine learning. From being our personal assistant, to deciding our travel routes, helping us shop, aiding us in running our businesses, to taking care of our health and wellness, machine learning is integrated to our daily existence at such fundamental levels, that most of the time we don’t even realize that we are relying on it. In this article, we will follow a beginner’s approach to implement standard a machine learning classifier in Python.
Machine Learning is a concept which allows the machine to learn from examples and experience, and that too without being explicitly programmed. So instead of you writing the code, what you do is you feed data to the generic algorithm, and the algorithm/ machine builds the logic based on the given data.
Introduction to Machine Learning provides the foundational understanding of how this process works, enabling learners to grasp how machines derive logic from data without manual programming.

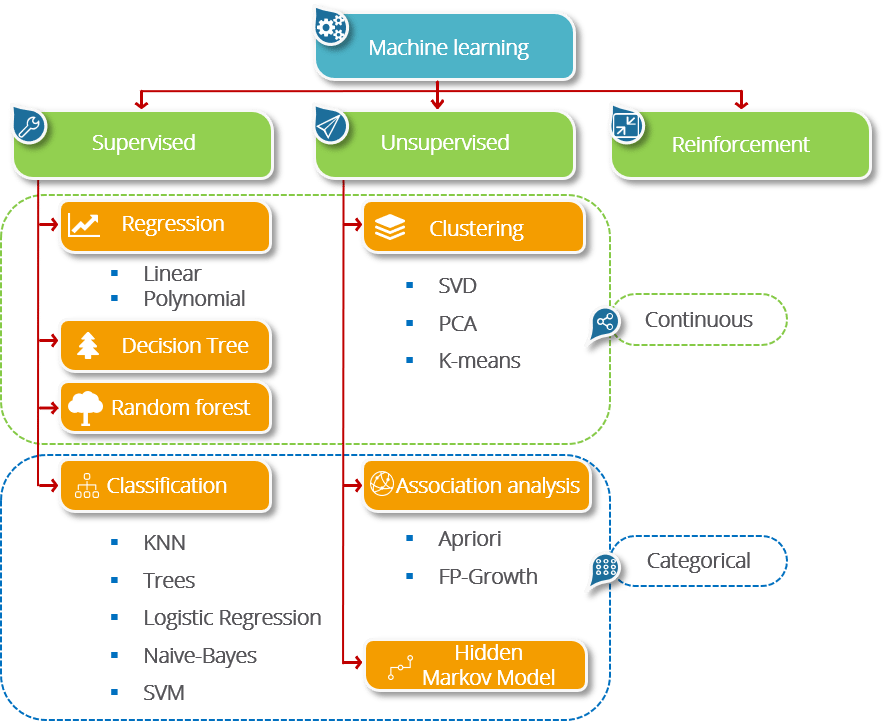
Machine Learning involves the ability of machines to take decisions, assess the results of their actions, and improve their behavior to get better results successively.
The learning process takes place in three major ways
Machine learning tools are provided quite conveniently in a Python library named as scikit-learn, which are very simple to access and apply.
Install scikit-learn through the command prompt using:
pip install -U scikit-learn
If you are an anaconda user, on the anaconda prompt you can use:
conda install scikit-learn
The installation requires prior installation of NumPy and SciPy packages on your system.
This Edureka Machine Learning Full Course video will help you understand and learn Machine Learning Algorithms in detail. This Machine Learning Tutorial is ideal for both beginners as well as professionals who want to master Machine Learning Algorithms.
Preprocessing: The first and most necessary step in any machine learning-based data analysis is the preprocessing part. Correct representation and cleaning of the data is absolutely essential for the ML model to train well and perform to its potential.
Step 1 – Import necessary libraries
import numpy as np
import pandas as pd
import matplotlib.pyplot as plt
Step 2 – Import the dataset
dataset = pd.read_csv(<pathtofile>)
Then we split the dataset into independent and dependent variables. The independent variables shall be the input data, and the dependent variable is the output data.
X=dataset.iloc[<range of rows and input columns>].values
y=dataset.iloc[<range of rows and output column>].values
Step 3 – Handle missing data
The dataset may contain blank or null values, which can cause errors in our results. Hence we need to deal with such entries. A common practice is to replace the null values with a common value, like the mean or the most frequent value in that column.
from sklearn.preprocessing import Imputer
imputer=Imputer(missing_values="NaN", strategy="mean", axis=0)
imputer=imputer.fit(X[<range of rows and columns>])
X[<range of rows and columns>]=imputer.transform(X[<range of rows and columns>])
Step 4 – Convert categorical variables to numeric variables
from sklearn.preprocessing import LabelEncoder
le_X=LabelEncoder()
X[<range of rows and columns>]=le_X.fit_transform(X[<range of rows and columns>])
labelencoder_y = LabelEncoder()
y = labelencoder_y.fit_transform(y)
Now, after encoding, it might happen that the machine assumes the numeric data as a ranking for the encoded columns. Thus, to provide equal weight, we have to convert the numbers to one-hot vectors, using the OneHotEncoder class.
from sklearn.preprocessing import OneHotEncoder
oneHE=OneHotEncoder(categorical_features=[<range of rows and columns>])
X=oneHE.fit_transform(X).toarray()
Step 5 – Perform scaling
This step is to deal with discrepancies arising out of mismatched scales of the variables. Hence, we scale them all to the same range, so that they receive equal weight while being input to the model. We use an object of the StandardScaler class for this purpose.
from sklearn.preprocessing import StandardScaler
sc_X=StandardScaler()
X=sc_X.fit_transform(X)
Step 6 – Split the dataset into training and testing data
As the last step of preprocessing, the dataset needs to be divided into a training set and test set. The standard ratio of the train-test split is 75%-25%. We can modify as per requirements. The train_test_split() function can do this for us.
from sklearn.model_selection import train_test_split
X_train,X_test,y_train,y_test=train_test_split(X,y,test_size=0.25)
Model Building: This step is actually quite simple. Once we decide which model to apply on the data, we can create an object of its corresponding class, and fit the object on our training set, considering X_train as the input and y_train as the output.
from sklearn.<class module> import <model class>
classifier = <model class>(<parameters>)
classifier.fit(X_train, y_train)
The model is now trained and ready. We can now apply our model to the test set, and find predicted output.
y_pred = classifier.predict(X_test)
Viewing Results: The performance of a classifier can be assessed by the parameters of accuracy, precision, recall and f1-score. These values can be seen using a method known as classification_report(). t can also be viewed as a confusion matrix that helps us to know how many of which category of data have been classified correctly.
from sklearn.metrics import confusion_matrix
cm = confusion_matrix(y_test, y_pred)
print(cm)

from sklearn.metrics import classification_report
target_names = [<list of class names>]
print(classification_report(y_test, y_pred, target_names=target_names))
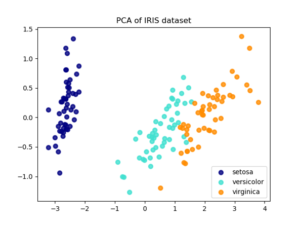
We will use the very popular and simple Iris dataset, containing dimensions of flowers in 3 categories – Iris-setosa, Iris-versicolor, and Iris-virginica. There are 150 entries in the dataset.
# Importing the libraries
import numpy as np
import matplotlib.pyplot as plt
import pandas as pd

# Importing the dataset
dataset = pd.read_csv('iris.csv')
Let us view the dataset now.
dataset.head()
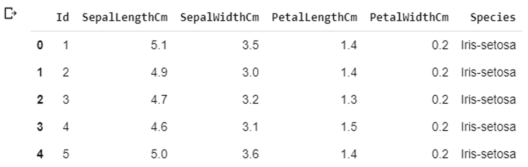
We have 4 independent variables (excluding the Id), namely column numbers 1-4, and column 5 is the dependent variable. So we can separate them out.
X = dataset.iloc[:, 1:5].values
y = dataset.iloc[:, 5].values
Now we can Split the Dataset into Training and Testing.
# Splitting the dataset into the Training set and Test set
from sklearn.model_selection import train_test_split
X_train, X_test, y_train, y_test = train_test_split(X, y, test_size = 0.25)
Now we will apply a Logistic Regression classifier to the dataset.
# Building and training the model
from sklearn.linear_model import LogisticRegression
classifier = LogisticRegression()
classifier.fit(X_train, y_train)

# Predicting the Test set results
y_pred = classifier.predict(X_test)
The last step will be to analyze the performance of the trained model.
# Making the Confusion Matrix
from sklearn.metrics import confusion_matrix
cm = confusion_matrix(y_test, y_pred)
print(cm)
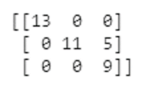
This shows us that 13 entries of the first category, 11 of the second, and 9 of the third category are correctly predicted by the model.
# Generating accuracy, precision, recall and f1-score
from sklearn.metrics import classification_report
target_names = ['Iris-setosa','Iris-versicolor','Iris-virginica']
print(classification_report(y_test, y_pred, target_names=target_names))
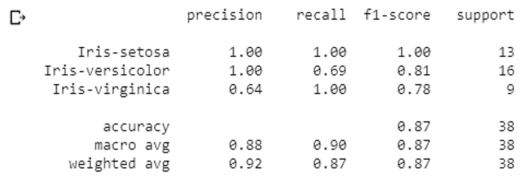
The report shows the precision, recall, f1-score and accuracy values of the model on our test set, which consists of 38 entries (25% of the dataset).
Congratulations, you have successfully created and implemented your first machine learning classifier in Python! To get in-depth knowledge of Python along with its various applications, you can enroll for live Python Machine Learning training with 24/7 support and lifetime access.
What Is MLOps? It is the practice of streamlining machine learning model development, deployment, and monitoring efficiently.
Stay ahead of the curve in technology with our Post Graduate Program in AI and Machine Learning in partnership with E&ICT Academy, National Institute of Technology, Warangal. This Artificial Intelligence Course is curated to deliver the best results. The backbone of modern AI systems is a machine learning algorithm. Those who are looking to master the intricacies of these algorithms. Enrolling MLOps training is necessary. It helps to develop, monitor, and effectively maintain the models of ML in the current environment.


 Thank you for registering Join Edureka Meetup community for 100+ Free Webinars each month JOIN MEETUP GROUP