Okay, so you want to learn Linux. Or, it may be the Linux Operating System is something you have to know as a part of your academic syllabus. Either way, look at learning Linux as a great opportunity.
You’re getting to learn a powerful tool, which if you choose to Get certified in, can make you a more employable candidate in the market today.
So, here is the basic outline of the subjects covered in this Linux Tutorial.
- Linux Tutorial: What is Linux?
- Linux Tutorial: UNIX vs Linux
- Linux Tutorial: Linux Distributions & License
- Linux Tutorial: Linux Installation
- Linux Tutorial: Linux Text Editors
- Linux Tutorial: Linux Commands
Linux Tutorial: What is Linux?
Before we learn Linux, let’s try and understand, what is an Operating System.
What is an Operating System?
So, to work on your computer, you need an Operating System(OS). In fact, you are using one as you read this very article on your laptop/computer.
The computer program that allocates the system resources and coordinates all the details of the computer’s internals, such as scheduling tasks and controlling peripherals, is called an Operating System.
Now, you might have used popular Operating Systems such as Windows or iOS. In this article, we’re talking about one in particular – the Linux Operating System!
Introduction to the Linux Operating System
Linux is a family of open source Unix-like operating systems. It is a set of programs that act as a link between the computer and the user.
The Linux Operating System been around since the mid-‘90s and has since reached a user-base that spans industries and continents. It runs most of the Internet, the supercomputers making scientific breakthroughs, and the world’s stock exchanges. But before Linux came to be known as the platform to run desktops, servers, and embedded systems across the globe, it was acknowledged as one of the most reliable, secure, and worry-free operating systems available.
You could get to know more in-depth about Linux through this video-tutorial for beginners by our Subject Matter Expert;
Linux Tutorial For Beginners | Linux Commands | Edureka
Linux Architecture
The following are components of the architecture that unites all the versions of Linux;
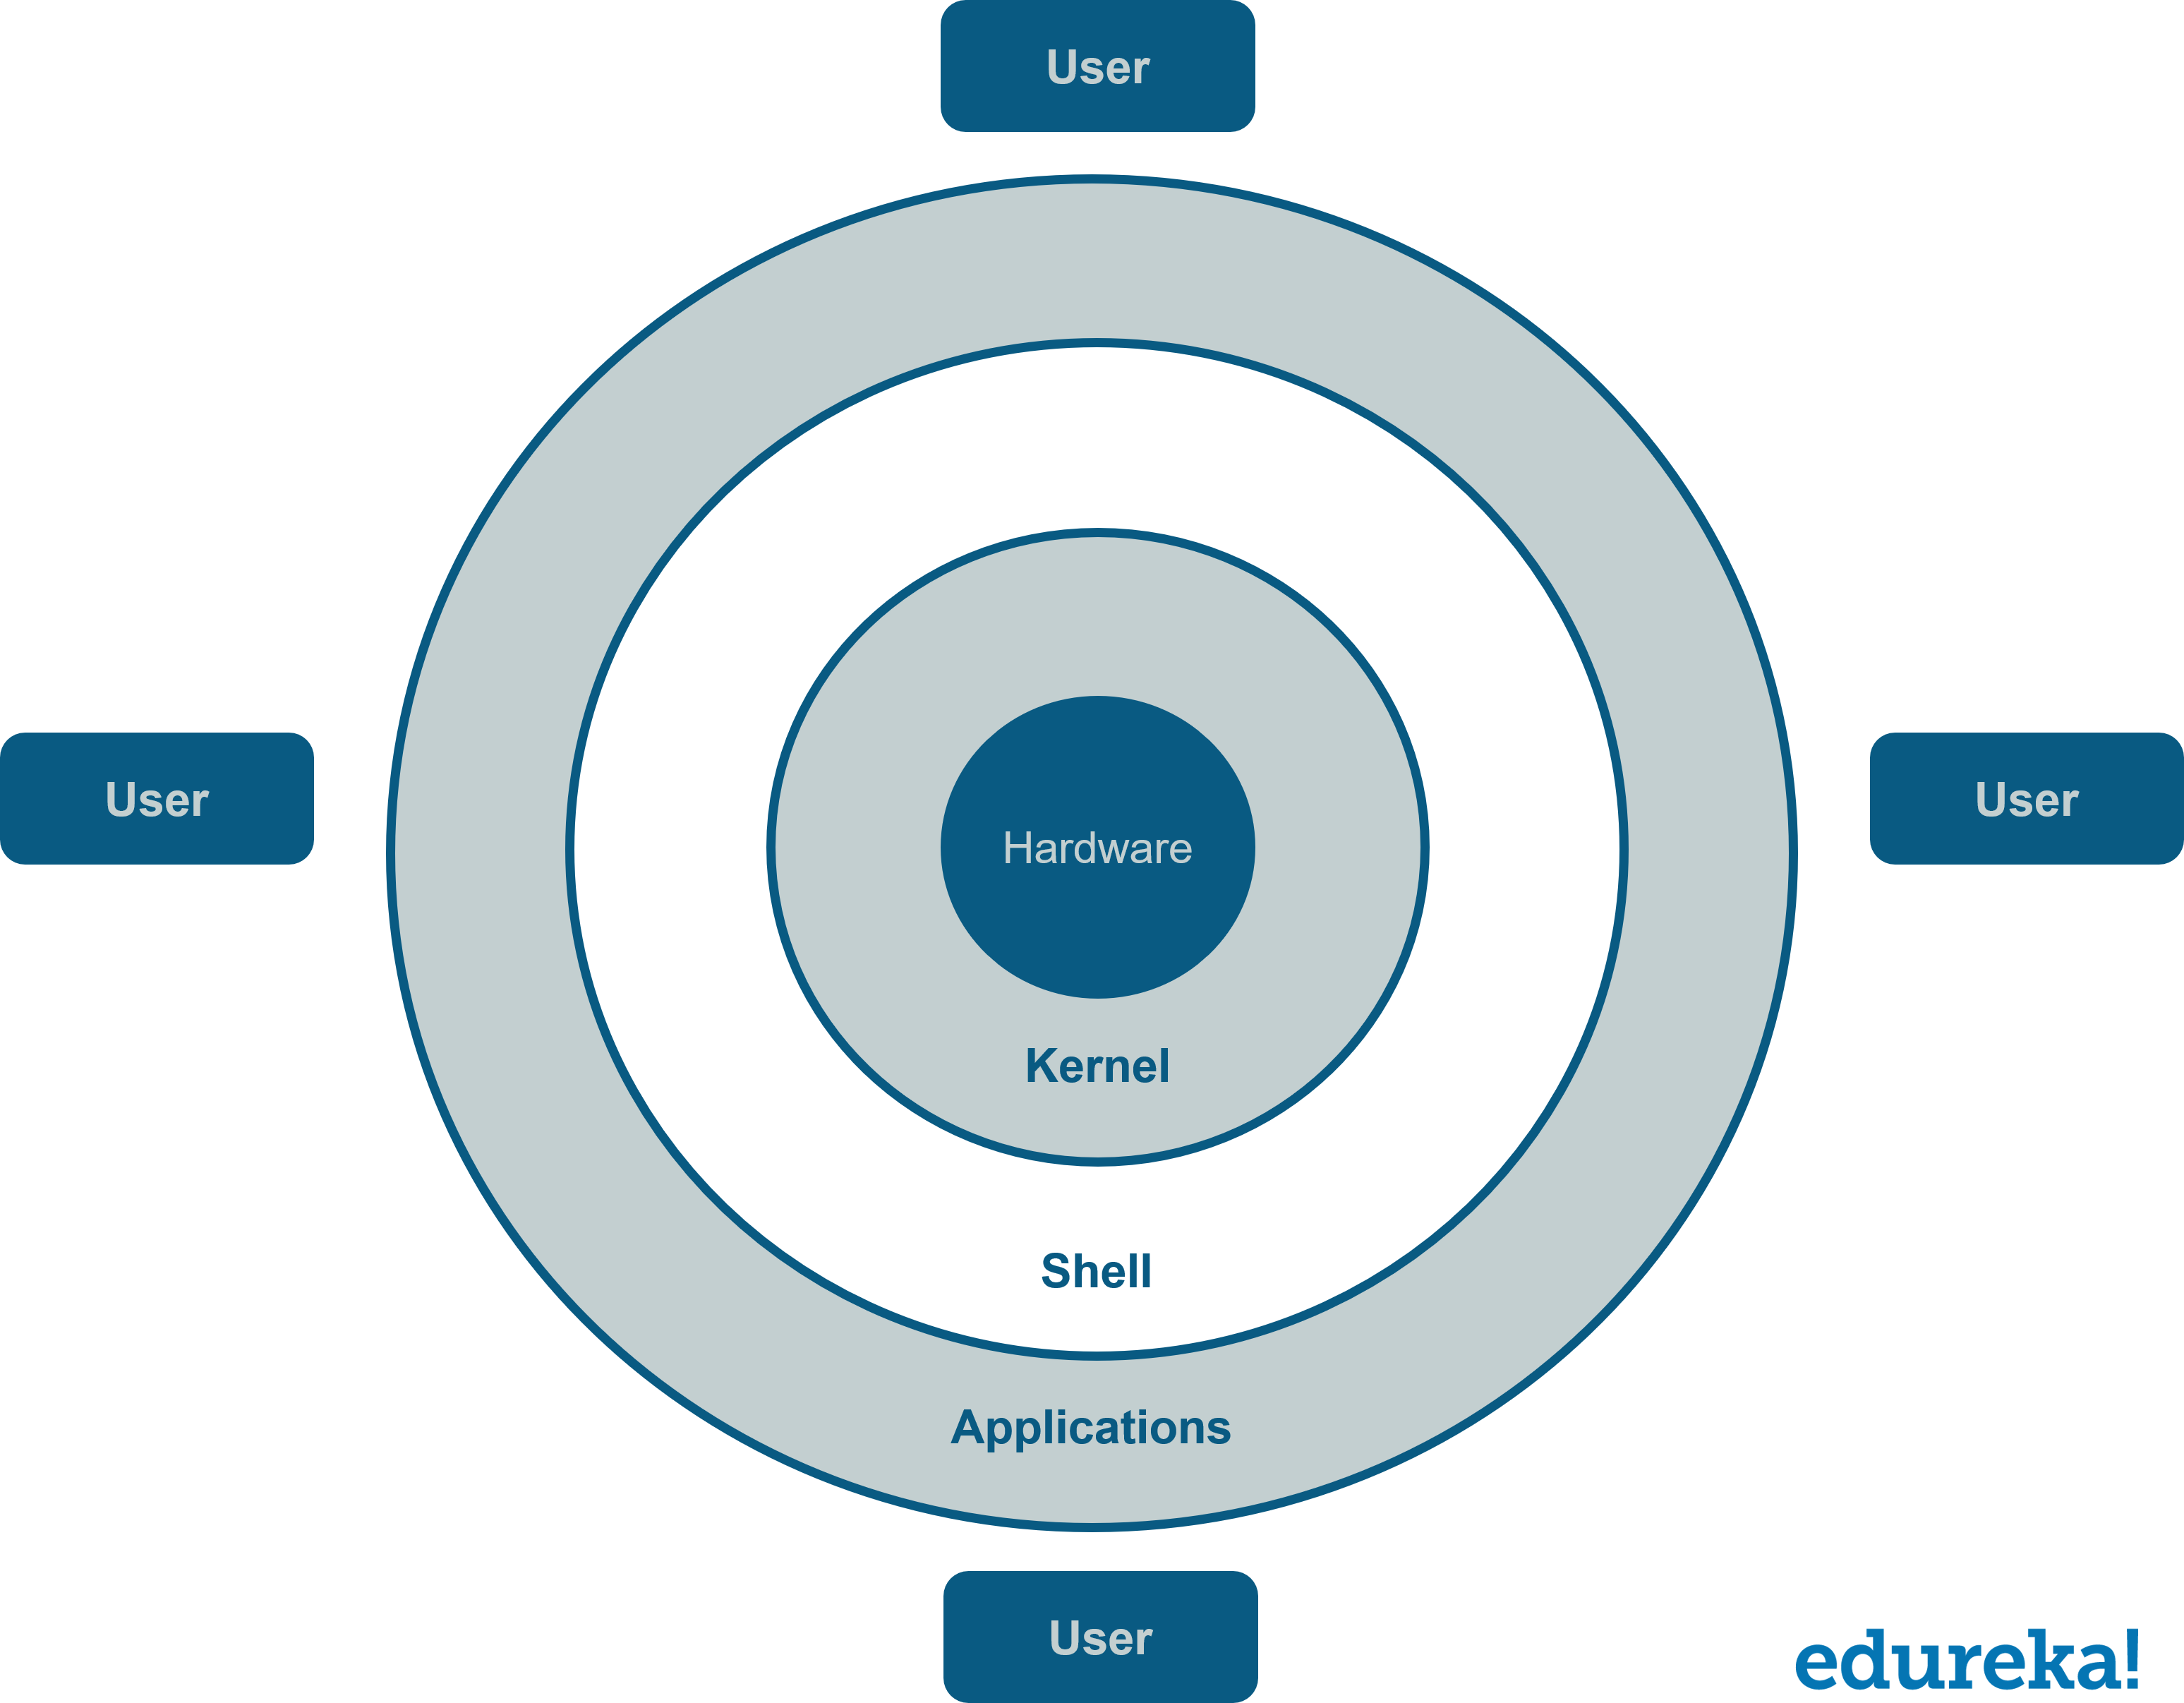
1. Kernel
The kernel is the heart of the operating system. It is the lowest level of the operating system and is responsible for translating the command into something that can be understood by the computer. It interacts with the hardware and most of the tasks like memory management, task scheduling, and file management.
2. Command Line
The command line is a text interface for your computer. It’s a program that takes in Linux commands, passes them on to the computer’s operating system to run. From here, you can navigate through files and folders on your computer.
At first, the Linux command line may seem complex and intimidating but once you get used to working with it you’d realize it is, on the contrary, quite intuitive and simple to use.
Linux likes to take the approach of giving you a set of building blocks and then letting you put them together. This allows you to build and assemble things to suit our needs.
3. Shell
The shell is the utility that processes your requests. When you type in a command at your terminal, the shell interprets the command and calls the program that you want. So basically, you communicate with the kernel through this program. C Shell, Bourne Shell, and Korn Shell are the most famous primary shells.
4. Commands and Utilities
There are various commands and utilities which you can make use of in your day to day activities. There are over 250 standard commands plus numerous others provided through 3rd party software. All the commands come along with various options.
The aim here is to be lazy. Why should you do anything you can get the computer to do for you?
The only reason I can think of is that you don’t know how to but once you work through these pages you will know how so then there won’t be a good reason.
5. Files and Directories
All the data in Linux is organized into files. All files are then organized into directories. These directories are further organized into a tree-like structure called the filesystem.
History of Linux
Linux was launched as an underlying GNU project by Richard Stallman in the year 1983, but it went on to become a global sensation in no time. Almost 90% percent of the supercomputers in the world use the Linux operating system, today. Surprising, isn’t it? So, in this article, we’re giving you a complete timeline to take you through the history of Linux.
1991
A student from a Finnish university named Linus Torvalds announced that he is working on a free operating system. What he did is that he wrote the UNIX OS from scratch. The company Usenet Newsgroup, subsequently launched the first active version Linux 0.01 on the Internet.
1992
With version 0.12 in February 1992, Torvalds relicensed the project under the GNU General Public License, declaring it to be open-source software.
1993
Patrick Volkerding launched the first Linux distribution ever and called it Slackware. The same year Ian Murdock released the initial version of Debian. That was the basis of a number of modern distros such as Ubuntu, MEPIS, etc.
1995
An instrumental year in terms of Linux marketing as the company holds first ever Linux expo. It went on to become a tradition for the next several years. It was the first trade show of its kind and featured many software and updates by various marketers.
1997
The Tux mascot(Penguin mascot) was created and the company launches a new version called Linux Kernel 2.0. Linux started to gain acceptance among various business organizations for its unique architecture. The same year, a serious Linux virus, first of its kind, Bliss was discovered. It could easily side-step the system firewall
2000
Linux shipments rose to an astounding 200% within three months of the release of the second major version. In the year 1999, the first ever desktop version of Linux, the GNOME desktop arrived.
Ericcson, then, announced the first mobile phone based on Linux the same year.
2007
Linux launched the first of its kind user-friendly desktop version called Ubuntu with all the essential features meant for domestic use.
Present Day
Global users of Linux operating system touched the magical mark of 20 million in the year 2010. Many interfaces were released in the duration of the next couple of years with Google’s Chromebooks being the most popular of them all.
Torvalds has announced Linux 5.0 to be released in 2019 with features we’ve never seen before.
Linux Features
Linux is completely different from other operating systems in ways more than a few. It is an open source OS which gives a great advantage to the programmers in the form of options in programs having varied features so they can choose according to their needs and customize the OS. Some of those features are enlisted below;
Multiuser capability
The same system resources like memory, hard disk, etc can be accessed by multiple users, operating on separate terminals.
Multitasking
CPU time is divided intelligently, making it possible for multiple functions to be performed simultaneously.
Open Source
Linux code is freely available to all and is a community-based development project.
Portability
Linux is portable, supporting various kinds of hardware.
Live CD/USB
Almost all Linux distros provide live CD/USB so that users can run it without installation.
Graphical User Interface
Despite being primarily a command line based OS, Linux sure can be converted to GUI based through additional packages.
Security
Linux provides security through authentication, authorization, and encryption.
File System
You are provided with a tree-like, hierarchical file system in Linux.
Linux Tutorial: UNIX vs Linux
Linux is said to be a UNIX-clone re-written from scratch. But is that all there is to Linux? Let’s make a few comparisons of UNIX vs Linux to see if it is.
Linux Tutorial: Linux Distributions and License
Distributions
There are on about 600 distros in Linux, today. We’ll mainly be talking about some of the popular ones.
| Linux Distribution | Why should you use it? |
| Ubuntu | It is easy to use and has a graphical Linux Desktop to be used even without the command line. It is an optimum choice for new users. |
| RHEL/CentOS | Red hat is a commercial Linux distributor. CentOS is a community project that uses Red Hat Enterprise Linux code but removes all its trademark to make it freely available. So, if you want to use RedHat but without its trademark, this is the OS for you. |
| Debian | Debian came into the scene in 1993 and had much slower releases because of which it is one of the most stable Linux distributors. It is apt for slightly experienced people to use. |
| Arch Linux | Every package in Arch Linux has to be installed by the user. It does give some sense of control but makes it difficult for beginners to use. |
| Mint | What started out as an alternative to Ubuntu because of media codecs and proprietary software, has now gained its own user-base. It shares many attributes with Ubuntu like its repository software and ease of use, making it optimum for beginners to use. |
| Fedora | It is a project that mainly focuses on free software and provides the latest version of the software. It doesn’t make its own desktop environment but uses upstream software. Despite not being as stable as some other distros, it does manage to provide the latest updates in Linux. |
License
Linus Torvalds has given the Linux kernel license to GNU General Public License (GPL) version 2. This basically means that you may freely copy, change, and distribute it, but you may not impose any restrictions on further distribution, and you must make the source code available.
Linux Tutorial: Linux Installation
The Ubuntu desktop includes everything you need to run your organization, enterprise, school or home. It is easy to use and equally easy to install. Also, it’s open source, accessible, secure and free to download.
Step 0: Prerequisites
You’ll need to consider the following before starting the installation:
- Your laptop should be connected to a power source.
- Ensure you have at least 25GB of free storage space or 5GB for a minimal installation.
- You need to have access to either a DVD or a USB flash drive containing the version of Ubuntu you require.
- Make sure you have a recent backup of your data. While it’s unlikely that anything will go wrong, precaution is always better than cure.
Step 1: Boot from DVD/Flash Drive
It’s easy to install Ubuntu from a DVD /USB. All you need to do is:
- Put the Ubuntu DVD into your optical drive. If you’re using a Flash Drive, you can go ahead and plug it into the USB port.
- Restart your computer. As soon as your computer boots you’ll be able to see the welcome window.

Now, you can select your preferred language from a list that’ll appear on your left. Then you can choose between either installing Ubuntu directly or trying the desktop first.
- Depending on your computer’s configuration, you’ll be presented with either a large language pane which you can navigate through using your cursor keys/mouse/touchpad or a simple installation menu, like the one shown below.
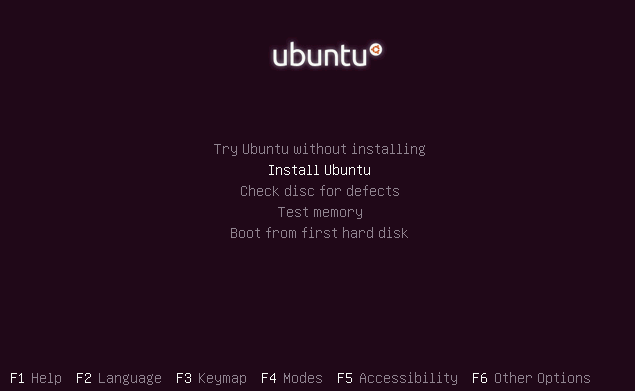
- Go for option, Install Ubuntu, and press return to launch the desktop installer automatically.
- Alternatively, you could also select the first option, Try Ubuntu without installing to give Ubuntu a test run.
A few moments later, after the desktop has loaded, you’ll see the welcome window. From here, you can select your language from a list on the left and choose between either installing Ubuntu directly or trying the desktop first.
Step 2: Preparations for Installing Ubuntu
- You shall be asked to select your keyboard layout, first. If the installer doesn’t guess the default layout correctly, use the Detect Keyboard Layout button to run through a brief configuration procedure. Select Continue.
- After that, you will be asked What apps would you like to install to start with? The two options are Normal installation and Minimal installation.
- The former is the equivalent to the old default bundle of utilities, applications, games and media players. It’s a great launchpad for any Linux installation.
- The latter takes considerably less storage space and allows you to only install what you require.
- Beneath the installation-type question are two checkboxes; we reckon to enable both Download and Install Third-Party Software.
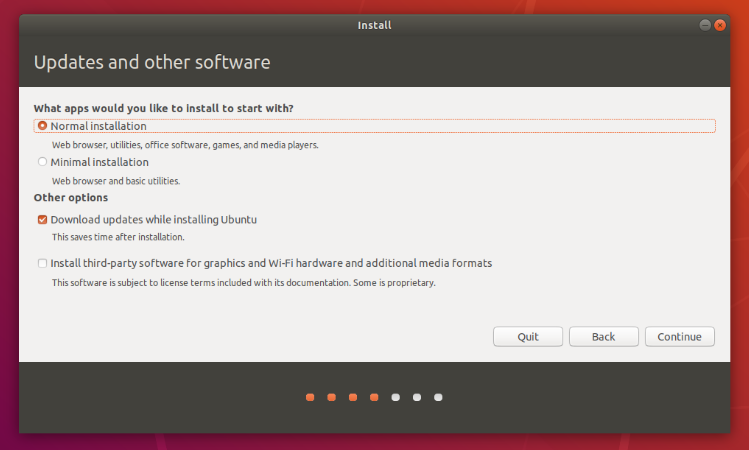
If you are not connected to the internet, you will be asked to select a wireless network, if available. It’s advisable to stay connected to the internet during the installation so your machine is updated.
Step 3: Allocate Drive Space
- There will be these checkboxes to choose from. So make a choice, whether you’d like to install Ubuntu alongside another operating system, delete your existing operating system and replace it with Ubuntu, or Something else.
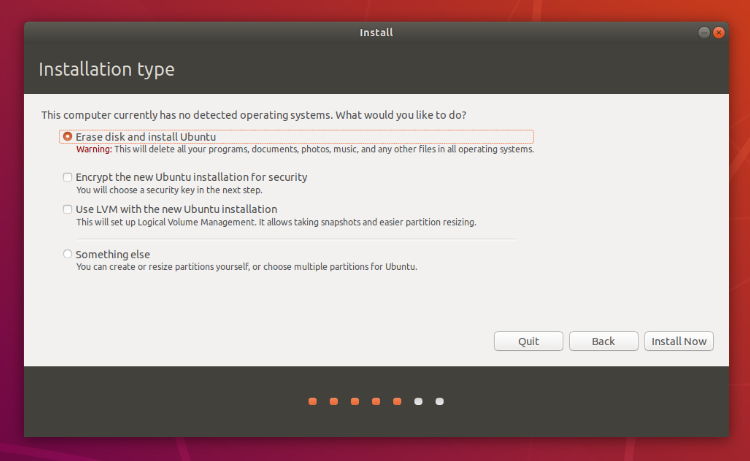
- Click on Install Now.
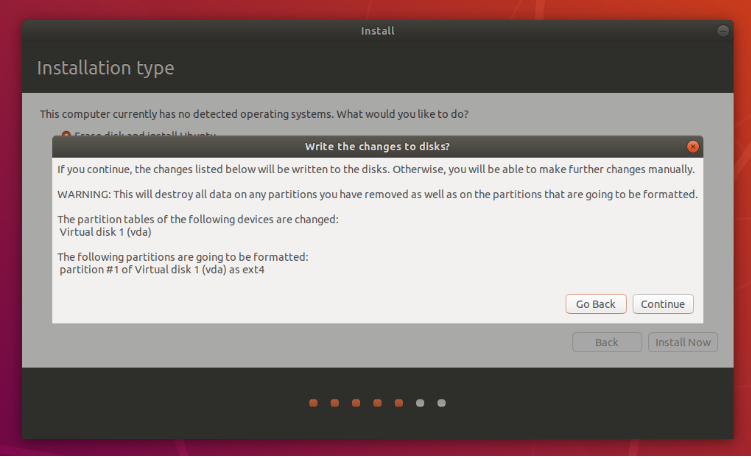
Step 4: Begin Installation
- A small pane will appear and have an overview of the storage options you’ve chosen, with the chance to go back if the details are incorrect.
- Click Continue to fix those changes in place and start the installation process.
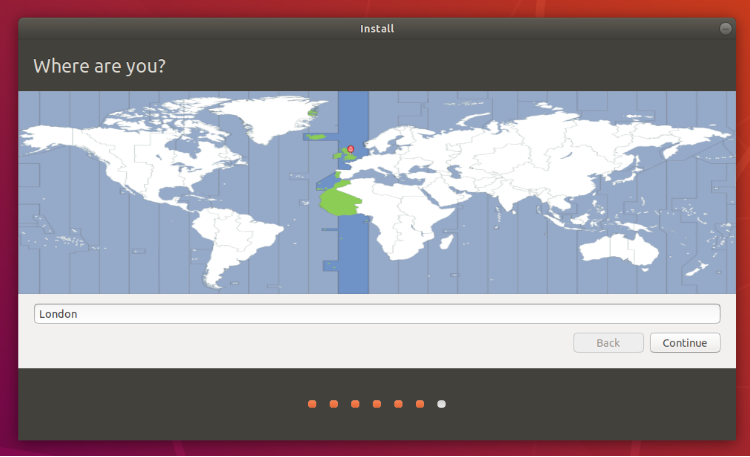
Step 5: Select Location
- Since you are connected to the internet, your location shall be detected automatically. You can check if your location is accurate and click on Forward to proceed.
Step 6: Login
- The installer will automatically suggest a computer name and username once you enter your name. These can easily be changed if you prefer. The computer name is how your computer will appear on the network, while your username will be your login and account name.
- Next, set a strong password.
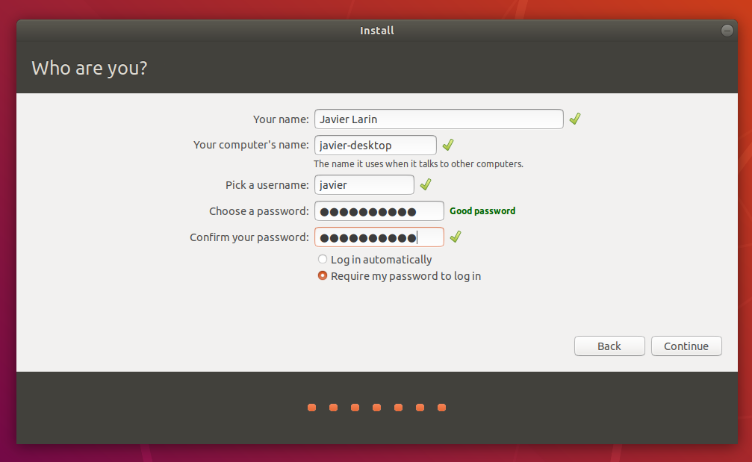
- You can also choose to enable automatic login and home folder encryption. This will prevent people from accessing your personal files if the machine is lost or stolen. But if you enable home folder encryption and you forget your password, you won’t be able to retrieve any personal data stored in your home folder. That’s the downside.
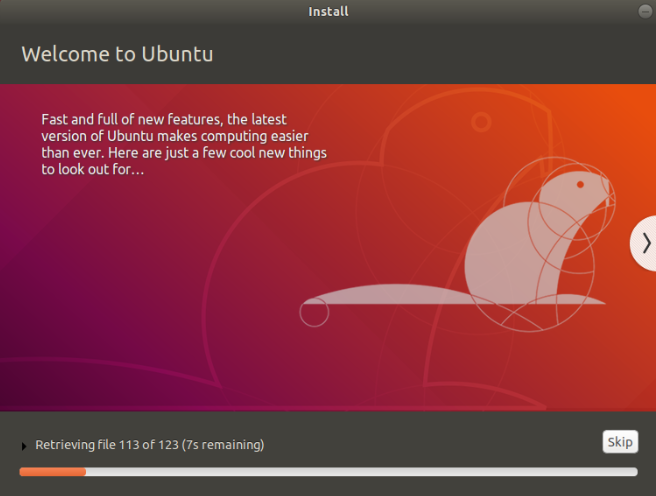
Step 7: Background Installation
- The installer tells you a little about how fantastic Ubuntu is, while it completes in the background. This should only take a few minutes.
Step 8: Installation Complete!
- After the installation and configuration, a small window appears asking you to restart your machine. Click on Restart Now and when prompted, remove either the DVD or flash drive you’ve plugged in.

Kudos! You have now successfully installed the World’s most popular Linux OS!
Linux Tutorial: Linux Text Editors
Text editors are still a big deal in Linux systems. As Windows or Mac users, you might feel that the graphical text editors are where it’s at, but in this world which is largely driven by the command line, you can already launch, write, and email from a Linux text editor before Microsoft Word or Outlook even boot up. This makes speed and power in an OS more tangible.
Here are 3 examples of popular text editors in Linux;
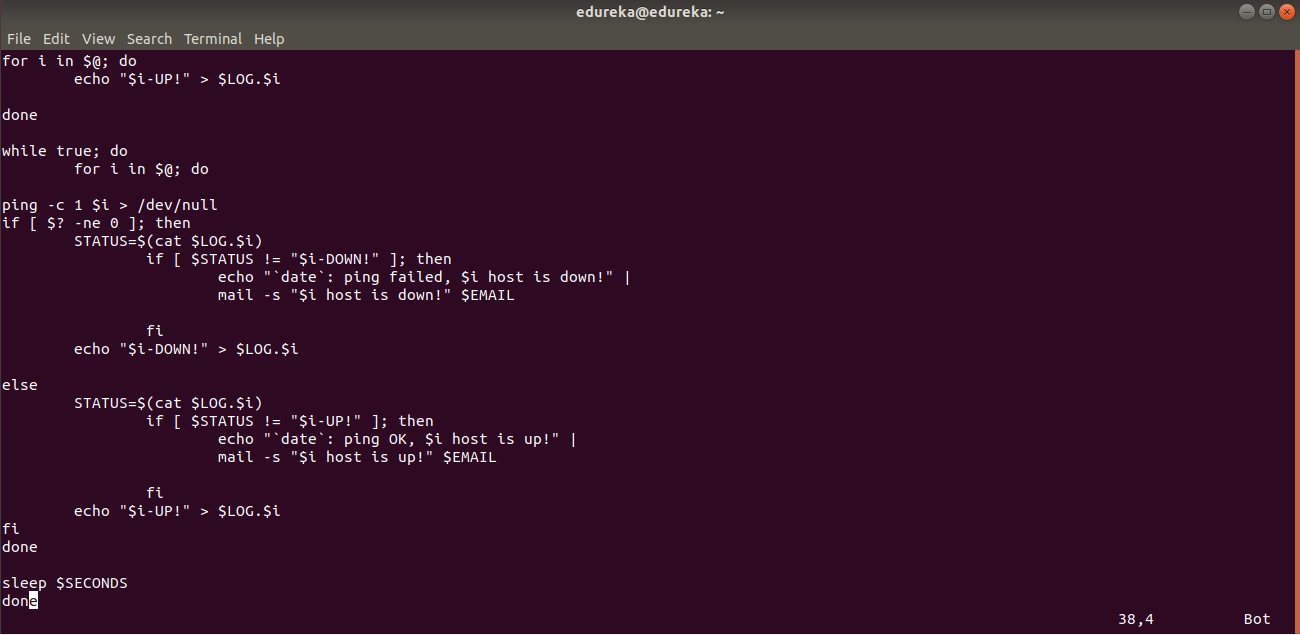
Vi (or Vim Editor)
Vi (later enhanced Vim) has been part of Linux from the start. So, it obviously has some faithful users with Vi so deeply ingrained in their psyche, they manage to design whole websites with it. You can jump in and out of a file in a second, which is great for rapid changes in text files.
User-friendliness, however, is not its strongest point.
More recent Vim extensions offer functionalities such as graphical versions, newer editing commands, syntax highlighting and mouse support.
Pros: Vi is brutally efficient. No matter what Linux distribution you’re using, it is always available.
Cons: Vi has the ugliest user interface of any text editor. Commands are short but usually not very intuitive.
Nano (or Pico Editor)
The Pico text editor was originally developed to help users speed their emails along with the pine email system, having all of a dozen commands available, which it helpfully displayed at the bottom of the text editing area.
The Nano text editor carried over the small design objectives, and with a few added features it became an open-source version of Pico. This text editor also allowed the usage of a mouse or other pointer devices to position the cursor or activate commands on the shortcuts bar at the bottom of the screen.

Pros: These are immediately available for emailing, with compact command sets you won’t get lost in.
Cons: Commands are non-intuitive commands and functionality is limited.
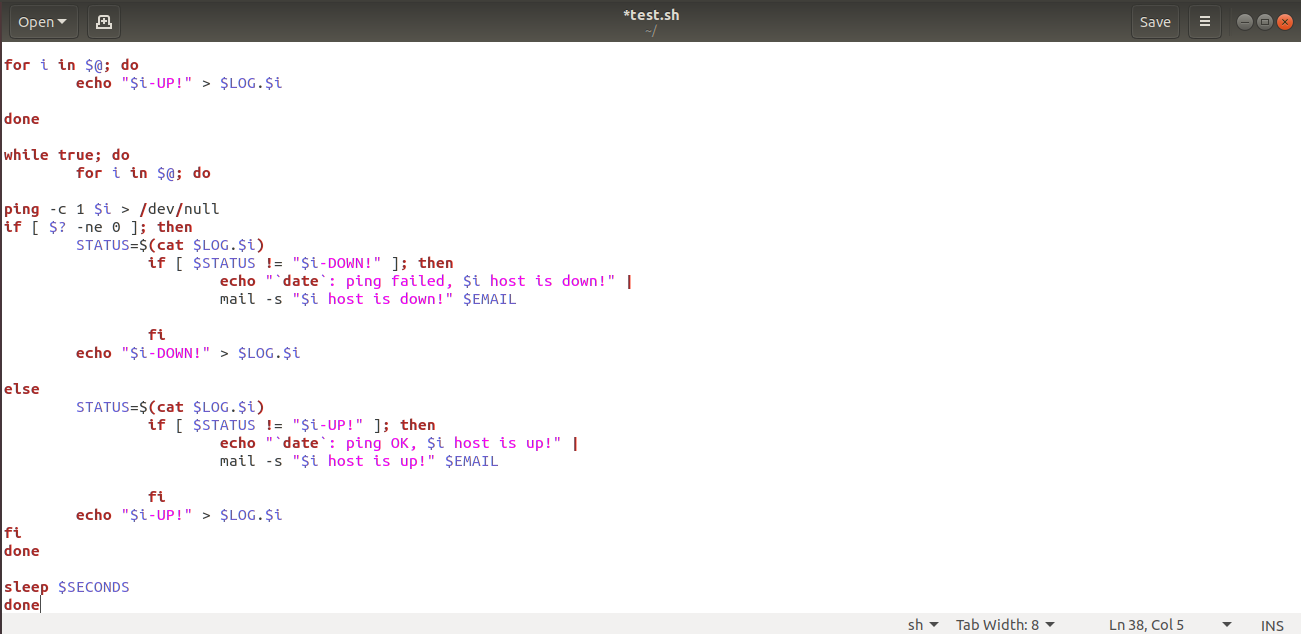
Gedit
Gedit is the default Linux text editor for the GNOME environment. This text editor means no-nonsense and it gets the job done. It is equipped with functionalities including but not limited to search and replace, undo and redo, multi-language spell-checking, and tools for editing programming code and working with markup, as well as other structured languages.
Additional features include automatically detecting and alerting you to the modification of an open file by another application.
Pros: It’s efficient, popular, and its limitations may be overcome with available plugins.
Cons: It performs best only in a GNOME environment.
Linux Tutorial: Linux Commands
In this segment, we’ve brought together a list of useful Linux commands into a convenient guide for you to follow with examples.
Basic Linux Commands
Linux provides a CLI (Command Line Interface) to communicate with the OS. Here are the most basic of the Linux Commands.
1. pwd
Displays the current working directory of the terminal.
syntax:
$ pwd
2. echo
Writes its arguments to standard output.
syntax:
$ echo "<text>"
3. clear
Clears the terminal screen. Contents will not actually be deleted in this case, only scrolled down. You can also clear the screen by pressing Ctrl+L on the keyboard.
syntax:
$ clear
Working with Files
1. cp
Copies files and directories. A copy of the file/directory copied, still remains in the working directory.
syntax:
$ cp <flag> {filename} /pathname/

2. mv
Moves files and directories from one directory to another. The file/directory once moved, is deleted from the working directory.
syntax:
$ mv <flag> {filename} /pathname/

3. rm
Removes files from a directory. By default, the rm command does not remove directories. Once removed, the contents of a file cannot be recovered.
syntax:
$ rm <flag> {filename}

4. grep
Searches for a particular string/ word in a text file. This is similar to “Ctrl+F”, but executed via a CLI.
syntax:
$ grep <flag or element_to_search> {filename}

5. cat
Used to read, modify or concatenate text files. It also displays file contents.
syntax:
$ cat <flag> {filename}
Working with Directories
1. ls
Lists all the contents in the current working directory.
syntax:
$ ls <flag>

2. cd
Used to change the current working directory of the user.
syntax:
$ cd /pathname/
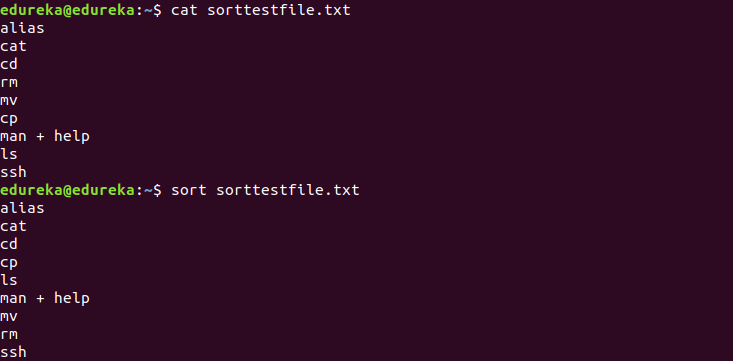
3. sort
Sorts the results of a search either alphabetically or numerically. Files, file contents and directories can be sorted using this command.
syntax:
$ sort <flag> {filename}
4. mkdir
Creates a new directory.
syntax:
$ mkdir <flag> {directoryname} /pathname/

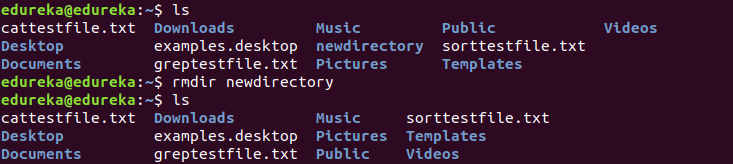
5. rmdir
Removes a specified directory. Although by default, it can only remove an empty directory, there are flags which can be deployed to delete the non-empty directories as well.
syntax:
$ rmdir <flag> {directoryname}
User Permissions
1. su
Switches to root-user so that superuser permissions can be used to execute commands.
syntax:
$ su
2. su <username>
Switches to a different user whose name is passed as the argument.
syntax:
$ su <username>
3. sudo
Executes only that command with root/ superuser privileges.
syntax:
$ sudo <command>
4. chmod
Used to change the access permissions of files and directories. Consider the example below.

On trying to run the newly created file named chmodtestfile.sh, an error is thrown. After modifying the permissions of the file using the said Linux command, it turns executable.
syntax:
$ chmod <permissions of user,group,others> {filename}

The permissions associated with each digit is as follows.
| Number | read | write | execute |
0 | – | – | – |
1 | – | – | yes |
2 | – | yes | – |
3 | – | yes | yes |
4 | yes | – | – |
5 | yes | – | yes |
6 | yes | yes | – |
7 | yes | yes | yes |
Zipped Files
When you download a package from the internet, the downloaded file comes in compressed form. Here are a few commands to decompress and compress files in Linux.
1. tar
Zips/Compresses files of .tar format.
syntax:
$ tar –cvf tar-filename source-folder-name
Unzips/Decompresses files of .tar format.
syntax:
$ tar –xvf tar-file-name
Secure Shell For Remote Access
1. ssh
The following command refers to a cryptographic network protocol for operating network services securely over an unsecured network. Typical use-cases include remote command-line execution, but any network service can be secured with SSH.
This command, on running at the slave node, will give remote access to the master.
syntax:
$ ssh <master's ip>
This command, on running at the master, will give remote access to the slave node.
syntax:
$ ssh <slave's ip>
And with this, we come to the end of this Linux Tutorial!
Got a question for us? Please post it on Edureka Community and we will get back to you.
If you wish to learn Linux Administration and build a colorful career, then check out our Linux Certification Training which comes with instructor-led live training and real-life project experience. This training will help you understand Linux Administration in depth and help you achieve mastery over the subject.