Cloud is all about agility. Quickly creating new servers of various sizes and deploying applications on them is one of them. Let’s take the example of Netflix, it’s hosted on AWS. Whenever there is a popular show or a movie, Netflix would be adding more and more EC2s using AutoScaling to meet the customer demand. Depending on the number of users trying to access Netflix service, the AutoScaling feature can automatically add or delete EC2 instances. Let us see how to launch an EC2 Instance from a custom AMI?
So let us get started with article on, How to Launch an EC2 Instance From a Custom AMI?
What are the different ways of getting the application onto the EC2 instance?
How is the application installed on EC2 automatically? There are multiple ways to have the application along with the settings on the EC2 instance as discussed below.
Using configuration management tool like Puppet and Chef to manage the application lifecycle. The application can be installed, upgraded and rolled back on thousands of machines using these configuration management tools.
By passing the user data to the EC2 instance. The user data can be a shell script to install the application and will be executed when the EC2 starts.
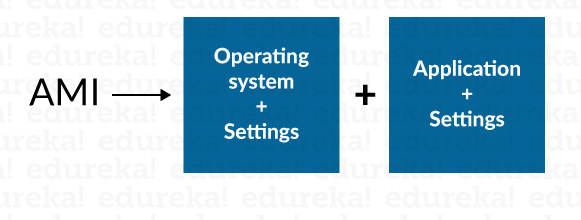
The last options is to use an EC2 AMI (Amazon Machine Image), the AMI has all the information like the Operating System, attached EBS Disks, Applications and the corresponding settings. The AMI is what is all required to start an EC2 instance. Compared to the above two approaches, using the AMI is the fastest way to start an EC2 instance as AMI already has all the details to start the EC2 instance. This tutorial goes through the sequence of steps to create an AMI in AWS.
 So let us move on to the demo part,
How to Launch an EC2 Instance From a Custom AMI: Demo on creating a custom AMI?
AWS provides us with a set of AMIs for both Windows and Linux. Based on the requirement, it’s also possible to create customized AMI with additional software and configuration settings. Here are the high-level sequence of steps to create an AMI.
Step 1: Launch an EC2 instance from an existing AMI and login to it.
Step 2: Install the application and make the appropriate configuration changes.
Step 3: Create a new AMI.
Step 4: Launch additional EC2 instances by using the AMI created in Step 3.

Here are steps in detail:
Step 1: Launching EC2 instance
Use one the existing AWS provided AMI (Windows or Linux) to launch an EC2 instance and login to the instance as mentioned in the Edureka tutorial for EC2.
Step 2: Installing the application on EC2
Once logged into the EC2 instance, install any application as per your requirement. The below commands are for installing Apache Tomcat on Ubuntu EC2 instance. Apache Tomcat can be used to build dynamic web pages using JSP and Servlets. Likewise, any other software can be installed.
#become a root
sudo su
#get the list of softwares and the latest patches
apt-get update && apt-get upgrade
#download and install Apache Tomcat
apt-get install tomcat8
The Tomcat installation can be verified by going to (ec2-ip:8080) URL in the browser, the Tomcat home page should be shown as below. Make sure to replace the ec2-ip with the appropriate public IP of the EC2 instance. The port 8080 should be opened in the inbound rules of the Security Group along with port 22 as shown in the below “inbound rules” of the Security Group. Port 22 is used for SSH access and port 8080 is used for accessing Tomcat.


Related Learning: AWS Interview Questions about EC2
Step 3: Creating Custom AMI
Step 3.1: Select the EC2 instance and go to “Actions -> Image -> Create Image”.

Step 3.2: Specify the Image name and description and click on “Create Image”. Note that before creating the image the EC2 instance is stopped, the AMI created and rebooted back. This is to ensure that the image created is in a consistent state. The EC2 is rebooted, so any Putty or other sessions to the EC2 will be terminated.


Step 3.3: Click on the AMI tab in the left pane. Initially the AMI would be in a “pending” state and then it would change to the “available” status. Depending on the size of the EC2 instance, the AMI creation might take some time. Note that the AMI has a visibility of Private by default and is only accessible to the user who created it. The AMI can be made public or accessible to a few users by going to “Actions -> Manage Image Permissions”.


Step 4: Creating EC2 from the new AMI
In the EC2 Management Console click on “Launch Instance”, Click on “My AMI” where the private AMI created in Step 3 should be visible. Select the AMI and follow the EC2 creation process as usual. Once the EC2 instance has been created, get the public IP address of the EC2 and access the Tomcat homepage by going to (ec2-ip:8080) URL in the browser. This time there is no need to login to the EC2 instance and install Tomcat, as the AMI created in Step 3 has already got the Tomcat already installed in it.

Once the EC2 had been created, make sure to terminate the EC2 and deregister the AMI in the same order. If the EC2 instance is running, then the corresponding AMI cannot be deregistered. The AMI takes storage space and if it is not deregistered/deleted, there is a cost associated with the same.

Check out our AWS Certification Training in Top Cities
So this is it guys, this brings us to the end of this article on How to Launch an EC2 Instance From a Custom AMI? In case if you wish to gain expertise in this subject, Edureka has come up with a curriculum that covers exactly, what you would need to crack the Solution Architect Exam! You can have a look at the course details for AWS Solutions Architect Certification.
In case of any queries related to this blog, please feel free to put question in the comments section below and we would be more than happy to reply to you the earliest.