
Advanced DevOps Certification Training with G ...
- 24k Enrolled Learners
- Weekend
- Live Class
(7990)


 Copy Link!
In the previous blog on What Is Kubernetes, you must have got an understanding on Kubernetes. In this blog on Kubernetes networking, I will primarily focus on the networking concepts involved in Kubernetes.
You can define Kubernetes as an open-source container orchestration tool that provides a portable platform for automating the deployment of containerized applications.
Now, anybody working with Kubernetes must have a clear understanding of Kubernetes Cluster as that will help you in understanding Kubernetes Networking.
The Kubernetes platform offers desired state management, which enables the cluster services to run, the fed configuration in the infrastructure. Let me explain with an example.
Consider a YAML file which has all the configuration information which needs to be fed into the cluster services. So, this file is fed to the API of cluster services, and then it will be up to the cluster services to figure out how to schedule pods in the environment. So, suppose there are two container images for pod 1 with three replicas, and one container image for pod 2 with two replicas, it will be up to the cluster services to allocate these pod-replica pairs to the workers.
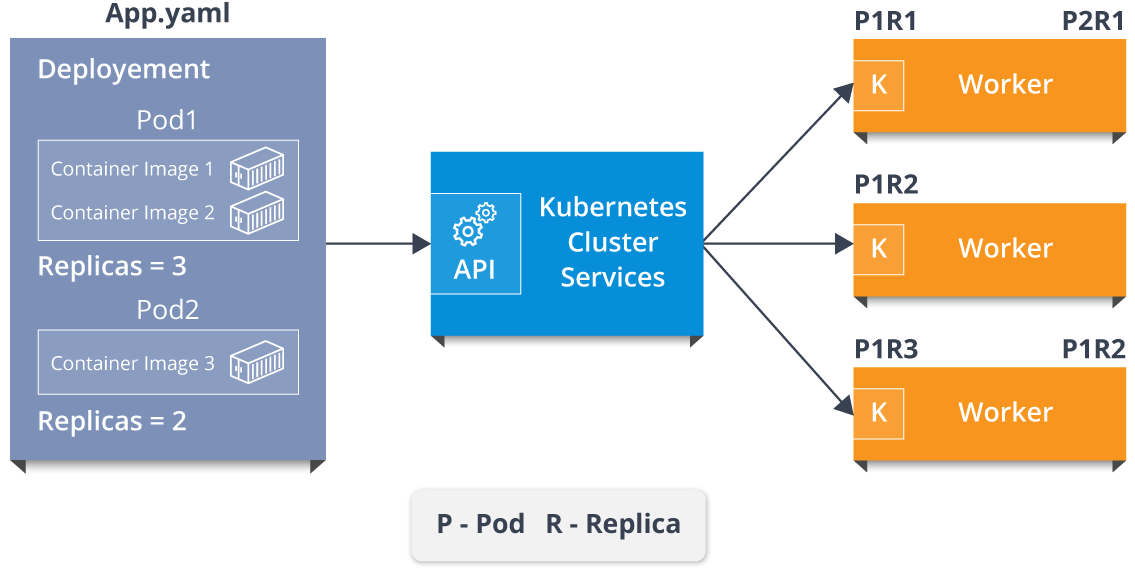
Refer to the above diagram. Now, as you can see that the cluster services have allotted the first worker with two pod replica pairs, the second worker with a single pod-replica pair, and the third worker with two pod replica pairs. Now, it is the Kubelet process which is responsible for communicating the cluster services with workers.
So, this whole setup of cluster services and the workers themselves makes up this Kubernetes cluster!!
How, do you think these individually allocated pods communicate with each other?
The answer lies in Kubernetes Networking!
Subscribe to our youtube channel to get new updates..!
There are mainly 4 problems to solve with the networking concepts.
Now, let me tell you how are the above problems are solved with Kubernetes Networking.
The communication between pods, services and external services to the ones in a cluster brings in the concept of Kubernetes networking.
So, for your better understanding let me divide the concepts into the following.
Before I tell you how do pods communicate, let me introduce you what are pods?
Pods are basic units of Kubernetes applications, that consists of one or more containers allocated on the same host to share a network stack and other resources. So, this implies that all containers in a pod can reach other on a local host.
Now, let me brief you on how do these pods communicate?
There are 2 types of communication. The inter-node communication and the intra-node communication.
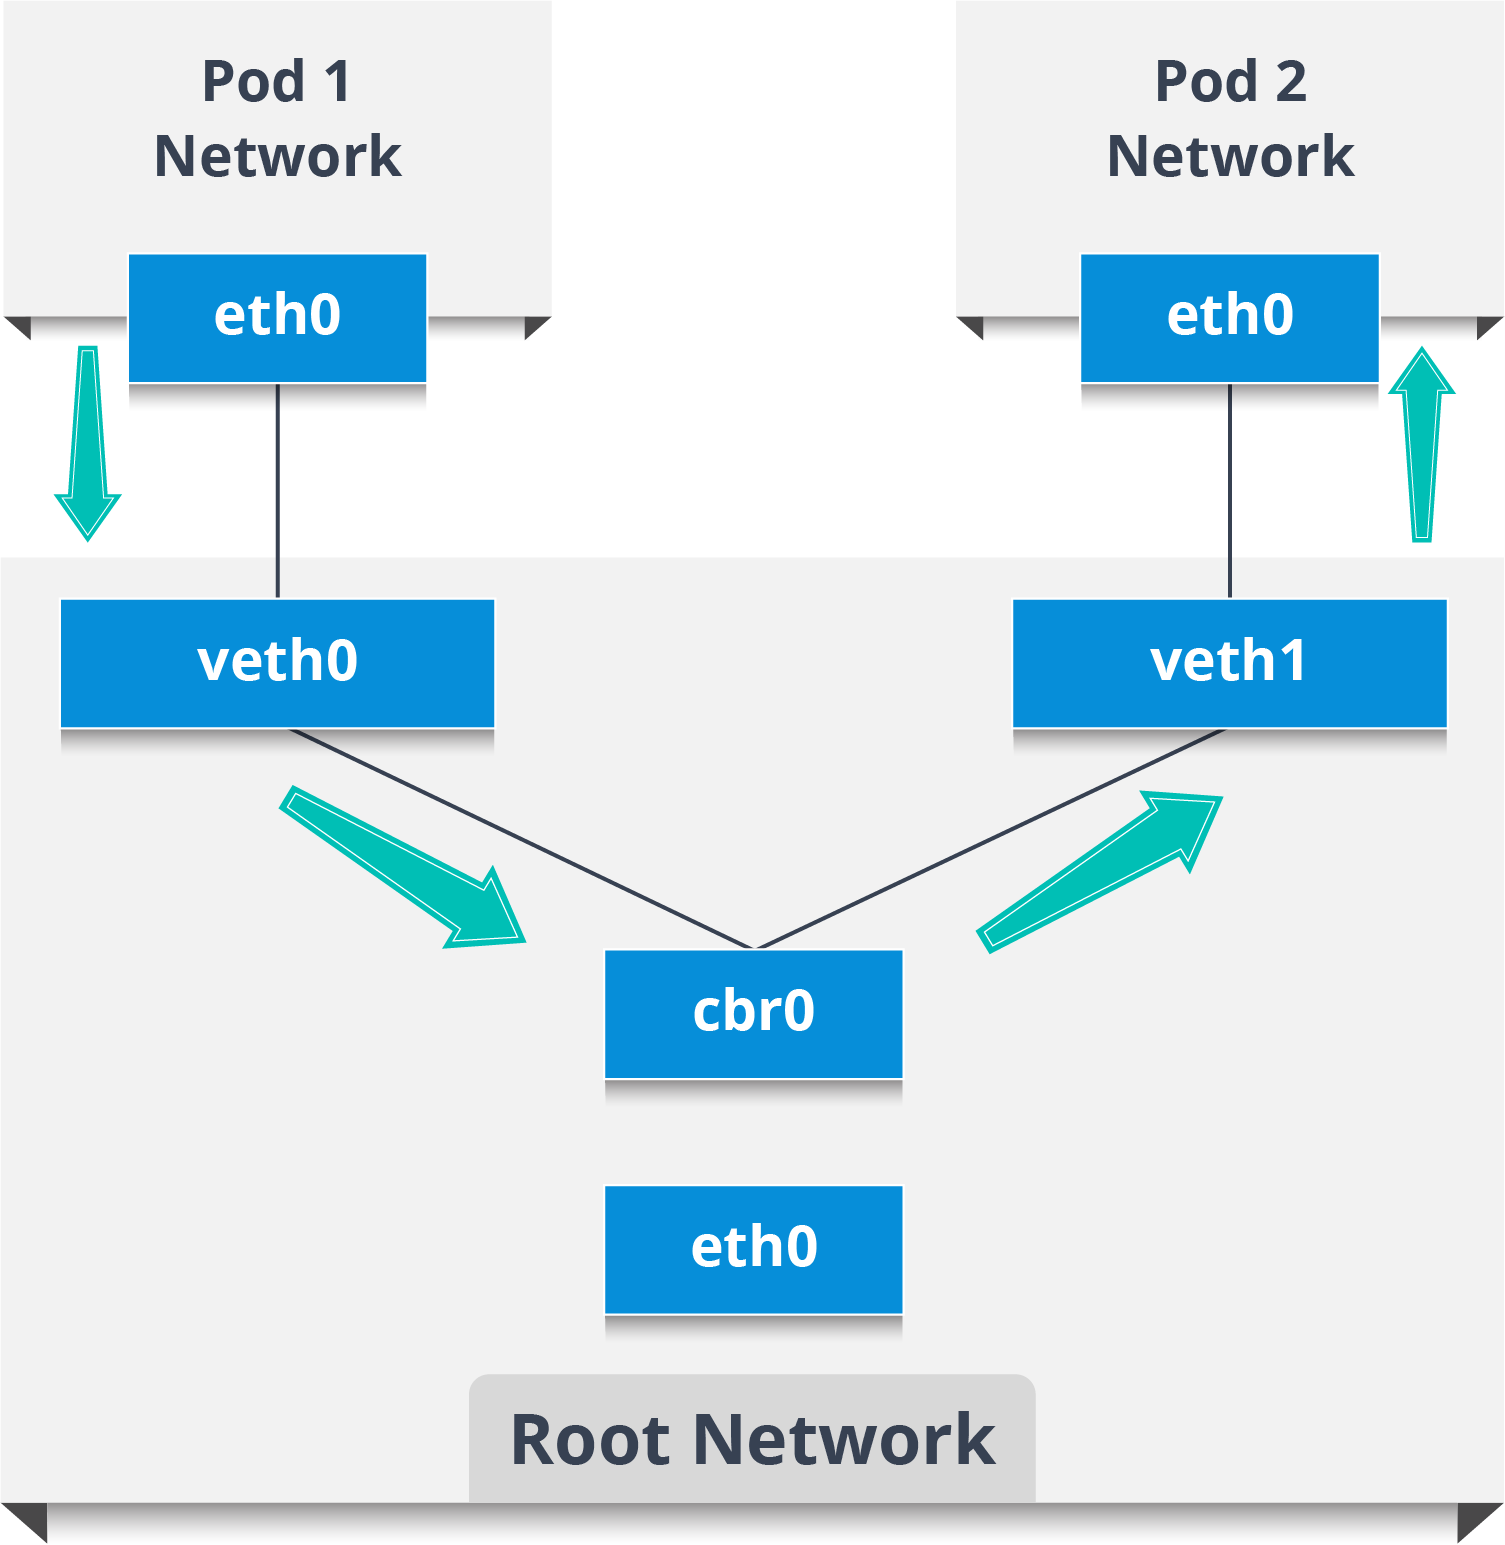
So, let’s start with intra-node communication, but before that let me introduce to you the components of the pod network.
Intra-node pod network is basically the communication between two different nodes on the same pod. Let me explain you with an example.
Assume a packet is going from pod1 to pod2.
Now, similarly let me tell you about the inter-node pod communication.
Consider two nodes having various network namespaces, network interfaces, and a Linux bridge.
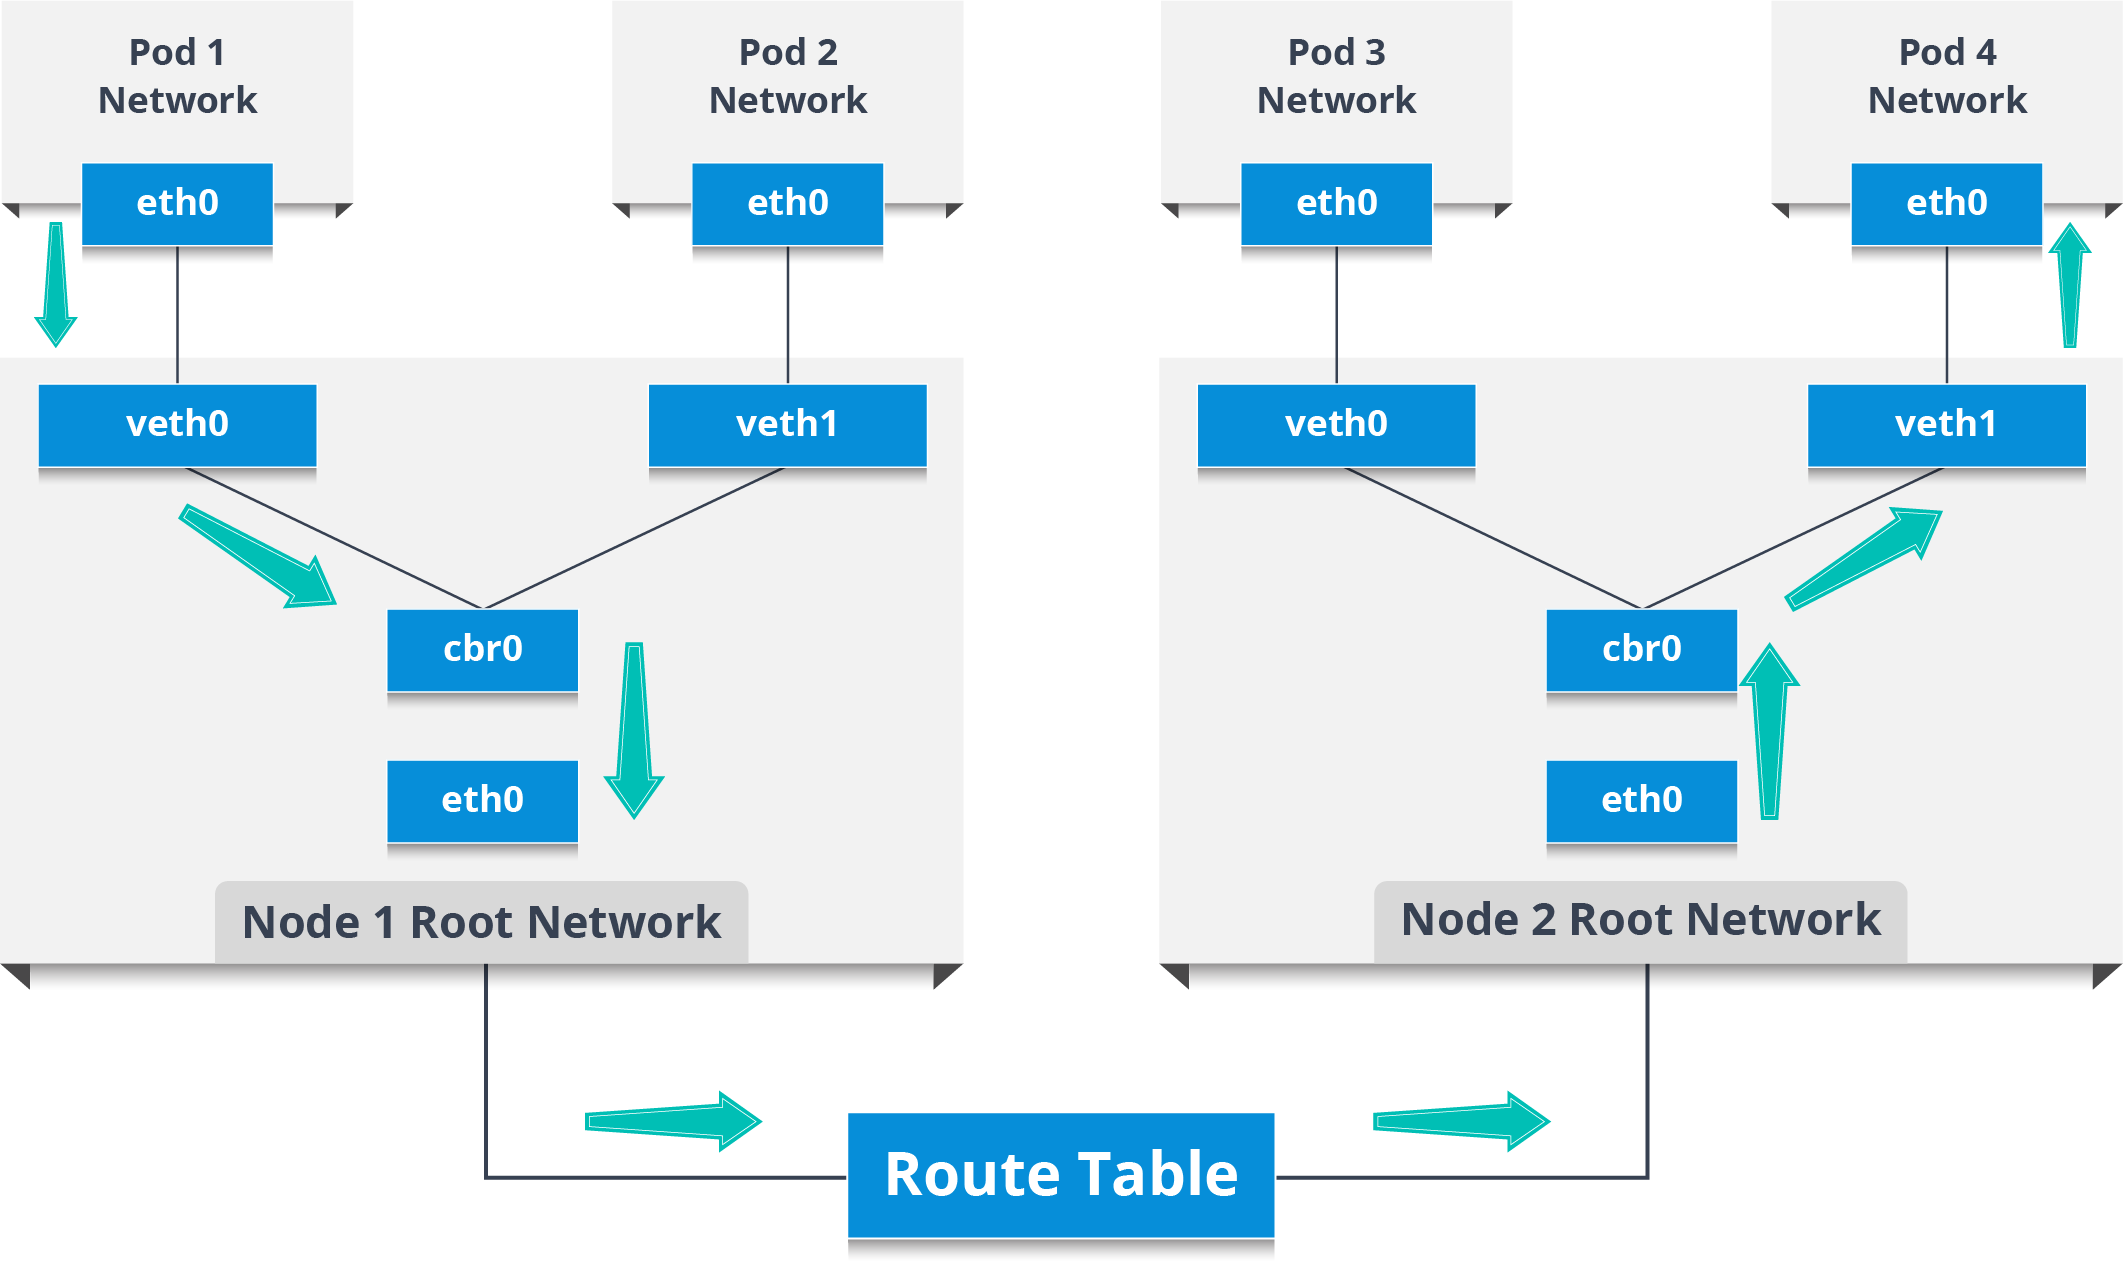
Now, assume a packet travels from pod1 to a pod4 which is on a different node.
So, that’s how pods communicate with each other. Now, lets’ move on and see how services help in the communication of pods.
So, what do you think the services are?
Basically, services are a type of resource that configures a proxy to forward the requests to a set of pods, which will receive traffic & is determined by the selector. Once the service is created it has an assigned IP address which will accept requests on the port.
Now, there are various service types that give you the option for exposing a service outside of your cluster IP address.
Types of Services
There are mainly 4 types of services.
ClusterIP: This is the default service type which exposes the service on a cluster-internal IP by making the service only reachable within the cluster.
NodePort: This exposes the service on each Node’s IP at a static port. Since, a ClusterIP service, to which the NodePort service will route, is automatically created. We can contact the NodePort service outside the cluster.
LoadBalancer: This is the service type which exposes the service externally using a cloud provider’s load balancer. So, the NodePort and ClusterIP services, to which the external load balancer will route, are automatically created.
ExternalName: This service type maps the service to the contents of the externalName field by returning a CNAME record with its value.
So, guys that was all about services. Now, you might be wondering how do external services connect to these networks right?
Well, that’s by none other than Ingress Network.
Well, Ingress network is the most powerful way of exposing services as it is a collection of rules that allow inbound connections, that can be configured to give services externally through reachable URLs. So, it basically acts as an entry point to the Kubernetes cluster that manages external access to the services in a cluster.
Now, let me explain to you the working of Ingress Network with an example.
We have 2 nodes, having the pod and root network namespaces with a Linux bridge. In addition to this, we also have a new virtual ethernet device called flannel0(network plugin) added to the root network.
Now, we want the packet to flow from pod1 to pod 4.
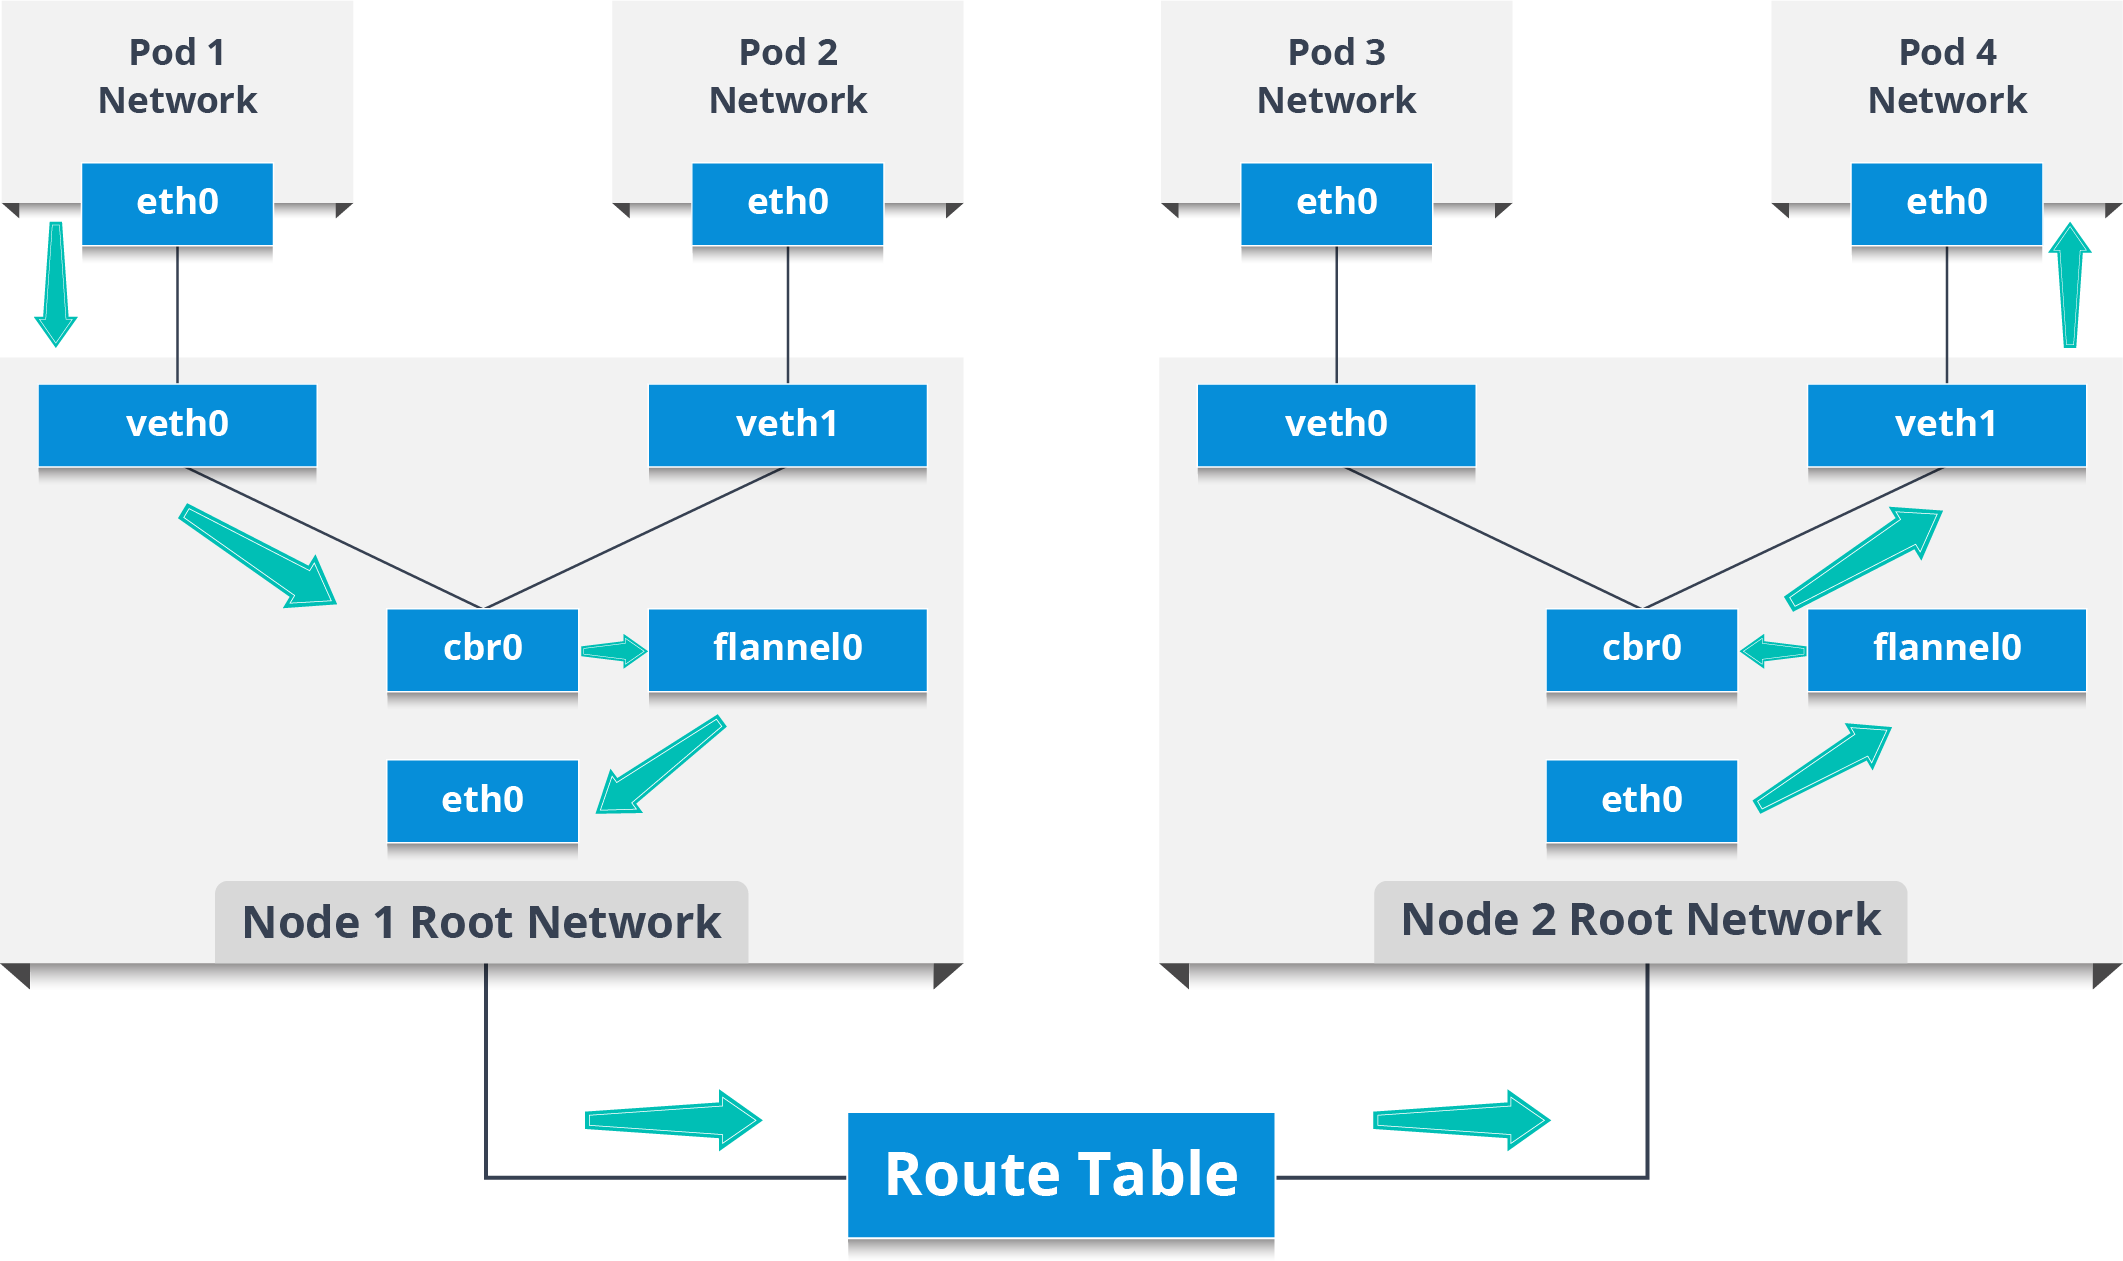
So, that’s how external services are connected with the help of an ingress network. Now, as I was talking about Network plugins, let me introduce you to the list of popular network plugins available.
Now, that I have told you so much about Kubernetes Networking, let me show you a real-life case study.
Wealth Wizards is an online financial planning platform that combines financial planning, and smart software technology to deliver expert advice at an affordable cost.
Now, it was extremely important for the company to quickly discover and eliminate code vulnerabilities with full visibility of their cloud environment but wanted to control traffic through access restrictions.
So, they used Kubernetes infrastructure to manage the provisioning and rollout of the clusters with the help of tools to manage the deployment and configuration of microservices across the Kube clusters.
They also used a network policy feature of Kubernetes to allow them to control traffic through access restrictions.
Now, the problem was, these policies are application-oriented and can only evolve with the applications, but, there was no component to enforce these policies.
So, the only solution the company could find for this was to use a network plugin, and hence they started using Weave Net.
This network plugin creates a virtual network that has a network policy controller to manage and enforce the rules in Kubernetes. Not only this, but it also connects Docker containers across multiple hosts and enables their automatic discovery.
So, suppose you have a workload in the cluster and you want to stop any other workload in the cluster talking to it. You can achieve this by creating a network policy that restricts access and only allows ingress to it via the ingress controller on a specific port.
Now, with his deployment on each Kubernetes node, the plugin manages inter-pod routing and has access to manipulate the IPtables rules. In simple terms, each policy is converted to a collection of IPtables rules, coordinated and configured across each machine to translate the Kubernetes tags.
Alright, now that you have gone through so much theory about Kubernetes Networking, let me show you how is it done practically.
So, with an assumption that all of you have installed Kubernetes on your systems, I have a scenario to showcase.
Suppose you want to store product name and product ID, for that you will need a web application. Basically, you need one container for web application and you need one more container as MySQL for the backend, and that MySQL container should be linked to the web application container.
How about I execute the above-stated example practically.
Let’s get started!
Step 1: Create a folder in your desired directory and change the working directory path to that folder.
mkdir HandsOn
cd HandsOn/

Step2: Now create deployment YAML files, for the web application and MySQL database.
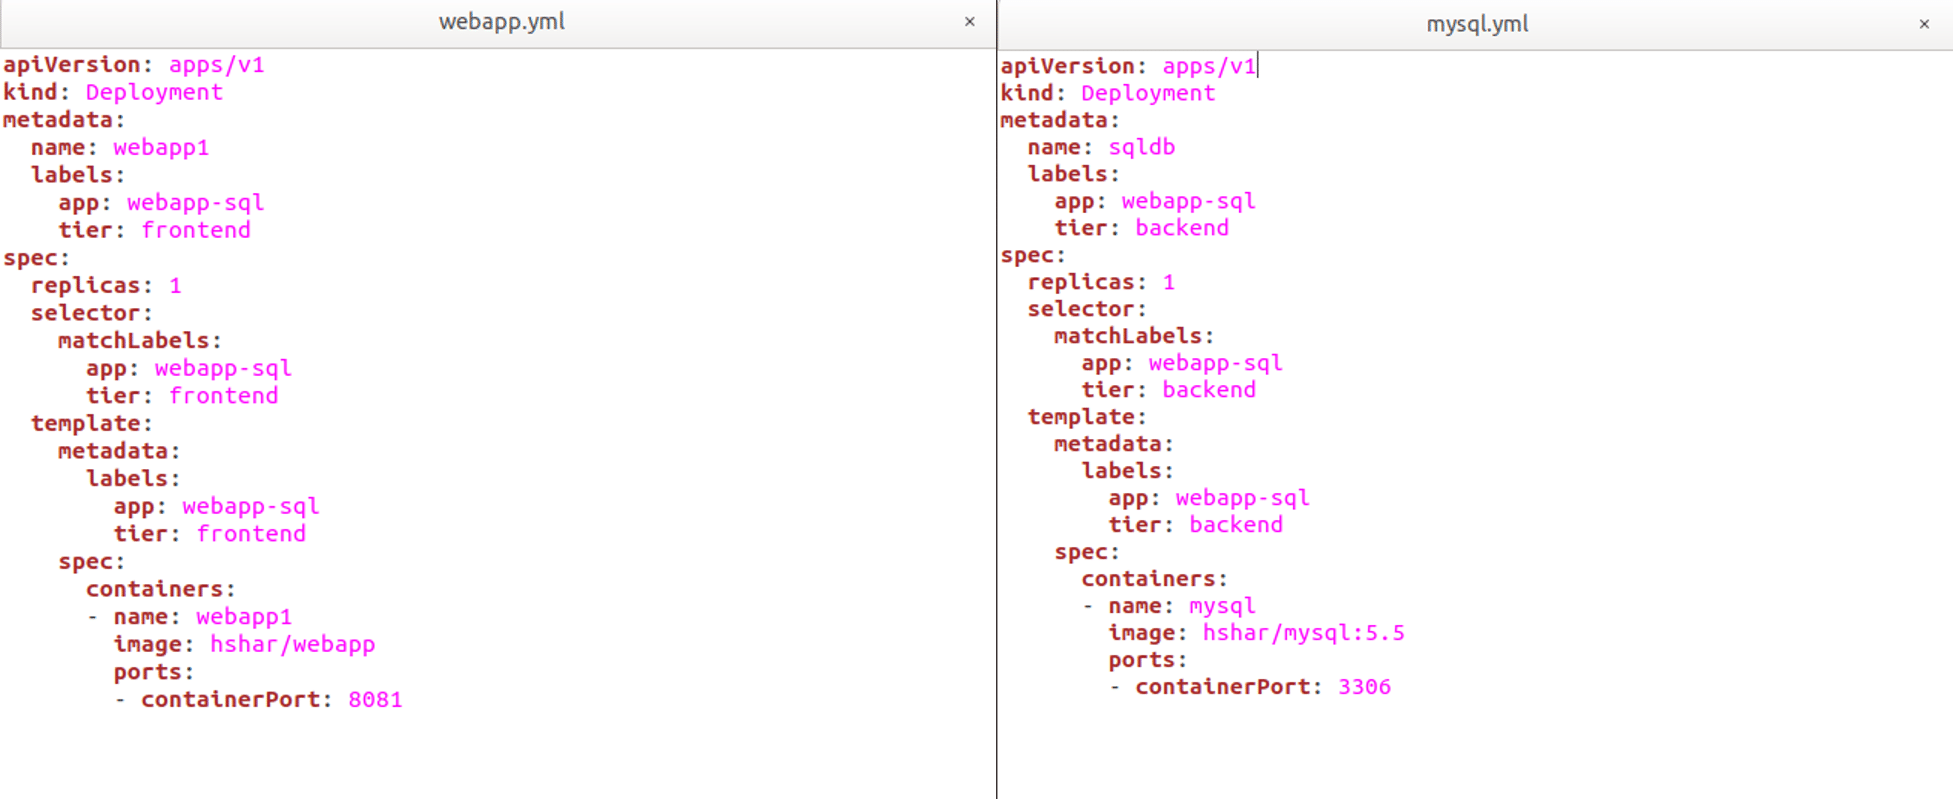
Step3: Once you create the deployment files, deploy both the applications.
kubectl apply -f webapp.yml
kubectl apply -f mysql.yml

Step 3.1: Check both the deployments.
kubectl get deployment

Step 4: Now, you have to create services for both the applications.
kubectl apply -f webservice.yml
kubectl apply -f sqlservice.yml

Step 4.1: Once the services are created, deploy the services.

Step 4.2: Check whether the services have been created or not.
kubectl get service

Step 5: Now, check the configuration of running pods.
kubectl get pods

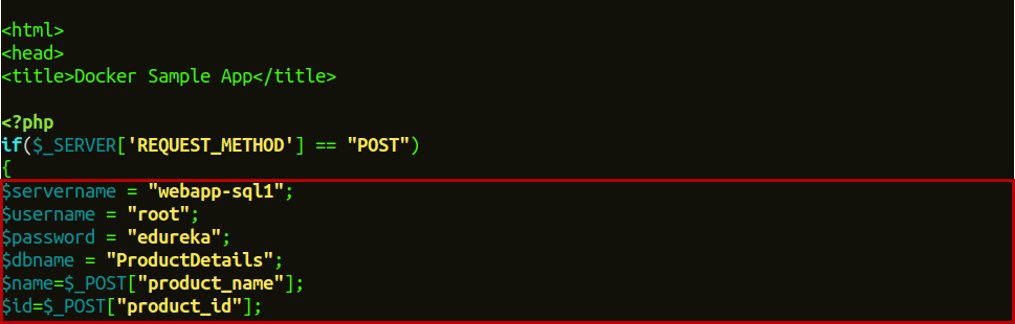
Step 6: Go into the container inside the webapp pod.
kubectl exec -it container_id bash
nano var/www/html/index.php
![]()
Step 6.1: Now, change the $servername from localhost to the SQL service name which is “webapp-sql1” in this case, and $password from “” to “edureka”. Also, fill all the database details required and save your index.php file by using the keyboard shortcut Ctrl+x and after that press y to save and press enter.
Step 7: Now, go into the MySQL container present in the pod.
kubectl exec it container_id bash

Step 7.1: Get the access to use the MySQL container.
mysql -u root -p edureka
Where -u represents the user and -p is the password of your machine.
Step 7.2: Create a database in MySQL which will be used to get data from webapp.
CREATE DATABASE ProductDetails;

Step 7.3: Use the created database.
USE ProductDetails;
![]()
Step 7.4: Create a table in this database in MySQL which will be used to get data from webapp.
CREATE TABLE products(product_name VARCHAR(10), product_id VARCHAR(11));

Step 7.5: Now, exit MySQL container as well using the command exit.
Step 8: Check the port number on which your web application is working.
kubectl get services

Step 8.1: Now, open the web application on it’s allocated port number.

Step 9: Once you click on Submit Query, go to the node in which your MySQL service is running and then go inside the container.
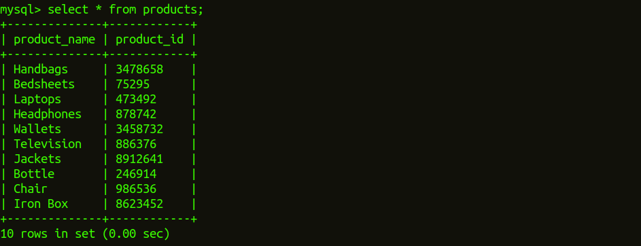
This will show you the output of all the list products, of which you have filled in the details.
If you found this Kubernetes Networking blog relevant, check out the Docker and Kubernetes Training Course by Edureka, a trusted online learning company with a network of more than 250,000 satisfied learners spread across the globe.
Got a question for us? Please mention it in the comments section and we will get back to you.


 Thank you for registering Join Edureka Meetup community for 100+ Free Webinars each month JOIN MEETUP GROUP