Since it is official that Kotlin Programming Language is one of the preferred languages for Android Development, it has taken down Java in a single go. This article will help your way out if you are new to Kotlin and have the thirst to learn this super cool programming language.
I’ll be discussing the topics in this order:
Let’s get started!
What is Kotlin and Why should you learn Kotlin?
Kotlin was introduced by a very famous Software company called JetBrains (formerly known as IntelliJ Software) in the year 2011, as a new language for JVM.
Kotlin is a cross-platform, statically typed, general-purpose programming language which means it performs type checking at compile-time as opposed to run-time. It is widely used to develop Android application. If you have basic knowledge of What is Java, you will be able to learn Kotlin in no time.
Kickstart your learning on Kotlin by taking a look at this Kotlin Tutorial video where our Kotlin expert is explaining What is Kotlin.
Kotlin Tutorial for Beginners | Learn Kotlin from Scratch
Kotlin has gained more popularity since Google has announced it as its official language for Android Development. Now, what if I say, Java has complex programs and Kotlin is a substitute for it? Would you agree to it? Well, you have to!
Let me tell you why.
Why should you learn Kotlin?
Consider writing 10-15 lines of code in Java and write the same code in just 3-4 lines in Kotlin. Which one would you prefer? Java or Kotlin? Definitely Kotlin right? Yes. This is because,
Kotlin reduces the number of boilerplate codes that are present in Java. These are nothing but the sections of code that has to be included in many places with little or no alterations.
Kotlin is very safe to use. By safe, I mean, Kotlin programming language reduces the NullPointerExecptions that occur during the execution of a program.
Kotlin is Interoperable. This means, existing Java code can be called from Kotlin in a natural way, and also Kotlin code can be used from Java smoothly.
You will also be impressed as it is being adopted by the vast multitude of companies around the globe.
Now that you have understood what is Kotlin and why Kotlin is important, let’s quickly take a look at the installation process.
To work with any programming language, you need an IDE where you can write the code and run them. In the case of Kotlin Programming Language, you can either work on Eclipse, IntelliJ, Android Studio or you can also consider using a Standalone Compiler. But as IntelliJ is also a product of JetBrains, it is preferred to use IntelliJ to work with Kotlin.
So, I’ll be explaining how to install IntelliJ onto your system and help you guys write a simple program in Kotlin.
Kotlin Installation
Setting up the environment
Follow the steps to complete your IntelliJ installation.
Go to IntelliJ Downloads Page and click on the Community Edition link

Download the Community edition and open the file.
Once you open IntelliJ, you’ll be asked a few questions, like, what type of project you want to work on ie., either Java or Kotlin or some other programming language. It asks you to select the destination folder and also enter the project name and then click on Run Community Edition of IntelliJ. You are almost there!
IntelliJ workspace is very handy. You’ll find the shortcuts on the screen and also there is a lot to try out on while working on this platform.
First, let’s create a new Kotlin file.
Go to File->Click on New->Select Project
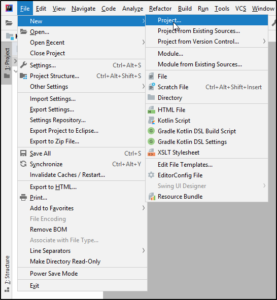
Next, select Kotlin and JVM.
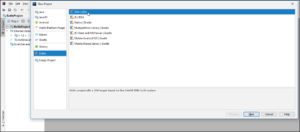
Next, click on Finish and then it’s done.
Got a new Kotlin project and now let’s write a simple Hello World program.
In order to create a new Kotlin file, right-click on the src folder and click on new Kotlin File/class.
Let’s write our first program in Kotlin.
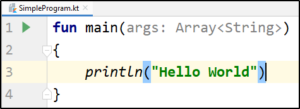
Now let me explain how this works.
I line: Functions are referred as the building blocks of a Kotlin program. All functions in Kotlin start with the keyword fun followed by a name of the function (main), a list of zero or more comma-separated parameters, an optional return type, and a body. The main() function takes one argument, an Array of Strings.
III line: println() is used to display the message (input) on the output screen.
Note: You can directly use println() to print to standard output. Whereas, in Java, you need to use System.out.println().
Now let’s move ahead and understand the Kotlin fundamentals.
In an object-oriented programming language, the first thing to do is know is how to create a class and an object, So, let’s see how to create a class and an object in Kotlin programming language.
Classes and Objects
Kotlin supports both object-oriented programming (OOP) as well as functional programming. Object-oriented programming is based on real-time objects and classes. Kotlin also supports pillars of OOP language such as encapsulation, inheritance, and polymorphism.
Kotlin Class
Kotlin class is similar to the Java class. Kotlin classes are declared using the keyword class. Kotlin class has a class header which specifies its type parameters, constructor, etc. and the class body that is surrounded with curly braces.
Syntax:
class className{   // Class Header
// Prooerty
// Member function
}
Kotlin Object
An object is considered as a real-time entity or a logical entity which has state and behavior, where state represents the value of an object and behavior represent the functionality of an object.
An object is basically used to access the properties and member function of a class. Kotlin allows creating multiple objects of a class.
Create an Object
Kotlin object is created in two steps, the first step is to create a reference and then create an object.
var obj = Classname()
Now, this is not the same as Java right? You would instantiate the object using the keyword New which is not used in Kotlin.
Variables declaration
Once you understand how to create a class and an object, another major thing to know is how to declare a variable in Kotlin.
Variable actually refers to a memory location which is used to store data. Now, let’s see how to declare a variable in Kotlin.
Kotlin variable is declared using keyword var and val.
var xyz ="Edureka"
val abc = 20
You might have this question, why should you use var and val as variables? Let me help you guys with this.
Here, variable xyz is String type and variable abc is Int type. Kotlin compiler knows this by initializer expression. This is called type inference in programming. You can also explicitly specify the type like this:
 var xyz : String ="Edureka"
val abc : Int = 20
This is how you declare a variable in Kotlin Programming Language.
Next, let’s understand the ranges.
Ranges
With the help of these Ranges in Kotlin, you can easily create a list of a sequence by specifying just the starting and ending value.
Kotlin range is defined as an interval from the start value to the end value. Range expressions are created with the operator (. .) which is followed by in and !in. These value which comes inside the defined range.
Let’s see how to create a range.
Declare a variable and specify the start and the end interval.
var AtoZ = 'A'..'Z'
You can also use numerical in the place of letters.
var 1to9 =1..9
This is will be of great use while working with the control flow statements in Kotlin.
Now, if you want to get the sequence in the reverse order, you can use a method called DownTo()
var Reverse = 9 DownTo 1
This helps in getting the sequence in the reverse order.
Now let’s move ahead and understand the Control Flow statements in Kotlin.
Control flow statements
Control flow statements mainly comprise of if, when, if-else, for loop, while loop, do-while loop, jump statements.
Let’s understand them in detail.
Kotlin ‘if’ Expression
In Kotlin, if is an expression which returns a value. It is used to control the flow of the program structure.
Syntax:
if(condation){

//code statement

}
Example:
fun main(args: Array<String>) {
val num1 = 5
val num2 =10
val result = if (num1 > num2) {
"$num1 is greater than $num2"
} else
{
"$num1 is smaller than $num2"
}
println(result)
}
Output: 5 is smaller than 10
Note: You can remove the curly braces of if-else body if the expression has only one statement.
You can also use if as an expression.
fun main(args: Array<String>)
{
var num1 : Int = 4
var num2 : Int = 6
var result: Int = 0
result = if (num1>num2)
num1
else
num2
println(result)
}
Output: 6
For loop
Kotlin for loop is used to iterate a part of the program multiple times. It iterates through arrays, ranges, collections and so on. Kotlin’s for loop is equivalent to the for each loop in languages like C, C++, C#.
Syntax:
for (item in collection){
//body of loop
}
fun main(args : Array<String>) {
val Course= arrayOf(2,4,5,8,9)
for(item in Course){
println(item)
}
}Output:
2
4
5
8
9
when in Kotlin
In Kotlin, when is a conditional expression that returns the value. This when expression is a replacement of switch statement in Java.
Syntax:
when(expression)
{
case value
//statement
break
case value n
//statement
break
default
}fun main(args: Array<String>){
var number = 4
var num= when(number) {
1 -> "One"
2 -> "Two"
3 -> "Three"
4 -> "Four"
5 -> "Five"
else -> "invalid number"
}
println("The number is: $num")
}Output:
The number is: 4
while loop
The while loop is also used to iterate a part of program several time. The loop executes the block of code until the condition has true. Kotlin’s while loop is similar to Java while loop.
Syntax:
while(condition){
//body
}
Example:
fun main(args: Array<String>){
var i = 1
while (i<=3){
println(i)
i++
}
}Output:
1
2
3
do-while
The do-while loop is similar to while loop except for one key difference. A do-while loop first executes the body of do block after that it checks the condition of while.
Syntax:
do{
//body of do block
}
while(condition);
Example:
fun main(args: Array<String>){
var i = 1
do {
println(i)
i++
}
while (i<=3);
}
Output:
1
2
3
Now that you guys know how control flow statements work, let’s take a look at Kotlin Functions.
Kotlin Functions
Functions are basically referred to a group of an interrelated block of code which performs a particular task. A function is used to break a program into different submodules.
In Kotlin, functions are declared using the keyword fun.
fun (x: Int): Int {
return 2 * x
}
This is how you declare a function in Kotlin.
Now let’s discuss Lambda functions.
Lambda functions
Kotlin functions are referred as first-class, which means that they can be stored in variables and data structures, passed as arguments to and returned from other higher-order functions. Now, what are lambda functions?
Lambda functions are the function that is specified without a name.
Example:
fun main(args: Array<String>)
{
val myLambda : (Int) -> Unit ={ p :Int -> println(p)}
addNumber(3,6,myLambda)
}

fun addNumber(a:Int, b:Int, myLambda: (Int) -> Unit)
{
val add = a+b
myLambda(add)
}Exceptions
Exceptions are used to indicate a problem in your code during its execution. Exception handling is also referred as the capability to address the exception that might occur. If you don’t handle any exception that occurs, our program will stop execution abruptly hence crashes your application immediately.
In Java, there are two kinds of exceptions: checked and unchecked. But, Kotlin supports unchecked exceptions.
Unchecked Exceptions
These are exceptions that are thrown because of flaws in your code. They are a direct or indirect subclass of the RuntimeException superclass.
- ArithmeticException: This is thrown when you divide a number by zero.
- ArrayIndexOutOfBoundExceptions: This is thrown when an array has been accessed with an illegal index.
- SecurityException: This is thrown by the security manager to indicate a security violation.
- NullPointerException: This is thrown when you invoke a method or property on a null object.
With this, we come to the end of this article on “Kotlin Programming Language“. I hope you guys are clear with the topics that were discussed.
Now that you have gone through our Kotlin Programming Language blog, you can check out Edureka’s Android App Development Certification Training Got a question for us? Please mention it in the comments of Kotlin Programming Language blog section and we will get back to you.


