Agentic AI Certification Training Course
- 139k Enrolled Learners
- Weekend/Weekday
- Live Class
(63442)


 Copy Link!
Kotlin is a language that can run on JVM. Google has announced Kotlin as one of its officially supported programming languages in Android Studio, and the Android community is migrating at a high pace from Java to Kotlin. In this Kotlin Android Tutorial, I will tell you how to create an Android Application using Kotlin.
Below topics are covered in this article:
Let’s get started!
Kotlin is a statically typed, general-purpose programming language with type inference. It is widely used to develop Android application. Kotlin is designed to interoperate fully with Java, and the JVM version of its standard library depends on the Java Class Library, but type inference allows its syntax to be more concise. Kotlin mainly targets the JVM but also compiles to JavaScript or native code. Kotlin is sponsored by JetBrains and Google, through the Kotlin Foundation. If you wish to know more about Kotlin, you can refer to this article on Kotlin Tutorial.
Now let’s understand the basic fundamentals of Android.
Android is a mobile operating system developed by Google. It is based on the Linux kernel and designed primarily for touchscreen mobile devices such as smartphones and tablets.
 Android is the most successful and powerful mobile operating system in the market today. So before jumping into that, let’s first get an answer to why Android?
You can learn more about Android Architecture and its features with the help of Android Tutorial. With this, let’s see how to set up Android Studio on your system.
Android studio is one of the official IDE (Integrated Development Environment) or tool) for developing an application for the Android platform. It has a strong editor tool for developing creative UI and emulators for different versions to test and simulate sensors without having actual Android devices.
You can also use IntelliJ to develop Android Application, but Android Studio is more suitable for app development. Now let’s see how to install it on your system.
Step 1: Download Android Studio from this link.
Step 2: Once it is downloaded, then Open Android Studio and click Start a new Android Studio project on the welcome screen or File | New | New project.
Step 3: Select an activity that defines the behavior of your application. For your first application. Select Empty Activity that just shows a screen, and click Next.
Step 4: After that, you need to choose the preferred Programming language and hit the next button. If you wish to know more about installation, kindly check out this article on Android Studio Installation.
Step 5: Once everything is set up, and your project is configured, your project structure looks like as shown below.
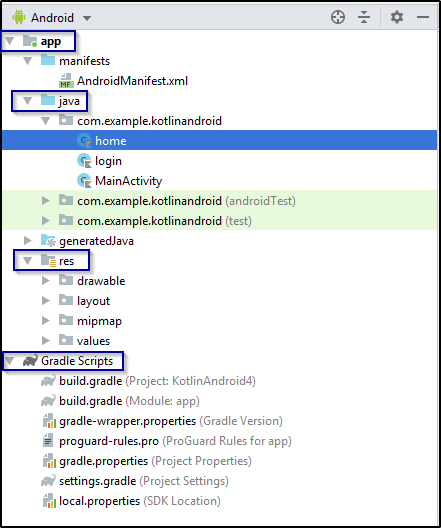
This is nothing but the anatomy of Android Application which comprises of an app, Java, res and Gradle Scripts. Know details of it with the help of Android Application Anatomy Tutorial.
Now let’s write a program and create a simple login Android Application.
Here, I am going to create a login android application. Here, the first screen is the Welcome page as shown below.

In order to create and design this screen, you need to configure your layout. For that, you need to open the layout folder and double click activity_main.xml as shown below.

Once you open the XML file, you need to create the elements based on the structure you want your screen to look like. Before creating the elements, I will open the design tab and drag and drop the buttons onto my screen as shown below.

After this, I will go back and configure the activity_main.xml file and create all the elements. Your code looks like:
<?xml version="1.0" encoding="utf-8"?>
<androidx.constraintlayout.widget.ConstraintLayout
xmlns:android="http://schemas.android.com/apk/res/android"
xmlns:tools="http://schemas.android.com/tools"
xmlns:app="http://schemas.android.com/apk/res-auto"
android:layout_width="match_parent"
android:layout_height="match_parent"
tools:context=".MainActivity">

<TextView
android:layout_width="wrap_content"
android:layout_height="wrap_content"
android:text="Welcome to Kotlin Android App"
android:textSize="26sp"
android:textColor="#000000"
app:layout_constraintBottom_toBottomOf="parent"
app:layout_constraintLeft_toLeftOf="parent"
app:layout_constraintRight_toRightOf="parent"
app:layout_constraintTop_toTopOf="parent" android:id="@+id/textView"/>
<Button
android:text="Click here to Login"
android:layout_width="wrap_content"
android:layout_height="wrap_content"
android:id="@+id/click" android:layout_marginTop="16dp"
app:layout_constraintTop_toBottomOf="@+id/textView" android:layout_marginEnd="96dp"
android:layout_marginRight="96dp" app:layout_constraintEnd_toEndOf="@+id/textView"/>

</androidx.constraintlayout.widget.ConstraintLayout>
Note: If Gradle project sync fails when the project is opened for the first time, click on the link Install missing platform(s) and sync project” in “Messages” window the missing components are downloaded and installed by Android Studio.
After this, you need to create a Kotlin Class file to add the listeners for calling the actions from the XML file. So here, I will be adding the listeners for calling the actions for buttons and the text views that I have created in the XML file.
package com.example.kotlinandroid

import android.content.Intent
import androidx.appcompat.app.AppCompatActivity
import android.os.Bundle
import android.widget.Button
import android.widget.Toast

class MainActivity : AppCompatActivity() {

override fun onCreate(savedInstanceState: Bundle?) {
super.onCreate(savedInstanceState)
setContentView(R.layout.activity_main)

val but_click=findViewById<Button>(R.id.click)
but_click.setOnClickListener{
val intent = Intent(this, login::class.java)
startActivity(intent)
}
}
}
With this, your first Welcome page screen is completely created. Next, you have login screen where you need to enter the email address and password and then hit the login button as shown in the below snapshot.

Now I will create the design according to the above image in my Design Tab of second activity i.e activity_login.xml file as shown below.

After this, I will configure my XML file same as shown in the above screen.
<?xml version="1.0" encoding="utf-8"?>
<androidx.constraintlayout.widget.ConstraintLayout
xmlns:android="http://schemas.android.com/apk/res/android"
xmlns:tools="http://schemas.android.com/tools"
xmlns:app="http://schemas.android.com/apk/res-auto"
android:layout_width="match_parent"
android:layout_height="match_parent"
tools:context=".login">

<TextView
android:text="Edureka!"
android:textSize="26sp"
android:textColor="#3677d1"
android:layout_width="wrap_content"
android:layout_height="wrap_content"
android:id="@+id/textView2" app:layout_constraintTop_toTopOf="parent"
app:layout_constraintStart_toStartOf="parent" android:layout_marginTop="101dp"
app:layout_constraintEnd_toEndOf="parent"/>
<ImageView
android:layout_width="100sp"
android:layout_height="100sp" app:srcCompat="@mipmap/edureka"
android:id="@+id/imageView"
app:layout_constraintTop_toBottomOf="@+id/textView2"
app:layout_constraintEnd_toEndOf="@+id/textView2"/>
<TextView
android:text="Email: "
android:textSize="20sp"
android:textColor="#000000"
android:layout_width="wrap_content"
android:layout_height="wrap_content"
app:layout_constraintStart_toStartOf="parent" android:layout_marginTop="69dp"
android:layout_marginLeft="6dp" android:layout_marginStart="6dp"
app:layout_constraintTop_toBottomOf="@+id/imageView" android:id="@+id/textView5"
app:layout_constraintHorizontal_chainStyle="packed" app:layout_constraintEnd_toStartOf="@+id/email"
android:layout_marginEnd="24dp" android:layout_marginRight="24dp"/>
<TextView
android:text="Password: "
android:textSize="20sp"
android:textColor="#000000"
android:layout_width="wrap_content"
android:layout_height="wrap_content"
app:layout_constraintStart_toStartOf="parent" android:layout_marginTop="144dp"
android:layout_marginLeft="6dp" android:layout_marginStart="6dp"
app:layout_constraintTop_toBottomOf="@+id/imageView" android:id="@+id/textView6"
app:layout_constraintHorizontal_chainStyle="packed" app:layout_constraintEnd_toStartOf="@+id/pass"
android:layout_marginEnd="24dp" android:layout_marginRight="24dp"
app:layout_constraintHorizontal_bias="1.0"/>
<EditText
android:layout_width="wrap_content"
android:layout_height="wrap_content"
android:inputType="textEmailAddress"
android:ems="10"
android:id="@+id/email"
app:layout_constraintBaseline_toBaselineOf="@+id/textView5"
app:layout_constraintStart_toEndOf="@+id/textView5" app:layout_constraintEnd_toEndOf="parent"/>
<EditText
android:layout_width="wrap_content"
android:layout_height="wrap_content"
android:inputType="textPassword"
android:ems="10"
android:id="@+id/pass"
app:layout_constraintStart_toStartOf="@+id/email" android:layout_marginTop="29dp"
app:layout_constraintTop_toBottomOf="@+id/email"/>
<Button
android:text="Login"
android:layout_width="wrap_content"
android:layout_height="wrap_content"
android:id="@+id/login"
app:layout_constraintStart_toStartOf="@+id/pass" android:layout_marginTop="29dp"
android:layout_marginLeft="23dp" android:layout_marginStart="23dp"
app:layout_constraintTop_toBottomOf="@+id/pass"/>
</androidx.constraintlayout.widget.ConstraintLayout>
After this, you need to create a Kotlin Class file to add the listeners for calling the actions from the XML file. So here, I will be adding the listeners for calling the actions for the email and password field and also for the buttons that I have created in the XML file.
package com.example.kotlinandroid

import android.content.Intent
import androidx.appcompat.app.AppCompatActivity
import android.os.Bundle
import android.widget.Button
import android.widget.EditText
import android.widget.Toast

class login : AppCompatActivity() {

override fun onCreate(savedInstanceState: Bundle?) {
super.onCreate(savedInstanceState)
setContentView(R.layout.activity_login)
val email = findViewById(R.id.email) as EditText
val pass = findViewById(R.id.pass) as EditText

val btnLogin = findViewById(R.id.login) as Button
btnLogin.setOnClickListener {
//read value from EditText to a String variable
val ema: String = email.text.toString()
val pas: String = pass.text.toString()
//check if the EditText have values or not
if (ema.trim().length == 0) {
Toast.makeText(applicationContext, "Email field cannot be empty", Toast.LENGTH_SHORT).show()
}
if (pas.trim().length == 0) {
Toast.makeText(applicationContext, "Password field cannot be empty", Toast.LENGTH_SHORT).show()
}

if (ema.equals("abc@xyz.com")&&(pas.equals("123456"))){
val intent = Intent(this, home::class.java)
startActivity(intent)
} else{
Toast.makeText(applicationContext, "Wrong Email or Password!!", Toast.LENGTH_SHORT).show()
}
}
}
}
Now you are left with the last screen. That is your home screen. Once you enter the valid username and password, you will be navigated through the next screen as shown below.

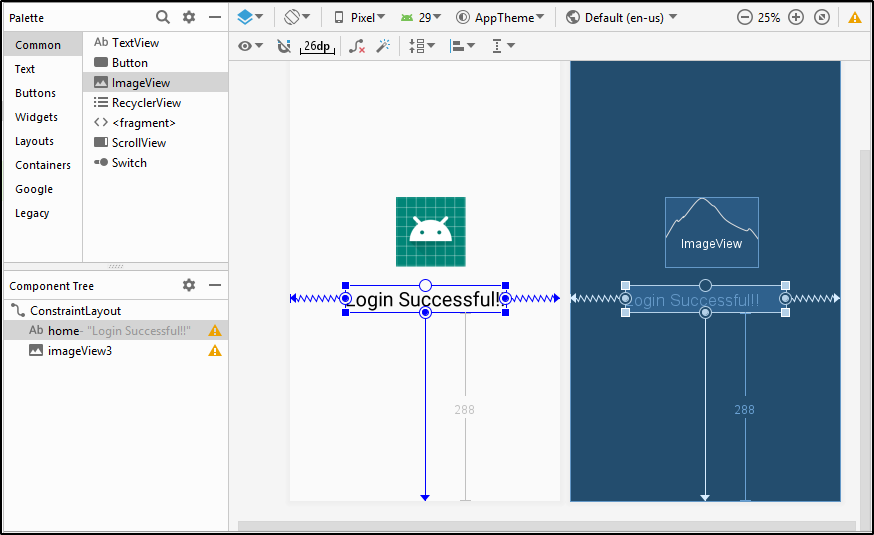
I have to configure this screen as well. Now I will create the design according to the above image in my Design Tab of second activity i.e activity_home.xml file as shown below.
Let’s now write the code for the same design created.
<?xml version="1.0" encoding="utf-8"?>
<androidx.constraintlayout.widget.ConstraintLayout
xmlns:android="http://schemas.android.com/apk/res/android"
xmlns:tools="http://schemas.android.com/tools"
xmlns:app="http://schemas.android.com/apk/res-auto"
android:layout_width="match_parent"
android:layout_height="match_parent"
tools:context=".home">

<TextView
android:text="Login Successful!!"
android:textColor="#000000"
android:textSize="30sp"
android:layout_width="wrap_content"
android:layout_height="wrap_content"
android:id="@+id/home"
app:layout_constraintStart_toStartOf="parent"
app:layout_constraintEnd_toEndOf="parent" app:layout_constraintBottom_toBottomOf="parent"
android:layout_marginBottom="288dp"/>
<ImageView
android:layout_width="142dp"
android:layout_height="106dp" app:srcCompat="@android:drawable/sym_def_app_icon"
android:id="@+id/imageView3"
app:layout_constraintStart_toStartOf="@+id/home" android:layout_marginLeft="60dp"
android:layout_marginStart="60dp" android:layout_marginBottom="28dp"
app:layout_constraintBottom_toTopOf="@+id/home"/>
</androidx.constraintlayout.widget.ConstraintLayout>
After this, you need to create a Kotlin Class file to add the listeners for calling the actions from the XML file. So here, I will be adding the listeners for calling the actions for the text view and the image that I have created in the XML file.
package com.example.kotlinandroid

import androidx.appcompat.app.AppCompatActivity
import android.os.Bundle
class home : AppCompatActivity() {
override fun onCreate(savedInstanceState: Bundle?) {
super.onCreate(savedInstanceState)
setContentView(R.layout.activity_home)
}
}
After configuring all the 3 screens you have to check for gradle build and then run the project. When you do so, it will ask you to choose the virtual device and you need to choose the one which you like and run the code. Your first mobile application will be launched.
That’s how you need to create your first Android Application using Kotlin Programming language. If you wish to know the fundamentals of Android, then kindly check this article on Android Tutorial.
This brings us to the end of this article on Kotlin Android Tutorial. Hope you are clear with all that has been shared with you in this article.
Now that you have gone through our Kotlin Android Tutorial, you can check out Edureka’s Android App Development Certification Training Got a question for us? Please mention it in the comments of “Kotlin Android Tutorial” blog section and we will get back to you.