


Data Science with Python Certification Course
- 132k Enrolled Learners
- Weekend
- Live Class
(49300)


 Copy Link!
With the business world entirely revolving around Data Science, it has become one of the most sort after fields. Hence, the heavy demand for a Data Science Certification. In this blog on KNN algorithm, you will understand how the KNN algorithm works and how it can be implemented by using Python.
kNN is often used in search applications where you are looking for similar items, like find items similar to this one.
Algorithm suggests that if you’re similar to your neighbours, then you are one of them. For example, if apple looks more similar to peach, pear, and cherry (fruits) than monkey, cat or a rat (animals), then most likely apple is a fruit.
The k-nearest neighbors algorithm uses a very simple approach to perform classification. When tested with a new example, it looks through the training data and finds the k training examples that are closest to the new example. It then assigns the most common class label (among those k-training examples) to the test example.
This Edureka video on KNN Algorithm will help you to build your base by covering the theoretical, mathematical and implementation part of the KNN algorithm in Python.
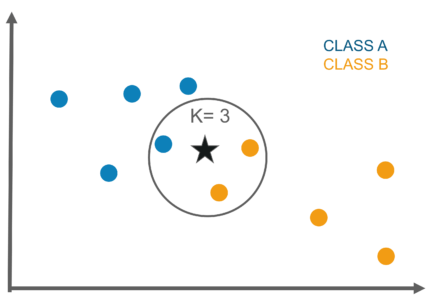
If k=1, then test examples are given the same label as the closest example in the training set.
If k=3, the labels of the three closest classes are checked and the most common (i.e., occurring at least twice) label is assigned, and so on for larger ks.
Let’s consider this example,
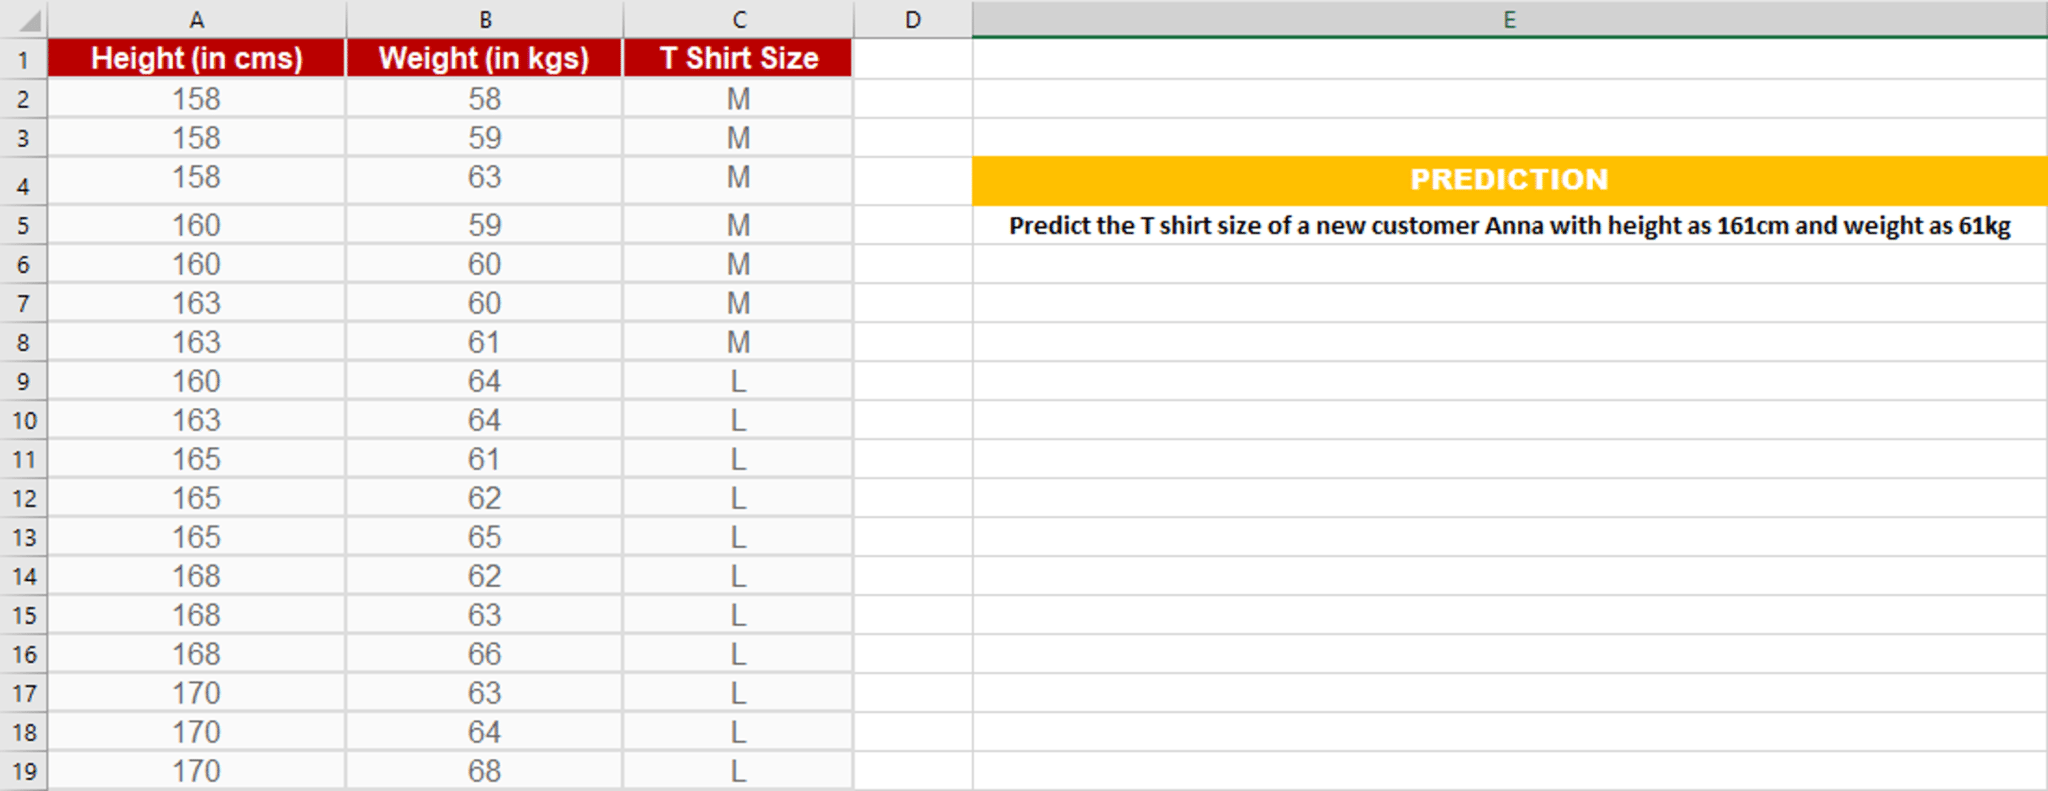
Suppose we have height and weight and its corresponding Tshirt size of several customers. Your task is to predict the T-shirt size of Anna, whose height is 161cm and her weight is 61kg.
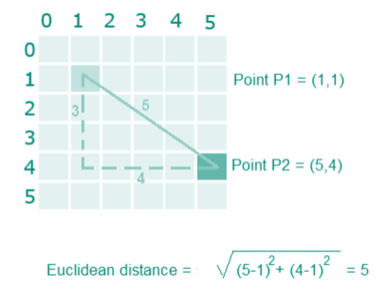
For example, Euclidean distance between point P1(1,1) and P2(5,4) is:

In this case, select the top 5 parameters having least Euclidean distance
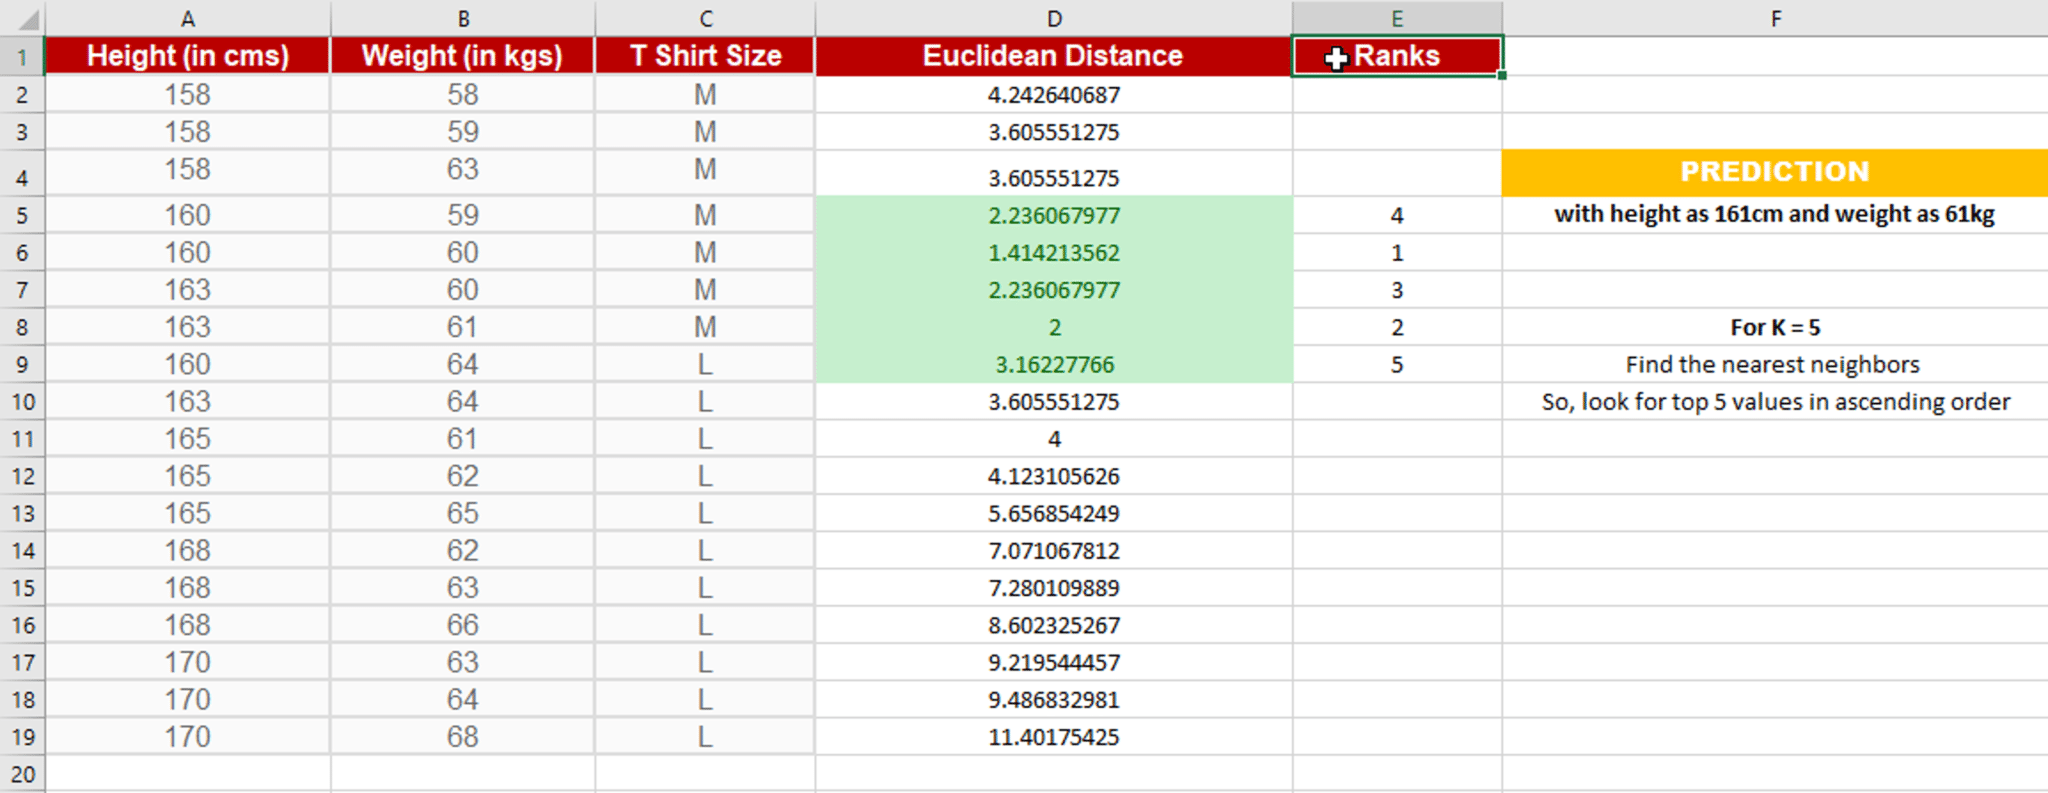
Since for K = 5, we have 4 Tshirts of size M, therefore according to the kNN Algorithm, Anna of height 161 cm and weight, 61kg will fit into a Tshirt of size M.

Handling the data
Calculate the distance
Find k nearest point
Predict the class
The very first step will be handling the iris dataset. Open the dataset using the open function and read the data lines with the reader function available under the csv module.
[python]
import csv
with open(r’C:UsersAtul HarshaDocumentsiris.data.txt’) as csvfile:
lines = csv.reader(csvfile)
for row in lines:
print (‘, ‘.join(row))
[/python]
Now you need to split the data into a training dataset (for making the prediction) and a testing dataset (for evaluating the accuracy of the model).
Before you continue, convert the flower measures loaded as strings to numbers. Next, randomly split the dataset into train and test dataset. Generally, a standard ratio of 67/33 is used for test/train split
Adding it all, let’s define a function handleDataset which will load the CSV when provided with the exact filename and splits it randomly into train and test datasets using the provided split ratio.
[python]
import csv
import random
def handleDataset(filename, split, trainingSet=[] , testSet=[]):
with open(filename, ‘r’) as csvfile:
lines = csv.reader(csvfile)
dataset = list(lines)
for x in range(len(dataset)-1):
for y in range(4):
dataset[x][y] = float(dataset[x][y])
if random.random() < split:
trainingSet.append(dataset[x])
else:
testSet.append(dataset[x])
[/python]
Let’s check the above function and see if it is working fine,
[python]
trainingSet=[]
testSet=[]
handleDataset(r’iris.data.’, 0.66, trainingSet, testSet)
print (‘Train: ‘ + repr(len(trainingSet)))
print (‘Test: ‘ + repr(len(testSet)))
[/python]
In order to make any predictions, you have to calculate the distance between the new point and the existing points, as you will be needing k closest points.
In this case for calculating the distance, we will use the Euclidean distance. This is defined as the square root of the sum of the squared differences between the two arrays of numbers
Specifically, we need only first 4 attributes(features) for distance calculation as the last attribute is a class label. So for one of the approach is to limit the Euclidean distance to a fixed length, thereby ignoring the final dimension.
Summing it up let’s define euclideanDistance function as follows:
[python]
import math
def euclideanDistance(instance1, instance2, length):
distance = 0
for x in range(length):
distance += pow((instance1[x] – instance2[x]), 2)
return math.sqrt(distance)
[/python]
Testing the euclideanDistance function,
[python]
data1 = [2, 2, 2, ‘a’]
data2 = [4, 4, 4, ‘b’]
distance = euclideanDistance(data1, data2, 3)
print (‘Distance: ‘ + repr(distance))
[/python]
Now that you have calculated the distance from each point, we can use it collect the k most similar points/instances for the given test data/instance.
This is a straightforward process: Calculate the distance wrt all the instance and select the subset having the smallest Euclidean distance.
Let’s create a getKNeighbors function that returns k most similar neighbors from the training set for a given test instance
[python]
import operator
def getKNeighbors(trainingSet, testInstance, k):
distances = []
length = len(testInstance)-1
for x in range(len(trainingSet)):
dist = euclideanDistance(testInstance, trainingSet[x], length)
distances.append((trainingSet[x], dist))
distances.sort(key=operator.itemgetter(1))
neighbors = []
for x in range(k):
neighbors.append(distances[x][0])
return neighbors
[/python]
[python]
trainSet = [[2, 2, 2, ‘a’], [4, 4, 4, ‘b’]]
testInstance = [5, 5, 5]
k = 1
neighbors = getNeighbors(trainSet, testInstance, 1)
print(neighbors)
[/python]
Now that you have the k nearest points/neighbors for the given test instance, the next task is to predicted response based on those neighbors
You can do this by allowing each neighbor to vote for their class attribute, and take the majority vote as the prediction.
Let’s create a getResponse function for getting the majority voted response from a number of neighbors.
[python]
import operator
def getResponse(neighbors):
classVotes = {}
for x in range(len(neighbors)):
response = neighbors[x][-1]
if response in classVotes:
classVotes[response] += 1
else:
classVotes[response] = 1
sortedVotes = sorted(classVotes.items(), key=operator.itemgetter(1), reverse=True)
return sortedVotes[0][0]
[/python]
[python]
neighbors = [[1,1,1,’a’], [2,2,2,’a’], [3,3,3,’b’]]
print(getResponse(neighbors))
[/python]
Now that we have all of the pieces of the kNN algorithm in place. Let’s check how accurate our prediction is!
An easy way to evaluate the accuracy of the model is to calculate a ratio of the total correct predictions out of all predictions made.
Let’s create a getAccuracy function which sums the total correct predictions and returns the accuracy as a percentage of correct classifications.
[python]
def getAccuracy(testSet, predictions):
correct = 0
for x in range(len(testSet)):
if testSet[x][-1] is predictions[x]:
correct += 1
return (correct/float(len(testSet))) * 100.0
[/python]
[python]
testSet = [[1,1,1,’a’], [2,2,2,’a’], [3,3,3,’b’]]
predictions = [‘a’, ‘a’, ‘a’]
accuracy = getAccuracy(testSet, predictions)
print(accuracy)
[/python]
Since we have created all the pieces of the KNN algorithm, let’s tie them up using the main function.
[python]
# Example of kNN implemented from Scratch in Python
import csv
import random
import math
import operator
def handleDataset(filename, split, trainingSet=[] , testSet=[]):
with open(filename, ‘rb’) as csvfile:
lines = csv.reader(csvfile)
dataset = list(lines)
for x in range(len(dataset)-1):
for y in range(4):
dataset[x][y] = float(dataset[x][y])
if random.random() < split: trainingSet.append(dataset[x]) else: testSet.append(dataset[x]) def euclideanDistance(instance1, instance2, length): distance = 0 for x in range(length): distance += pow((instance1[x] – instance2[x]), 2) return math.sqrt(distance) def getNeighbors(trainingSet, testInstance, k): distances = [] length = len(testInstance)-1 for x in range(len(trainingSet)): dist = euclideanDistance(testInstance, trainingSet[x], length) distances.append((trainingSet[x], dist)) distances.sort(key=operator.itemgetter(1)) neighbors = [] for x in range(k): neighbors.append(distances[x][0]) return neighbors def getResponse(neighbors): classVotes = {} for x in range(len(neighbors)): response = neighbors[x][-1] if response in classVotes: classVotes[response] += 1 else: classVotes[response] = 1 sortedVotes = sorted(classVotes.iteritems(), key=operator.itemgetter(1), reverse=True) return sortedVotes[0][0] def getAccuracy(testSet, predictions): correct = 0 for x in range(len(testSet)): if testSet[x][-1] == predictions[x]: correct += 1 return (correct/float(len(testSet))) * 100.0 def main(): # prepare data trainingSet=[] testSet=[] split = 0.67 loadDataset(‘iris.data’, split, trainingSet, testSet) print ‘Train set: ‘ + repr(len(trainingSet)) print ‘Test set: ‘ + repr(len(testSet)) # generate predictions predictions=[] k = 3 for x in range(len(testSet)): neighbors = getNeighbors(trainingSet, testSet[x], k) result = getResponse(neighbors) predictions.append(result) print(‘> predicted=’ + repr(result) + ‘, actual=’ + repr(testSet[x][-1]))
accuracy = getAccuracy(testSet, predictions)
print(‘Accuracy: ‘ + repr(accuracy) + ‘%’)
main()
[/python]
This was all about the kNN Algorithm using python. In case you are still left with a query, don’t hesitate in adding your doubt to the blog’s comment section.
Data is more than simply numbers as we approach 2026; it serves as the foundation for business decision-making in all sectors. However, data alone is insufficient. To remain competitive in the current digital environment, businesses must effectively gather, handle, and manage it. Data engineering can help with it. It is the force behind seamless data […]
This guide provides a comprehensive understanding of the essential skills and knowledge required to become a successful data scientist, covering data manipulation, programming, mathematics, big data, deep learning, and machine learning technologies. It emphasizes the importance of reporting strategies, data visualization tools, domain expertise, and lifelong learning for a fulfilling career in data science. Table […]
In this blog on ‘Python Pandas Tutorial’, we will dive deep into data analytics using the Pandas library in Python. Python Programming is a skill trending over other more prominent programming languages like Java, C++, and C#. But before we talk about Pandas, let’s start by understanding the concept of NumPy arrays. Why? Because Pandas […]
Python is a programming language that is used for general-purpose programming. It is a high-level, interpreted, and object-oriented language. Python has been around since 1991 and has become one of the most popular languages in the world. This language is an easy-to-learn language with a simple syntax and can be learned by anyone who knows […]
Data analysts are in high demand across various industries. In today’s data-driven world, businesses require data analysts to help them make sense of the vast amounts of data they collect. However, with the increasing demand for data analysts, the competition for available jobs is getting steeper. Therefore, it’s essential to have a strong set of […]
Data analytics is the process of analyzing, interpreting, and presenting data in a meaningful way. In today’s data-driven world, data analytics plays a critical role in helping businesses make informed decisions. As a data analytics professional, building a strong portfolio of projects is essential to showcase your skills and expertise to potential employers. This article […]
As data becomes increasingly essential to business decision-making, data scientists and analysts need to understand the fundamentals of statistics to make sense of data and extract valuable insights. This article will provide an introduction to the fundamentals of statistics for data analytics and data scientists. What are Statistics for Data Analytics? Statistics is a branch […]
In this digital transformation era, data is at the heart of decision-making. Data science has gained prominence, playing a crucial role in deriving insights from vast volumes of data. Aspiring data scientists must familiarize themselves with the best programming languages in their field. Programming Languages for Data Scientists Here are the top 11 programming languages […]
The modulo operation is performed in Python using the % operator, also called the “modulo” operator. When two numbers are split by one another, the modulo operation determines the residual. It is a basic mathematical operation, and the% operator in Python is a flexible tool with a number of uses. In this blog, we’ll discuss […]


 Thank you for registering Join Edureka Meetup community for 100+ Free Webinars each month JOIN MEETUP GROUP
hi sir!!
please explain person’s gender classification by only height and weight parameters using KNN step by step
Hi…….it is great article.
I would like to ask you , if the data is mixed between numerical features and nominal features ,Can I change the distance function to another one such as Gower distance?
thank you so much. This article really helped…
i want to implement this on mnist dataset..can you help