
Advanced Certification in Agentic AI Engineer ...
- 67k Enrolled Learners
- Weekend
- Live Class
(45931)


 Copy Link!
JUnit is a testing framework for Java programming language. It is important for test-driven development. Through the medium of this JUnit tutorial, I will guide your way to spread your wings in the field of testing Java frameworks.
I’ll be discussing the topics in this manner:
So, let get started!
 JUnit is an open source Unit Testing Framework for Java. It is important in the development of test-driven frameworks. It is considered as an instance of xUnit architecture. As the name suggests it is used for testing a small chunk of code or a unit.
Unit Testing is used to verify a small chunk of code by creating a path, function or a method. The term “unit” existed even before earlier the object-oriented era. It is basically a natural abstraction of an object-oriented system i.e. a Java class or object (its instantiated form).
JUnit promotes the idea of “Test first, code later”, which emphasizes on setting up the test data for a piece of code that can be tested first and then implemented.
It annotates rules and methods that return a Rule. A method must be public, not static, and must return a subtype of TestRule or MethodRule.
A JUnit 4 rule is a component that intercepts the test method calls and allows you to do perform some action before a test method is run and after a test method has been run. All JUnit 4 rule classes must implement this interface org.junit.rules.TestRule.
Add a public field to your test class and ensure that the type of that field is a subtype of TestRule.
Annotate the field with the @Rule annotation.
Note: JUnit 4 requires that rule fields are public, they aren’t static, and are a subtype of TestRule.
JUnit 5 rule: To handle the issue, you have several possible approaches to keep the JUnit 4 way. You can rewrite the @Rule as an extension.
JUnit is a Regression Testing framework which is used to implement unit testing in Java, to accelerate programming speed and increase the quality of code. This framework also allows quick and easy generation of test data and test cases.
Unit test framework provides these important features:
A fixture is a fixed state of a set of objects which is used as a baseline for running the test cases. The major purpose of a test fixture is to ensure that there is a well-known and fixed environment in which tests are run so that results are repeatable.
Let’s understand this with an example:
The below code is designed to execute two test cases on a simple file.
public class TestCaseFile
{
private File output;
output = new File(...);
output.delete();
public void testFile1()
{
//Code to verify Test Case 1
}
output.delete();
output = new File(...);
public void testFile2()
{
//Code to verify Test Case 2
}
output.delete();
}
Notice the few issues here:
Comparing the same code using JUnit
public class TestCaseFile
{
private File output;
@Before public void createOutputFile()
{
output = new File(...);
}
@After public void deleteOutputFile()
{
output.delete();
}
@Test public void testFile1()
{
// code for test case objective
}
@Test public void testFile2()
{
// code for test case objective
}
}
The code is far more readable and maintainable. The code structure above is a Text fixture.
If you want to execute multiple test cases in a specific order, it can be done by combining all the test cases in a single origin. This origin is called the test suites.
A test suite bundles a few unit test cases and runs them together.
To run the suite test, you need to annotate a class using below-mentioned annotations:
The test runner is used for executing the test cases.
JUnit provides a tool for the execution of the test cases.
JUnit classes are used in writing and testing JUnits. Some of the important classes are:
JUnit is a Testing framework used to test the Java-based application. So before installing JUnit, you need to configure and verify java development kit (JDK) in your machine.
Follow these steps to complete your Java installation.
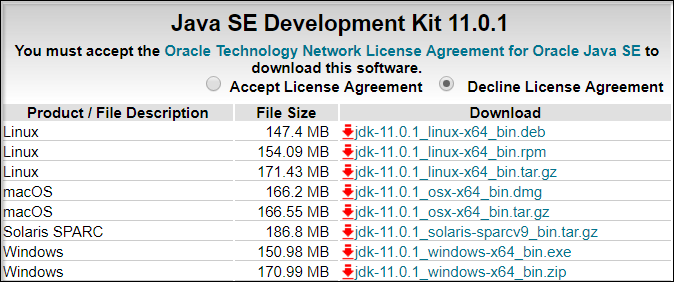
In the next page, select the Accept License Agreement radio button, accept it and click the download link against your matching system configuration.
Now to cross-check the installation, just run following command in cmd –java -version. It should display the installed version of Java in your system.
| OS | Task | Command |
|---|---|---|
| Windows | Open Command Console/ cmd | c:> java -version |
| Linux | Open Command Terminal/cmd | $ java -version |
| Mac | Open Terminal | machine:~ john$ java -version |
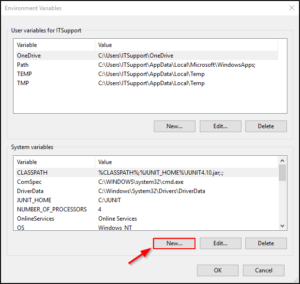
Next, click on New and add the variable and value.
It will create a new system variable with the given name and value.
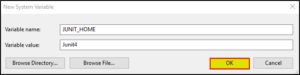
After creating JUNIT_HOME, create another variable with the name CLASSPATH. Follow the below steps:
In this step, point out JUNIT_HOME to JUnit.jar which is placed in the JUnit folder as given below:
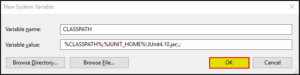
Once you click on the ‘OK‘ button, you can verify that a new environment variable called “CLASSPATH” can be seen under the system variable.

Please refer this to download Eclipse IDE on your system.
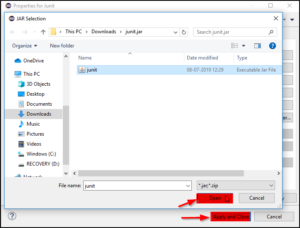
Add external JUnit jar files that you have downloaded.

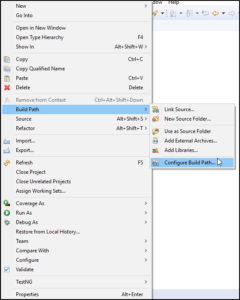
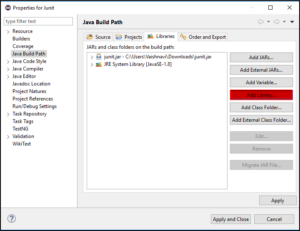
And add JUnit libraries to your project by following this method:
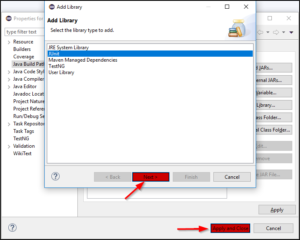
Then find JUnit and click on it.
Now that you have understood how to set up JUnit on your system, let’s move ahead and learn how to write a simple JUnit program.
I’ll create two classes in order to give you an idea of how JUnit programs can be written.
First class provides simple assert statements in order to verify JUnit setup.
package Edureka;
import org.junit.Test;
import static org.junit.Assert.assertEquals;
public class Java {
@Test
public void testSetup() {
String str= "I know to set up JUnit on my system";
assertEquals("I know to set up JUnit on my system",str);
}
}
Next up, I’ll create another class to execute the above test.
package Edureka;

import org.junit.runner.JUnitCore;
import org.junit.runner.Result;
import org.junit.runner.notification.Failure;

public class JunitClass {
public static void main(String[] args) {
Result result = JUnitCore.runClasses(Java.class);
for (Failure failure : result.getFailures()) {
System.out.println(failure.toString());
}
System.out.println("Result=="+result.wasSuccessful());
}
}
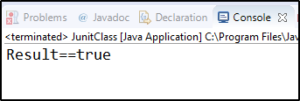
Output:
Now that you’ve learned how to write a simple JUnit program, let’s understand how assert statements work in JUnit.
JUnit framework is built on annotations. An annotation is a special form of syntactic metadata that can be added to the java source code for better code readability. These annotations provide the following information about test methods:
These are the following list of annotations and their meaning in JUnit:
Assert is a method used in determining pass or fail status of a test case. In JUnit, all the assertions are in the Assert class. This class provides a set of assertion methods which are useful for writing tests. Only failed assertions are recorded.
| Sr.No. | Method | Description |
|---|---|---|
| 1 | void assertEquals(boolean expected, boolean actual) | Checks that two primitives/objects are equal. |
| 2 | void assertTrue(boolean condition) | Checks whether the condition is true. |
| 3 | void assertFalse(boolean condition) | Checks whether the condition is false. |
| 4 | void assertNotNull(Object object) | Checks whether an object isn’t null. |
| 5 | void assertNull(Object object) | Checks whether an object is null. |
| 6 | void assertSame(object1, object2) | The assertSame() method tests if two object references point to the same object. |
| 7 | void assertNotSame(object1, object2) | The assertNotSame() method tests if two object references do not point to the same object. |
| 8 | void assertArrayEquals(expectedArray, resultArray) | The assertArrayEquals() method will test whether two arrays are equal to each other. |
Let’s take a look at an example:
import org.junit.Test;
import static org.junit.Assert.*;
public class TestAssertions
{
@Test public void testAssertions()
{
//test data
String str1 = new String ("edu");
String str2 = new String ("edu");
String str3 = null;
String str4 = "edu";
String str5 = "edu";
int val1 = 5;
int val2 = 6;
String[] expectedArray = {"one", "two", "three"};
String[] resultArray = {"one", "two", "three"};
//Check that two objects are equal
assertEquals(str1, str2);
//Check that a condition is true
assertTrue (val1 < val2);
//Check that a condition is false
assertFalse(val1 > val2);
//Check that an object isn't null
assertNotNull(str1);
//Check that an object is null
assertNull(str3);
//Check if two object references point to the same object
assertSame(str4,str5);
//Check if two object references not point to the same object
assertNotSame(str1,str3);
//Check whether two arrays are equal to each other.
assertArrayEquals(expectedArray, resultArray);
}
}
Now, write another program that helps in executing the test.
 import org.junit.runner.JUnitCore;
import org.junit.runner.Result;
import org.junit.runner.notification.Failure;
public class TestRunner()
{
public static void main(String[] args)
{
Result result = JUnitCore.runClasses(TestAssertions.class);
for (Failure failure : result.getFailures())
{
System.out.println(failure.toString());
}
System.out.println(result.wasSuccessful());
}
}
The output is: true
Now, let’s take a look at the exceptions that occur during the execution of the process.
JUnit provides an option of tracing the exception that occurs in the code. You can test whether the code throws the desired exception. The expected parameter is used along with @Test annotation.
While testing for an exception, you need to ensure that the exception class you are providing in that optional parameter of the @Test annotation is the same. This is because you are expecting an exception from the method you are testing, otherwise your JUnit test would fail.
Ex: @Test(expected=IllegalArgumentException.class)
By using the “expected” parameter, you can specify the exception name that your test may throw. In the above example, you are using “IllegalArgumentException” which will be thrown by the test if a developer uses an argument which is not permitted.
Let’s understand the parameterized test in JUnit.
JUnit 4 has introduced a new feature called Parameterized tests. This test allows a developer to run the same test over and over again using different values. You have to follow these steps in order to create a parameterized test.
Let’s take a look at an example.
import java.util.Arrays;
import java.util.Collection;
import org.junit.Test;
import org.junit.Before;
import org.junit.runners.Parameterized;
import org.junit.runners.Parameterized.Parameters;
import org.junit.runner.RunWith;
import static org.junit.Assert.assertEquals;
@RunWith(Parameterized.class)
public class PrimeNumber
{
private Integer i;
private Boolean expectedResult;
private PrimeNumberChecker primeNumberChecker;
@Before public void initialize()
{
primeNumberChecker = new PrimeNumberChecker();
}
// Each parameter should be placed as an argument here
// Every time runner triggers, it will pass the arguments
// from parameters we defined in primeNumbers() method
public PrimeNumberCheckerTest(Integer i, Boolean expectedResult)
{
this.i= i;
this.expectedResult = expectedResult;
}
@Parameterized.Parameters
public static Collection primeNumbers()
{
return Arrays.asList(new Object[][]
{
{ 2, true },
{ 6, false },
{ 19, true },
{ 22, false },
{ 23, true }
}
);
}
// This test will run 4 times since we have 5 parameters defined
@Test public void PrimeNumberCheckerTest()
{
System.out.println("Parameterized Number is : " + i);
assertEquals(expectedResult, primeNumberChecker.validate(i));
}
}
Create another class TestRunner to compile the program.
 import org.junit.runner.JUnitCore;
import org.junit.runner.Result;
import org.junit.runner.notification.Failure;
public class Runner
{
public static void main(String[] args)
{
Result result = JUnitCore.runClasses(PrimeNumberCheckerTest.class);
for (Failure failure : result.getFailures())
{
System.out.println(failure.toString());
}
System.out.println(result.wasSuccessful());
}
}
The output is: Parameterized Number is: 2
Parameterized Number is : 6
Parameterized Number is : 19
Parameterized Number is : 22
Parameterized Number is : 23
true
Let’s understand the final topic of this discussion, JUnit vs TestNG.
TestNG and JUnit, both are the well-known terminologies when you talk about Software testing frameworks. TestNG is almost similar to JUnit except for certain functionalities, I’ll compare JUnit and TestNG based on their features.
| Features | JUnit | TestNG |
Suite Test | Yes | Yes |
Annotation support | Yes | Yes |
Ignore test | @ignore | @Test(enable=false) |
Execution before and after all tests in the suite | No | @BeforeSuite, @AfterSuite,@BeforTest, @AfterTest |
Dependency test | No | Yes |
Parameterized Test | @RunWith and @Parameter | @DataProvider |
With this, we come to the end of “JUnit Tutorial” blog. I Hope you guys enjoyed this article and understood why JUnit plays a major role in testing a Java framework.
Now that you have understood how JUnit works, check out the Software Testing Certification Course by Edureka, a trusted online learning company with a network of more than 650,000 satisfied learners spread across the globe. This course is designed to introduce you to the complete Selenium features and its importance in testing software.
Got a question for us? Please mention it in the comments section of “JUnit Tutorial” and we will get back to you.