Advanced DevOps Certification Training with G ...
- 24k Enrolled Learners
- Weekend
- Live Class
(7990)


 Copy Link!
Jenkins is a powerful application that enables continuous integration and continuous delivery of projects on any platform. It is a free, open-source application of DevOps tools that can handle any type of build or continuous integration. Jenkins can be integrated with a variety of testing and deployment technologies.
In this Jenkins Tutorial blog, we will show you how to use the Jenkins DevOps tool to continuously build and test your software projects.
Before we proceed with Jenkins Tutorial, the key takeaways from the previous blog are:
What is Jenkins?
Jenkins is an open-source automation server widely used for building, deploying, and automating any project for continuous integration and continuous delivery. It helps automate parts of the software development process, making it more efficient and reducing manual intervention. Jenkins is an amazing tool to build a CI/CD pipeline because of its flexibility, extensibility, and strong community support. Jenkins plays a crucial role in the DevOps toolchain by automating key processes and providing a flexible and extensible platform for developing, testing, and releasing software.
History of Jenkins
The history of Jenkins dates back to the mid-2000s. The Jenkins project was started in 2004 by Kohsuke Kawaguchi, a software developer who began working on a project called Hudson while he worked for Sun Microsystems. Kohsuke created Hudson as a way to perform continuous integration. The goal was to create an extensible open-source continuous integration (CI) server that could automate the building and testing of software projects. Hudson gained popularity in the developer community due to its ease of use and extensibility. In 2011, a dispute arose within the Hudson community over the control and governance of the project. So, the Hudson community decided to fork the project. They created a new project named Jenkins, which retained the core features of Hudson but allowed for a more open and community-driven development model. And soon, Jenkins usage spread around the world. Today, Jenkins manages the entire software delivery pipeline.
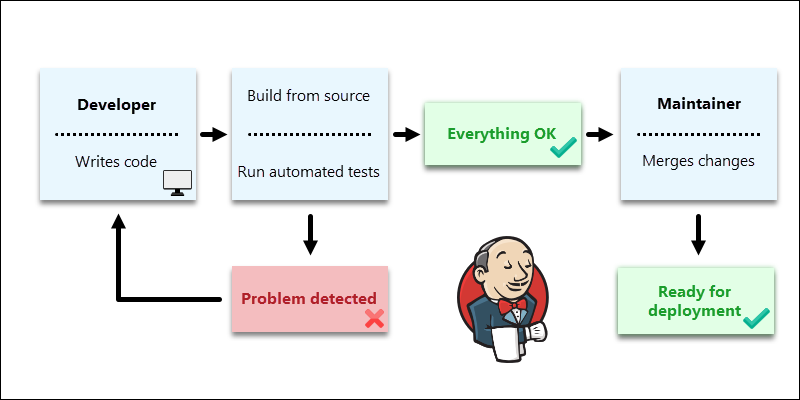
Continuous integration is possible with Jenkins, a software program DevOps tool.
A server where the central build will occur will have Jenkins installed on it. An extremely basic workflow for Jenkins is shown in the flowchart below.
It’s not uncommon to see Hudson mentioned in conjunction with the Jenkins DevOps tool.
Developed by Sun Microsystems, which was later purchased by Oracle, Hudson is a very well-known open-source Java-based continuous integration tool.
As a result of a fork in the Hudson source code following Oracle’s acquisition of Sun, Jenkins was developed.
According to the development practice known as continuous integration, developers must periodically integrate new code into a shared repository.
This idea was developed to solve the issue of discovering issues in the build lifecycle after they had already occurred.
The developers must conduct frequent builds in order to use continuous integration.
It is standard procedure to launch a build whenever a code commit takes place.
| JDK | JDK 1.5 or above |
| Memory | 2 GB RAM (recommended) |
| Disk Space | No minimal standard exists. Note that enough disc space must be available for build storage because all builds will be stored on the Jenkins machines. |
| Operating System Version | Jenkins can be installed on Windows, Ubuntu/Debian, Red Hat/Fedora/CentOS, Mac OS X, openSUSE, FReeBSD, OpenBSD, Gentoo. |
| Java Container | The WAR file can be run in any container that supports Servlet 2.4/JSP 2.0 or later.(An example is Tomcat 5). |
Now is the correct time to understand Jenkins architecture.
Let us revise the standalone Jenkins architecture that I have explained to you in the previous blog, below diagram depicts the same.

This single Jenkins server was not enough to meet certain requirements like:
To address the above stated needs, Jenkins distributed architecture was introduced.
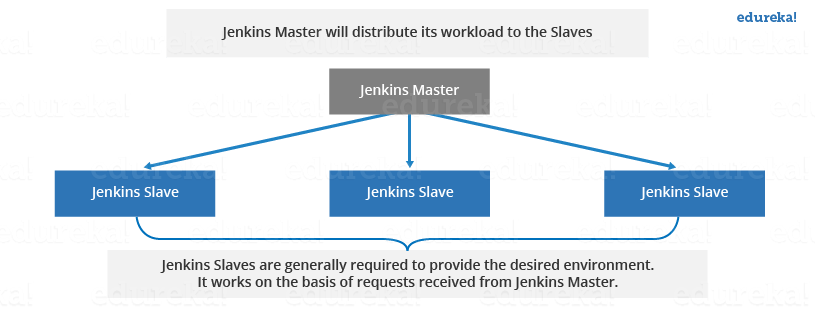
Jenkins uses a Master-Slave architecture to manage distributed builds. In this architecture, Master and Slave communicate through TCP/IP protocol.
Jenkins Master
Your main Jenkins server is the Master. The Master’s job is to handle:
A Slave is a Java executable that runs on a remote machine. The following are the characteristics of Jenkins Slaves:
The diagram below is self-explanatory. It consists of a Jenkins Master which is managing three Jenkins Slave.
Now let us look at an example in which Jenkins is used for testing in different environments like: Ubuntu, MAC, Windows etc.
The diagram below represents the same:
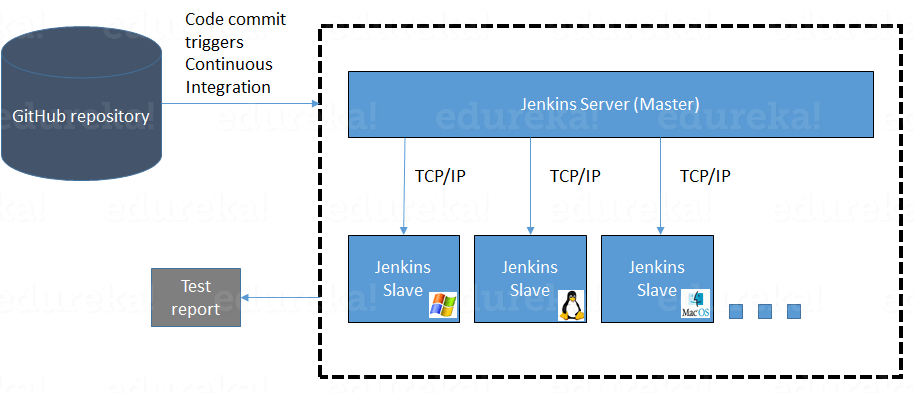
The following functions are performed in the above image:
Download Jenkins DevOps Tool.
The official website for Jenkins is Jenkins. You can access the home page of the official Jenkins website by clicking the provided link, as displayed below.
 The most recent release as well as the Long-Term support release will by default be accessible for download. Downloads of previous releases are also offered. In the download section, select the Long-Term Support Release tab.
Launch the command window. Navigate to the directory containing the Jenkins.war file using the command prompt. Execute the upcoming command.
D:>Java –jar Jenkins.warSeveral tasks will be carried out after the command has been executed, one of which is the extraction of the war file by an embedded webserver called Winstone.
D:>Java –jar Jenkins.war
Running from: D:jenkins.war
Webroot: $user.home/ .jenkins
Sep 29, 2015 4:10:46 PM winstone.Logger logInternal
INFO: Beginning extraction from war file
The following line will appear in the command prompt’s output once the processing is finished without any significant errors.
INFO: Jenkins is fully up and running
Once Jenkins is up and running, one can access Jenkins from the link − http://localhost:8080
This link will bring up the Jenkins dashboard.

Open the console and run the following java command to confirm Java installation.
| OS | Task | Command |
| Windows | Open Command Console | >java -version |
| Ubuntu | Open Command Terminal | $java -version |
Depending on the platform you are using, you should receive one of the following outputs if Java has been installed correctly on your system.
| OS | Output |
| Windows | Java version “1.8.0_202” Java(TM) SE Runtime Environment (build 1.8.0_202-b08) Java HotSpot(TM) 64-Bit Server VM (build 25.202-b08, mixed mode) |
| Ubuntu | java version “1.8.0_252” Open JDK Runtime Environment (build 1.8.0_252-8u252-bo9-1ubuntu1-b09) Open JDK 64-Bit Server VM (build 25.252-b09, mixed mode) |
Before starting this tutorial, we’ll assume that all of our readers have Java 1.8.0 202 installed on their computers.
You can download Java JDK from the link Oracle, if you don’t already have it.
Download Tomcat
The official website for tomcat is Tomcat.You can access the official Tomcat website’s home page by clicking the provided link, which is displayed below.
Browse to the link https://tomcat.apache.org/download-70. cgi to get the download for tomcat.

Look under “Binary Distributions.” Download the Windows 64-bit zip file.
Then, unzip the downloaded zip file’s contents.
Jenkins DevOps Tool and Tomcat Setup
In the tomcat folder, move the Jenkins.war file that was downloaded in the previous section to the web apps folder.
The command prompt is now open. Search for the tomcat7 folder by navigating to its location from the command prompt. Open this folder’s bin directory and execute the start. BAT files
E:Appstomcat7bin;startup.bat
The output of the command prompt will show the next line once the processing is finished without any significant errors.
INFO: Server startup in 1302 ms
Open the browser and go to the link − http://localhost:8080/jenkins.
Tomcat will have Jenkins up and running.
You must make sure that the machine on which DevOps Jenkins tool is installed has Internet connectivity to complete this exercise. Click the Manage Jenkins button on the left side of the Jenkins Dashboard (Home screen).

Select “Manage Plugins” from the menu on the following screen.
Select the Available tab from the following screen. A list of plugins that are available for download is provided on this tab. Go to the “Filter” tab and enter “Git plugin”

After that, the list will be filtered. Check the “Git Plugin” box, then select “Install without restart.”
The screen will then refresh to show the download status before the installation starts.

Following the completion of all installations, restart DevOps Jenkins by typing the following command into your browser. http://localhost:8080/jenkins/restart
Once DevOps Jenkins has been restarted, choosing Git as a job configuration option will be an option.
To make sure, select New Item from the Jenkins menu options.
Next, enter a name for the job; in this instance, the name is “Demo.” The item type should be set to “Freestyle project” Select “Ok” from the menu.

If you navigate to the Source code Management section on the following screen, “Git” will now be available as an option.

Downloading and Setting Up Maven
The official website for maven is Apache Maven.You can access the home page of the official Maven website by clicking the provided link, as displayed below.

Visit the Files section of the website and download the Binary.zip file using the link there.
Extract the files into the appropriate application folder after you download the file. The maven files will be stored in E: Appsapache-maven-3.8.6 for this purpose.
Setting up Jenkins DevOps Tool and Maven
Click Manage Jenkins in the left-hand menu of the Jenkins dashboard (Home screen).

Then, from the right side, select “Configure System.”

Click the ‘Add Maven’ button after scrolling down to the Maven section on the Configure system screen.

‘Install automatically’ should be unchecked.
Give the setting and the location of the MAVEN HOME any name you like.
Then, press the “Save” button located at the bottom of the screen.

With the new “Maven project” option, you can now create a job. Click the New Item button in the DevOps Jenkins dashboard.

You may have noticed a few instances in the earlier exercises where we had to configure Jenkins options. The different configuration options in Jenkins are displayed in the following.
By selecting “Manage Jenkins” from the left-hand menu, one can access Jenkins’ various configuration tools.
 The following screen will then appear for you:
Then select Configure System. Some of the settings for Jenkins configuration that can be used are covered below.
A crucial component of configuration is the configure system page. Generic Jenkins settings, global environment variables, and the majority of installed plugins are configured on this page. This screen represents several sections, each of which corresponds to a different configuration area.
Jenkins needs a certain amount of disc space to run builds and store archives. This location can be verified from Jenkins’ configuration screen. This location will initially be saved in your user profile location and is set by default to /.jenkins. In a suitable setting, you should change this location to a suitable place to keep all pertinent builds and archives. There are several ways one can accomplish this.
Before launching the servlet container, set the “JENKINS HOME” environment variable to the new home directory.
First, make a new Jenkins folder in E: Apps. Copy everything from the current /.Jenkins directory to this new directory.
The base directory location where Java is installed on your computer should be the value for the JENKINS HOME environment variable. For instance,
| OS | Output |
| Windows | Set Environmental variable JENKINS_HOME to you’re the location you desire. As an example you can set it to E:AppsJenkins |
| Linux | export JENKINS_HOME =/usr/local/Jenkins or the location you desire. |
Click Manage Jenkins in the left-hand menu of the Jenkins dashboard. Then, from the right side, select “Configure System.”
You can now find the newly configured directory in the Home directory.

Executors:
This is the maximum number of jobs that can be executed simultaneously on the Jenkins machine. Depending on the circumstances, this can be altered. For better performance, it is sometimes advised to keep this number constant with the number of CPUs installed on the machines.
Environmental Factors:
Using this, you can add unique environment variables that apply to all jobs. These are key-value pairs that can be used wherever needed in Builds.
Jenkins URL:
The Jenkins URL defaults to pointing to localhost. Set this to the domain name if you have one set up for your computer; otherwise, localhost will be replaced with the IP address of the device. This will help in setting up slaves and sending out links using the email as you can directly access the Jenkins URL using the environment variable JENKINS URL which can be accessed as ${JENKINS URL}.
Email notification:
You can set the SMTP settings for email sending in the Email Notification section. Jenkins needs to connect to the SMTP mail server and send emails to the recipient list, so this is necessary.
To manage Jenkins, select “Manage Jenkins” from the menu on the left.
By selecting “Manage Jenkins” from the left-hand menu, one can access Jenkins’ various configuration options.

You will then see the following screen:

A few management options include the following:
Configure System:
Here, one can control the paths to the various build-related tools, including JDKs, Ant and Maven versions, security settings, email servers, and other system-level configuration information. the installation of plugins. After the plugins are installed, Jenkins will dynamically add the necessary configuration fields.
Reload Configuration from Disk:
All of Jenkins’ system and build job configuration information is kept in XML files that are kept in the Jenkins home directory. Additionally, the complete build history is kept here. You must add or remove the relevant build job directories from Jenkins’s builds directory if you are moving build jobs from one Jenkins instance to another or archiving old builds. You can reload the Jenkins system and build job configurations without taking Jenkins offline by using the “Reload Configuration from Disk” option.
Manage Plugin:
One can install a wide range of third-party plugins here, ranging from metrics reporting for code quality and code coverage to different Source code management tools like Git, Mercurial, or ClearCase. The Manage Plugins screen allows for the installation, updating, and removal of plugins.

System Information
All of the current Java system properties and system environment variables are listed on this screen. Here, one can see the exact Java Jenkins version, user, and other information that is running.
The name-value data that is presented in this section is shown in part in the screenshot that follows.

System Log:
Jenkins log files can be conveniently viewed in real-time on the System Log screen. Again, troubleshooting is the main purpose of this screen.

 Load Statistics:
The length of the build queue and the number of concurrent builds are shown graphically on this page to give you an idea of how busy the Jenkins instance is and how long your builds will need to wait before being executed. These statistics can help determine whether additional build nodes or capacity is needed in terms of infrastructure..
 Script Console:
You can execute Groovy scripts on the server using this screen. Since it necessitates a thorough understanding of the internal DevOps Jenkins architecture, it is helpful for advanced troubleshooting.
 Manage nodes:
DevOps Jenkins can manage distributed and parallel builds. You can specify how many builds you want on this screen. Jenkins runs concurrently and configures build nodes if you are using distributed builds. Jenkins can use a build node as an additional computer to carry out its builds.

Prepare for Shutdown:
The best time to avoid shutting down Jenkins or the server it is running on is when a build is in progress. The Prepare for Shutdown link, which stops any new builds from starting, can be used to properly terminate Jenkins. One will eventually be able to shut down Jenkins cleanly once all of the ongoing builds have been completed.

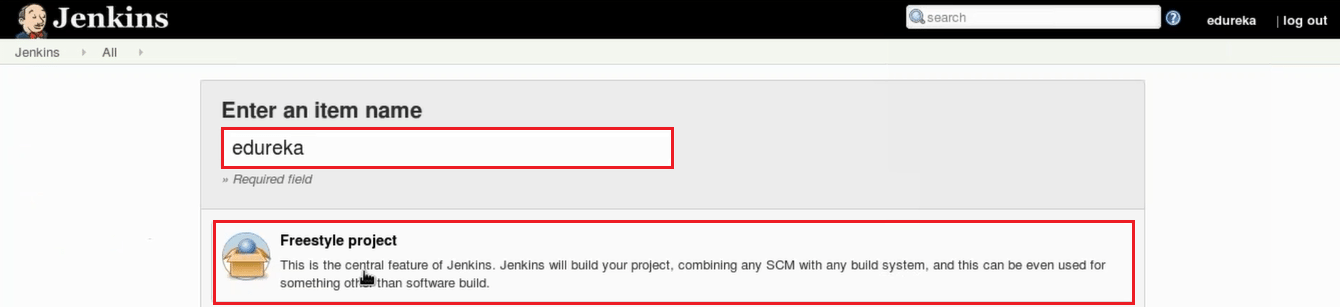
Step 1: From the Jenkins interface home, select New Item.

Step 2: Enter a name and select Freestyle project.
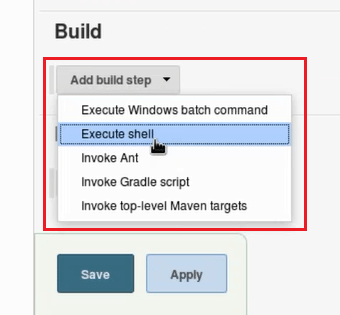
Step 3: This next page is where you specify the job configuration. As you’ll quickly observe, there are a number of settings available when you create a new project. On this configuration page, you also have the option to Add build step to perform extra actions like running scripts. I will execute a shell script.
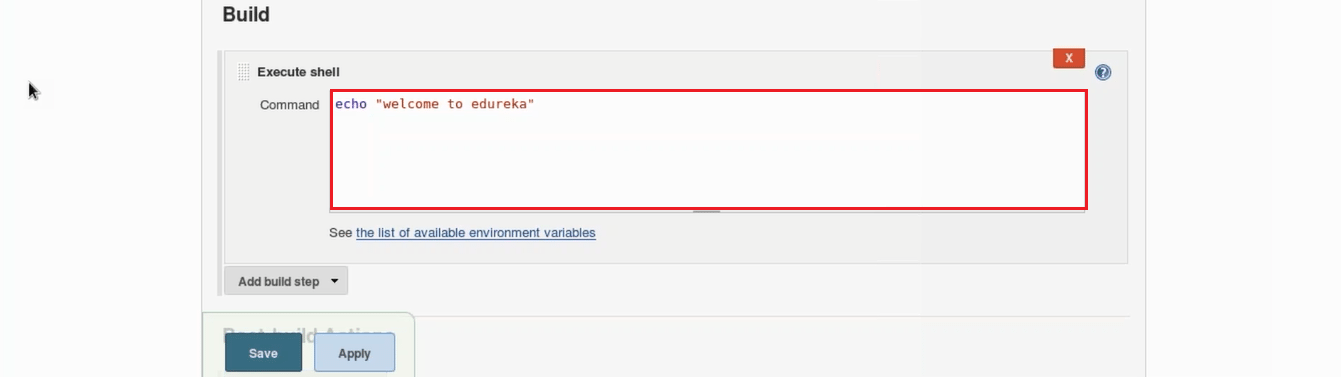
 This will provide you with a text box in which you can add whatever commands you need. You can use scripts to run various tasks like server maintenance, version control, reading system settings, etc. I will use this section to run a simple script.
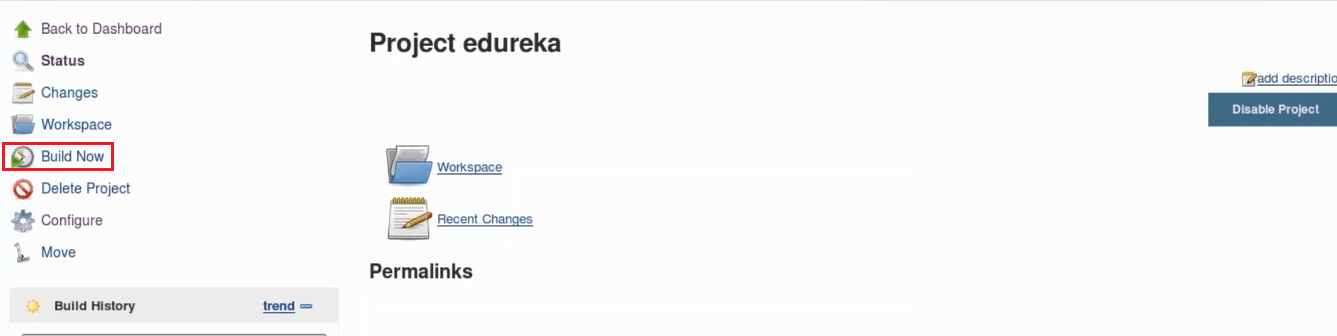
Step 4: Save the project, and you’ll be taken to a project overview page. Here you can see information about the project, including its built history.
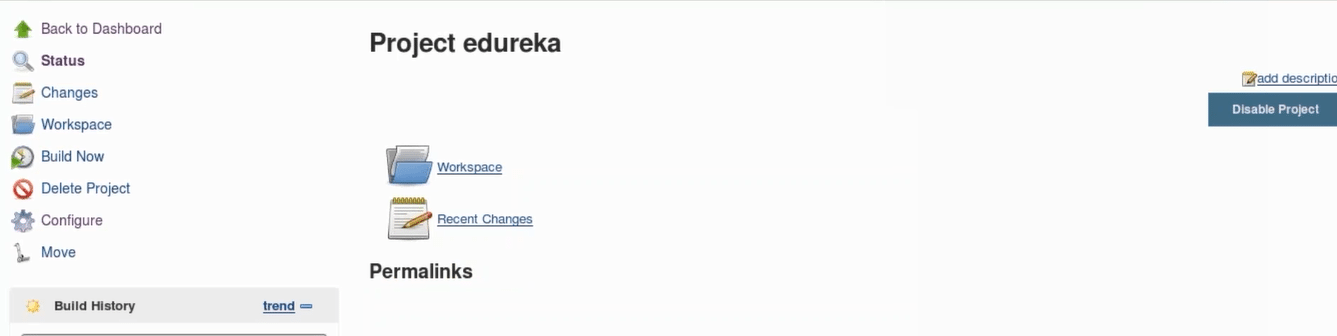
Step 5: Click Build Now on the left-hand side to start the build.
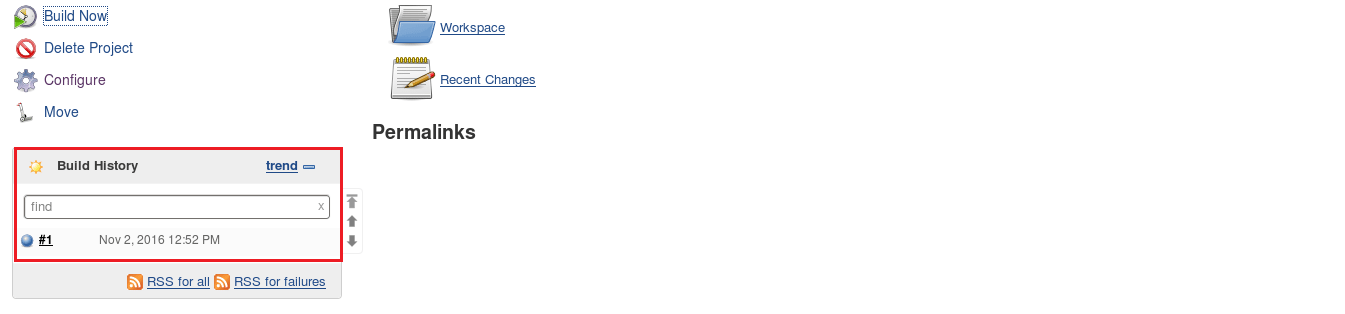
Step 6: To see more information, click on that build in the build history area, whereupon you’ll be taken to a page with an overview of the build information.
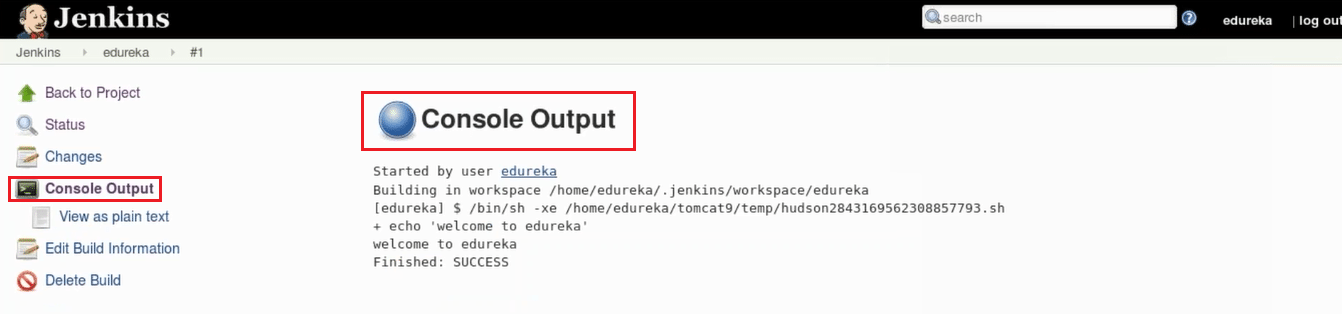
Step 7: The Console Output link on this page is especially useful for examining the results of the job in detail.
Step 8: If you go back to Jenkins home, you’ll see an overview of all projects and their information, including status.

Status of the build is indicated in two ways, by a weather icon and by a colored ball. The weather icon is particularly helpful as it shows you a record of multiple builds in one image.
As you can see in the above image, the sun represents that all of my builds were successful. The color of the ball gives us the status of that particular build, in the above image the color of the ball is blue which means that this particular build was successful.
In this Jenkins Tutorial, I have just given an introductory example. In my next blog, I will show you how to pull and build code from the GitHub repository using Jenkins.
Due to their accessibility and ease of use, emails have become a vital part of every organization.
There are many plugins on the market that enable you to customize every aspect of email notifications, including the one we’ll see in Jenkins right now.
Jenkins email notification is a Java-based plugin tool that automatically notifies users whenever new emails are received. The CI (Continuous Integration) code will benefit from it.
Step 1: Select Manage Jenkins -> Manage Plugins from the menu.

Step 2: Select Manage Jenkins -> Configure System to set up an SMTP server.

Proceed to System configuration.

Step 3: Select the Advanced button under the E-mail Notification section, then enter the necessary SMTP server information.
 Enter and then select the Use SMTP Authentication checkbox.
Email ID: user@gmail.com
Login: *******
Using SSL I verified SMTP Port 465.
Put a check in the box next to the Test configuration by sending a practice email and type your email address in the field for the test email receipt. To determine whether the email address is valid or not, click the Test configuration button after that.

Step 4: Click on the Apply and Save buttons.
Step 5: Navigate to the Jenkins dashboard page. Click on the previously created job, such as HelloWorld, and then select “configure.”

Step 6: Select the E-mail Notification section and scroll down to click on the Add post-build action button.

Step 7: In the E-mail Notification section, enter the receipt email address and check the “send an email for every unstable build” box.

Step 8: Press the save button after applying.
Step 9: Visit the Home page, select the job (HelloWorld), and then select Build now.
Verify your email address after the job has been completed.
After a successful build, Jenkins offers a variety of plugins that can be used to transfer the build files to the appropriate application or web server, such as the “Deploy to container” plugin. After a build, this plugin uses a war or ear file to deploy to an active remote application server.
Follow these instructions to use this plugin:
Step 1: Select Manage Plugins from the Manage Jenkins menu. Enter the “Deploy to container” plugin’s filter criteria in the Available tab.


Select Go back to the top of the page.

Step 2: Navigate to the build project you just created and select Configure from the panel’s left-hand menu.

Step 3: Scroll down to the Add post-build action button on the configuration page. Choose the option to deploy war/ear to a container.

Step 4: Enter the information for the server where the files are to be deployed in the Deploy war/ear to a container section.

Step 5: press the Save button.Then click Build Now.
Following a successful build, the aforementioned procedures will guarantee that all necessary files are deployed to the container.
The following are some of the fundamental tasks you’ll perform, some of which are best practices for maintaining Jenkins servers.
Optional URLs:
The relevant actions will be performed on the Jenkins instance when the commands listed below are appended to the URL of the Jenkins instance.
http://localhost:8080/jenkins/exit − shutdown jenkins
http://localhost:8080/jenkins/restart − restart jenkins
http://localhost:8080/jenkins/reload − to reload the configuration
Jenkins DevOps Tool – Home Backup
Jenkins stores all the data for the jobs, builds, etc. in a single location on your drive called Jenkins Home Directory.
By selecting Manage Jenkins -> Configure System, you can view the home directory’s location.


Jenkins should be installed on the partition with the most available disc space. Always make sure Jenkins is configured on a drive with enough hard disc space because Jenkins will be taking source code for the various jobs defined and performing continuous builds. All builds on the Jenkins instance will start failing if your hard drive fills up.
Writing cron jobs or maintenance tasks that can perform cleanup procedures is another best practice for preventing the disc where Jenkins is installed from filling up.
Continuous delivery and deployment are well supported by Jenkins. The process of developing software and then deploying it will look like what is shown below.

The main goal of continuous deployment is to fully automate the process described above. Jenkins offers a variety of plugins for each of these “Deploy to container” plugins, which was seen in earlier sections, is one of them.
Jenkins offers several plugins that are used to display the continuous deployment process graphically.
Let’s first create a different project in Jenkins to see how it functions and to simulate the QA stage to understand that:
Step 1: Click New Item on the Jenkins Dashboard.
 Step 2: Give the item a name, and select the Freestyle project option. I’ve labeled this item “demo” for clarity. Press the OK button.

Step 3: In this example, we’re keeping things straightforward by only printing HelloWorld.
Choose Git, then type the GitHub URL for your HelloWorld program in the Repository URL field.

Step 4: Give the command to run your Java program by selecting the Execute Windows Batch Command option from the add build step button.

Step 5. Press the Apply and Save buttons.

Our project demo has thus been produced. A build can be checked to determine whether it was successfully created or not. Select the Build Now option to inspect a build.

Step 6: Go back to the Helloworld project you previously created and select the Configure button.

Step 7: Select Build other projects under Add post-build action in the Project configuration.

Step 8: Type “demo” as the project name to build in the Projects to build option. The other selection can be left as is. After clicking Apply, press Save.

Step 9: Complete the HelloWorld project building. To accomplish that, select Build Now.

Step 10: Click the most recent build and choose Console Output.

Now, if you look at the Console output, you will also see that the build of the demo project will take place after the HelloWorld project has been successfully built.
 Delivery Pipeline Plugin
Step 11. Installing the Delivery pipeline plugin is the eleventh step. Choose Manage Jenkins from the menu.

Step 12: Choose Manage Plugins from the menu.

Step 13: Using the filter option in the Available tab, look for the “Delivery Pipeline” plugin. Click Install without Restart after choosing the Delivery Pipeline plugin.

After the plugins have been installed successfully, click the link that says “Go back to the top page.”

Step 14: On the Jenkins Dashboard screen, click the + symbol in the tab next to the All tab to view the Delivery Pipeline in action.

Step 15: Choose Delivery Pipeline View and give the view a name. Press the OK button.

Step 16: Leave the default selections on the following page. Change the following settings by scrolling down:
Check to see if “Show static analysis results” is selected.
Ensure that the “Show total build time” checkbox is selected.
Enter the Helloworld project as the first job that should build in the Pipelines section for the Initial job.
Give the Pipeline any name you like.
Select “Apply” and “OK.”

You can now see a view of the entire delivery pipeline as well as the current status of every project in it.
The “Build pipeline” plugin for Jenkins is another significant plugin. Look at this plugin, shall we?
Step 1: Click Manage Jenkins on the Jenkins Dashboard.

Step 2: Choose Manage Plugins from the menu.

Step 3: Filter for Build pipeline in the Available tab, choose Build pipeline plugin and then click the Install without Restart button.

Step 4: After the installation has been successful, click the link that says “Go back to the top page.”

Step 5: In the Jenkins Dashboard, click the + icon in the tab next to the All tab to view the Build pipeline in action.

Step 6: Select the Build Pipeline View option under the View name option and type any name.
 Step 7: Scroll down and leave all default settings alone. Enter the name of the HelloWorld project for the select initial job option in the Upstream/downstream config section. Next, press the OK button.

The status of each project in the entire delivery pipeline can now be seen, and you have a view of the entire pipeline.
Jenkins provides a variety of plugins for different task. To see the list of all available plugins in Jenkins, open the following link: https://plugins.jenkins.io/
In our earlier sections, we have already seen a large number of plugins. Let’s look at some plugin maintenance tasks.
Installing Plugins:
Step 1: Navigate to the Jenkins Dashboard and select Manage Jenkins to begin installing a plugin.

Step 2: Scroll down and choose Manage Plugins.

Step 3: Locate the plugins you want to install by going to the Available tab and using the filter option.

Step 4: Choose those plugins, then click the button that says “Install without restart.” Another option is the button that says “Download now and install after restart.”

Click the link that says “Go back to the top page” once the installation has been completed.
 Uninstalling Plugins
Step 1: Go to Manage Jenkins to uninstall a plugin from Jenkins.

Step 2: Choose Manage Plugins.

Step 3: Select the Installed tab. And then choose the pipeline that you want to remove by clicking the Uninstall button.

Step 4: Select Yes from the menu. Jenkins DevOps Tool – Backup Plugins
The data and configurations must both be included in a Jenkins backup. It includes job configuration, plugin configuration, build logs, and plugins.
Jenkins provides a plugin for backups that can be used to save crucial Jenkins configuration settings. Let’s examine how to configure the Jenkins backup plugin:
Step 1: To remove a plugin from Jenkins, go to Manage Jenkins.

Step 2: Select Manage Plugins.

Step 3: Choose the Installed tab. After that, select the pipeline you want to uninstall by clicking the Uninstall button.

Step 4: To return to the top of the page after a successful installation, click the link.

Step 5: Backup manager will now be an option when you select Manage Jenkins and scroll-down. Make this your choice.

Step 6: Select setup.
 Step 7: In the Backup config files, type the name of the directory. Make sure it is located on a different drive than the one where your Jenkins instance is installed. Next, select the Save button.
 Step 8: To start the backup, click the Backup Hudson configuration link on the backup manager page.

The backup status will appear on the following page.

Go to the Backup manager screen and select Restore Hudson configuration to restore data from a backup.

Here, the backup list will be displayed.
Advantages of Using Jenkins
Disadvantages of Using Jenkins
No matter what platform you are using, DevOps Jenkins is a powerful tool that enables continuous integration and delivery of projects. Any build or continuous integration can be handled by this free source. A variety of testing and deployment technologies are compatible with Jenkins. We’ll go over how to use Jenkins to continuously build and test your software projects in this tutorial.
If you found this Jenkins Tutorial relevant, check out the DevOps Training by Edureka, a trusted online learning company with a network of more than 250,000 satisfied learners spread across the globe. The Edureka DevOps Certification Training course helps learners gain expertise in various DevOps processes and tools such as Puppet, Jenkins, Nagios and GIT for automating multiple steps in SDLC.
Got a question for us? Please mention it in the comments section and we will get back to you.


 Thank you for registering Join Edureka Meetup community for 100+ Free Webinars each month JOIN MEETUP GROUP
The best explanation I have ever came across. Easy to understand and learn all about Jenkins in one go.
Thanks
Nice blog
Hey buddy great Post,
I found something helpful which I want to share as I was browsing the web for learning some coding algorithms it was very difficult to visit different sites at a time.
I went here and found that the stuff from best programming sites were all allocated at a single place so I just thought of sharing with you all.
I hope it will help you
Hi,can you tell me if jenkins can be installed on windows?if so how?
Hey Priya, thanks for checking out our blog.
Yes it can be installed. Please follow the below steps :WINDOWS:
STEP 1:
Go to this link https://jenkins.io/download/
and download the war file
STEP 2:
put this war file in DESKTOP or anywhere
STEP 3:
start powershell or command prompt
cd to directory where u have kept the war file ( cd Desktop if u have saved on desktop)
STEP 4:
execute the command
java -jar jenkins.war
http://ip-of-your-machine:8080.(here we can see the jenkins dashboard)’
Hope this helps. Cheers!
Saurabh Can you please also explain some real time issues and commands which you use in Jenkins. that would be really helpfull
Very nice explanation. Helped me clear basic concepts of Jenkins.
Hey Sai Kumar, thanks for the wonderful feedback! We’re glad we could be of help.
Do subscribe to our blog to stay posted on upcoming blog posts. Cheers!
This tutorial is very helpful , so where i can get the next block of your , Thanks in Advance.
Hey Chandu, thanks for checking out the blog. I’m glad you liked it. I’ll be publishing the next blog in the series very soon. Please subscribe to our blog to stay posted. Cheers!