

Advanced DevOps Certification Training with G ...
- 24k Enrolled Learners
- Weekend
- Live Class
(7990)


 Copy Link!
With big giants such as Expedia, Autodesk, UnitedHealth Group, Boeing, etc. using Jenkins for the continuous delivery pipeline, you can interpret the demand for Continuous delivery & Jenkins skills. Have you ever wondered why Jenkins has gained so much popularity, especially over the recent years? One of the major factors that contribute to its popularity is the Jenkins pipeline and if you’re looking for a simple Jenkins pipeline tutorial, this blog is your go-to. Jenkins pipeline is a continuous delivery pipeline that executes the software workflow as code.
Here’s a list of the topics covered in this blog:
We’re all aware that Jenkins has proven to be an expert in implementing continuous integration, continuous testing, and continuous deployment to produce good quality software. When it comes to continuous delivery, Jenkins uses a feature called Jenkins pipeline. In order to understand why Jenkins pipeline was introduced, we have to understand what continuous delivery is and why it is important.
In simple words, continuous delivery is the capability to release software at all times. It is a practice which ensures that the software is always in a production-ready state.
What does this mean? It means that every time a change is made to the code or the infrastructure, the software team must work in such a way that these changes are built quickly and tested using various automation tools after which the build is subjected to production.
By speeding up the delivery process, the development team will get more time to implement any required feedback. This process, of getting the software from the build to the production state at a faster rate is carried out by implementing continuous integration and continuous delivery.
Continuous delivery ensures that the software is built, tested, and released more frequently. It reduces the cost, time, and risk of incremental software releases. To carry out continuous delivery, Jenkins introduced a new feature called Jenkins pipeline. So, in this article I will try to help you understand how to make a CI CD pipeline using Jenkins.
A pipeline is a collection of jobs that brings the software from version control into the hands of the end-users by using automation tools. It is a feature used to incorporate continuous delivery in our software development workflow.
Over the years, there have been multiple Jenkins pipeline releases including, Jenkins Build flow, Jenkins Build Pipeline plugin, Jenkins Workflow, etc.
Let me explain this with an example. Suppose I’m developing a small application on Jenkins and I want to build, test and deploy it. To do this, I will allot 3 jobs to perform each process. So, job1 would be for build, job2 would perform tests and job3 for deployment. I can use the Jenkins build pipeline plugin to perform this task. After creating three jobs and chaining them in a sequence, the build plugin will run these jobs as a pipeline.
This image shows a view of all the 3 jobs that run concurrently in the pipeline.

Build Pipeline Plugin output – Jenkins Pipeline Tutorial
This approach is effective for deploying small applications. But what happens when there are complex pipelines with several processes (build, test, unit test, integration test, pre-deploy, deploy, monitor) running 100’s of jobs?
The maintenance cost for such a complex pipeline is huge and increases with the number of processes. It also becomes tedious to build and manage such a vast number of jobs. To overcome this issue, a new feature called Jenkins Pipeline Project was introduced.
The key feature of this pipeline is to define the entire deployment flow through code. What does this mean? It means that all the standard jobs defined by Jenkins are manually written as one whole script and they can be stored in a version control system. It basically follows the ‘pipeline as code’ discipline. Instead of building several jobs for each phase, you can now code the entire workflow and put it in a Jenkinsfile. Below is a list of reasons why you should use the Jenkins Pipeline.
A Jenkinsfile is a text file that stores the entire workflow as code and it can be checked into a SCM on your local system. How is this advantageous? This enables the developers to access, edit and check the code at all times.
The Jenkinsfile is written using the Groovy DSL and it can be created through a text/groovy editor or through the configuration page on the Jenkins instance.
The Jenkins pipeline is written based on two syntaxes, namely:
Declarative pipeline is a relatively new feature that supports the pipeline as code concept. It makes the pipeline code easier to read and write. This code is written in a Jenkinsfile which can be checked into a source control management system such as Git.
Whereas, the scripted pipeline is a traditional way of writing the code. In this pipeline, the Jenkinsfile is written on the Jenkins UI instance. Though both these pipelines are based on the groovy DSL, the scripted pipeline uses stricter groovy based syntaxes because it was the first pipeline to be built on the groovy foundation. Since this Groovy script was not typically desirable to all the users, the declarative pipeline was introduced to offer a simpler and more optioned Groovy syntax.
The declarative pipeline is defined within a block labelled ‘pipeline’ whereas the scripted pipeline is defined within a ‘node’. This will be explained below with an example.
This is a user defined block which contains all the processes such as build, test, deploy, etc. It is a collection of all the stages in a Jenkinsfile. All the stages and steps are defined within this block. It is the key block for a declarative pipeline syntax.

A node is a machine that executes an entire workflow. It is a key part of the scripted pipeline syntax.

There are various mandatory sections which are common to both the declarative and scripted pipelines, such as stages, agent and steps that must be defined within the pipeline. These are explained below:
An agent is a directive that can run multiple builds with only one instance of Jenkins. This feature helps distribute the workload to different agents and execute several projects within a single Jenkins instance. It instructs Jenkins to allocate an executor for the builds.
A single agent can be specified for an entire pipeline or specific agents can be allotted to execute each stage within a pipeline. Few of the parameters used with agents are:
Runs the pipeline/ stage on any available agent.
This parameter is applied at the root of the pipeline and it indicates that there is no global agent for the entire pipeline and each stage must specify its own agent.
Executes the pipeline/stage on the labelled agent.
This parameter uses docker container as an execution environment for the pipeline or a specific stage. In the below example I’m using docker to pull an ubuntu image. This image can now be used as an execution environment to run multiple commands.

This block contains all the work that needs to be carried out. The work is specified in the form of stages. There can be more than one stage within this directive. Each stage performs a specific task. In the following example, I’ve created multiple stages, each performing a specific task.

A series of steps can be defined within a stage block. These steps are carried out in sequence to execute a stage. There must be at least one step within a steps directive. In the following example I’ve implemented an echo command within the build stage. This command is executed as a part of the ‘Build’ stage.
Now that you are familiar with the basic pipeline concepts let’s start of with the Jenkins pipeline tutorial. Firstly, let’s learn how to create a Jenkins pipeline.
Step 1: Log into Jenkins and select ‘New item’ from the dashboard.

Jenkins Dashboard – Jenkins Pipeline Tutorial
Step 2: Next, enter a name for your pipeline and select ‘pipeline’ project. Click on ‘ok’ to proceed.
 Enter the project name – Jenkins Pipeline Tutorial
Step 3: Scroll down to the pipeline and choose if you want a declarative pipeline or a scripted one.

Declarative or scripted pipeline – Jenkins Pipeline Tutorial
Step 4a: If you want a scripted pipeline then choose ‘pipeline script’ and start typing your code.

Scripted Pipeline – Jenkins Pipeline Tutorial
Step 4b: If you want a declarative pipeline then select ‘pipeline script from SCM’ and choose your SCM. In my case I’m going to use Git throughout this demo. Enter your repository URL.
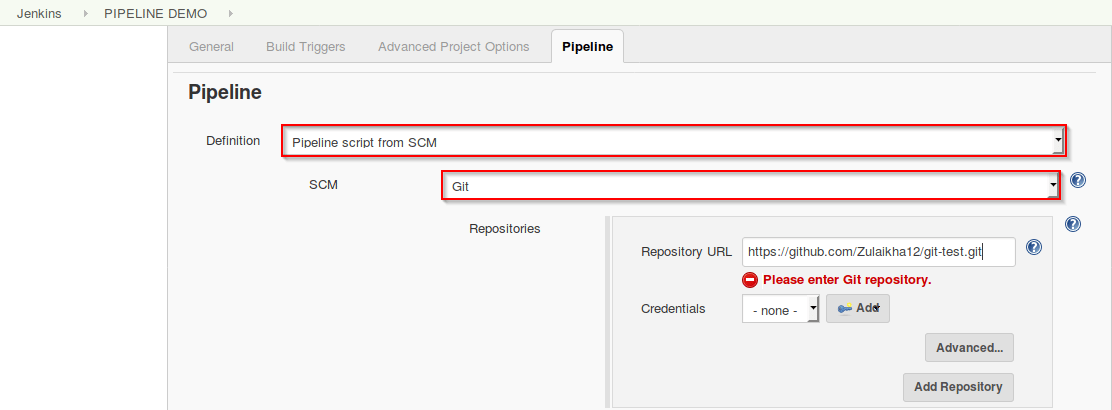 Declarative pipeline – Jenkins Pipeline Tutorial
Step 5: Within the script path is the name of the Jenkinsfile that is going to be accessed from your SCM to run. Finally click on ‘apply’ and ‘save’. You have successfully created your first Jenkins pipeline.
 Script path – Jenkins Pipeline Tutorial
Now that you know how to create a pipeline, lets get started with the demo.
The first part of the demo shows the working of a declarative pipeline. Refer the above ‘Creating your first Jenkins pipeline’ to start. Let me start the demo by explaining the code I’ve written in my Jenkinsfile.
Since this is a declarative pipeline, I’m writing the code locally in a file named ‘Jenkinsfile’ and then pushing this file into my global git repository. While executing the ‘Declarative pipeline’ demo, this file will be accessed from my git repository. The following is a simple demonstration of building a pipeline to run multiple stages, each performing a specific task.


pipeline {
         agent any
         stages {
                 stage('One') {
                 steps {
                     echo 'Hi, this is Zulaikha from edureka'
                 }
                 }
                 stage('Two') {
                 steps {
                    input('Do you want to proceed?')
                 }
                 }
                 stage('Three') {
                 when {
                       not {
                            branch "master"
                       }
                 }
                 steps {
                       echo "Hello"
                 }
                 }
                 stage('Four') {
                 parallel {
                            stage('Unit Test') {
                           steps {
                                echo "Running the unit test..."
                           }
                           }
                            stage('Integration test') {
                              agent {
                                    docker {
                                            reuseNode true
                                            image 'ubuntu'
                                           }
                                    }
                              steps {
                                echo "Running the integration test..."
                              }
                           }
                           }
                           }
              }
}
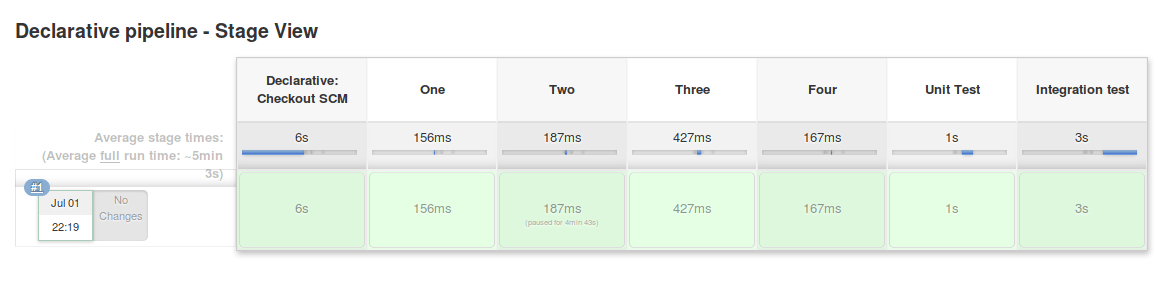
Now that I’ve explained the code, lets run the pipeline. The following screenshot is the result of the pipeline. In the below image, the pipeline waits for the user input and on clicking ‘proceed’, the execution resumes.

To give you a basic understanding of the scripted pipeline, lets execute a simple code. Refer to Creating your first Jenkins pipeline to create the scripted pipeline. I will run the following script.

Pipeline script – Jenkins Pipeline Tutorial
node {
      for (i=0; i<2; i++) {
           stage "Stage #"+i
           print 'Hello, world !'
           if (i==0)
           {
               git "https://github.com/Zulaikha12/gitnew.git"
               echo 'Running on Stage #0'
           }
           else {
               build 'Declarative pipeline'
               echo 'Running on Stage #1'
           }
      }
}
In the above code I have defined a ‘node’ block within which I’m running the following:
Now that I’ve explained the code, lets run the pipeline. The following screenshot is the result of the Scripted pipeline.
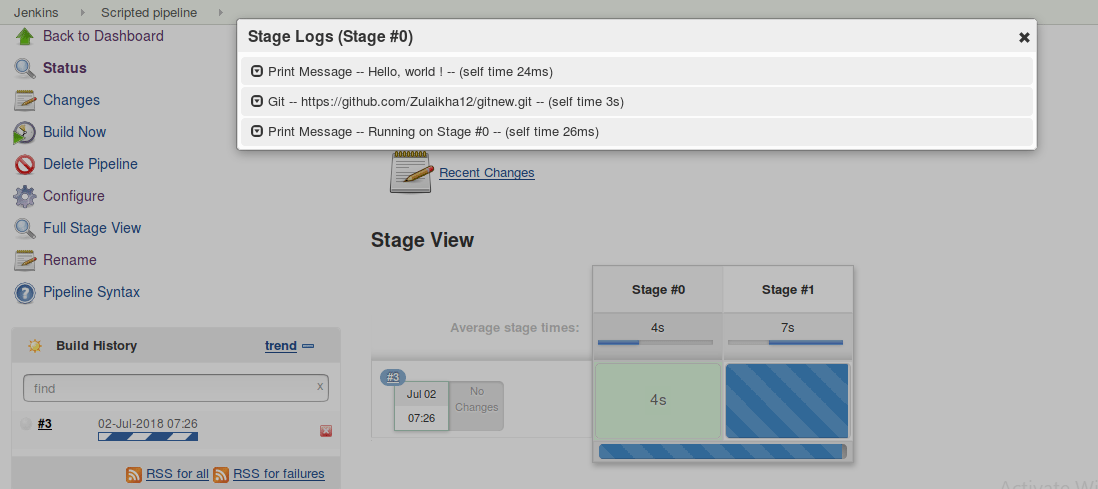
2. Shows the logs of Stage #1 and starts building the ‘Declarative pipeline’

Stage #1 running the declarative pipeline – Jenkins Pipeline Tutorial
3. Execution of the ‘Declarative pipeline’ job.

4. Results.

I hope this blog helped you understand the basics of scripted and declarative pipeline. In my next blog on Jenkins Pipeline, I will explain the pipeline and the syntax in more depth. Stay tuned.
Now that you’ve understood the features and working of a Jenkins pipeline, check out DevOps Course and an exclusive Jenkins Course by Edureka to learn more.
Unlock the potential of Continuous Testing in DevOps. Gain expertise in quality assurance, accelerated delivery, and seamless collaboration for successful software development.


 Thank you for registering Join Edureka Meetup community for 100+ Free Webinars each month JOIN MEETUP GROUP
the pipeline script where you mentioned step 3 when condition is skipping. how come i followed all your steps pls help me