According to a survey by Hirekind, about one-third of all programming-related jobs listed on sites require JavaScript proficiency. Also, JavaScript provides the foundation for 95.1% of all active websites. It is an essential part of Web development and in this article, we will discuss some of the JavaScript Projects that will help you build applications on your own in the following sequence:
Career in JavaScript
In 2018, there were almost 34k JavaScript jobs created in India. And the number is increasing each day. JavaScript is one of the top languages that is creating an enormous number of jobs.
There is so much scope for JavaScript developers like you can build your own portfolio site and do freelancing projects along with the regular JavaScript jobs. With the growth in JavaScript jobs, it may become a part of all types of industries like finance, insurance, and telecommunication. Let’s have a look at some of the Key Roles in JavaScript along with their Salary:
- Front End Web Developer – The average salary for Front End Developers in India ranges around 4,00,000 to 4,50,000 per annum.
- Web Application Developer – The average salary for Web Developers in India is Rs. 2,80,727 per annum.
- JavaScript Developer – For JavaScript developers, the average salary in India is Rs 4,25,863 per annum.
- Web Designer – The average salary of a UI Designer in India is around Rs. 5,07,943 per year.
- Full-Stack Developer – The average salary of a Full Stack Developer in India is around Rs.500000 per year.
Now that you know about the career growth, let’s have a look at some of the JavaScript Projects that will help you understand the scripting language better and also build your own projects.
JavaScript Projects
The JavaScript Projects are divided into three levels- Basic, Intermediate, and Advance. We will discuss the different levels of project and how the JavaScript code works. This will help you understand the scripting language better and provide you the idea to build your own applications using JavaScript. So, let’s begin with the basic level JavaScript Project.
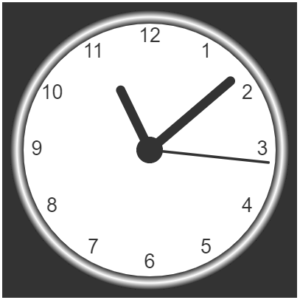
Analog Clock
In the first project, we will build a simple analog clock with the help of HTML canvas.
The first step is to create a canvas. The clock needs an HTML container:
<!DOCTYPE html> <html> <body> <canvas id="canvas" width="400" height="400" style="background-color:#333"></canvas> <img src="data:image/gif;base64,R0lGODlhAQABAIAAAAAAAP///yH5BAEAAAAALAAAAAABAAEAAAIBRAA7" data-wp-preserve="%3Cscript%3E%0Avar%20canvas%20%3D%20document.getElementById(%22canvas%22)%3B%0Avar%20ctx%20%3D%20canvas.getContext(%222d%22)%3B%0Avar%20radius%20%3D%20canvas.height%20%2F%202%3B%0Actx.translate(radius%2C%20radius)%3B%0Aradius%20%3D%20radius%20*%200.90%0AsetInterval(drawClock%2C%201000)%3B%0A%2F%2FdrawClock()%3B%0A%0Afunction%20drawFace(ctx%2C%20radius)%20%7B%0Avar%20grad%3B%0A%0Actx.beginPath()%3B%0Actx.arc(0%2C%200%2C%20radius%2C%200%2C%202%20*%20Math.PI)%3B%0Actx.fillStyle%20%3D%20'white'%3B%0Actx.fill()%3B%0A%0Agrad%20%3D%20ctx.createRadialGradient(0%2C%200%20%2Cradius%20*%200.95%2C%200%2C%200%2C%20radius%20*%201.05)%3B%0Agrad.addColorStop(0%2C%20'%23333')%3B%0Agrad.addColorStop(0.5%2C%20'white')%3B%0Agrad.addColorStop(1%2C%20'%23333')%3B%0Actx.strokeStyle%20%3D%20grad%3B%0Actx.lineWidth%20%3D%20radius*0.1%3B%0Actx.stroke()%3B%0A%0Actx.beginPath()%3B%0Actx.arc(0%2C%200%2C%20radius%20*%200.1%2C%200%2C%202%20*%20Math.PI)%3B%0Actx.fillStyle%20%3D%20'%23333'%3B%0Actx.fill()%3B%0A%7D%0A%0Afunction%20drawNumbers(ctx%2C%20radius)%20%7B%0Avar%20ang%3B%0Avar%20num%3B%0Actx.font%20%3D%20radius%20*%200.15%20%2B%20%22px%20arial%22%3B%0Actx.textBaseline%20%3D%20%22middle%22%3B%0Actx.textAlign%20%3D%20%22center%22%3B%0Afor(num%20%3D%201%3B%20num%20%3C%2013%3B%20num%2B%2B)%7B%0Aang%20%3D%20num%20*%20Math.PI%20%2F%206%3B%0Actx.rotate(ang)%3B%0Actx.translate(0%2C%20-radius%20*%200.85)%3B%0Actx.rotate(-ang)%3B%0Actx.fillText(num.toString()%2C%200%2C%200)%3B%0Actx.rotate(ang)%3B%0Actx.translate(0%2C%20radius%20*%200.85)%3B%0Actx.rotate(-ang)%3B%0A%7D%0A%7D%0Afunction%20drawClock()%20%7B%0AdrawFace(ctx%2C%20radius)%3B%0AdrawNumbers(ctx%2C%20radius)%3B%0AdrawTime(ctx%2C%20radius)%3B%0A%7D%0A%0Afunction%20drawTime(ctx%2C%20radius)%7B%0Avar%20now%20%3D%20new%20Date()%3B%0Avar%20hour%20%3D%20now.getHours()%3B%0Avar%20minute%20%3D%20now.getMinutes()%3B%0Avar%20second%20%3D%20now.getSeconds()%3B%0A%2F%2Fhour%0Ahour%20%3D%20hour%2512%3B%0Ahour%20%3D%20(hour*Math.PI%2F6)%2B(minute*Math.PI%2F(6*60))%2B(second*Math.PI%2F(360*60))%3B%0AdrawHand(ctx%2C%20hour%2C%20radius*0.5%2C%20radius*0.07)%3B%0A%2F%2Fminute%0Aminute%20%3D%20(minute*Math.PI%2F30)%2B(second*Math.PI%2F(30*60))%3B%0AdrawHand(ctx%2C%20minute%2C%20radius*0.8%2C%20radius*0.07)%3B%0A%2F%2F%20second%0Asecond%20%3D%20(second*Math.PI%2F30)%3B%0AdrawHand(ctx%2C%20second%2C%20radius*0.9%2C%20radius*0.02)%3B%0A%7D%0A%0Afunction%20drawHand(ctx%2C%20pos%2C%20length%2C%20width)%20%7B%0Actx.beginPath()%3B%0Actx.lineWidth%20%3D%20width%3B%0Actx.lineCap%20%3D%20%22round%22%3B%0Actx.moveTo(0%2C0)%3B%0Actx.rotate(pos)%3B%0Actx.lineTo(0%2C%20-length)%3B%0Actx.stroke()%3B%0Actx.rotate(-pos)%3B%0A%7D%0A%0A%2F*var%20canvas%20%3D%20document.getElementById(%22canvas%22)%3B%0Avar%20ctx%20%3D%20canvas.getContext(%222d%22)%3B%0Avar%20radius%20%3D%20canvas.height%20%2F%202%3B%0Actx.translate(radius%2C%20radius)%3B%0Aradius%20%3D%20radius%20*%200.90%0A*%2F%0A%0A%3C%2Fscript%3E" data-mce-resize="false" data-mce-placeholder="1" class="mce-object" width="20" height="20" alt="<script>" title="<script>" /> </body> </html>
This HTML code creates the canvas for the clock and creates the function to draw the clock. Now the next step is to draw the face of the clock. Now, we need a JavaScript function to draw the face:
function drawClock() {   //Create a function for drawing the clock face
drawFace(ctx, radius);
}

function drawFace(ctx, radius) {
var grad;

ctx.beginPath();    //Draw the white circle
ctx.arc(0, 0, radius, 0, 2 * Math.PI);
ctx.fillStyle = 'white';
ctx.fill();

grad = ctx.createRadialGradient(0, 0 ,radius * 0.95, 0, 0, radius * 1.05);    //Create a radial gradient
grad.addColorStop(0, '#333');     //Create 3 color stops, corresponding with the inner, middle, and outer edge of the arc
grad.addColorStop(0.5, 'white');
grad.addColorStop(1, '#333');
ctx.strokeStyle = grad;   //Define the gradient as the stroke style of the drawing object
ctx.lineWidth = radius*0.1;   //Define the line width of the drawing object
ctx.stroke();  //Draw the circle

ctx.beginPath();    //Draw the clock center
ctx.arc(0, 0, radius * 0.1, 0, 2 * Math.PI);
ctx.fillStyle = '#333';
ctx.fill();
}
Once you have drawn the face of the clock, it’s time to add numbers:
function drawClock() {
drawFace(ctx, radius);
drawNumbers(ctx, radius);
}

function drawNumbers(ctx, radius) {
var ang;
var num;
ctx.font = radius * 0.15 + "px arial";    //Set the font size to 15% of the radius
ctx.textBaseline = "middle";    //Set the text alignment to the middle and the center of the print position
ctx.textAlign = "center";
for(num = 1; num < 13; num++){ //Calculate the print position to 85% of the radius, rotated for each number
ang = num * Math.PI / 6;
ctx.rotate(ang);
ctx.translate(0, -radius * 0.85);
ctx.rotate(-ang);
ctx.fillText(num.toString(), 0, 0);
ctx.rotate(ang);
ctx.translate(0, radius * 0.85);
ctx.rotate(-ang);
}
}
Now, before we start the clock we need to add the clock hands:
function drawClock() {
drawFace(ctx, radius);
drawNumbers(ctx, radius);
drawTime(ctx, radius);
}

function drawTime(ctx, radius){
var now = new Date(); //Use Date to get hour, minute, second
var hour = now.getHours();
var minute = now.getMinutes();
var second = now.getSeconds();
//hour
hour = hour%12; //Calculate the angle of the hour hand, and draw it a length, and a width
hour = (hour*Math.PI/6)+(minute*Math.PI/(6*60))+(second*Math.PI/(360*60));
drawHand(ctx, hour, radius*0.5, radius*0.07);
//minute
minute = (minute*Math.PI/30)+(second*Math.PI/(30*60));
drawHand(ctx, minute, radius*0.8, radius*0.07);
// second
second = (second*Math.PI/30);
drawHand(ctx, second, radius*0.9, radius*0.02);
}

function drawHand(ctx, pos, length, width) {
ctx.beginPath();
ctx.lineWidth = width;
ctx.lineCap = "round";
ctx.moveTo(0,0);
ctx.rotate(pos);
ctx.lineTo(0, -length);
ctx.stroke();
ctx.rotate(-pos);
}
Now that you have designed your analog clock, it’s time to start the clock. To start the clock, call the drawClock function at intervals:
var canvas = document.getElementById("canvas");
var ctx = canvas.getContext("2d");
var radius = canvas.height / 2;
ctx.translate(radius, radius);
radius = radius * 0.90
//drawClock();
setInterval(drawClock, 1000);
The only thing you have to do to start the clock is to call the drawClock function at intervals. With this, we are done with the first basic level JavaScript Project. It will give you the following Output:
Now let’s have a look at another basic level project.
Pick Your Color
This is a color game where you will have six square boxes with different colors. Now, you have to pick the right color based on the RGB value provided during each round. So let’s have a look at the JavaScript functions that are required to build this game:
var numSquares = 6;
var colors = generateRandomColors(numSquares);
var square = document.querySelectorAll(".square");
var pickedColor = pickColor();
var rgbCode = document.getElementById("rgbCode");
var messageDisplay = document.querySelector("#message");
var h1 = document.querySelector("h1");
var resetButton = document.querySelector("#reset");
var easyBtn = document.querySelector("#easyBtn");
var hardBtn = document.querySelector("#hardBtn");

easyBtn.addEventListener("click", function(){
hardBtn.classList.remove("selected");
easyBtn.classList.add("selected");
numSquares = 3;
colors = generateRandomColors(numSquares);
pickedColor = pickColor();
rgbCode.textContent = pickedColor;
for(var i = 0; i < square.length; i++) {
if (colors[i]) {
square[i].style.background = colors[i];
} else {
square[i].style.display = "none";
}
}
});

hardBtn.addEventListener("click", function(){
easyBtn.classList.remove("selected");
hardBtn.classList.add("selected");
numSquares = 6;
colors = generateRandomColors(numSquares);
pickedColor = pickColor();
rgbCode.textContent = pickedColor;
for(var i = 0; i < square.length; i++) {
square[i].style.background = colors[i];
square[i].style.display = "block";
}
});

resetButton.addEventListener("click", function(){
//generate all new colors
colors = generateRandomColors(numSquares);
//pick a new random color from the array
pickedColor = pickColor();
//change colorDisplay to match picked color
rgbCode.textContent = pickedColor;
this.textContent = "New Color";
messageDisplay.textContent = "";
//change colors of squares
for (var i = 0; i < square.length; i++) {
square[i].style.background = colors[i];
}
h1.style.background = "steelblue";
})

rgbCode.textContent = pickedColor;

for(var i = 0; i < square.length; i++) {
//add initial colors to squares
square[i].style.background = colors[i];
//add click listeners to squares
square[i].addEventListener("click", function() {
//grab color of picked square
var clickedColor = this.style.background;
//compare color to pickedColor
if (clickedColor === pickedColor) {
messageDisplay.textContent = "Good Job!";
resetButton.textContent = "Play Again ?";
changeColors(clickedColor);
h1.style.background = clickedColor;
}else{
this.style.background = "#232323";
messageDisplay.textContent = "Try Again";
}
})
}

function changeColors(color){
//loop through all squares
for (var i = 0; i < square.length; i++) {
//change each color to match given color
square[i].style.background = color;
}

}

function pickColor(){
var random = Math.floor(Math.random() * colors.length)
return colors[random];
}

function generateRandomColors(num){
//make and array
var arr = []
//add num random colors to array
for (var i = 0; i < num; i++) {
arr.push(randomColor())
//get random color and push into array
}
//return that array
return arr;
}

function randomColor(){
//pick a "red" from 0-255
var r = Math.floor(Math.random() * 256)
//pick a "green" from 0-255
var g = Math.floor(Math.random() * 256)
//pick a "blue" from 0-255
var b = Math.floor(Math.random() * 256)

return "rgb(" + r +", " + g + ", " + b +")";
}
These are the different functions that will make your game work. Now, you can also add styles with the help of CSS:
body {
background-color: #060111;
margin: 0;
font-family: sans-serif;
font-weight: normal;
text-transform: uppercase;
}

.square {
width: 30%;
background: white;
padding-bottom: 30%;
float: left;
margin: 1.66%;
border-radius: 10%;
transition: background 0.7s;
-webkit-transition: background 0.7s;
-moz-transition: background 0.7s;
}

#container {
margin: 20px auto;
max-width: 600px;
}

h1 {
color: white;
line-height: 1.5;
text-align: center;
background-color: rgb(3, 69, 73);
margin: 0;
padding: 20px 0;
}

#stripe {
background: white;
height: 30px;
text-align: center;
color: black;
}

.selected {
color: white;
background: rgb(5, 153, 146);
}

#rgbCode {
font-size: 200%;
}

button {
border: none;
background: none;
text-transform: uppercase;
font-family: sans-serif;
height: 100%;
font-weight: 700;
color: rgb(5, 153, 146);
letter-spacing: 1px;
font-size: inherit;
transition: all 0.5s;
-webkit-transition: all 0.5s;
-moz-transition: all 0.5s;
outline: none;
}

button:hover{
color: white;
background: rgb(5, 153, 146);
}

#message{
display: inline-block;
width: 20%;
}
Once you are done styling your game, it’s time to implement these functions and styles in the HTML code to build the basic structure of your game:
<head> <meta charset="utf-8"> <title>Color Game</title> </head> <link rel="stylesheet" href="colorgamestyle.css"> <body> <h1> Pick your Shade <br> <span id="rgbCode">RGB</span> <br> Pick and Play </h1> <div id="stripe"> <button id="reset">Change Colors</button> <span id="message"></span> <button id="easyBtn">Easy</button> <button class="selected" id ="hardBtn">Hard</button> </div> <div id="container"> <div class="square"></div> <div class="square"></div> <div class="square"></div> <div class="square"></div> <div class="square"></div> <div class="square"></div> </div> <img src="data:image/gif;base64,R0lGODlhAQABAIAAAAAAAP///yH5BAEAAAAALAAAAAABAAEAAAIBRAA7" data-wp-preserve="%3Cscript%20src%3D%22colorgamejs.js%22%20charset%3D%22utf-8%22%3E%3C%2Fscript%3E" data-mce-resize="false" data-mce-placeholder="1" class="mce-object" width="20" height="20" alt="<script>" title="<script>" /> </body>
With this, your game is ready and you can pick colors from the square boxes based on the RGB value. The above codes will give the following output:

Now that you have an idea about building an analog clock and a color game, let’s move on to the next level of JavaScript Projects.
To-Do List
The To-Do list helps you create a list of tasks that are to be completed. You can add a number of tasks in the list and also remove them once it is completed. This is an intermediate level project. So let’s see how to use different JavaScript functions to create a to-do list:
var enterButton = document.getElementById("enter");
var input = document.getElementById("userInput");
var ul = document.querySelector("ul");
var item = document.getElementsByTagName("li");

function inputLength(){
return input.value.length;
}

function listLength(){
return item.length;
}

function createListElement() {
var li = document.createElement("li"); // creates an element "li"
li.appendChild(document.createTextNode(input.value)); //makes text from input field the li text
ul.appendChild(li); //adds li to ul
input.value = ""; //Reset text input field

//Start Strikethrough
// because it's in the function, it only adds it for new items
function crossOut() {
li.classList.toggle("done");
}

li.addEventListener("click",crossOut);
//End strikethrough

// Start add delete button
var dBtn = document.createElement("button");
dBtn.appendChild(document.createTextNode("X"));
li.appendChild(dBtn);
dBtn.addEventListener("click", deleteListItem);
// End add delete button

//Add class delete (DISPLAY: NONE)
function deleteListItem(){
li.classList.add("delete")
}
//End add class delete
}

function addListAfterClick(){
if (inputLength() > 0) { //makes sure that an empty input field doesn't create a li
createListElement();
}
}

function addListAfterKeypress(event) {
if (inputLength() > 0 && event.which ===13) { //this now looks to see if you hit "enter"/"return"
//the 13 is the enter key's keycode, this could also be display by event.keyCode === 13
createListElement();
}
}

enterButton.addEventListener("click",addListAfterClick);

input.addEventListener("keypress", addListAfterKeypress);
Next step is to add styling features to the list with the help of CSS:
body {
background: rgb(8, 221, 210);
text-align: center;
font-family: 'Open Sans', sans-serif;
}

.intro {
margin: 30px 0px;
font-weight: bold;
}

h1 {
color: #ffffff;
text-transform: uppercase;
font-weight: 800;
}

p {
font-weight: 600;
}

#first {
margin-top: 10px;
color: rgb(2, 57, 65);
}

#second {
color: rgb(226, 62, 40);

}

#third {
color: rgb(217, 241, 79);
margin-bottom: 30px;
}

#enter {
border: none;
padding: 15px 25px;
border-radius: 10px;
color: rgb(146, 250, 252);
background-color: rgb(3, 63, 68);
transition: all 0.75s ease;
-webkit-transition: all 0.75s ease;
-moz-transition: all 0.75s ease;
-ms-transition: all 0.75s ease;
-o-transition: all 0.75 ease;
font-weight: normal;
}

#enter:hover{
background-color: rgb(172, 230, 240);
color: rgb(85, 60, 7);
}

ul {
text-align: left;
margin-top: 20px;
}

li {
list-style: none;
padding: 10px 20px;
color: #ffffff;
text-transform: capitalize;
font-weight: 600;
border: 2px solid #94e0ee;
border-radius: 10px;
margin-bottom: 10px;
background: rgb(3, 76, 88);
transition: all 0.75s ease;
-webkit-transition: all 0.5s ease;
-moz-transition: all 0.5s ease;
-ms-transition: all 0.5s ease;
-o-transition: all 0.5 ease;
}

li:hover {
background: rgb(129, 71, 5);
}

li > button {
font-weight: normal;
background: none;
border: none;
float: right;
color: #025f70;
font-weight: 800;
}

input {
border-radius: 5px;
min-width: 65%;
padding: 15px;
border: none;
}

.done {
background: rgb(56, 161, 79) !important;
color: rgb(187, 245, 200);
}

.delete {
display: none;
}
Now that you have written the functions and styled them all, it’s time to create the HTML structure for the To-Do list:
<link rel="stylesheet" href="todostyle.css"> <body> <div class="container"> <div class="row"> <div class="intro col-12"> <h1>Work To-Dos</h1> <div> <div class="border1"></div> <div c </div> </div> </div> <div class="row"> <div class="helpText col-12"> <p id="first">Enter text into the input field to add items to your list.</p> <p id="second">Click the item to mark it as complete.</p> <p id="third">Click the "X" to remove the item from your list.</p> </div> </div> <div class="row"> <div class="col-12"> <input id="userInput" type="text" placeholder="New item..." maxlength="27"> <button id="enter"><i class="fas fa-pencil-alt"></i></button> </div> </div> <!-- Empty List --> <div class="row"> <div class="listItems col-12"> <ul class="col-12 offset-0 col-sm-8 offset-sm-2"> </ul> </div> </div> </div> <img src="data:image/gif;base64,R0lGODlhAQABAIAAAAAAAP///yH5BAEAAAAALAAAAAABAAEAAAIBRAA7" data-wp-preserve="%3Cscript%20type%3D%22text%2Fjavascript%22%20src%3D%22todojs.js%22%3E%3C%2Fscript%3E" data-mce-resize="false" data-mce-placeholder="1" class="mce-object" width="20" height="20" alt="<script>" title="<script>" /> </body> </html>
With this, your To-Do list is ready and you can add list of tasks that are to be completed. The above codes will give the following output:

Now that you have understood the different basic level and intermediate level projects, let’s move on to the advanced level JavaScript Project and create a shopping cart with your favorite items in the list.
Related Article: JS Interview Questions
Shopping Cart
The advanced level project is to create a shopping cart with a number of items. It will provide the price of each item and you can also add or remove these items from your cart.
The first step is to create our HTML structure. We need a container div which will be our shopping cart. Inside the container, we will have a title and three items which will include:
- two buttons — delete button and favorite button
- product image
- product name and description
- buttons that will adjust quantity of products
- Total price
<div class="shopping-cart">
<!-- Title -->
<div class="title">
Shopping Bag
<span><pre> Price/item</pre></span>
</div>

<!-- Product #1 -->
<div class="item">
<div class="buttons">
<span class="delete-btn"></span>
<span class="like-btn"></span>
</div>

<div class="image">
<img src="item-1.jpg" alt="" />
</div>

<div class="description">
<span>Daniel Jean</span>
<span>Round neck</span>
<span>Maroon</span>
</div>

<div class="quantity">
<button class="plus-btn" type="button" name="button">
<img src="plus.svg" alt="" />
</button>
<input type="text" name="name" value="1">
<button class="minus-btn" type="button" name="button">
<img src="minus.svg" alt="" />
</button>
</div>

<div class="total-price">₹750</div>
</div>

<!-- Product #2 -->
<div class="item">
<div class="buttons">
<span class="delete-btn"></span>
<span class="like-btn"></span>
</div>

<div class="image">
<img src="item-2.jpg" alt=""/>
</div>

<div class="description">
<span>Maison Jack</span>
<span>Leather Jacket</span>
<span>Black</span>
</div>

<div class="quantity">
<button class="plus-btn" type="button" name="button">
<img src="plus.svg" alt="" />
</button>
<input type="text" name="name" value="1">
<button class="minus-btn" type="button" name="button">
<img src="minus.svg" alt="" />
</button>
</div>

<div class="total-price">₹3499</div>
</div>

<!-- Product #3 -->
<div class="item">
<div class="buttons">
<span class="delete-btn"></span>
<span class="like-btn"></span>
</div>

<div class="image">
<img src="item-3.jpg" alt="" />
</div>

<div class="description">
<span>Woodland</span>
<span>Sneaker shoes</span>
<span>Brown</span>
</div>

<div class="quantity">
<button class="plus-btn" type="button" name="button">
<img src="plus.svg" alt="" />
</button>
<input type="text" name="name" value="1">
<button class="minus-btn" type="button" name="button">
<img src="minus.svg" alt="" />
</button>
</div>

<div class="total-price">₹6999</div>
</div>
</div>
Now, let’s add some style to our body:
* {
box-sizing: border-box;
}

html,
body {
width: 100%;
height: 100%;
padding: 10px;
margin: 0;
background-color: rgb(6, 146, 151);
font-family: 'Roboto', sans-serif;
}
Now, it’s time to add dimensions to the cart and style it to look nice. We are using flexbox, so we set it to display flex and make the flex direction column, because by default the flex direction is set as row.
.shopping-cart {
width: 750px;
height: 423px;
margin: 80px auto;
background: rgb(0, 3, 3);
box-shadow: 1px 2px 3px 0px rgba(0,0,0,0.10);
border-radius: 6px;

display: flex;
flex-direction: column;
}
Next step is to style the basic structure of the shopping cart:
.title {
height: 60px;
border-bottom: 1px solid rgb(108, 201, 224);
padding: 20px 30px;
color: rgb(255, 255, 255);
font-size: 18px;
font-weight: 400;
}

.item {
padding: 20px 30px;
height: 120px;
display: flex;
}

.item:nth-child(3) {
border-top: 1px solid #E1E8EE;
border-bottom: 1px solid #E1E8EE;
}
The first elements are the delete and favorite buttons. Here, we have implemented the twitter heart button animation:
/* Buttons - Delete and Like */
.buttons {
position: relative;
padding-top: 30px;
margin-right: 60px;
}

.delete-btn {
display: inline-block;
cursor: pointer;
width: 18px;
height: 17px;
background: url("delete-icn.svg") no-repeat center;
margin-right: 20px;
}

.like-btn {
position: absolute;
top: 9px;
left: 15px;
display: inline-block;
background: url('twitter-heart.png');
width: 60px;
height: 60px;
background-size: 2900%;
background-repeat: no-repeat;
cursor: pointer;
}
In this step, we set class “is-active” for when we click the button to animate it using jQuery:
.is-active {
animation-name: animate;
animation-duration: .8s;
animation-iteration-count: 1;
animation-timing-function: steps(28);
animation-fill-mode: forwards;
}

@keyframes animate {
0% { background-position: left; }
50% { background-position: right; }
100% { background-position: right; }
}
Next step is the product image which needs a 50px right margin:
/* Product Image */
.image {
margin-right: 50px;
}

/* Product Description */
.description {
padding-top: 10px;
margin-right: 60px;
width: 115px;
color: antiquewhite
}

.description span {
display: block;
font-size: 14px;
color: antiquewhite
font-weight: 400;
}

.description span:first-child {
margin-bottom: 5px;
}
.description span:last-child {
font-weight: 300;
margin-top: 8px;
color: #86939E;
}
After this, we need to add a quantity element, where we have two buttons for adding or removing product quantity:
/* Product Quantity */
.quantity {
padding-top: 20px;
margin-right: 60px;
}
.quantity input {
-webkit-appearance: none;
border: none;
text-align: center;
width: 32px;
font-size: 16px;
color: #43484D;
font-weight: 300;
}

button[class*=btn] {
width: 30px;
height: 30px;
background-color: #E1E8EE;
border-radius: 6px;
border: none;
cursor: pointer;
}
.minus-btn img {
margin-bottom: 3px;
}
.plus-btn img {
margin-top: 2px;
}
button:focus,
input:focus {
outline:0;
}
Now, the final section is the total price of the product:
/* Total Price */
.total-price {
width: 83px;
padding-top: 27px;
text-align: center;
font-size: 16px;
color: antiquewhite;
font-weight: 300;
}
Finally, to make you shopping cart responsive:
/* Responsive */
@media (max-width: 800px) {
.shopping-cart {
width: 100%;
height: auto;
overflow: hidden;
}
.item {
height: auto;
flex-wrap: wrap;
justify-content: center;
}
.image img {
width: 50%;
}
.image,
.quantity,
.description {
width: 100%;
text-align: center;
margin: 6px 0;
}
.buttons {
margin-right: 20px;
}
}
This was all about styling the shopping cart. Now we have to use JavaScript functions to make the heart animate when we click on it:
$('.like-btn').on('click', function() {
$(this).toggleClass('is-active');
});
And finally,let’s make the quantity buttons work:
$('.minus-btn').on('click', function(e) {
e.preventDefault();
var $this = $(this);
var $input = $this.closest('div').find('input');
var value = parseInt($input.val());

if (value >1) {
value = value - 1;
} else {
value = 0;
}

$input.val(value);

});

$('.plus-btn').on('click', function(e) {
e.preventDefault();
var $this = $(this);
var $input = $this.closest('div').find('input');
var value = parseInt($input.val());

if (value < 100) {
value = value + 1;
} else {
value =100;
}

$input.val(value);
});
With this, your shopping cart is now ready. And you can add or remove items from the list. The above codes will give the following output:

These were some of the JavaScript Projects. with this, we have come to the end of this article. I hope you understood the different level of projects and got the idea on how to build your own applications or projects using JavaScript.
Now that you know about JavaScript Loops, check out the Web Development Certification Training by Edureka. Web Development Certification Training will help you learn how to create impressive websites using HTML5, CSS3, Twitter Bootstrap 3, jQuery and Google APIs and deploy it to Amazon Simple Storage Service(S3).
Check out the Angular certification training course by Edureka, a trusted online learning company with a network of more than 250,000 satisfied learners spread across the globe. Angular is a JavaScript framework that is used to create scalable, enterprise, and performance client-side web applications. With Angular framework adoption being high, performance management of the application is community-driven indirectly driving better job opportunities.
If you want to get trained in React and wish to develop interesting UI’s on your own, then check out the Best React JS Course by Edureka, a trusted online learning company with a network of more than 250,000 satisfied learners spread across the globe.
Take your design skills to the next level with our UI UX Design Course Online.
Got a question for us? Please mention it in the comments section of “JavaScript Projects” and we will get back to you.